Eduard's 1/48 scale
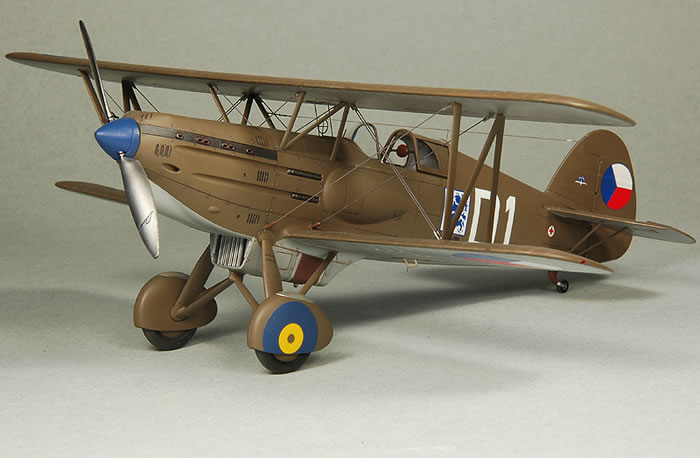
Avia B-534 IV. série
by Wolf Buddee
|
|
Avia B-534 IV. série |

Eduard's 1/48 scale Avia B-534 IV. serie is available online from Squadron for less than $27.00!
 When Eduard first released the Avia B-534 series IV kit I was inspired by the beautiful box art and Roger Fabrocini’s build of the series III kit here on Hyperscale. When Eduard first released the Avia B-534 series IV kit I was inspired by the beautiful box art and Roger Fabrocini’s build of the series III kit here on Hyperscale.
I knew I had to have one.
I made the trip to my LHS and bought one and after an initial inspection of the bits and pieces and the instruction booklet the work bench was cleared and the build began.
Cockpit:
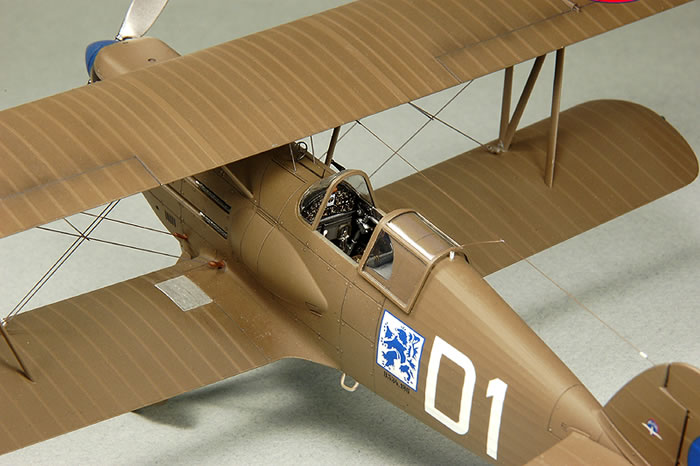
The kit cockpit was basically built straight from the box with the exception of extending the roof over the oil cooler air intake tunnel with a piece of sheet styrene to avoid any possibility of seeing through to the cockpit. I also added some small data stencils to the throttle quadrant using decals from a 1/48th Phantom white data stencil sheet. The data itself is illegible but the effect looks great.
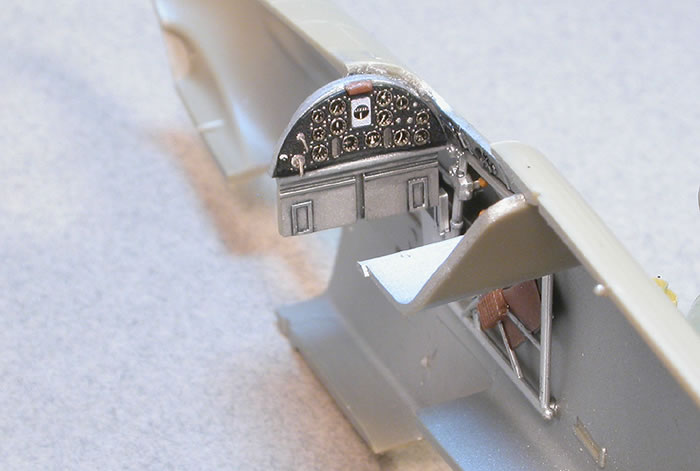
I painted the interior fuselage walls with Testor's Metallic Silver decanted from a spray can and slightly darkened with flat black. The tubular interior structure was painted straight silver and highlighted with a black/brown wash. Details were painted according to the instructions with the exception of the guns which were painted gunmetal instead of flat black and the outer edge of the trim wheel which was painted a base coat of wood brown and covered with a strip of wood-grain decal.
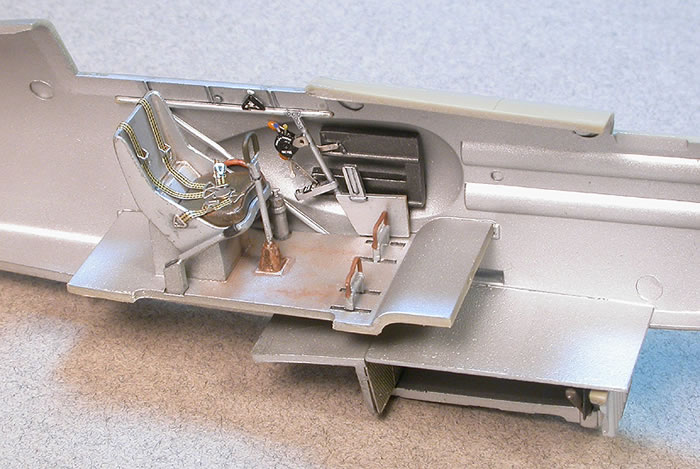
The V shaped brace within the intake was painted khaki drab instead of aluminum as it appears to be part of the landing gear support structure. I didn’t attach the rear photo-etch face for the radiator (PE 16) as it made painting the underside of the fuselage much easier.
Fuselage and Wings:
The fuselage closed up easily and the upper fuselage seams required nothing more than a light sanding. The underside join was not nearly as good and required multiple applications of Mr. Surfacer 500 and wet sanding. In the process I managed to eliminate all the extremely fine fabric representation on the rear lower fuselage. The horizontal stabilizers where added needing only a smear of Mr. Surfacer along the join lines. I found the rudder control horns which are molded to the extreme rear edge of the fuselage halves didn’t line up so I cut one side off and reposition it so that they were level allowing the rudder to fit perfectly. I drilled out all 12 exhaust ports which really enhanced their look and drilled out the port on the right lower engine cowling. I added a small thinned piece of aluminum tubing squished to an oval shape to represent the engine crankcase breather tube which protruded through this hole. I didn’t glue the upper engine cowl in place at this stage as suggest by the instructions as it would make attaching the cabane strut rigging much easier later on. Dry fitting the cowl showed a gap at the rear so I added a thin strip of styrene sheet to the cowlings rear edge. Small holes drilled along the cowlings new rear edge were filled with small lengths of stretched sprue to replace lost fastener detail.
Dry fitting the lower wings to the fuselage revealed a small gap along the lower wing to fuselage join when the wings were held at their proper angle. To eliminate this I glued a very narrow strip of thin sheet styrene along the bottom edge of the wing root area on the fuselage. This ensured that I would have the correct dihedral for the wings and no gaps to fill.
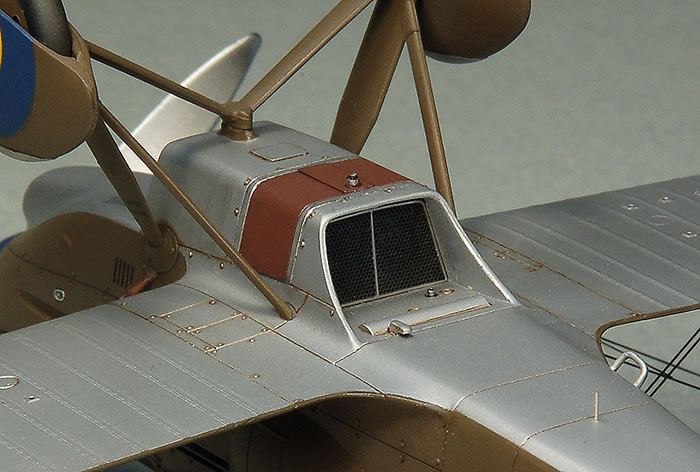
With the lower wings in place all the photo-etch rigging attachment points were glued on using 5 minute epoxy for maximum strength. As per the instructions the elongated triangular shaped photo-etch rigging attachments to the fuselage butt join to the fuselage which makes their attachment weak. It also makes their correct alignment complete guess work as they have to be at the same angle as the rigging wires coming from the upper wing. Constant adjustment while the epoxy set up allowed me to get them reasonably close but I still broke two of them off trying to fine tune the alignment while attaching the rigging wires. In the process I lost two and had to scratch-build replacements out of thin sheet styrene. I’ve since figured out a much better, easier, and stronger way of attaching them. There is a small hole in the center of each photo-etch piece. Partially fold the piece and thread it on to your rigging material. Glue the rigging material in to your pre-drilled holes in the fuselage. Slide the photo-etch piece to the base of each rigging wire and complete the fold, pinching the rigging material in the process. If you do this right, you won’t even have to secure the photo-etch piece with any kind of glue. Paint the part a buff or leather color. The photo-etch part is supposed to represent a fabric/leather (?) cover over the rigging wire attachment point. Assembling it this way eliminates any strength or alignment issues.
To attach the upper wing struts I used the old Mk 1 eyeball and a ruler to align everything. First I glued the cabane struts to the fuselage with Tamiya extra thin cement. When they were almost completely set I measured the distance between the holes for the cabane struts in the upper wing and used this measurement to space the cabane struts evenly apart. Left 24 hours to completely set I then glued the outer wing struts to the lower wings. Again, before the glue set up completely, I inverted the model on to the upper wing and made the final alignment adjustments to the outer wing struts. How easy is that? No jig required!
The canopy sections, which had been dipped in future, were masked off inside and out using the kit supplied masks. The insides of the canopy sections were sprayed Alclad II dark aluminum and the outsides given an initial coat of Khaki Drab. The front and rear sections were glued to the fuselage and the cockpit opening was masked off. I drilled holes in the upper fuselage for the aileron control cables and cabane strut rigging but I have to admit that their locations were pure guesstimation. I wish Eduard had, at the very least, provided dimples to suggest their actual location.
The upper wing, fuselage, and landing gear assemblies were painted a custom mixed Khaki using Tamiya’s Khaki Drab, Olive Drab, and Flat White. I used photos of the Avia B-534 museum replica as reference to approximate the color. The wing rib tapes on the wings were masked off and a darker base color was misted on to give the paint work a little depth. Afterwards, the undersides of the wings and fuselage were masked and sprayed Testors Metallic Silver, again decanted from a spray can. Finally, in preparation for decal application, Testors Clear Gloss lacquer was sprayed on in several light coats.
The kit decals were used and performed flawlessly using Micro-set and Micro-sol. I modified the starboard (right) fuselage codes as Eduard has them printed “1D” but photos show that they should read “D1”. According to Eduard’s marking instructions, this aircraft should have a tail skid. Looking at two different photos of this aircraft, one appears to show the tail skid while the other looks like it suggests a tail wheel may have been possible so I used that as justification for using the tail wheel. I think it looks better anyways so it may very well boil down to artistic license rather than historical accuracy on my part.
After decal application all sub-assemblies were given several misted coats of Testor’s Clear Flat lacquer.
Detail Painting & Weathering
Before the top wing was installed I added a scratch-built pitot tube to the right outer wing strut and painted it metallic grey. I used a highly diluted 50/50 mix of Tamiya’s red brown and flat black to add a bit of subtle weathering to the entire airframe. I sprayed it heavier along the aileron, rudder, and elevator hinge lines and randomly over the engine cowl panel lines and wing surfaces. The upper panel lines were given a thin wash of “The Detailer Black It Out” and the underside with “The Detailer” brown wash. These washes can be thinned with distilled water and drawn in to panel lines very easily. Any excess is cleaned up using a damp end of a Q-tip or small paint brush. The photo-etch gun sight was secured with tiny drops of thick CA and sealed in position with a thin wash of Polly Scale Clear flat. After a final over-all flat coat the exhaust panels were masked off and sprayed Testors metallizer gunmetal. The exposed exhaust ends were brush painted Testor's metallizer burnt metal and then burnished with a mix of red brown, black, and grey pastel chalk.
Final Assembly
The main landing gear assembly was attached by drilling small holes at the fuselage location points and inserting steel wire pins in to the landing gear struts to give them a much stronger attachment.
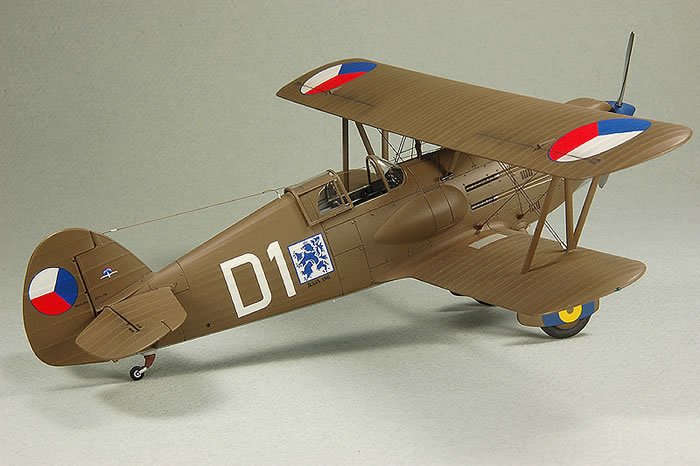
The rigging wires, using 7lb (3.3kg) fishing line were attached to the upper wing locations using CA. The model was then inverted on to the upper wing and the struts glued to the upper wing using 5 minute epoxy. Left over-night to dry, the loose ends of the rigging wires were glued in place and tensioned with a heated dental tool. The rigging between the cabane struts and fuselage was done with Minimeca 0.2mm stiff wire which was easier to work with than fishing line in such close quarters. All rigging was then painted a metallic grey dispensed from a Gunze paint marker. The rigging wires spreader bar was added by first holding it in position with small drops of clear acrylic paint and then secured permanently with water thin CA. The last items to be added were the bombs and their racks, the wing tip navigation lights, and the prop. I managed to loose one of the bomb racks which are very tiny but fellow Hyperscaler Jared Taylor came to my rescue with a replacement. The bombs were painted RLM 70 Black Green and weathered slightly with MIG Pigments European Dust powder. The wing tip lights were made with heated clear sprue pushed through an Eduard photo-etch fret frame which had tear-drop shaped holes along its edge. The lights were carefully cut from the sprue, painted clear red and blue/green and attached with white glue. When dry, the lights were sealed with a final coat of clear gloss. Finally, the prop spinner and backing plate were painted the same color blue as the wheel spat markings. The propeller blades were painted Tamiya gloss black lacquer and then Alclad II polished aluminum.
This Avia B-534 is another brilliant effort by Eduard and I highly recommended it to anyone with a little experience building bi-planes.
I hope this article will be of inspiration or help to anyone else building this beautiful kit.
Model, Images and Text Copyright © 2009 by Wolf Buddee
Page Created 18 May, 2009
Last Updated
18 May, 2009
Back to
HyperScale Main Page

|
Home
| What's New | Features | Gallery | Reviews | Reference | Resource Guides | Forum |