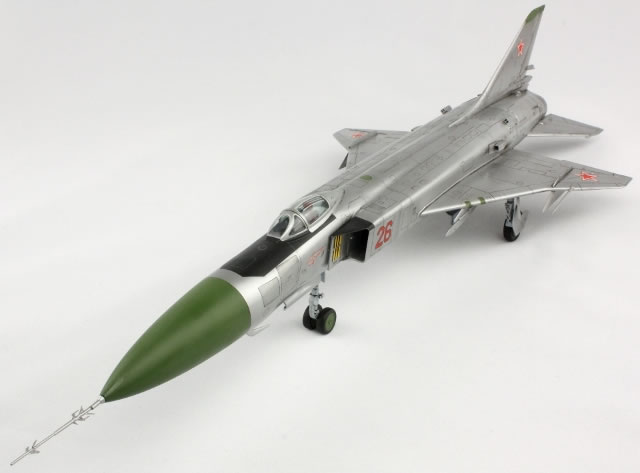
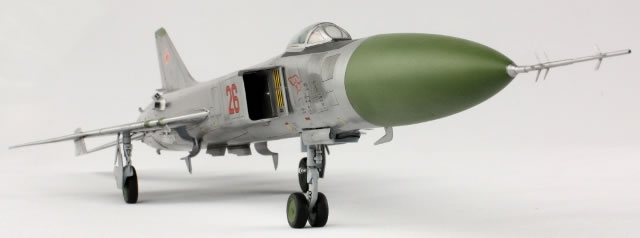
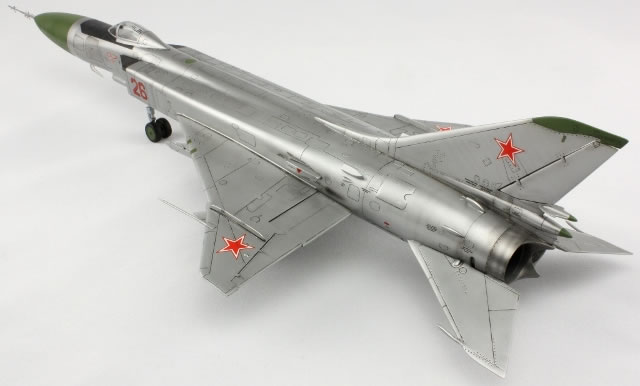
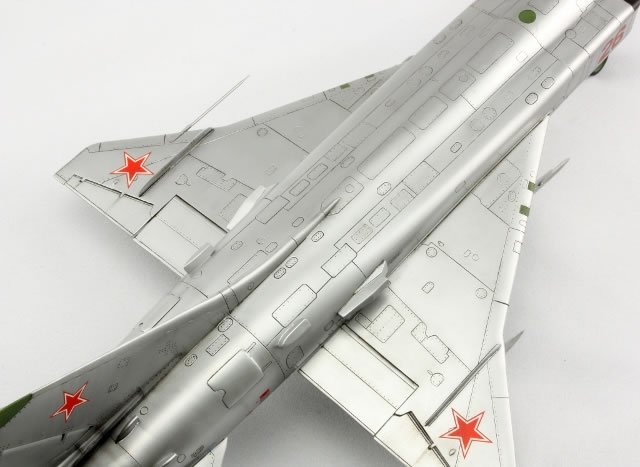
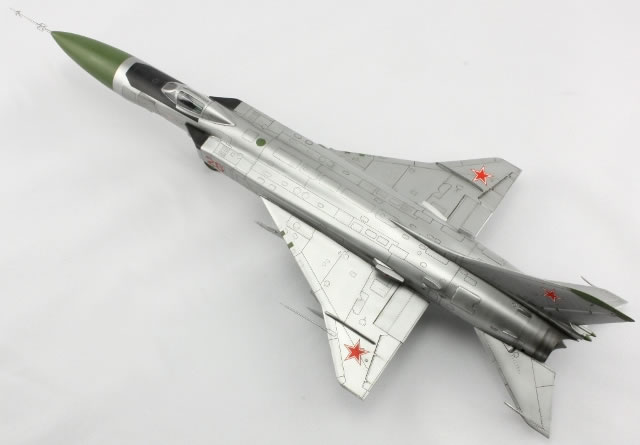
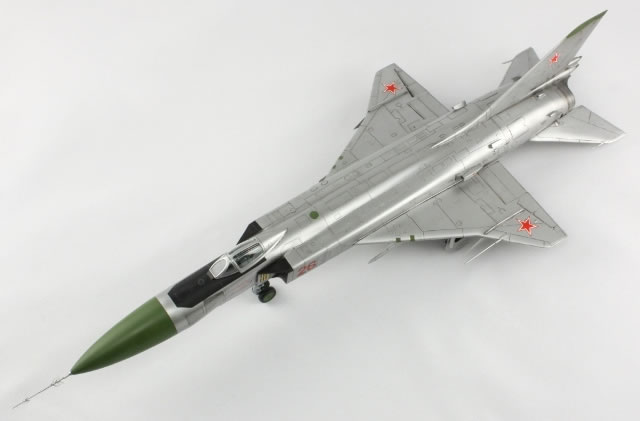
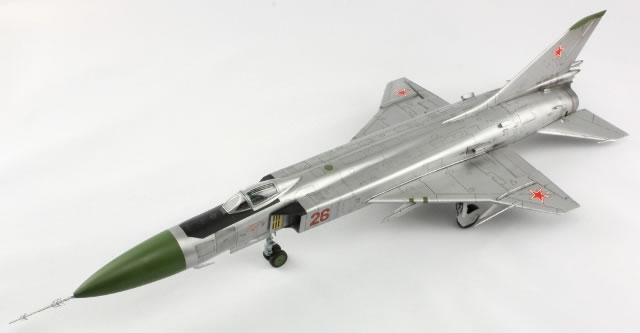
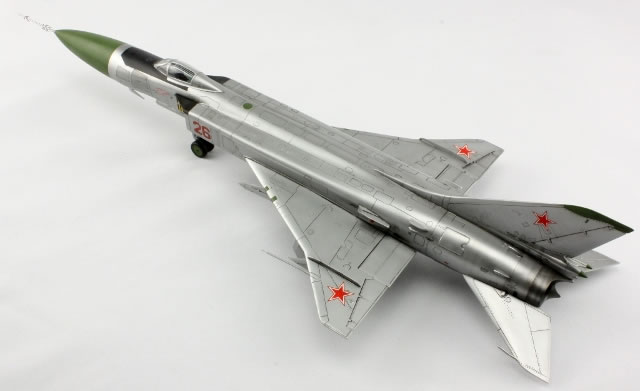
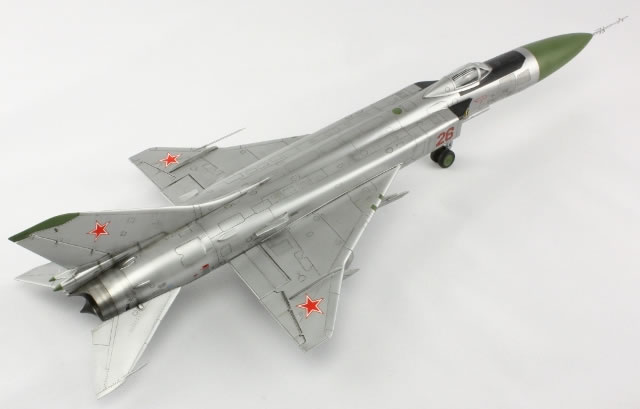
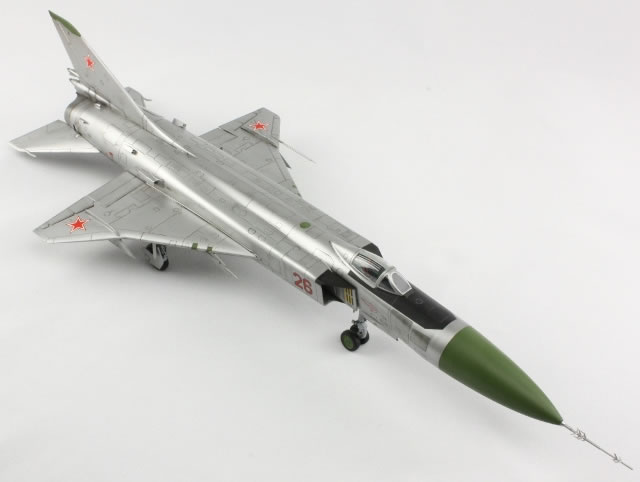
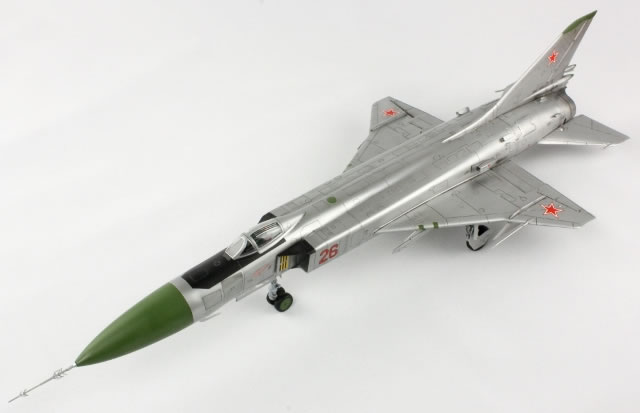
Trumpeter's 1/48 scale
Sukhoi Su-15TM Flagon-F
by Jon Bryon
|
|
Sukhoi Su-15TM Flagon-F |

Trumpeter's 1/48 scale Su-15TM is available online from Squadron.com
Oh dear. This is my first Trumpeter kit. And it has not gone well.
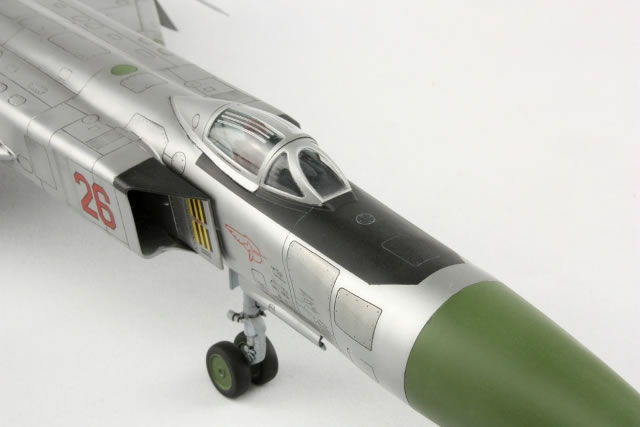
When I was a kid back in the 1980s, the Su-15 held a strange fascination for me, particularly the TM Flagon-F with its nice, smooth radome. A radome that seems to stretch on forever. I'd spend ages looking at the photos in the books I borrowed from the local library; just what aircraft has any business having a nose as enormous as that? So when I started my current collection back in 1994 it was only natural I'd want an Su-15 in it.
Problem was, 1/48 Flagons are thin on the ground. I believe Collectaire did one, a company I'd heard of through FSM and taken note of simply for its mind-boggling prices, but other than that there was a gaping Su-15 shaped hole in the 1/48 modelling scene. Until 2003 (or was it 2004? ... I forget...) when Trumpeter released three versions. This was the first kit they released that I wanted, and I was crushed when it came out with an RRP of £34.99. Back then that was ridiculous; on every visit to Hannants in Colindale I'd gaze up at the Flagons on the shelf and shake my head before buying a nice Hasegawa kit at half the price. Oh how times have changed...
Fortunately, my life has lead me to visit Hong Kong several times, and so it was in the summer of 2004 that I stumbled into a tiny little model shop on Dundas Street and found this kit at HK$188, which was about £15; that was more like it!
My Flagon sat untouched in the stash until 2010, when my brother visited me in China. I asked him to select two kits at random from my stash back in England and bring them out for me to build, and so it was this Su-15 jumped to the top of my to-build pile. I began to read all the online articles, gathered my two primary references (AJ Press Aircraft Monograph and the variant briefing in the International Airpower Journal) and prepare the ground.
The Trumpeter Su-15 was very well received when first released. An error with the angle of the nose was quickly spotted and a diagram outlining how to address the issue was circulated around the internet. Loon Models took all the work out of it by marketing a resin corrected nose, which I duly purchased. Aside from this, people who seemed to know what they were talking about were happy, and so was I.
As time passed, however, concerns were raised. The nose was deemed too long. The wing cross section was wrong. The planform of the wings was also incorrect. The list grew longer by the year. By the time I came to build my kit the list was disturbingly long. By the end of the build it would be longer still!
I started comparing kit parts to photos, especially some excellent walkarounds here and here.
The Trumpeter parts matched the plans in the AJ Press book well, but it was clear these were horribly flawed.
I found other plans at http://www.airwar.ru/image/idop/fighter/su15tm/su15tm-1.gif and then began a process of overlaying the two sets of plans with photos. It became very clear that the kit nose was too long. I can forgive a millimetre or two here and there, but this was of the order of 10mm, and all in the nose. Worse, my nice Loon Models nose had exactly the same issue! I started accumulating aftermarket afresh. A Quickboost nose corrected the length issue, and some Begemot Decals solved the problem that the kit came with two utterly uninteresting options: the infamous Red 17 (which, it has since been established, was probably the very different Flagon-A anyway) and a camouflaged example. I had to have a silver one; Flagons should be silver.
To get over Hannant's minimum order I also ordered Quickboost resin fuselage intakes (the little ones) and resin and PE nose pitot, which looked terrifyingly complicated. Had I been able to find them anywhere I would also have bought resin replacement wheels and exhausts, but unfortunately no luck there.
The Litany of Woes
I then began to compile a list of what was wrong with the kit. By the time I completed the model it looked, from nose to tail, something like this:
-
Nose too long by c.10mm, and at wrong angle. I fixed this by using the Quickboost nose.
-
Entire nose undercarriage bay too far rearward by c. 10mm. I only discovered this as I was decalling; I haven't measured how far it is actually out by. Might be correct for a Flagon-A
-
Canopy profile shape wrong. I left this.
-
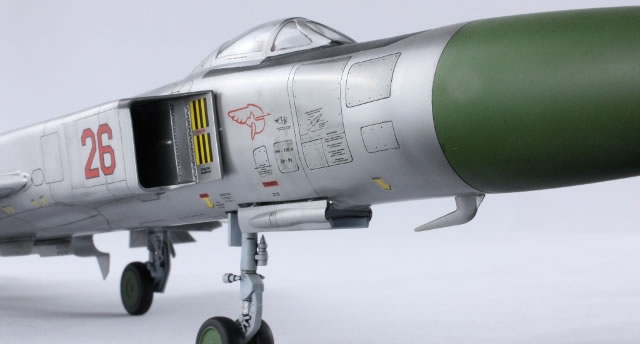
Cockpit close to useless. Instrument panel coaming especially poor with practically no representation of radar screen. I was going to build with a closed canopy anyway.
-
Surface detail fictional. Again, I only discovered this during decalling, despite its prominence. Might be correct for a Flagon-A.
-
No three-rods antenna behind radome on lower fuselage. On some Su-15s (presumably later in service) this was a triangular blade antenna, which is what I replicated (it's easier!), taking a spare PE part from an EE Lightning.
-
Nosegear leg too short. Su-15TM should have a nose high stance. I extended it using some stretched sprue.
-
Nosewheels too fat and too far apart; hub shape not right.
-
Canopy/windscreen frame missing something that looks like a rearview mirror or periscope. This was not on all Su-15TMs, so I left it off.
-
Similarly, many Su-15TMs seem to have had a rainguard on the anti-glare panel in front of the windscreen. Again, I just didn't add it.
-
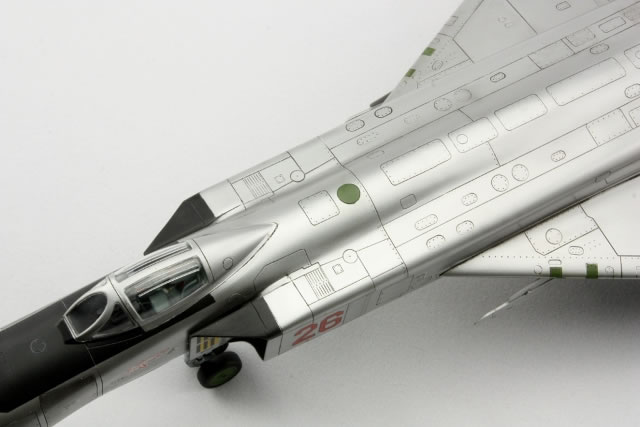
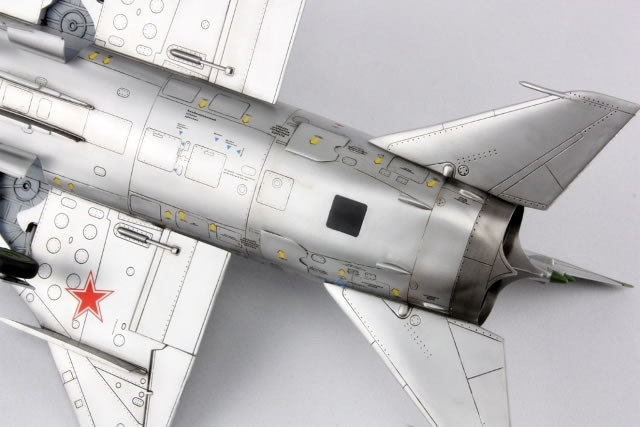
Circular panel behind the canopy should not be raised. I sanded it down and rescribed.
-
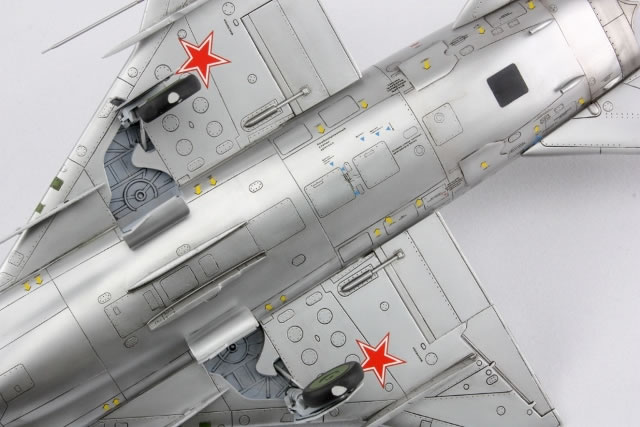
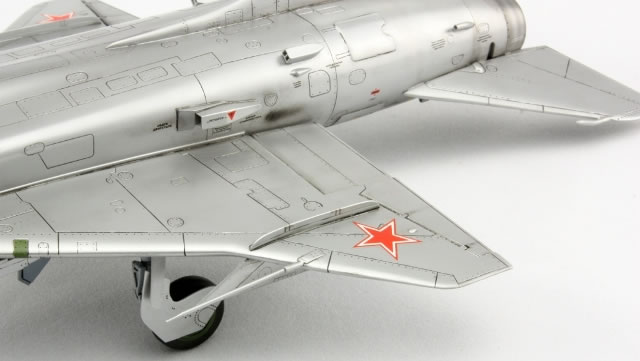
Lights under the wings should not be there, but under the fuselage. I relocated them; this is not incorrect for a Flagon-A.
-
Wing cross-section is significantly wrong for the TM, which means the wing pitot doesn't meet the wing at the right place. I would say this is impossible to correct without a completely new wing.
-
Wing planform is reputedly wrong, but, since I don't trust plans and could not find a good plan photo, I couldn't confirm this.
-
Main outer undercarriage doors are wrong shape and mount incorrectly to the undercarriage legs. I discovered this as I was finishing the model and left it.
-
Wing anhedral is too great.
-
Engravings on upper and lower wing do not match up (not even close) across the leading edge join.
-
Rear fuselage cross section is noticably wrong, being too 'boxy'. Again, left uncorrected.
-
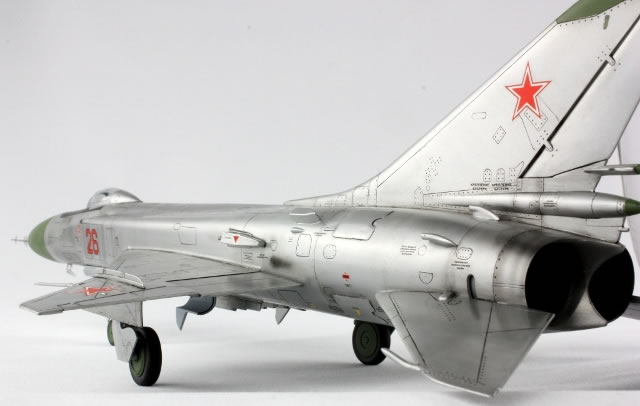
Airbrakes are the wrong shape; they should be much wider. I describe what I did about this below.
-
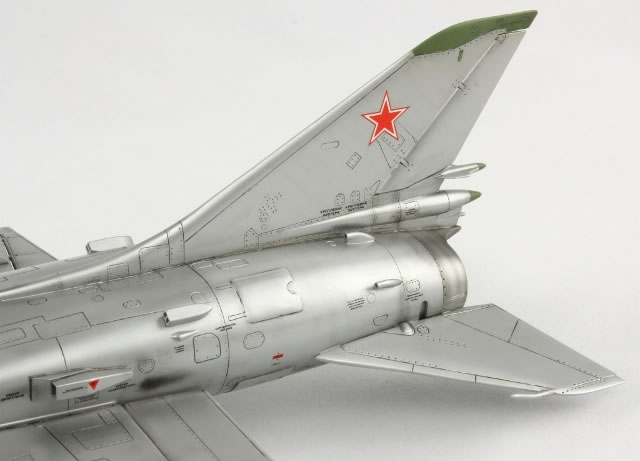
Angle of tail fin is wrong, but not enough for me to care.
-
Tail plane anhedral is far to big.
-
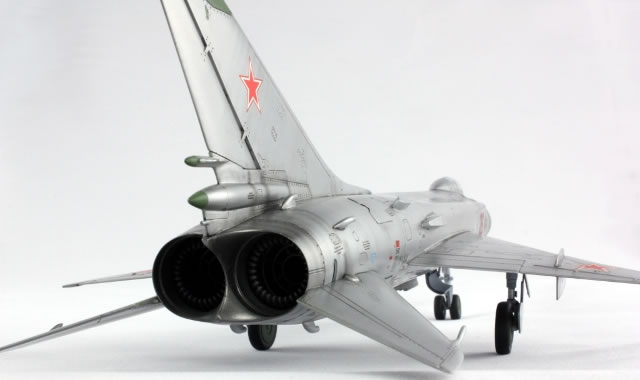
Exhausts are not very accurate compared to the real thing.
-
On top of this, moulding quality was very patchy. Many small parts, especially the undercarriage doors, had very rough surfaces.
Note that I didn't even start with the weaponry as I planned from the outset to leave all the pylons empty.
I can guarantee there are a host of other problems, but these are what jumped out at me during research and the subsequent build. With that list done, there isn't much left that is accurate!
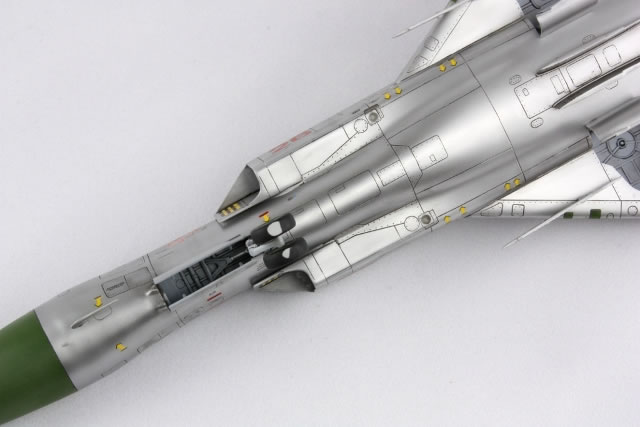
On with the build! The pieces went together pretty well. My memory is somewhat vague since I started this back in September 2010, and made lots of headway with the wings (including replacement wing-mounted pitot made from brass tube and wire), intakes and undercarriage. I tried the trick of assembling the intake trunking, sorting out the (very long) seams, sealing one end with tape and pouring in paint, and discovered that Gunze metallic paints most definitely do not work for this purpose! Fortunately the intakes are narrow and it's hard to see down them.
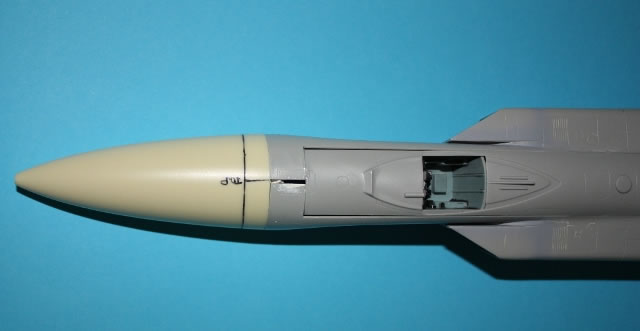
As the time for assembling the fuselage neared I realised I was missing a rather important part: the entire forward part of the upper fuselage that extends from the nose to midway along the spine. It definitely came in the kit, so it must have made its way into the bin and some point and been accidentally discarded. Work ground to a halt as I considered a solution.
Unfortunately, for 18 months a solution was not forthcoming. I put a couple of forum posts out and a kind soul said they'd send me the part from a discarded build, but it never arrived. My local model shop contacted Trumpeter on my behalf, but no luck there either. I considered scratch building, for all of about 2 minutes. No way I could carry off a silver finish if I was going to scratchbuild it. I looked at the Neomega cockpit set, since that included the forward part and I'd only have to scratchbuild the rear section, but after having the part on order with the UK importer for several months, I gave up and cancelled it. I had to go with my last resort and buy a replacement kit. To dull the pain I bought the Flagon-A (price in China was again £15, so not much different from the Neomega set anyway). If anyone has a spare part E1 kicking around so I can one day finish the A model, I'd love to hear from you...
Once my replacement kit arrived, in mid 2012, work resumed. Most of the fuselage can be assembled before the cockpit goes in, so I focussed on that and aimed to get a smooth finish; I was going to use Alclad II on this model. It was at this point I knew I was going to have to deal with the airbrakes.
The airbrakes are a horrible shape and I decided that whilst I could not address most of the inaccuracies in this model, I could improve these. The simplest solution would be to fit the airbrakes closed, fill the seams and rescribe the correct shape. However, rescribing across filled seams never goes well for me, so I tried a different tack. I noticed on various walkarounds that the airbrakes were slightly proud of the fuselage surface, so decided to simply stick new airbrakes cut from thin plasticard over the old ones. This worked pretty well except obviously they stand too proud; I still prefer what I ended up with over the originals though.
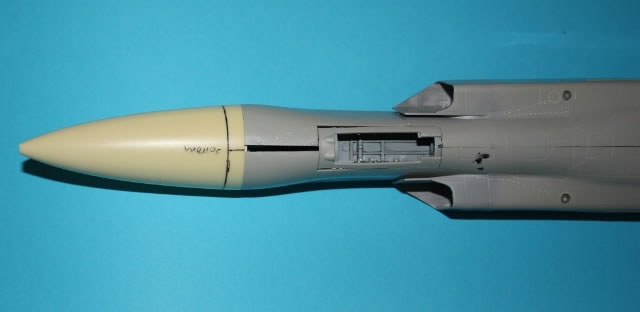
The nose was also another problem. Having abandon the incorrect Loon Models example (anyone want it?) and bought the Quickboost replacement, I discovered the latter did not fit as well as the former. In the photos you can see that it forces the fuselage apart. I don't know if this is because the Quickboost nose is more accurate and the kit too narrow, but I just went with it anyway. Lots of plasticard and superglue were used as filler.
In order to guarantee complete seam removal, all major components were joined with superglue. This leaves wider seams than using liquid cement, but I get no shrinkage and no ghost seams, so it's worth the effort. Then began many an evening of patient sanding, polishing and rescribing. I used plastic tabs along the fuselage joins so they would withstand all the remedial work. In all honesty, I am astonished the result is as good as it is.
The useless cockpit was installed, as were the outer wing pylons.
The fit of the main wings was fine and I worked to reduce the anhedral as much as possible. The tail planes were another matter and would need a complete rework to fit at the correct angle. I minimised it as best I could, but I was losing momentum on this project and just wanted it on my shelf. The anti-flutter weights on the tail planes had been glued on, but also snapped off multiple times, so I finally used brass wire to pin them, which solved that problem. The Quickboost fuselage intakes were pretty nice and glued on, the gaps (due to the fuselage curvature, which is not matched by the resin) were faired in using wet white Milliput. The nose pitot was a nightmare, consisting of a resin pitot with photo-etched blades. QB devised a complicated system, far too convoluted to describe here, to get the various appendages glued in the right place at the right angle. Even just by looking at the instructions I wondered if anyone had every actually managed to do this. I gave it a go and discovered it requires someone with a much steadier hand than me to get it right. Still, better than the chunky kit part!
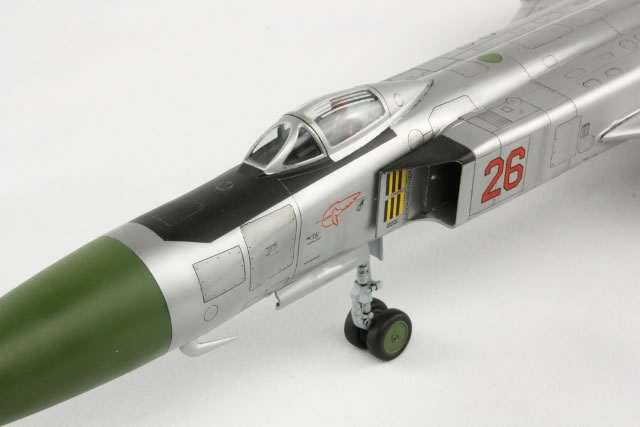
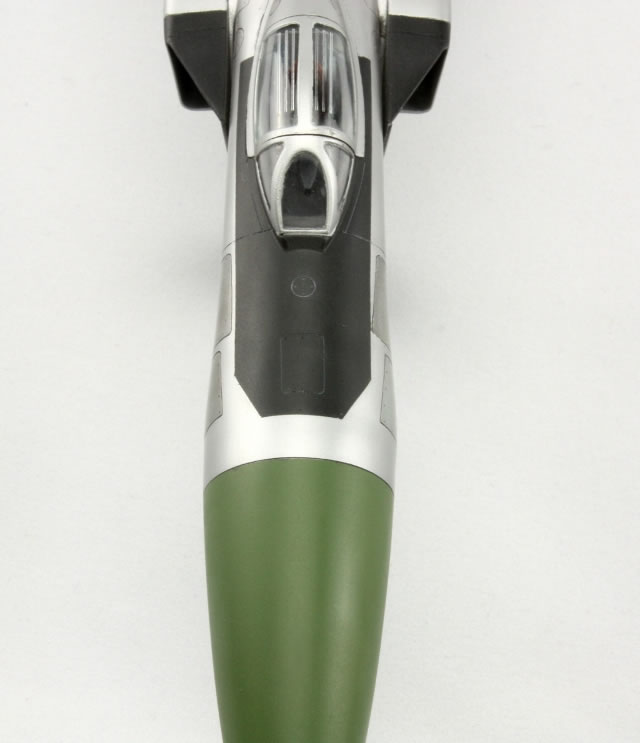
And so, with some trepidation, I approached the painting stage. I've painted a lot of silver aircraft in recent years, but I wanted this one to be 'proper', to have a nice, smooth, silver finish. I started with primer, in this case from a Mr Surfacer 1000 spray can. That was fine, but inefficient and expensive; next time I'll go back to the airbrush. Then all the minor colours were sprayed on: a green for the nose, wheels and various other panels (mixed from Mr Color 340 and 319 at about 50/50); black for the anti-glare panel, a panel under the rear fuselage and the area above the intakes; and then Alclad Steel for the rear fuselage. These were all masked and then came the gloss coat. I had particular trouble with the anti-glare panel as I could not find any pictures that clearly showed its shape. In the end it appears I got it wrong; it is too wide as it gets to the nose and the shape is wrong. It would have been really nice for Begemot to supply a good image of what this area should look like. It's also worth mentionaing that I couldn't get most of Begemot's paint recommendations to make sense; the FS numbers they supply for various green and grey areas either don't exist or contradict each other.
I decided to use Mr Color clear gloss as the undercoat for the Alclad. I applied many thin coats but just couldn't quite get it glossy enough, especially around areas such as the wingroots and fuselage intakes, so it really needed polishing out with Micromesh cloths. I have since decided to invest in a better pressure regulator on my compressor to see if I can spray acrylics at lower pressure and reduce this problem in the future. Because I hate polishing. I particularly hate having to get into the nooks and crannies where the acrylic paint doesn't lay down very smooth, so I soon got bored and did a half good job. Once semi-satisfied I sprayed some of the major nose panels in Alclad Aluminium, since in photos these seemed to be a different shade to the rest of the airframe.
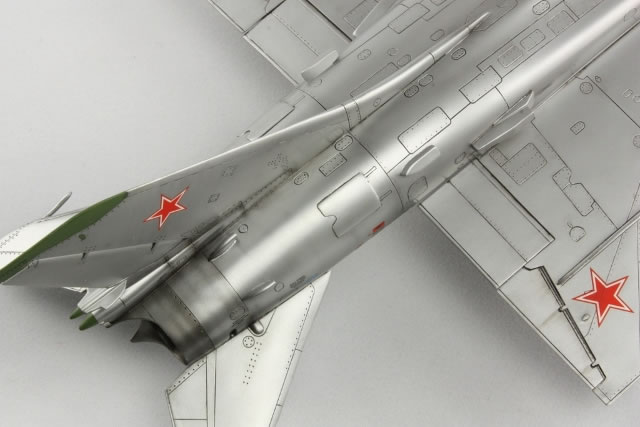
The remainder was sprayed Alclad Duraluminum, over three of four sessions. I can't say I got on particularly well with the Alclad (probably a pressure problem, again), which is strange because I've had much success with it in the past. In the end I got a fairly smooth, patchy finish which I was satisfied with. The undercarriage bays were sprayed with Mr Color 307. Off came the masking, followed by the realisation that the Aluminium was really rather dark compared to the Duraluminum. Too late to change it now!
I used Johnson's Klear for the gloss coat over the non-Alclad areas, a finish I am becoming increasingly dissatisfied with, especially as my two bottles have started to yellow. I need to find a water-based acrylic replacement for the future which I can have more confidence airbrushing; Klear just gets away from me sometimes and runs. I need the acrylic base, though, for the subsequent wash since Mr Color paints are soluble in Tamiya enamel thinners and Zippo lighter fluid, the two thinners I use for the wash.
I've grown to really like the Tamiya enamel washes, and used the black for most of the panel lines, except on the anti-glare panel, where I used grey. I loaded up some thinned Mr Hobby Color Smoke and then Lifecolor Tensochrom Burnt Brown in the airbrush and sprayed some thin streaks in various places, especially around the tail; I was fairly satisfied with this. The Tensochrom dries too quickly on the needle tip; more experimenting with pressure probably required! A small amount of dark grey oil paint was smeared from the hinges on the wing control surfaces; I spend a reasonable amount of time flying in Asia and have noticed that all airliner wings show this kind of weathering and surmised that fighters are probably not much different.
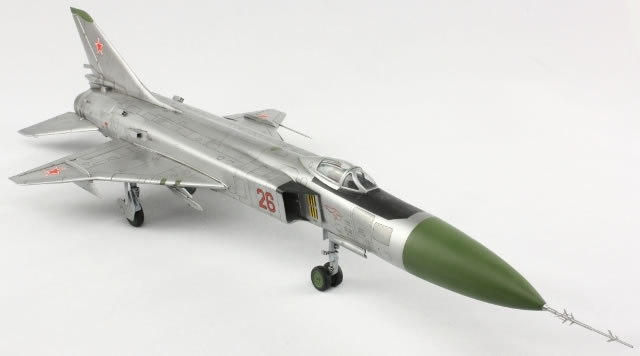
So it came to decalling. I had Begemot Decals' first set for the Su-15, which contains four options: Red 17 (as above, obviously no interest to me); a camouflaged TM (also of no interest); a Ukranian example in special markings (also of no interest); which just left Red 26 in a nice, plain metal/laquer finish. The decals were very yellow, so I taped them to a window for a couple of weeks, which did the trick.
Studying the instructions revealed a problem. Clearly the decal numbers on the diagrams did not match those on the sheet. Furthermore, the stencil location diagrams didn't show clearly where they were to be placed. This meant placing the stencils was impossible.
I emailed Begemot, who were very helpful. It turns out they released another Su-15 sheet much later (and correctly depicts Red 17 as a Flagon-A), and they offered to send me a set. I didn't want to wait two weeks for delivery, so simply had to make do with what I had and some scans they sent me of the new instructions and decals (these are also available on their website). Thus began a long process of identifying the stencil from the new instruction sheet, finding said image on the new decal sheet, finding the matching image on my old sheet and applying that. I had to do the whole thing sat in front of a computer and it took ages. Furthermore, the older set had several stencils missing and, in some places, too few of a given decal. The instructions noted that Red 26 didn't have stencils with the red background, so I missed these off and that made the task a little easier. In the end I only went for the impression of where stencils should be, rather than accuracy. I discovered that correct placement was impossible because the kit's surface detail was so wrong, especially around the nose. It was also at this point I discovered how badly out of place the nose wheel bay is, being too far to the rear. I also think the red star on the fin is too small. In their new set, the stars provided by Begemot are all the same size, but in mine there were two smaller ones (presumably for the fin). My model was quickly turning into a caricature of the real thing anyway, and the decals would be no different!
The decals themselves, however, were beautiful: in register, thin and clearly printed. They went down fine with a little Microsol. The sheet I used is now out of print; if I were to go through the whole process again I'd definitely get the newer set (plus it has a lot more options, including the Flagon-A and the two seater).
Once the decals were on I mixed up some Lifecolor matt and gloss varnish and sprayed it over the green and black areas and the undercarriage bays. This varnish sprayed okay, but is still an inadequate substitute for my beloved Pollyscale varnishes; in particular, it left some white blemishes on the nose.
The final stage was to remove the canopy masking (good job this time) and attach all the little bits. The undercarriage mounted fine. I stuck some 180 grit sandpaper to the table and dragged the whole model across it several times. I couldn't do this for as long as I would have liked because the nose gear is so long that it's rather fragile. At this point I discovered the main gear doors were both wrong in shape and mounted wrongly to the legs. Too late to do anything about it now.
The very last step was attaching the nose pitot. I was very nervous since superglue would give me only seconds to get the alignment correct in two dimensions. I took a deep breath and stuck it on. Not bad; looked good. Then I looked again, opened a reference book, and found I'd attached it rotated 90 degrees from how it should be. The glue had set and gently prodding at the joint with a knife showed it had set very well. Slightly despondant, I went to bed. Since there was so much wrong with the kit, did I really care the nose pitot was wrong?
Well, yes, I did. Next morning I decided to cut the pitot off with a razor saw, but not at the joint, further forward. I cleaned the cuts (very gingerly; the whole thing is flexible and fragile) and reattached it in the correct orientation. I knew the new joint would not look very good (and it doesn't), but at least the pitot is the right orientation now.
And so the thing was finally finished.
I never imagined it would take so long, and I never imagined I'd find so much wrong with it. But still, I seriously doubt anyone will ever manufacture another; despite all its (quite serious) failings, better to have this than nothing.
I do now have a Flagon-A (minus its upper fuselage decking) and I have concluded that this is significantly more accurate than the TM. But it's a long way down my to-build pile and I doubt it will ever see the light of day.
In conclusion: only worth it if you really must have an Su-15TM in your collection.
I do, and so I have.
Text and Images Copyright ©
2012 by Jon Bryon
Page Created 21 December, 2012
Last Updated
21 December, 2012
Back to
HyperScale Main Page

|
 Home
| What's New |
Features |
Gallery |
Reviews |
Reference |
Forum |
Search
Home
| What's New |
Features |
Gallery |
Reviews |
Reference |
Forum |
Search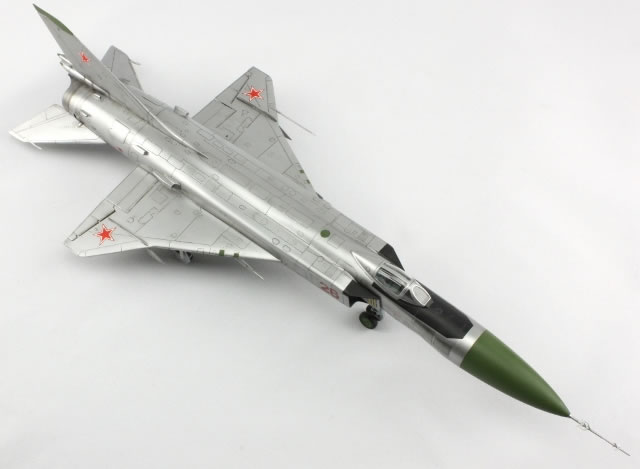
