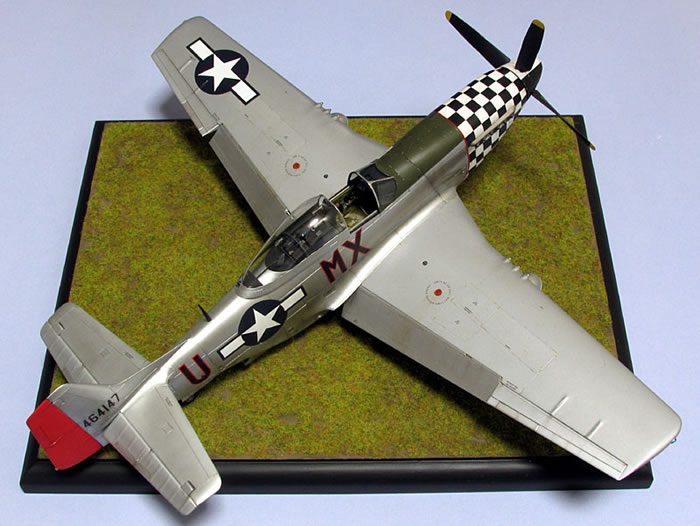
Tamiya's 1/32 scale
P-51D Mustang
by Bruce Salmon
|
|
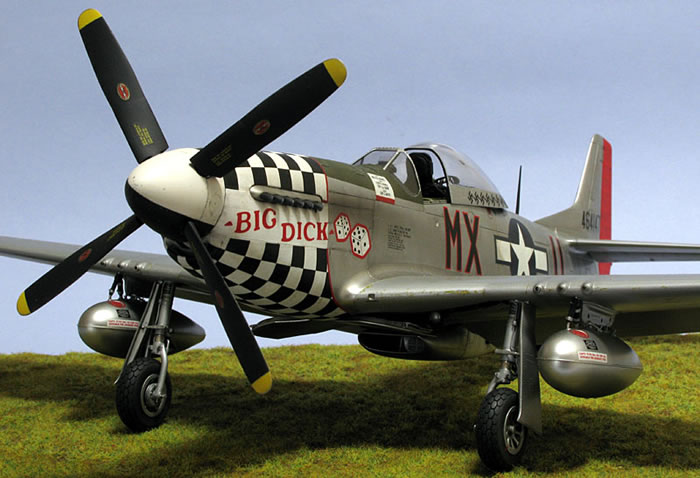
North American P-51D-20NA Mustang
Maj. Dick Hewitt (82nd FS, 78th FG, 8th AF |

Tamiya's 1/32 scale Tamiya P-51D Mustang is available online from Squadron.com
Aftermarket Products Used
Aftermarket Products Used:
-
BarracudaCals (BC32010) Mustang Cockpit Stencils and Placards
-
BarracudaCast (BR32012) P-51D Mustang Cockpit Sidewalls
-
BarracudaCast (BR32013) P-51D Mustang Instrument Panel
-
BarracudaCast (BR32014) P-51D Mustang Cockpit Upgrade
-
BarracudaCast (BR32031) P-51D Mustang Octagonal Tread Tires
-
Zotz (ZTZ32-048) The Duxford Eagles Decal Sheet
Cockpit
The Barracuda resin cockpit is very nice and fits without any headaches (You can always visit their website if you need further help). Caution is needed with their PE instrument panel as the holes in the bezels are smaller than the ones in the panel itself thus they can get off-centre enough so that they don’t line up with the plastic instruments sheet.
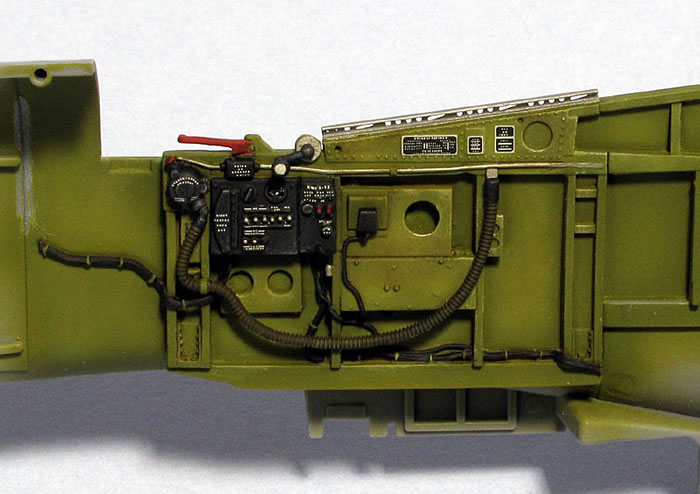
Of note the instructions for the canopy rails are wrong. You’ll need to fold one inside out as both rails should have the high end of the slot holes facing towards the front.
Also be aware that the Barracuda cockpit stencil decal set is for use on the kit parts so you may need to adjust them a bit to fit the resin; the large decals for the lower instrument panel will need to be cut up to fit properly. I couldn’t find any info in my oodles of reference material as to what radios to use so I just did what the Barracuda instructions said.
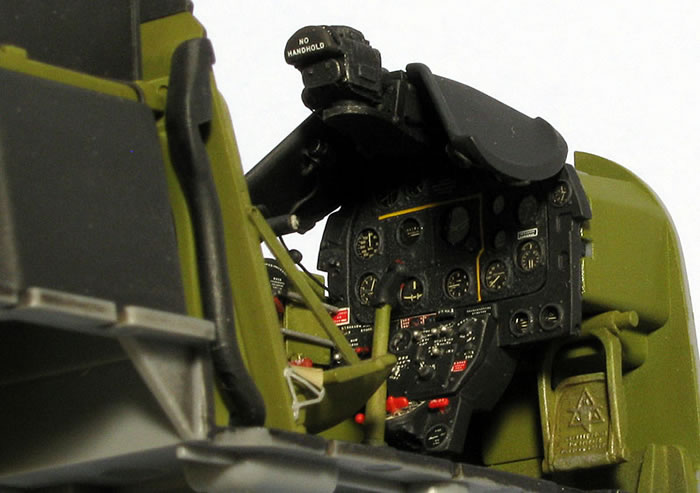
I ended up using the wrong gunsight as Barracuda don’t say which block number their replacement resin K-14 gunsight/throttle lever is for. I didn’t find any references until it was already done. I then discovered that “Late” meant Block 20 onwards (I originally started out to build Maj. George Preddy’s Mustang “Cripes Amighty” which was a Block 15). I also couldn’t see the gunsight’s sunshield being used in any period photos available to me so left it off.
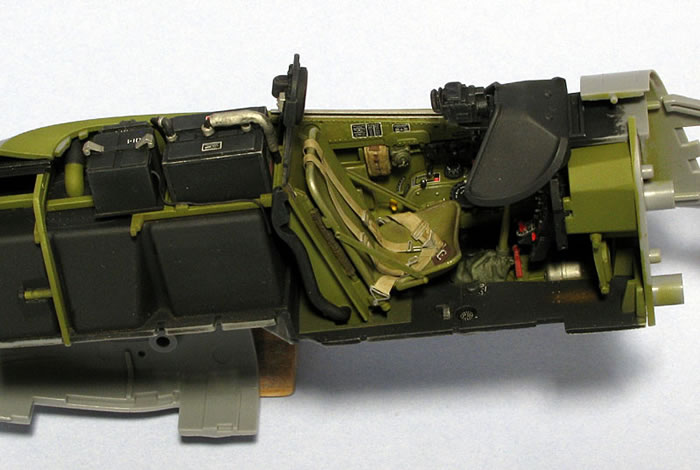
The rest of the cockpit build held no surprises.
Fuselage
The radiator sub-assembly was quite straight forward but proved difficult to paint as the Alclad tended not to settle properly in such a confined space. You should also make sure the cockpit is attached to the engine BEFORE you close up the fuselage halves otherwise it won’t fit and you’ll need a knife and a bag of choice words to fix it. The tail insert was attached with no fit issues.
Once the halves were glued I added the exterior inserts, some of which don’t fit very well. The Q4 & Q5 inserts are a bit gappy and the removable parts have a sloppy fit. These gaps will show up hugely with a NMF and so I had to shim a few of them to ensure a tight fit. The sliding canopy insert Q2 was glued in place at this time as my canopy would be posed open.
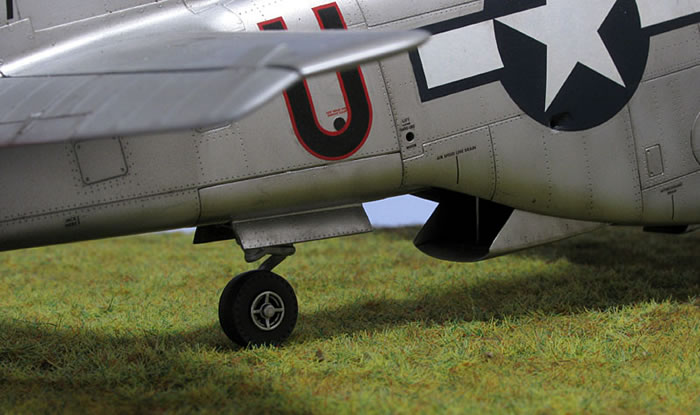
The tail wheel well was also attached and was spruced up by adding lightening holes to the internal panels as well as hydraulic lines and control cables. Not that you can see much of it but once I got started I just couldn’t help myself.
In this instance I chose to have the cowls permanently fixed to the nose framework as I didn’t want to bother with super detailing an engine. To build this Mustang with closed cowls you are still going to need to assemble much of the engine just to hang everything off. I also added some sprue supports between the engine block and part V18 as it seemed a bit flimsy to support the upper cowl.
I then moved on to the cowls themselves which are very thin and only have a tiny seamline that needs sanding. You will need to be very careful in gluing the cowls to the frame as any errors will show up horribly with a NMF. While it may be the best option when using magnets, to pose the cowls on and off as Tamiya proposes does not represent the way they function in real life. The top and bottom cowls would need to be cut into more than one piece to be accurate.
Wings
There is one problem with the wings and gun access panels and that is all those nasty rivet holes. I decided to paint Mr Surfacer 1000 into all the rivet holes and panel lines as spraying the whole surface would have erased the details I wanted to keep. I can’t remember how many times I did it but it was a lot! The Mr Surfacer would tend to ride over the holes creating an air bubble beneath. When sanded back the holes would reappear. I glued the gun panels closed with one proving to be a bit gappy on one edge. I also lost count of the number of times I filled it with super glue and rescribed to get a perfect line. This was all done before the wing halves were joined for simplicity’s sake.
Undercarriage Legs
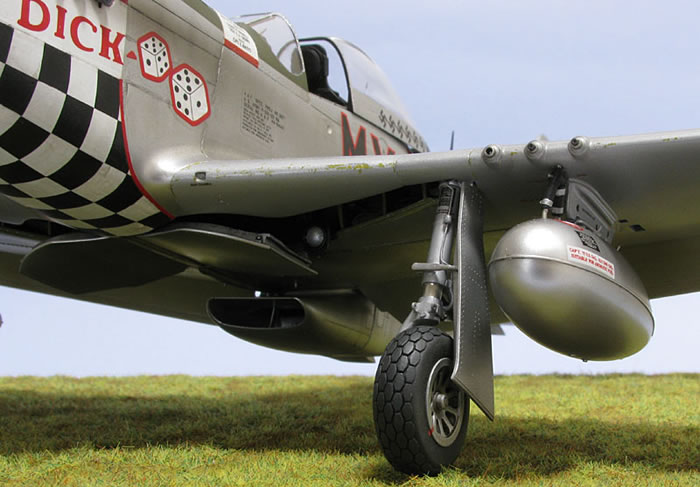
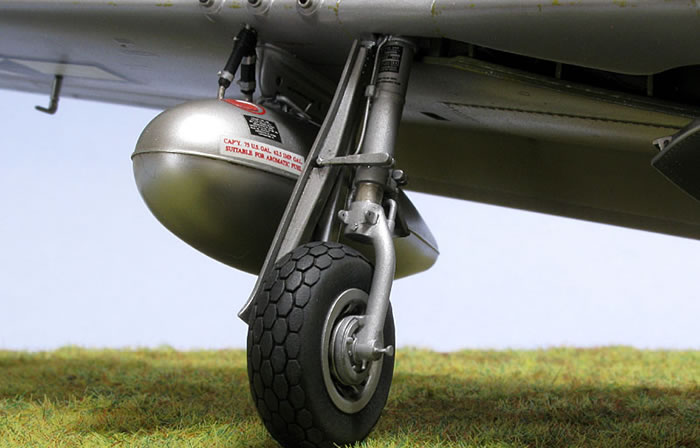
The legs are a bit toy-like in the way they are constructed. The scissor links are reminiscent of something you would find in a 1/72 scale kit and required drilling out before adding the PE. I replaced the over scale brake lines with brass wire and also scratch built the tow rings which consequently broke off several times. The legs were sprayed with Floquil Old Silver.
Wheels
I used the Barracuda resin wheels as I just don’t like rubber ones. After painting they were weathered using the Tamiya Weathering Master set (Mud) applied to the wheel sidewalls and tread.
When I sprayed on a coat of Estapol matt varnish to seal it, the weathering vanished so I had to do it all over again.
Wheel Wells
The wheel well ribs are very gappy and it is not easy to fix so I left them alone. If you plan to add all the relevant pipework and wiring then you should drill out the necessary holes in the ribs before gluing them in place. Ask me how I know this. Do your research before you build, not afterwards.
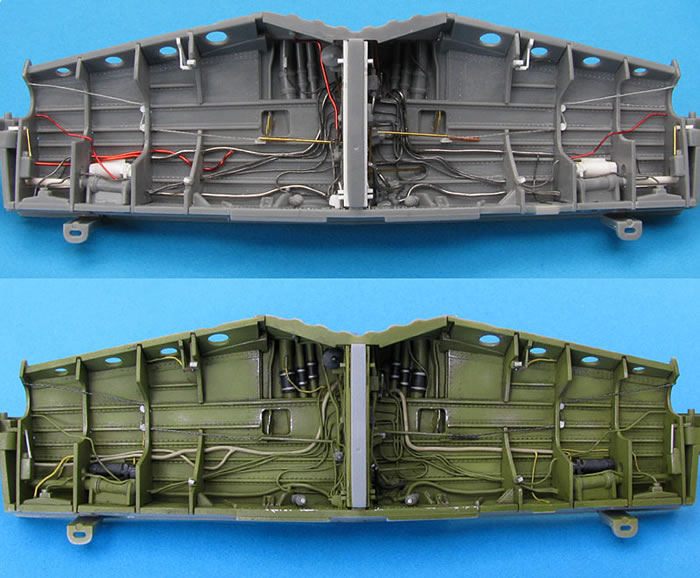
The inner gear doors/centre bulkhead was assembled as per the instructions. Then I decided the doors would be in the way when I went to detail the wheel wells so I cut them off as close to the centre bulkhead as possible. I made a bit of a hash of it so I had to engineer the doors to be inserted at an angle thus hiding the mess.
Half way through detailing the wells I put my back out due to poor posture and had to take a break for about 2 months...
Construction Continues
With the NZ IPMS nationals looming I decided it was time to go hard out and get the Mustang finished. I completed the wheel wells sub-assembly and painted it Humbrol 226 Interior Green, gave it a wash with raw umber oil paint then added highlights by drybrushing lighter green and also silver for wear and a little chipping.
I glued the wells onto the lower wing and attached the top wing halves. The fuselage was then mated with the wings. I must say that the joint was perfect. Next on were the horizontal stabilizers and suddenly I had what was starting to look like an aeroplane. It should be noted here that the internal plastic anchor points corresponding to the metal tabs on all the moveable surfaces (ailerons etc) were removed so those surfaces could be inserted and then pulled out again if there were any problems. Better safe than sorry.
The removable gear leg maintenance panels (A11 & A12) were detailed on the inside. Their fit to the wing was less than satisfactory with an approx 5 thou gap at the sides and one even had a 10 thou gap at the back. I decided that the best fix was to glue them in position then fill the gaps and rescribe. This meant that I had to attach the painted gear legs before painting the wings; some very careful sanding would be required so as not to damage them. I also left the wheels and doors off at this stage so they wouldn’t get broken during the masking/painting process; a fair bit of mucking around was involved to engineer this solution.
The landing light was also detailed and its corresponding attachment point in the wing modified to look more realistic.
With the cockpit and wheel wells masked over I was now ready for priming and sanding. Since I was using Alclad II Metallics I undercoated with their White Primer and Microfiller product. It sprays very nicely straight from the bottle but has a bad habit of chronic pebbling in the wing roots where the wing forms a perpendicular angle to the fuselage. I had to use a rag and Lacquer thinner to clean it off which also removed some of the raised plastic detail. I then sprayed the roots again and it was on to the sanding process. I used wet sandpaper as this lessens the chances of any scratching; starting with 1000 grit and finishing off with 4000 grit. Any finer than that and you’re just wasting your time.
I added the gun sight glass, armoured glass and windscreen after this step so they wouldn’t get damaged during sanding.
Canopy
The first thing to do with the canopy is to remove the seam line. I did this with a 1000 grit sanding stick then proceeded all the way to 12000 grit finishing up with Tamiya Polishing Compound (Fine) and then (Finish). This yielded a very clear and shiny canopy. I tend to stay away from Future now days as there is too much chance of muck sticking to it while it is drying.
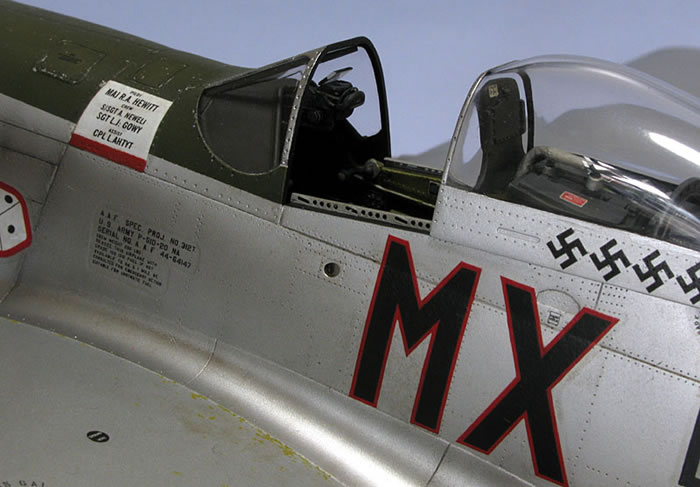
I scratch built a new antenna wire guide and attached it with white glue. The Tamiya paint masks for the canopy have to be cut out which is no real problem. However, it is a bit annoying that they give you what I consider unnecessary masks to fill in the blank spaces on top of the canopy but none for the armoured glass or the canopy interior.
Drop Tanks
The drop tanks were assembled then painted Alclad 106 White Aluminum. I gave them a very light wash with black oil paint as they would have been brand new. I plumbed the tanks with lead wire wrapped with Tamiya tape to simulate the rubber hoses.
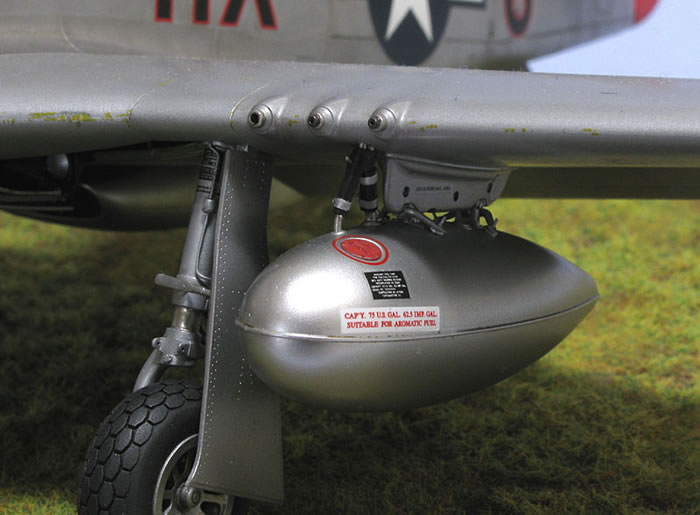
It should be noted that the plumbing for the drop tanks changed at Block 20 so that both the fuel and pressure lines originated from the same hole near the leading edge of the wing.
Flaps
I also decided to mimic wrinkles seen on the flaps of real Mustangs by scraping along the rivet lines with a curved blade. They were then sanded to a smooth finish which also necessitated a re-riveting exercise.
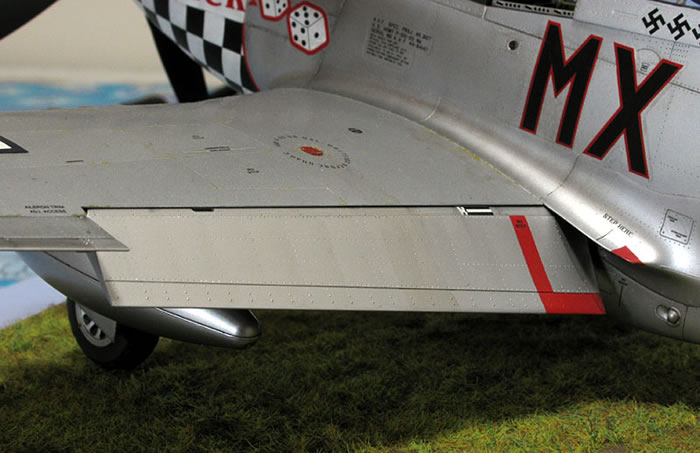
I had never tried this before and it seems to work quite well.
Wings
I sprayed Floquil Old Silver initially but that didn’t cover very well (too much thinner I think) and I was rapidly losing the gun access panel lines so I switched to Tamiya XF-16 Flat Aluminium.
Fuselage
Alclad II Lacquer metallics:
ALC 101 Aluminum
ALC 102 Duraluminum
ALC 103 Dark Aluminum
ALC 106 White Aluminum
ALC 104 Pale Burnt Metal
I used a base coat of ALC 101 Aluminum and then tinted some of the panels by mixing Aluminum with 10-50% of one of the other colours. The panel and rivet lines were then post shaded with a very thin mix of Tamiya X19 Smoke.
Rudder: Testors Gloss Enamel 1103 Red lightened with Humbrol 153 Insignia Red.
Clear Coat
Once the painting was done I gave the model a protective clear coat using Tamiya Acrylic X-22 Clear to give a nice smooth surface for decaling. It took 8 coats to cover the matt paint on the wings and only 2 coats to seal the Alcladed fuselage. I used Tamiya’s X-20A Acrylic Paint Thinner at a ratio of 1 part clear coat to 2 parts thinner.
Decals
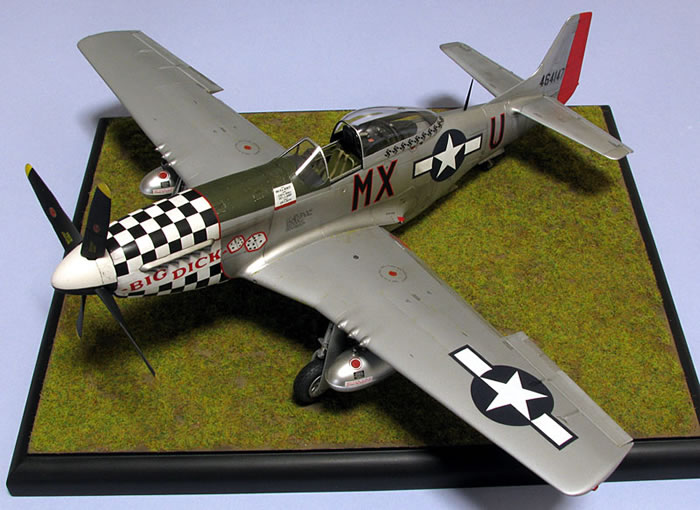
As stated earlier my initial intention was to build Maj. George Preddy’s “Cripes Amighty” from the Eagle Strike Decals (32045) “Blue Nose Birds of Bodney” sheet. By the time I got the airframe painted I decided that “Cripes Amighty” wasn’t quite showy enough for me. Not only that but I had already glued in the wrong gunsight which was unfixable. So after much deliberation the only decal scheme that I liked enough and was accurate for what I had already made was “Big Dick” from the Zotz “Duxford Eagles” decal sheet. Now I had to repaint everything I had already done in the previous scheme: Rudder, ailerons, elevators, canopy and prop. I tried to cut the corner by just painting over them; it didn’t work so I had to sand them all back to plastic again.
The Zots decals were somewhat of a disappointment. They are a tad thick and the white is not opaque enough. For example you can see through the stars on the fuselage to the Alclad beneath. They also silver a bit and don’t seem to stick too well in places. It gets worse... Their placement drawings are too small to see properly and very inaccurate (find some good reference photos on the interweb before you start).
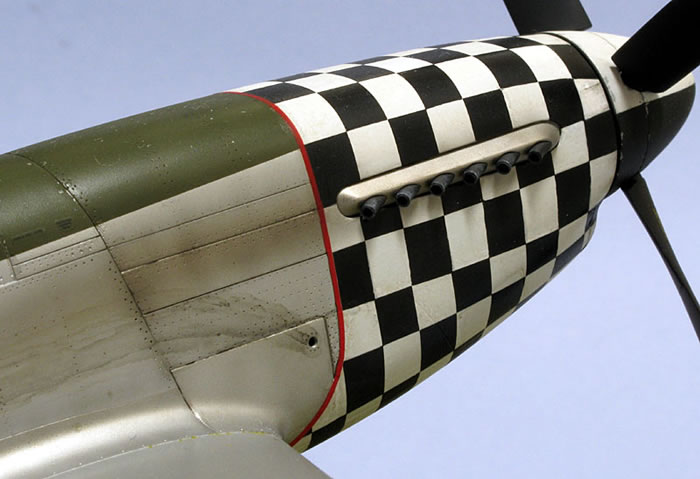
Applying the checker decals to the nose is a scary experience! I applied the upper cowl decal first; it fits OK but is a bit flappy at the front end. I tried to keep it centred while aligning the decal edges with the cowl “cut-outs” for the exhaust pipes. I discovered that the decal exhaust pipe cut-out is too wide by about 2mm so I had to quickly decide if I wanted the gap at the front, back or centred. I chose to have the gap at the front as photos show the rear end to be a narrowly painted area and I didn’t want to attempt cutting off any excess on my nice paintwork later on. I then applied Microsol and left it to set overnight. It ended up not too bad except for a few coarse wrinkles near the front.
Next I tackled the lower cowl decal; it fits well at the back but barely touches anything at the front. I tried to keep the checkers aligned with those on the top cowl while ensuring that the decal stayed centred. I covered it with a boatload of Microsol then went and hid under the bed hoping for a miracle. Days passed before I got up the courage to venture out; fortunately it seemed to be mostly good except for a couple of wrinkles at the front.
The two bottom side decals went on without too much problem but the upper right side was misaligned by about 1-2 millimetres. I was thinking about buying another set and having another crack at it but decided against this as there was too much chance involved and it could just as easily end up worse. In the end I hand painted the crooked bits and it turned out pretty well. I have seen a few Mustangs built in this scheme on the interweb and none of their checker decals align properly either. Interestingly the Microsol would make the decals suck into the rivet holes but not the panel lines. I then gave the nose several coats of Tamiya X-22 Clear before cutting off the wrinkles with a sharp knife. This operation left divots which were filled with Mr Surfacer then sanded and hand painted. Another overall light clear coat was sprayed and we were ready for weathering.
Weathering
The model was given an overall wash with Windsor & Newton water mixable raw umber oil paint. This was dissolved in Bar’s Bugs Windscreen Cleaner concentrate which I have used many times before to good effect. However, this time the wash seemed to bind to the clear coat before I had a chance to clean the excess off; maybe because the concentrate has ammonia in it. I rubbed like hell using turps on a Q-Tip and it gradually came off however it also whitened the area I was rubbing. The effect was quite nice in some areas but I’d rather be in control of my weathering than rely on blind luck. Some panel lines were darkened with further darker washes and oil stains added with a heavier black wash and some drybrushing.
I gave the painted areas some restrained chipping with silver and the wings were chipped with Humbrol HD4 Zinc Chromate Primer. This was a tin that I have had lying around for at least 30 years. There was small amount of very thick paint in the bottom with some brown goo on top. I added a heap of turps and stirred. By the time the paint was thin enough to use it had filled the tin to the top. Lastly the gun smoke and exhaust staining was sprayed using Tamiya X19 Smoke.
For the final clear coat I used a ratio of 6 parts Tamiya Acrylic XF-86 Flat Clear to 4 parts X-22 Clear. The anti-glare panel was sprayed straight Flat Clear (which isn’t very flat by the way).
I now removed the masking on the windscreen and cockpit. To my horror the windscreen had some patchy fog on the inside! I can only assume it was from the epoxy glue used to attach the armoured glass. There was no way that was ever going to come off! With the NZ IPMS Nationals only 3 days away and the model all but finished – I contemplated suicide. After an hour of “Time Out” I decided to brush it with some household window cleaner and hope for the best. Well whaddaya know the fog totally disappeared and the windscreen was crystal clear again; lucky for me as I had no idea how I was going to fix that mess. Whew!
Final Assembly
Last on are all the breakables:
I managed to lose one of the wingtips sharp trailing edges just as I was adding the second aileron. It had caught on my sleeve innumerable times during the build and yet it somehow endured. I spent an hour grovelling on the floor looking for it before I gave up and scratch built a new one.
Unfortunately I could only get the flaps to drop to about 30 degrees as they would catch on the lower part of the wing and I didn’t want to force them and scrape off any paint at this late stage.
The gear doors were added without a hitch although the gear leg tow rings had broken off again and needed replacing.
A trial fit of the drop tanks revealed a gap between the tanks and the sway bars. The sway bars got some scratch built clamps added to them which fixed the problem.
Last to go on were the canopy, pitot tube and radio mast. There is no aerial wire required, which was a common characteristic of many 8th AF Mustangs, as they used a different radio set.
To be honest I felt underwhelmed with this kit. Possibly my expectations were a little high due to the superabundance of superlatives used by other modellers to describe it. Tamiya’s insistence of making as many things posable as possible means they have compromised the kit in several areas necessitating re-engineering by the modeller to represent what the real aircraft would have looked like. I found this very frustrating.
This is the only kit I have ever made that at times I really hated building. Changing schemes half way through certainly didn’t help matters and trying to cut corners and using untried paint sometimes led to disastrous results. A natural metal finish is also very unforgiving; a small mistake can mean having to start over as it can be very difficult to hide. Towards the end of the build almost every time I went near the model something went horribly wrong. I’m so glad this one is over. The only reason I didn’t smash it earlier was because of all the hard work I had already done.
Over and out!
Model and Text Copyright ©
2014 by Bruce Salmon
Page Created 9 January, 2014
Last Updated
9 January, 2014
Back to
HyperScale Main Page

|
 Home
| What's New |
Features |
Gallery |
Reviews |
Reference |
Forum |
Search
Home
| What's New |
Features |
Gallery |
Reviews |
Reference |
Forum |
Search