Silver Wings 1/32 scale
Fairey Flycatcher
and Sram Biplane Assembly Jig
by Roger Hardy
 |
Fairey Flycatcher |

Eduard's 1/48 scale Nieuport Ni-17 Weekend Edition
is available online from Squadron for only $17.96
S
u m m a r y |
| Catalogue Number: |
Silver Wings Kit No. 32-009 - Fairey Flycatcher |
| Scale: |
1/32 |
| Contents and Media: |
Resin kit, photo-etched fret plus film instrument panel and windscreen, struts are resin and brass wire. Markings for three aircraft. |
| Price: |
£117.20 (or £97.67 Export) available online from Hannants and specialist hobby retailers worldwide. |
| Review Type: |
Build Review |
| Advantages: |
Excellent quality and precisely engineered. Accurate |
| Disadvantages: |
None really except that the instructions could be clearer here and there. Is the blue of the national markings too bright? |
| Conclusion: |
Easy to build and rig. ‘Wingnut Wings’ quality. Highly recommended. |
Background
 The Flycatcher was designed to meet the requirements of Specification N6/22 for a carrier and floatplane fighter to replace the Gloster Nightjar. The first of three prototype Flycatchers made its maiden flight on 28 November 1922. After trials, the Flycatcher was ordered for full production. The Flycatcher was designed to meet the requirements of Specification N6/22 for a carrier and floatplane fighter to replace the Gloster Nightjar. The first of three prototype Flycatchers made its maiden flight on 28 November 1922. After trials, the Flycatcher was ordered for full production.
The Flycatcher was a remarkable design for its time and was one of the earliest aircraft specifically designed for operation from the brand-new Royal Navy aircraft carriers. Flaps ran the entire trailing edges of both wings. These could be lowered for landing and takeoff, providing the aircraft with the capability of using only 50 yd (46 m) of deck space "to come and go." The fuselage was made of both wood and metal with fabric covering. A rather cumbersome undercarriage could be changed for twin floats or a wheel/float combo for amphibian use. Hydraulic wheel brakes were added to assist the aircraft in stopping in the confined space of an aircraft carrier. Arrestor hooks on the undercarriage spreader bar were a feature of early models, designed to engage the arrestor wires strung out on the carrier deck.
Production of the Flycatcher began at Fairey's Hayes factory in 1923, entering service with No. 402 Flight Fleet Air Arm. The Flycatcher was flown from all the British carriers of its era. Some 192 were produced. A typical deployment was on the aircraft carrier HMS Courageous, where 16 Flycatchers would serve alongside 16 Blackburn Ripons and 16 reconnaissance aircraft.
Very popular with pilots, the Flycatchers were easy to fly and very manoeuvrable. It was in them that the Fleet Air Arm developed the combat tactics used in the Second World War.
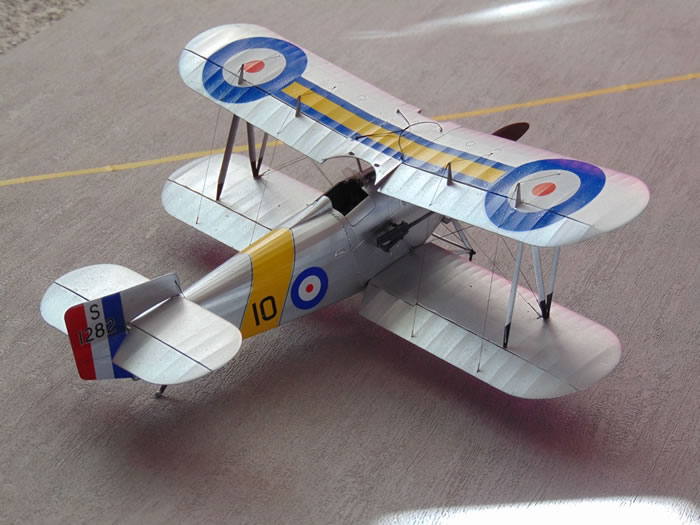
I love those inter-war British aircraft, with their colourful markings and all that luscious engine, strut and rigging detail. In this case, the struts are mostly resin cast around brass wire which makes them strong and easier to fit. Nice touch. I also wanted to try out the Šrám (Sram) Biplane Assembly Jig as my experience of setting up biplanes has been a bit mixed, to say the least. I think that 1/32 scale is perfect for these little biplanes as it’s big enough to justify lot of detail but small enough to be easily displayed. This one spans just 270mm, so just under a foot.
This is a resin kit, mastered with immense skill by Wojciech Kulawowski, and has very subtle surface detail that looks absolutely realistic. How often have I seen over-exaggerated fabric detail and skinny ribs? Well this one looks exactly right. The panel lines on the front fuselage are a little soft and some may want to rescribe them a bit deeper. There are no sprues, only moulding blocks, although the major components have already been removed from the casting blocks and prepared for assembly, needing little work. The remainder of the parts are too numerous to count and many are very small. At each stage of assembly, you need to take time to identify what goes where but they are packed into logical bags to make things a little easier. The decals are sealed in another bag and the photo-etched fret in another.
Silver Wings provide these comprehensive build instructions and advice on their website:
ttp://www.silverwings.pl/132-fairey-flycatcher-iv.html (Photos and text copyright Doug Nelson (2012)) so there’s almost no point me trying to do better. I found these notes very useful and it helped to sort out those areas where I wasn’t sure about what went where….thanks, Doug!
If you’re used to resin kits, this one will surprise you because the fit of the parts is very precise and the fuselage even has locating pins. You don’t actually need to agonize too much over the cockpit because very little can be seen on the final model which is a shame. The seat belt is provided but only has two components rather than the normal 4-part lapstrap-and-shoulder harness. I can only assume that they have researched this properly so I avoided the temptation to add a Sutton harness (this was too early for a Sutton, I think) and there may have been no structural attachment for the shoulder straps. Still strange, though. Incidentally, note that the instrument panel supplied is for the modern Flycatcher replica built by John Fairey and is different from the one originally fitted. Doug Nelson includes a layout of the original panel but I’ve never found a photo of it. I used the kit panel as it is quite deep in the cockpit and not that obvious. The fuselage needed a little filler along the lower seam, being careful not to spoil the stringer detail.
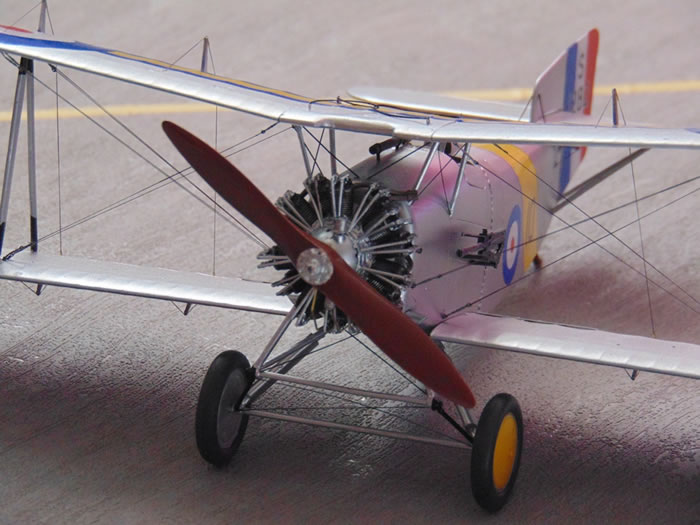
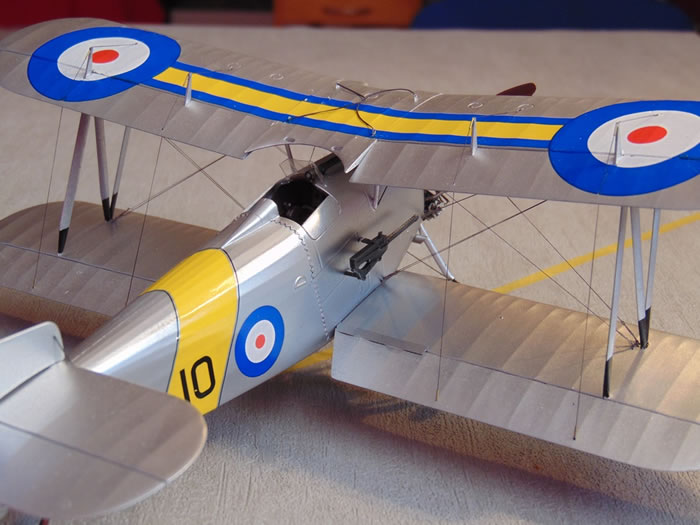
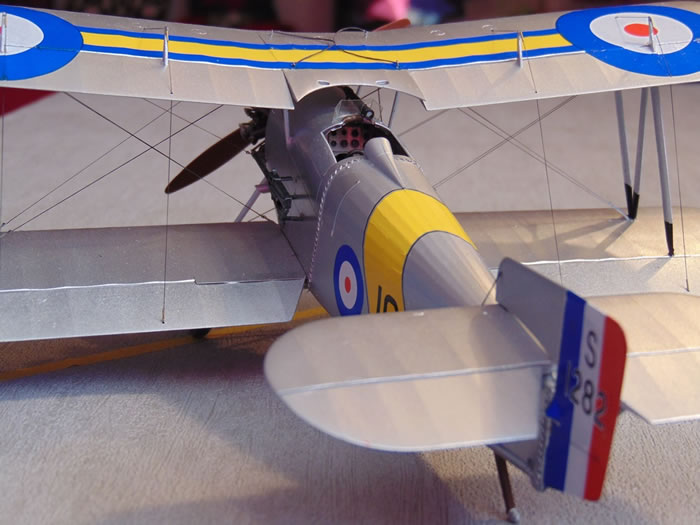
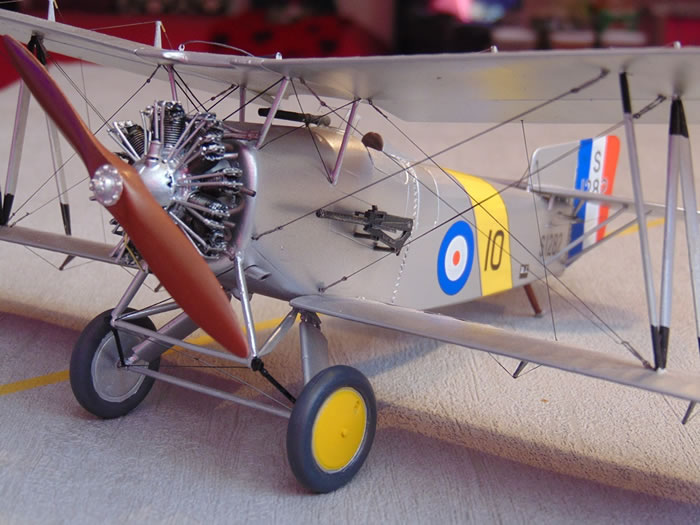
The engine is a work of art and is very visible on the finished model as it has no cowling. You need to follow Doug Nelson’s notes in order to get the assembly order right and to get the pushrods to align correctly. Also, the exhausts need care and remember that the bifurcated pipes go to the top of the engine, not the bottom as you might expect. I assume this may have resulted in exhaust fumes in the cockpit because they were replaced by a full collector ring and long pipes later in service (these are also provided for colour Option 3). You can add ignition harness cables to the spark plugs but I looked at photos of the engine and they are barely noticeable so I didn’t worry about them.
I separated the elevator and rudder to allow me to position them in slightly deflected positions.
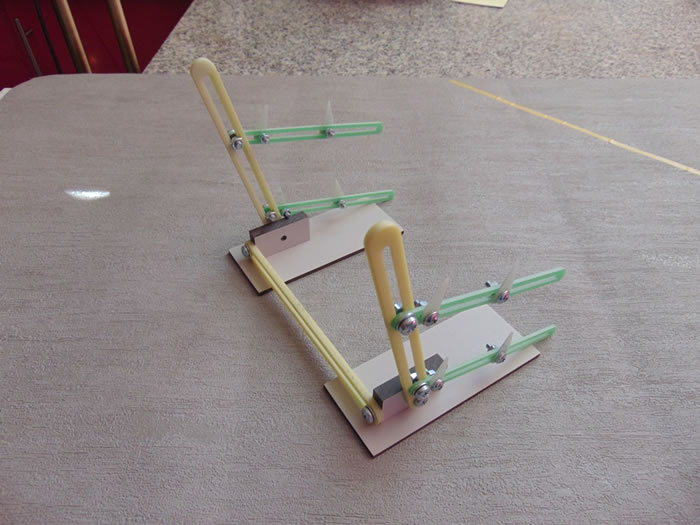
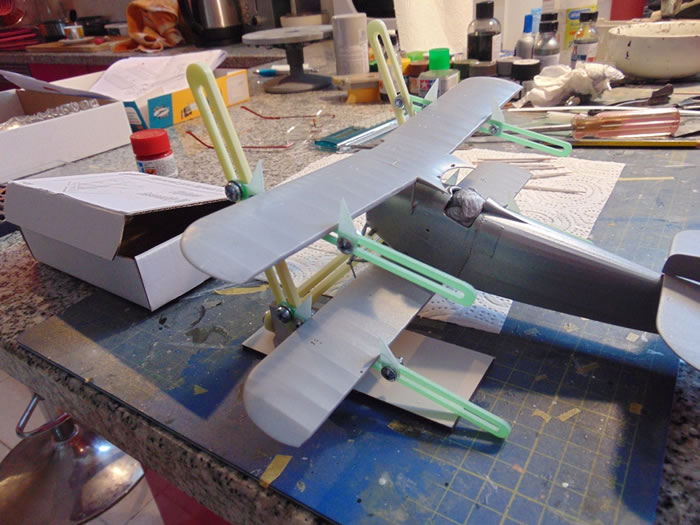
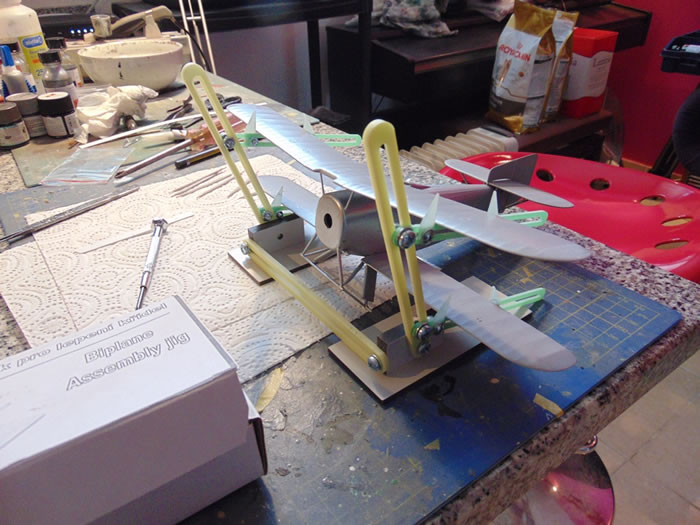
For the first time, Idecided to try the custom-made biplane assembly jig made by Czech company Šrám (Sram) who I had never heard of; I got it from Hannants in the UK. Basically it consists of base plates, two verticals and four wing supports with moveable stops for the wing leading and trailing edges, all bolted together at whatever angles you want. Have a look at the photos for a better idea.
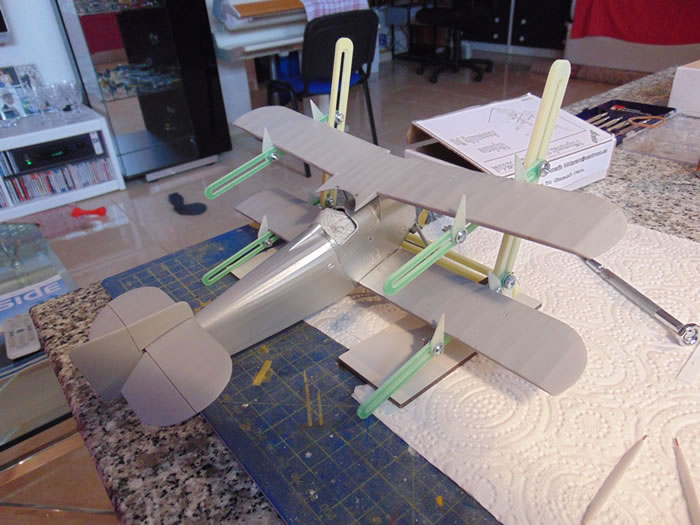
The assembly is straight-forward and it’s large and rigid enough to handle quite large and heavy wings without distortion. Once it’s assembled and tightened, you can position the entire model with lower wing in place and align the upper wing very precisely, in fact, you can handle the entire model in the jig as one piece if you’ve secured the lower wing properly. The bottom line is that you don’t need to worry about the orientation, stagger or incidence of the upper wing whilst you install the various struts. This makes biplanes really easy and I recommend this jig wholeheartedly. Here is the only link I can find:
ttps://www.hannants.co.uk/product/SRAMACC2.
All I can say is that I didn’t need to swear once!
Doug Nelson recommends leaving off the aileron control horns until the final stages and this is very good advice as they will get knocked off. Incidentally, the ailerons on the Flycatcher could all be deflected 10 degrees down to act as flaps so I did this on my model to add a bit of life.
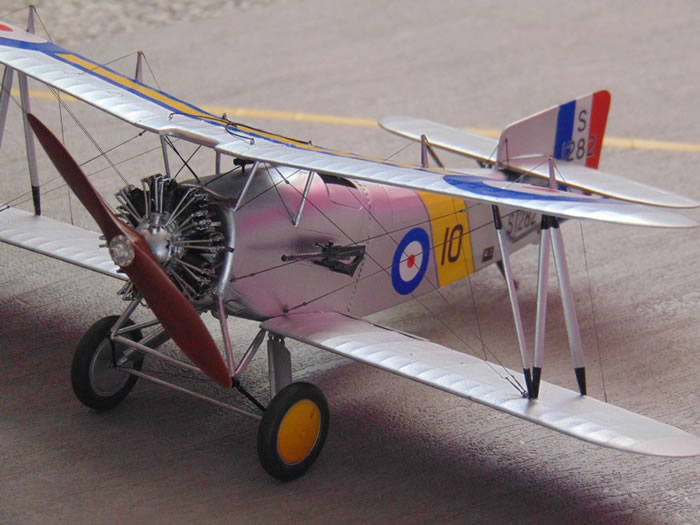
The undercarriage needs a little thought and you need to try to provide some positive location for the various components. This means drilling little holes for the brass rods but that’s difficult because the encasing resin is so thin. In the end, I superglued the whole lot together but think I may have trimmed a bit too much off the main undercarriage legs as it looks a bit too short, as if the suspension is fully compressed. Nothing I can do about that now!
I drilled the little 0.5mm holes for the rigging turnbuckles and sprayed the model before rigging it. Having broken hundreds of normal 0.5mm drills doing this stuff, I’ve finally hit on Tamiya’s 0.5mm drill bits that have 1mm shanks and these are far more difficult to break (I still manage it, though!).
Painting
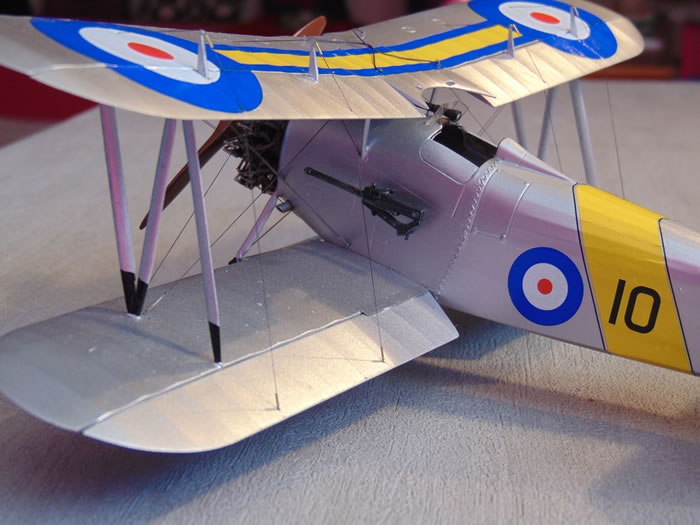
I used my Aztek A470 airbrush and Alclad II White Aluminium. Actually, I initially tried to apply the Alclad II Highly Polished Aluminium over gloss black but I’ve never had any success with this colour which I find too transparent, so I oversprayed the entire model in White Aluminium. Flycatchers didn’t have polished cowlings in any case, although John Fairey’s replica does have polished metal panels and there are lots of photos of this aircraft on the internet. You can identify it by the single row radial engine and longer nose.
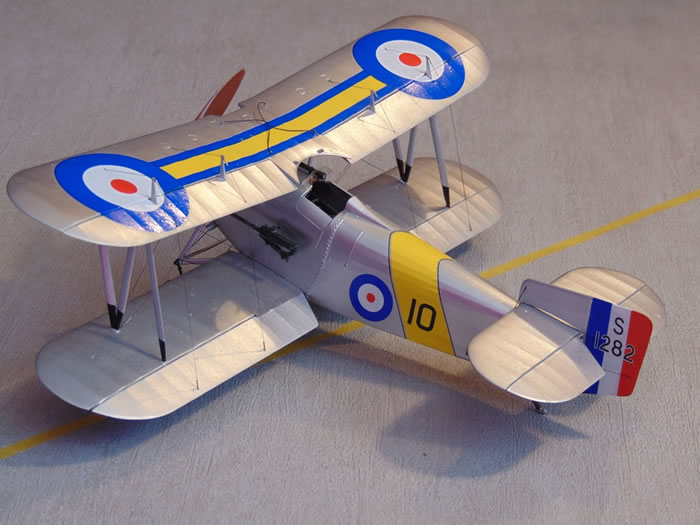
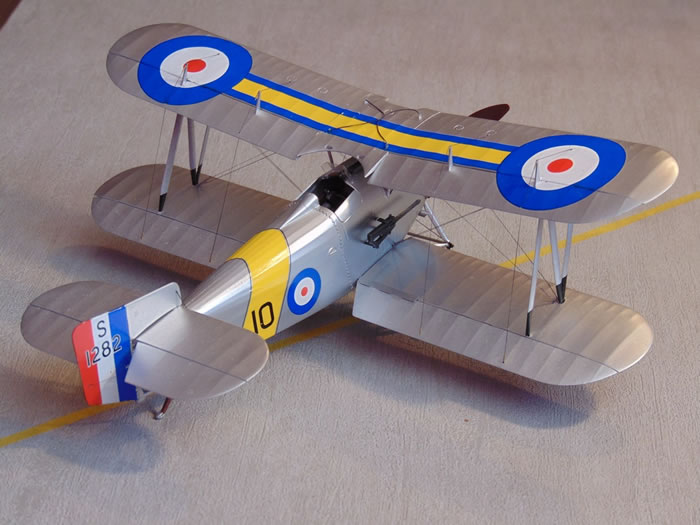
I did the 408 Flight option of HMS Glorious in 1930 as all of the decals for this example are provided, but if you opt for one of the other schemes, you’ll need to mask and spray the blue or red areas as decals for these colourful strips are not provided.
Rigging
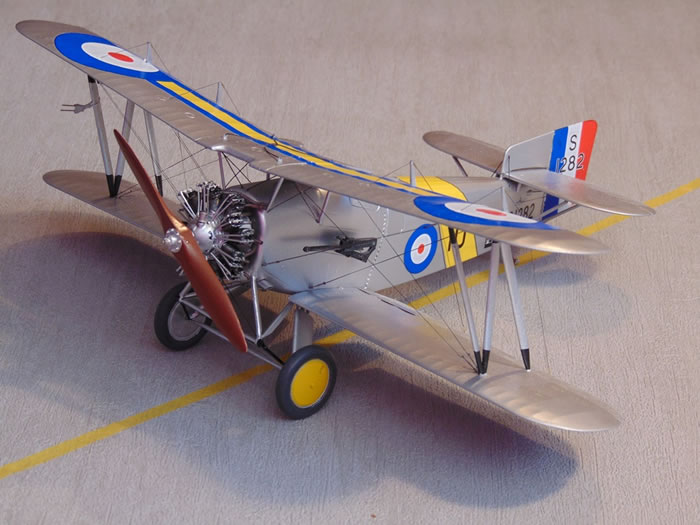
I used GasPatch Type A turnbuckles and EZ-line fine elastic rigging thread which, at this scale, are easy to use. The rigging (including the double flying wires) only took about three hours. The only thing to be aware of with the wonderful GasPatch turnbuckles is that the pre-drilled holes in the model to accommodate them need to be orientated in the correct direction as the turnbuckles are made of rather brittle sintered metal and can break if abused too much. I used stretched sprue for the undercarriage and cabane strut rigging because they don’t really benefit from the turnbuckles and tension is not important. For the control cable ends, I used Bob’s Buckles micro tubes which look to be about right and don’t been to be orientated in the cable direction. An alternative to the GasPatch turnbuckles are Bob’s Buckles eyelets and micro-tubes which also look good; I have used them before but find them rather fiddly and prefer the GasPatch turnbuckles, although they are considerably more expensive. Horses for courses.
Here are some links:
http://www.gaspatchmodels.com/
http://www.berkshirejunction.com/ezline.html
http://www.bobsbuckles.co.uk/
Finally a word of warning…..APPLY THE DECALS BEFORE THE WING CONTROL CABLES ARE ADDED. I didn’t and had to carve up the roundels to accommodate the rigging wires and control horns. Whatever happens, you’ll have to cut slots in the roundels for the control horns as they really have to be attached before painting….and do be careful when handling the decals…
Decals and Final Touches
Silver Wings provide three of the most colourful options for this aircraft, with decals for aircraft from 401 Flight, HMS Furious, 404 Flight, HMS Courageous, and the well-known colours of 408 Flight, HMS Glorious. The decals are thin and come free from the backing paper with little effort. They are more gloss than satin but the final sheen tones in well with silver finishes. Be careful as they are also a little brittle so keep them wet and position them with a paintbrush. The decals are simple with no maintenance instructions (though I think some were applied to the real aircraft). Now I look at the photographs of the finished model I wonder whether the blue of the national markings is a bit too bright….what do you think? There are no colour pictures from that period as far as I am aware.
The pitot–static head is provided as a photo-etched part but is seriously 2-dimensional so I fattened it up with some plastic card and micro steel tubes. Finally, there is the windscreen and a lifting strop that is attached to the top of the centre-section attaching to the four eyelets that should be installed there (if they didn’t go AWOL on the carpet!).
That’s it. It’s done. Sit back. Glass of wine…
Here are a few references that I used:
http://www.britmodeller.com/forums/index.php?/topic/60164-fairey-flycatcher-references/
http://www.britmodeller.com/forums/index.php?/topic/78098-132-fairey-flycatcher-by-silver-wings/
http://www.britmodeller.com/forums/index.php?/topic/234921438-132-fairey-flycatcher-by-ryszard-holak-silver-wings-kit/
Overall, this was an enjoyable and stress-free build of a pretty little biplane. The process was assisted ably by the biplane rigging jig. Some may regard the price of the kit as a bit high but this is a hand-made product that needs no after-market accessories and is in the same price league as Wingnut Wings to which I would compare it in terms of quality.
In the end, you get what you pay for. I have never built a Flycatcher before (there was only the Inpact/Lindberg offering or a dinky little 1/72 offering from Aeroclub) and have always been a little concerned that the real aircraft looked a bit toy-like, almost a caricature, with its stubby fuselage, pug nose and big wheels.
Well, there’s nothing I can do about that, but overall I’m very pleased with the finished result and recommend it without reservation to lovers of those aircraft that flew on silver wings in those years of peace between the wars.
Model, Images and Text
Copyright ©
2015 by Roger Hardy
Page Created 16 February, 2015
Last Updated
4 March, 2015
Back to HyperScale Main Page
|
 Home
| What's New | Features | Gallery | Reviews | Reference | Resource Guides | Forum |
Home
| What's New | Features | Gallery | Reviews | Reference | Resource Guides | Forum |