Sword's 1/72 scale
Fairey Gannet AEW.3
by Roger Hardy
 |
Fairey Gannet AEW.3 |

Sword's 1/72 scale Fairey Gannet AEW.3 is available online from Squadron
S
u m m a r y |
| Catalogue Number: |
Sword Kit No. 72088 – Fairey Gannet AEW.3 |
| Scale: |
1/72 |
| Contents and Media: |
2 sprues 84 light grey plastic parts; 5 clear; photo-etched parts; markings for two aircraft. |
| Price: |
£13.99 (£11.66 Export Price) plus shipping from Hannants
USD$25.99 plus shipping from Squadron
and other stockists worldwide |
| Review Type: |
Build Review |
| Advantages: |
Well engineered; crisp surface detail, high level of detail; many useful options including engine and gun bays on display; separate control surfaces; wing and belly tanks included. Generally good fit. |
| Disadvantages: |
The decals are extremely thin and difficult to handle . |
| Conclusion: |
Sword should be congratulated on producing a first-rate model at a bargain price and I recommend to modellers with a bit of experience. |
The Fairey Gannet was a British carrier-borne aircraft of the post-Second World War era developed for the Royal Navy's Fleet Air Arm (FAA) by the Fairey Aviation Company. It was a mid-wing monoplane with a tricycle undercarriage and a crew of three, and a double turboprop engine driving two contra-rotating propellers; it was a twin-engined aircraft.
Originally developed to meet the FAA's anti-submarine warfare requirement, the Gannet was later adapted for operations as an electronic countermeasures and carrier onboard delivery aircraft. The Gannet AEW was a variant of the aircraft developed as a carrier-based airborne early warning platform. It was superseded in this role by helicopters.
In the late 1950s, the Royal Navy operated the piston-engined Douglas A-1 Skyraider from its aircraft carriers in the AEW role. However, the Skyraider was a design that originated during the Second World War. It entered service with the RN in 1951 but, owing to its World War II vintage, would be considered obsolete by the late 50s. As a consequence, the Royal Navy issued its directive AEW.154 to begin planning for a replacement for the Skyraider. The aircraft considered most suitable for this were seen as those already under development for the Navy's GR.17/45 Specification for a new anti-submarine aircraft, of which the front runners were the Blackburn B-54/B-88 and the Fairey Type Q/17. In this competition, it was the Fairey Aviation aircraft that proved the winner, eventually entering service as the Gannet.
The intention was to use the Gannet AEW as a stop-gap measure prior to the acquisition of a new, purpose built system intended to be used on the planned new generation of aircraft carriers. As a consequence, it was intended to undertake as little in the way of modification as possible - the AN/APS-20 radar from the Skyraider would be mounted in a radome under the fuselage of an ordinary Gannet AS.1, with the associated electronics and space for two operators inside. However, the size of the radome meant that the existing airframe was too close to the ground to accommodate the radar, and so a significant modification to the fuselage was required. This involved removing the observer's cockpits and creating a new cabin within the fuselage; this was accessed via a pair of hatches next to the trailing edge of the wing, which also meant that the exhausts had to be moved from this position to the leading edge; increasing the total area of the vertical stabiliser to compensate for the instability caused by the radome; and extending the length of the undercarriage to increase the clearance for the radome, which consequently increased the aircraft's overall height by 1 m, and gave the aircraft a more level stance than the anti-submarine version.
The prototype Gannet AEW.3 first flew in August 1958, with carrier trials taking place using HMS Centaur in November, and the first production aircraft delivered in December. By August 1959, 700G Naval Air Squadron was formed as the Trials Unit for the new Gannet. This unit put the aircraft through an intensive test programme to make it ready for operation service, a process that lasted until January 1960, at which point the unit was renamed as 'A' Flight of 849 Naval Air Squadron. 849A Flight was then declared operational and was embarked for the first time in HMS Ark Royal. A total of 44 Gannet AEW3s were ordered for the Royal Navy and seven survive in museums in UK, Germany and the USA.
I remember seeing these aircraft arriving at RAF Changi in Singapore in the mid-1960s and have always wanted a model of one. Wish granted!
See http://en.wikipedia.org/wiki/Fairey_Gannet and http://en.wikipedia.org/wiki/Fairey_Gannet_AEW.3 for full details
The ASW Gannet is the subject of kits by both Trumpeter and Revell but as far as I am aware, the AEW3 has only been kitted in resin by Alley Cat (http://www.alleycatmodels.co.uk/fairey-gannet-aew-3-4755-p.asp) so this new addition to the Sword range is most welcome and a lot cheaper. The kit comes in a flimsy end-opening box that belies the quality within.
I don’t like these cheapie boxes but have had to get used to them at the insistence of Revell of Germany. The contents are detailed above and are well moulded with delicate engraved detail and smallish moulding gates. This is actually a limited run kit but the quality is very much mainstream, like their superb Lightnings. There are even some locating pins! Couple this with the comprehensive decal sheet by Techmod, photo-etch fret and all for the price of a standard Airfix kit, and you start to get the feeling that Sword are really trying hard.
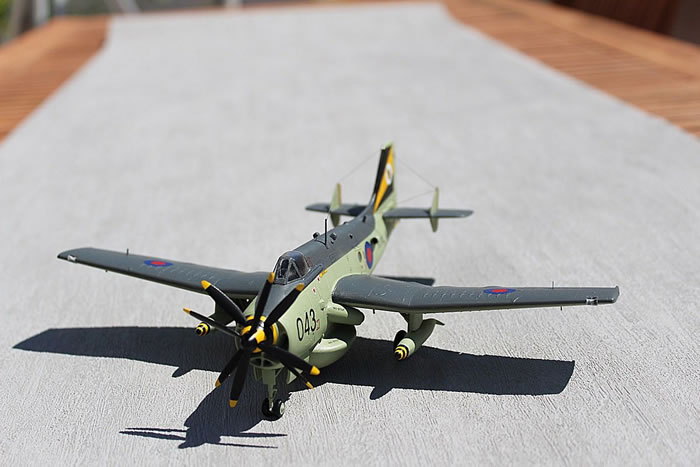
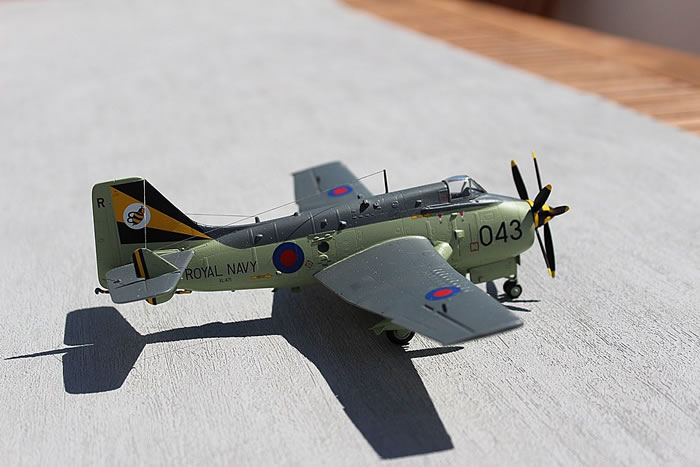
I was slightly disappointed that the canopy is one piece so cannot be posed open. I am pleased to see that they have resisted the temptation to deploy the flaps, unlike Revell who got it completely wrong. I was pleased to see that the surface of the aircraft accurately replicates the overlaying plates and panels that result in lumps and bumps everywhere rather than anodyne recessed panel lines. The Gannet was certainly not the prettiest or most aerodynamically perfect flying device ever designed!
Construction starts with the cockpit, of course, and this is adequately detailed with the harnesses provided on the p/e fret. They are unpainted (how spoilt we’ve become…) but nice nonetheless. The instrument panel is also on the p/e fret plus film instruments so rather better than a decal, although the cockpit is small, the canopy is closed so little can be seen. Everything fits with surprising precision. The first obvious omission in the instructions is that this model needs a nose weight. Actually, it needs lots of nose weight as all Gannets are inveterate tail-sitters unless the nose is full of lead. Put in as much as you can. I am fortunate in living in Portugal where we can still get real lead fishing weights. I brush-painted the cockpit Revell Panzergrau as I think matt black is just too dark. British aircraft of this vintage had black interiors so the cockpit is a bit of a coal hole but a little dry-brush white brings the edges to life.
The fuselage goes together well but the top of the nose needed a bit of pressure to bring the two halves together. It might be better to trim a little off the sides of the cockpit floor to get a better fit. You can insert the nose weight after the fuselage goes together but before the nose is added. I put in 20g which may be overkill but better too much than too little.
The wings assemble nicely as well, although the fit of some of the internal parts that enclose the wheel bay is a little approximate but this doesn’t matter as the joints cannot be seen (but…see later…). The wings insert precisely into the fuselage although there is need for a little filler around all joints. I decided to add the tailplanes in accordance with the instructions rather than leaving them off for ease of masking because they are butt-jointed and it is easier to ensure good joints before the model is painted, even though the masking is trickier. Some may want to add some reinforcing brass rod for the tailplanes but the joint area is quite large and I took the risk. For checking and filling tiny gaps in seams, I use Alclad grey primer that I have allowed to evaporate so that it can be brush-painted. The result is similar to Gunze Sangyo’s Mr Surfacer.
Attaching the undercarriage legs proved exciting as there are no pins for attaching the wheels, despite showing them in the instructions; I guess it was beyond the limited-run mould technology but no one told the guy who did the instructions. I added some from plastic rod but brass would be better. Then I realized that the approximate location of the internal U/C bay structure determines the location of the main undercarriage legs which should, of course, be symmetrical. Naturally, mine were not so I resorted to some minor surgery to get the legs in the same location left and right. The engine exhausts are exciting as well as it is not clear, initially, precisely how they should fit. However, there are large raised areas on the fuselage just around the wing root leading edge and the exhaust fairings fit these perfectly. The exhausts themselves fit inside against the fuselage sides and are snug.
Two decal options are offered:
-
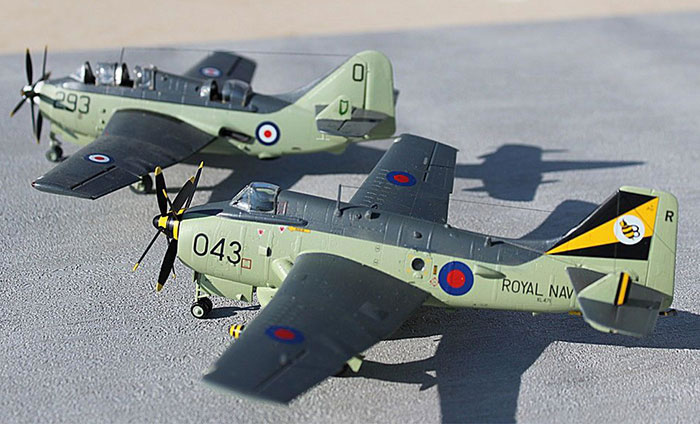
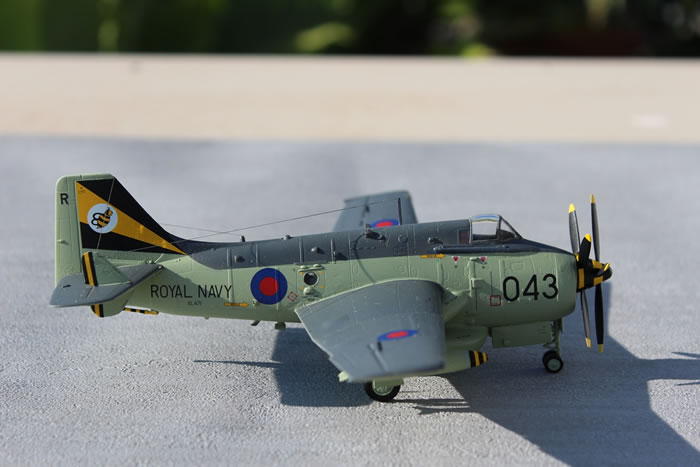
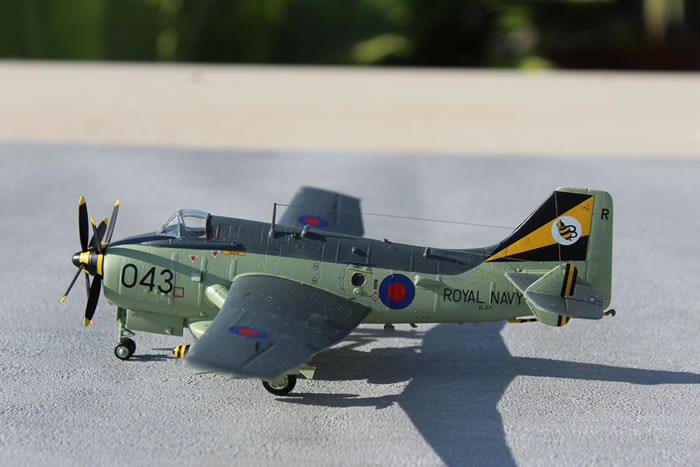
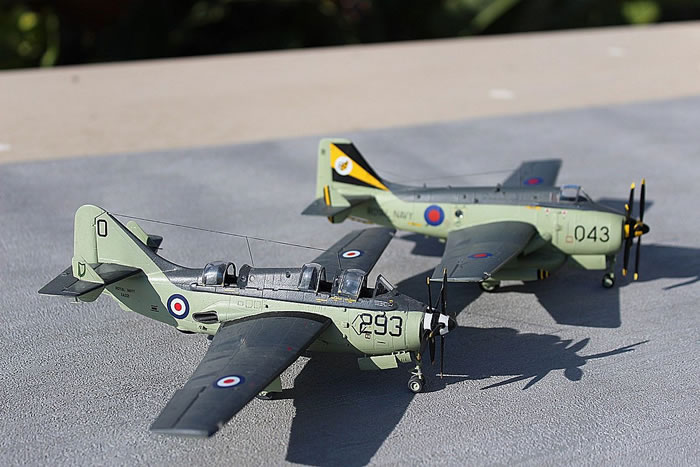
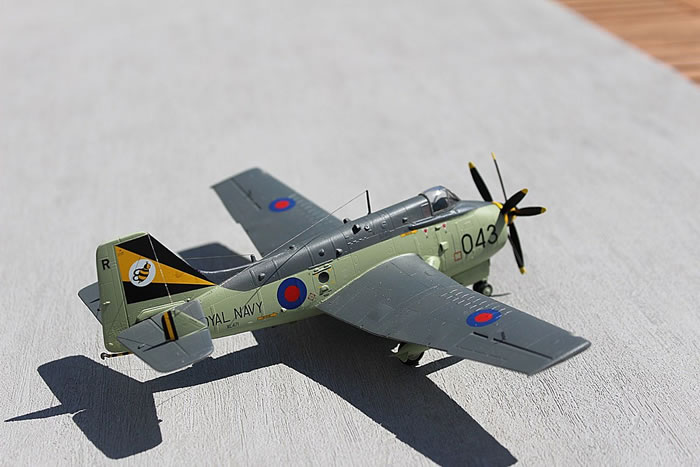
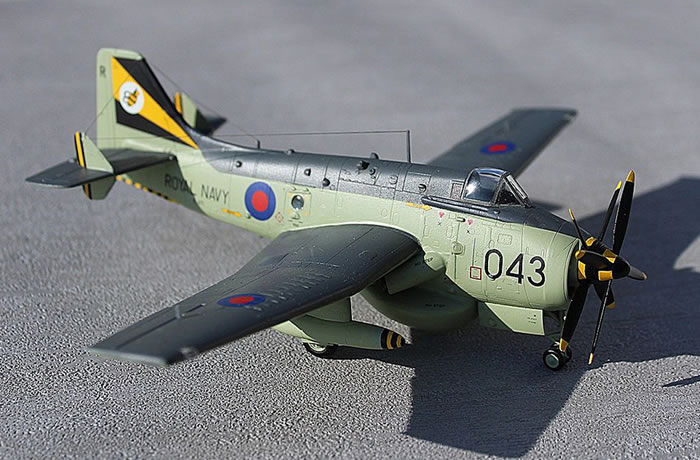
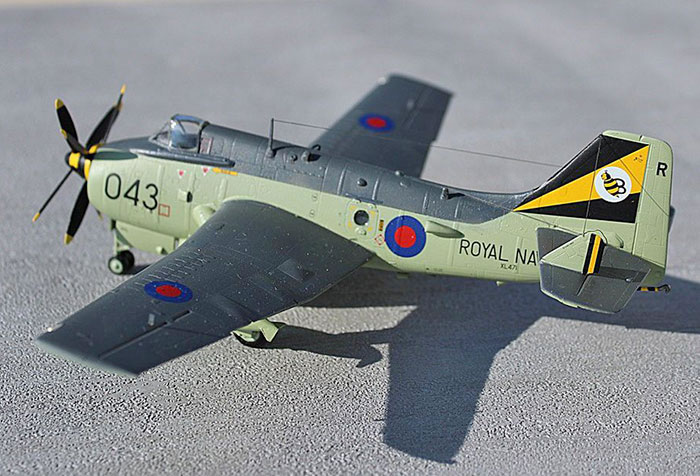
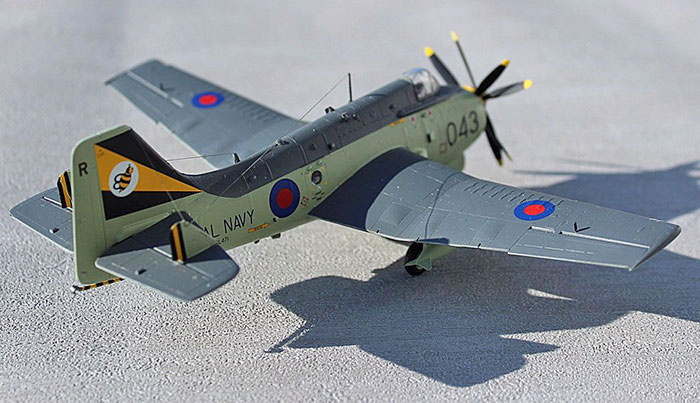
849 Sq.FAA , XL471/43R, HMS Ark Royal 1978
-
849 Sq.FAA , XP224/263H, HMS Hermes 1968
These cover the only two colour schemes that the 849 squadron aircraft sported. There was only ever one operator.
The painting is easy as the entire underside, including wheel wells, undercarriage leg s, door interiors, etc are all Sky Type S. The upper surfaces are Extra Dark Sea Grey. I used Alclad2’s new ‘Milspec’ paints after priming with Alclad’s grey primer; I normally use Tamiya acrylics but matching correct camouflage colours is a bit hit-and-miss as their range is somewhat incomplete unless you’re modelling Japanese subjects. Alclad2 have been known for their excellent natural metal finishes but they have now branched out to produce a range of authentic camouflage colours. These paints are enamels, not acrylic and, like all Aclad2 paints, come in a bottle, need a good shake and can only be sprayed. They dry extra fast, take masking well and dry matt and very smooth. Currently the range is limited to….well, why do I need to go into detail when it’s all here:
http://www.alclad2-online.co.uk/index.php?CATEGORY=1&SUB=8.
Their initial range allows the most common basic RAF, USN and Luftwaffe WWII schemes plus a few USAAC and USAF colours. I corresponded with Jay Laverty of Alclad to get the technique right. The main difference with these paints is that they dry very quickly and, if you spray from too far away, the paint can dry before it hits the surface, so you must avoid this. The key is to spray more closely than usual, Jay says 2-3cm; I probably sprayed 3-5cm away to avoid puddling but it depends on your airbrush settings. Actually, if you do get puddling by accident, DON’T PANIC! Just leave it and most of it just disappears on its own. Any that remains can be rubbed down with Micromesh and re-done so nils desperandum. Jay recommends buffing the surface between coats. The paint dries to give a very smooth matt surface if sprayed close. Masking onto this paint works just fine, incidentally, and the paint goes a long way. I left the paint a couple of hours to cure before masking but I think it would have been safer done sooner. Because the surface is matt, it needs to be glossed-up a bit to take the decals and I used Alclad’s Aqua Gloss (which I think is basically like Johnson’s Kleer acrylic floor polish) which gave the model a nice sheen, but not gloss; a nice satin sheen is good enough to take decals without silvering.
The decals are, at first sight, very nice…until you start to apply them, that is. They are the thinnest decals I have ever seen and curl back on themselves given any chance. Once this happens, you might as well throw it away because it is impossible to straighten it out. I was lucky in that I started with the stencils and ended up only getting half of them on the model. I reverted to the spare decals box in the end for some generic stencils that looked the part. The normal way of transferring tiny decals to a paintbrush and ‘painting’ them onto the model will not work here. The only way to succeed is to slide the decals directly from the paper, very wet, to the model with no gap in between. This needs a steady hand and lots of Microset. Fortunately the larger decals went on OK but I was always aware that if I lost even one of them the entire scheme would be ruined and I was grateful that there are two complete schemes provided with the same basic aircraft colour scheme so I could always revert to the second version in extremis.
Once set, I sprayed the model with Alclad’s semi-matt varnish to tone everything together; I don’t like matt finishes as they look lifeless, even on WWII bombers. Final touches are the portholes in the fuselage sides which are provided and are correctly domed but I couldn’t see how they could be inserted without falling into the fuselage so I elected to lose the doming and used Micro Crystal Klear which worked fine. It would have been better to insert the kit windows from the inside earlier in the construction and mask them later. The props do not turn and I fixed them with blu-tak so that they could at least be positioned. A few aerials and it was complete.
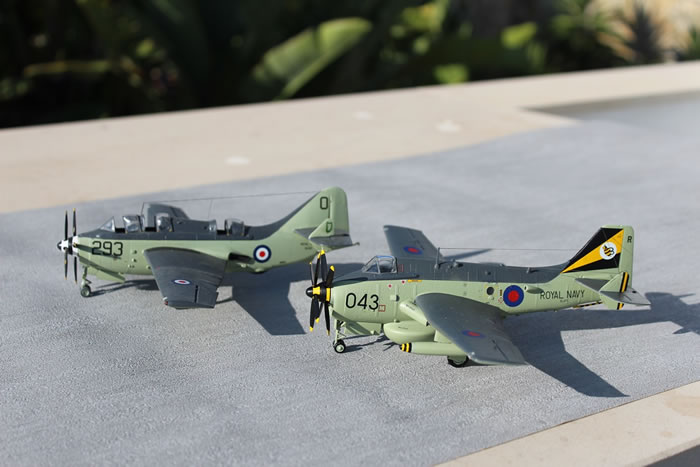
Some of the photos also show the Revell 1/72 Fairey Gannet AS4 for comparison.
I’m pleased with the finished result. It looks accurate, goes together well, is comprehensive and well detailed. Sword should be congratulated on producing a first-rate model at a bargain price and I recommend it to modellers with a bit of experience. My only reservation is the decal sheet which needs to be handled with great care.
Model, Images and Text
Copyright ©
2016 by Roger Hardy
Page Created 3 August, 2016
Last Updated
3 August, 2016
Back to HyperScale Main Page
|
 Home
| What's New | Features | Gallery | Reviews | Reference | Resource Guides | Forum |
Home
| What's New | Features | Gallery | Reviews | Reference | Resource Guides | Forum |