|
Hawker Tempest Mk.II
Hi-Tech
Special Hobby, 1/32 scale
S u m m a r y : |
Catalogue Number: |
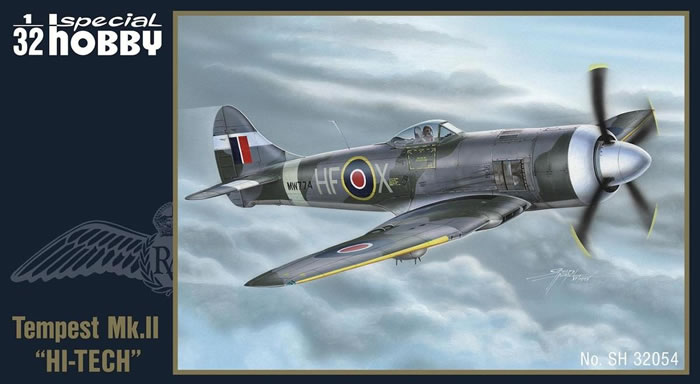
Special Hobby Kit No. SH32054 - Hawker Tempest Mk.II Hi-Tech |
Scale: |
1/32 |
Contents & Media: |
120 parts in grey resin; 16 photo-etched parts; acetate film; decals. |
Price: |
Euro 87.90 available online from Special Hobby |
Review Type: |
First Look |
Advantages: |
Excellent moulding; crisp surface textures; high level of detail; effective use of multimedia; long-desired subject. |
Disadvantages: |
None noted. |
Conclusion: |
Highly Recommended. |
Reviewed by
James Hatch

Kitty Hawk's 1/32 scale OS2U Kingfisher
will be available online from Squadron.com
Hawker had a reputation for producing superbly stable and rugged gun platforms, such as the Hurricane and Typhoon fighter types. Unfortunately, for the Typhoon, the thick wing section prevented it from operating in format other than for low-level strike and bombing missions, where it was ideally suited, and certainly well-placed for the phase of the war in which it operated.
The Typhoon wasn’t without other problems such as a fragile tail unit for which the rear fuselage needed metal plates riveted around the circumference, lest the tail depart the aircraft during violent manoeuvre. Whilst the poor visibility car-door canopy was replaced with a bubble hood, the pilot had to continually wear an oxygen mask due to a carbon monoxide engine leak that was never fixed.
Whilst the Typhoon was being introduced into active service, developments were being made to reduce the drag of the thick wing. The design was seen to be so radical in relation to the original airframe that the fighter was given a new name. This was the Tempest, which while outwardly had a very similar appearance to the Typhoon, had a whole new, thin, laminar flow wing that was close to elliptical in planform.

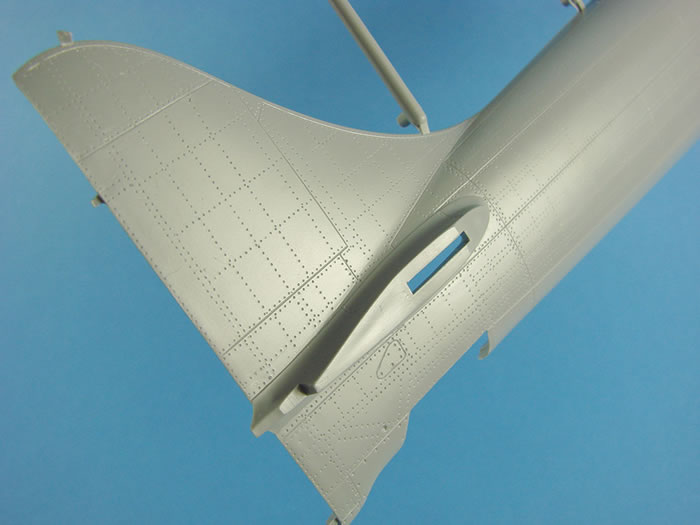
Other changes to standard production aircraft were the enlarged fin and strengthened fuselage, flush riveted surface and the shorter barrel Hispano cannon were mounted further into the wing, eliminating the faired barrels that protruded from the leading edge.
Whilst this aircraft was fitted with the Napier Sabre engine that produced an appearance that likened it to the Typhoon, this was about to change. Hawker was already designing a new fighter, the Tornado, that was to utilise the 18 cylinder Bristol Centaurus radial engine. After examining a captured Fw 190, the compact system of installation and exhaust layout was mimicked for the Tornado. However, it was decided to transfer the Centaurus engine installation to the more advanced Tempest airframe, creating what became designated as the Tempest II.
Production switching along with priority being given to Typhoon production, delayed the Tempest II entering service. A decision to tropicalize all Tempest II production for envisaged conflict in the South East Asian theatre, also added to delays.
The war was now coming to an end, and Tempest II orders were now being either cancelled or scaled back. This was the last Hawker aircraft to feature a tubular internal structure, which was synonymous with Hawker machines. There was also an increased length to the Centaurus-powered aircraft, but hardly any penalty in weight due to the absence of the heavy radiator unit that gave the Sabre-engine machines their characteristic lines. Openings on the wing leading edge were introduced. One of these was for a radiator, and the other for the carburettor, thus keeping any drag to a bare minimum. Performance was enhanced in relation to the Napier engine machines, with a faster top speed and higher rate of climb.
With the end of the war, and the scrapped plan to deploy Tempest II machines into the Japanese theatre of operations, many service machines began to operate from Allied bases within the defeated and occupied Germany.
The Tempest went on to serve with several nations after WW2, with one notable Tempest II operator being Pakistan.
Having already reviewed the initial Tempest Mk.V ‘HI-TECH’ kit here, the first thing that I noted was that this Tempest II box seemed heavier than the first release. I know that the kit itself costs around €10 more than the Mk.V, so it seemed pretty obvious that there was going to be more in here. An attractive artwork of a 183Sqn Tempest II above cloud cover, sets off this release, and of course highlighting the Tempest’s credentials as different to those of the low-level Typhoon interceptor. Various CAD images of the resin components are shown along the box edge, as are the FIVE schemes included in this boxing. This fairly large box contains:
-
Nine sprues of medium grey styrene
-
One sprue of clear styrene
-
One fret of photo-etched parts
-
One sheet of acetate film
-
One set of laser-cut fabric seatbelts
-
One sheet of vinyl masks
-
Four sheets of decals
-
20 page colour instruction manual
-
One box of resin parts for the cockpit, gun bay, undercarriage etc.
I’m not going to reinvent the wheel here, so this review is an adapted version of the original article, looking again at the standard components, and of course expanding on the changes within this new Tempest II release.
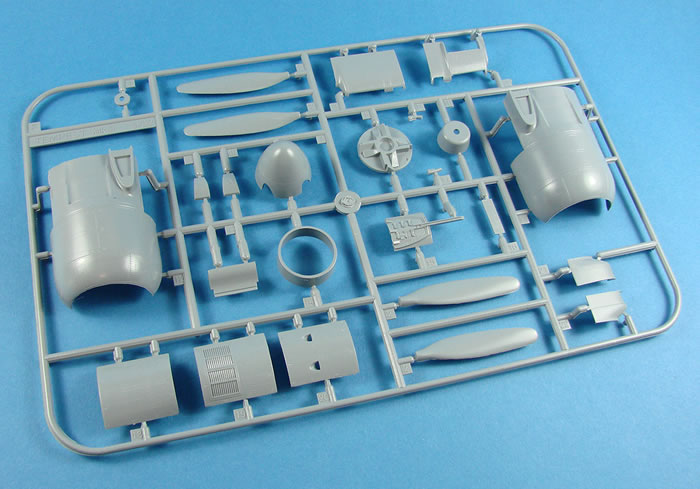
SPRUE A
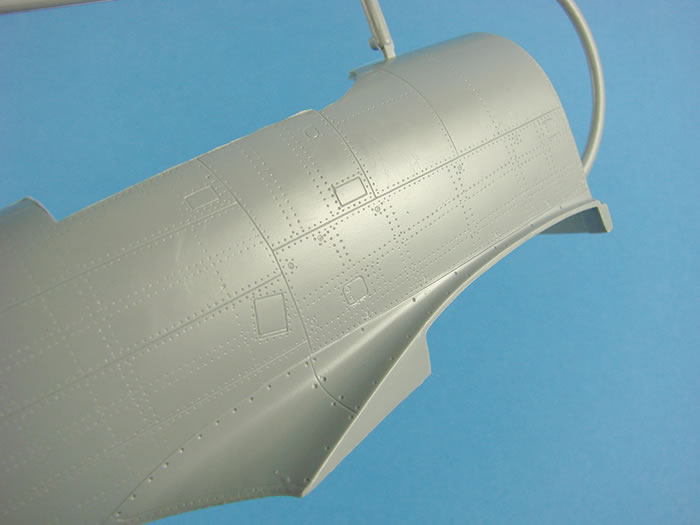
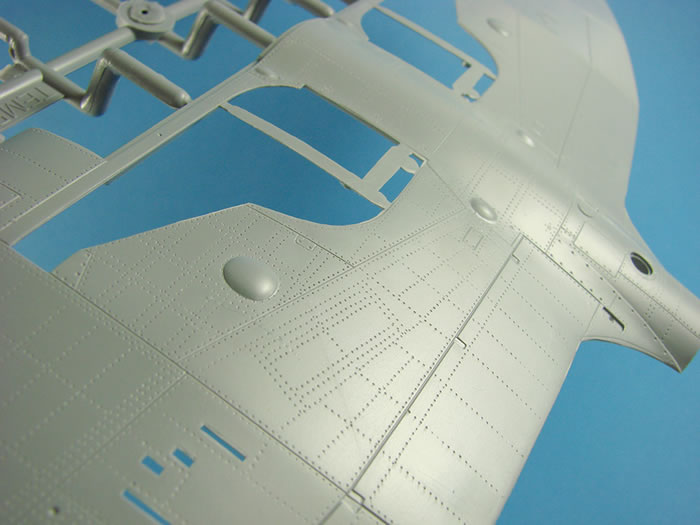
Only two parts here, but pretty key ones; both fuselage halves. As Special Hobby have designed these parts to be used with all versions of the Tempest, the nose is moulded separately. The kit shows just how far this company have come in the last years, with regards to both moulding, tooling and detailing. You would be hard pressed to differentiate the Tempest from a kit made by a whole multitude of more mainstream manufacturers out there, such as Hasegawa, Revell, Airfix etc. Surface detailing is excellent, with restrained, even rows of rivets, and lots of extremely fine panel lining and port/panel access plates. Edges are sharp where the wing will meet the fuselage etc. and the parts have a nicely polished finish to them that wouldn’t look out of place on a Tamiya release. The rudder is separately moulded, and where the nose cowl parts will fit, the forward fuselage has a moulded bulkhead that will provide rigidity to the proceedings.
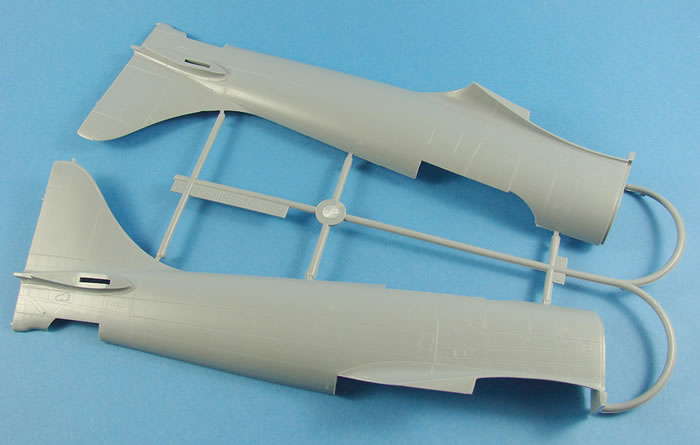
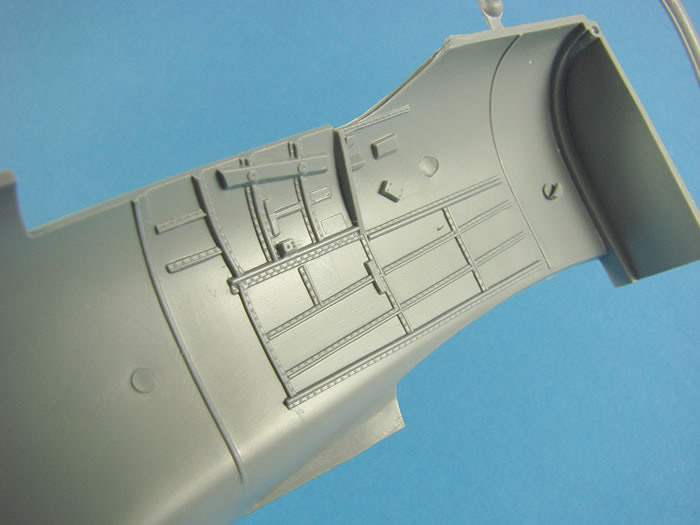
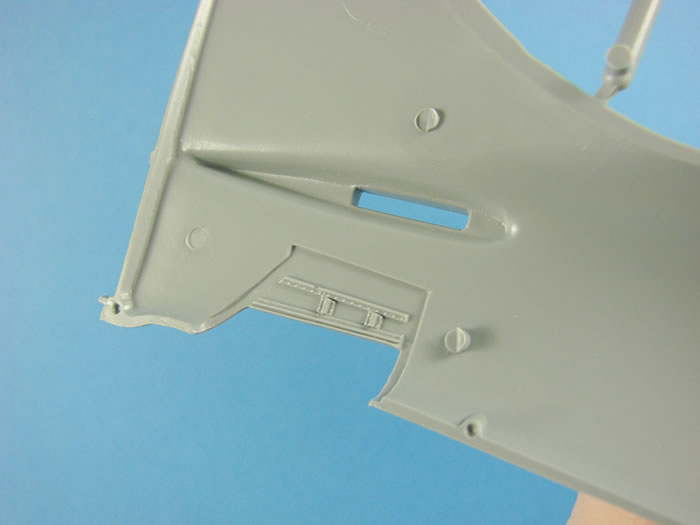
Internally, those high standards of detail are also evident, with stringer and former representation being both refined and sharp, and with associated rivet detail included. Only one ejector pin mark exists in this area, and this is on the area adjacent to the instrument panel. As no other detail is in the vicinity, removing this will be easy. Some detail is also included around the area of the retractable tail wheel, using the same level of refinement seen in the cockpit area. Note also that this model has locating pins too, unlike some of the other less mainstream model kits. I have to say here too that Special Hobby is NOT a Limited-Run company, but fully mainstream. I hear so many modellers say otherwise. I wish they would wise-up a little.
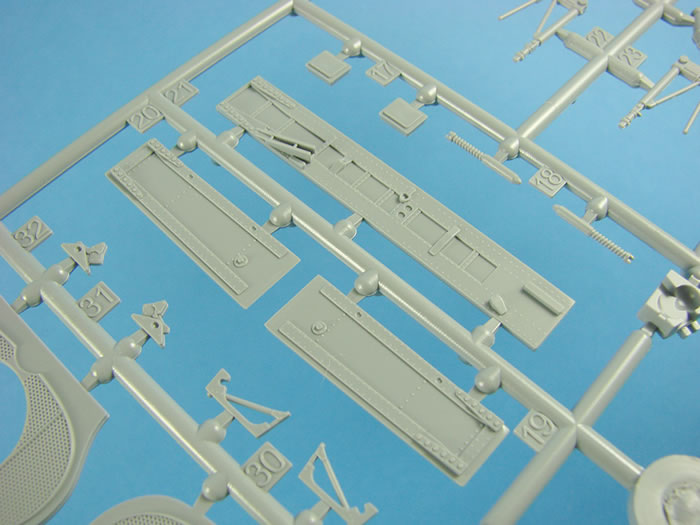
SPRUE B
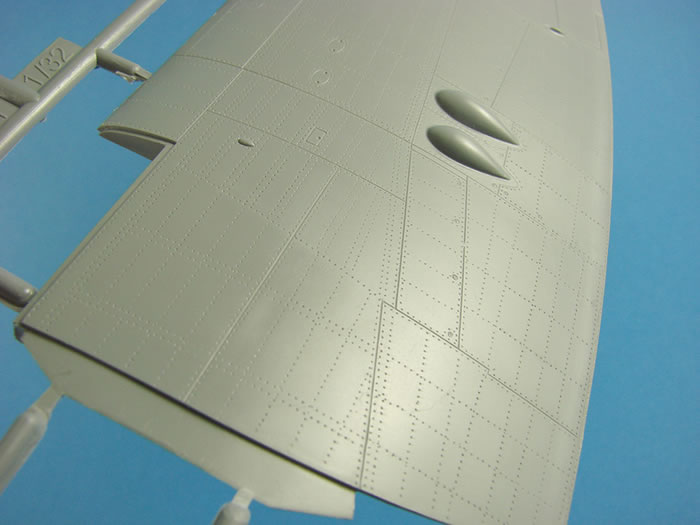
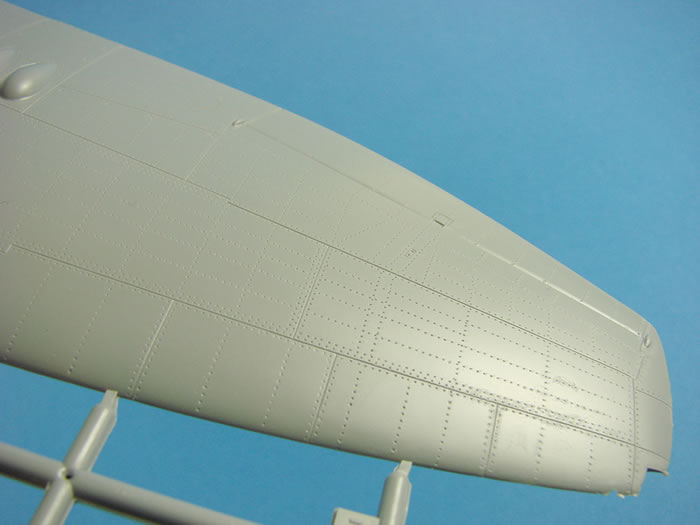
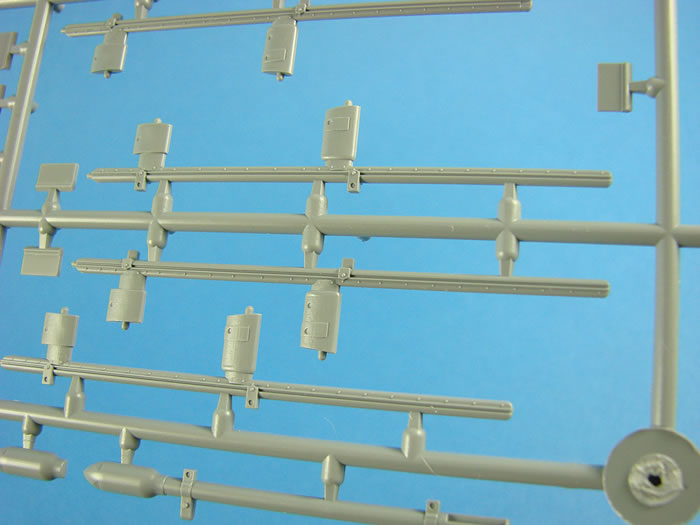
Pretty obvious what we have here! These wing parts are supplied as a single span lower part, and upper port and starboard panels. Note that the inboard leading edge is a separate part, accommodating the different versions of the Tempest II, without the need for surgery or extra tooling. I have to say that each time I take a look at this kit, I like it more and more. Surface detail is commensurate with that of the fuselage, incorporating full rivet detail (plus double rows, where applicable), finely engraved panel lines, fastener detail, access panels and nicely shaped cannon blisters. All control surfaces are integrally moulded, so can’t be posed without taking a saw to the model. Ailerons are moulded along with very fine actuator arms that really do look very good. Cannon shell ejection chutes are also finely moulded.
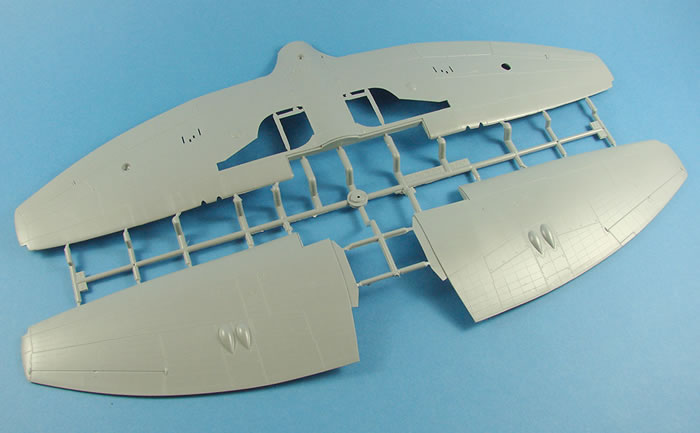
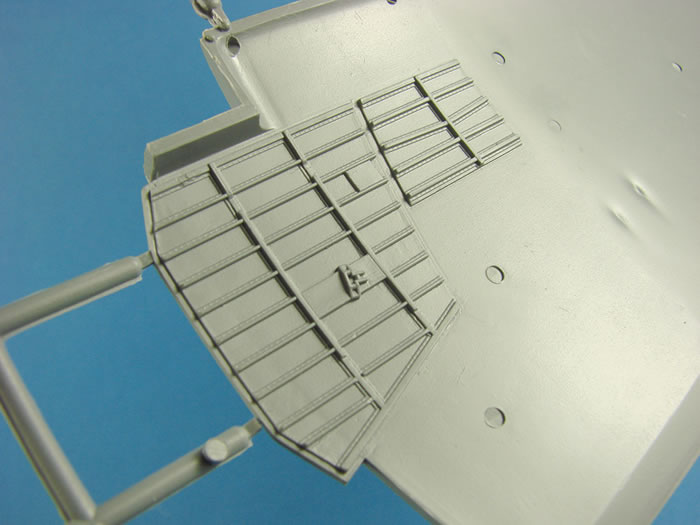
One thing I like here are the tabs that protrude from the upper panels, and provide a support for the wing to fuselage connection. There is actually another purpose for those tabs. If you flip the wing parts over, you will see they form the roof of the main gear wells. These areas contain rib and stringer detail, along with rivets, and this will be detailed further with various rods, pistons etc. All of this will be framed by the gear bay walls that are supplied as separate parts that will be fitted into the recessed area in the upper wing panel. Barrel tips are separate parts too, and the wing has a small bulkhead within that stops them from being inserted too far within.
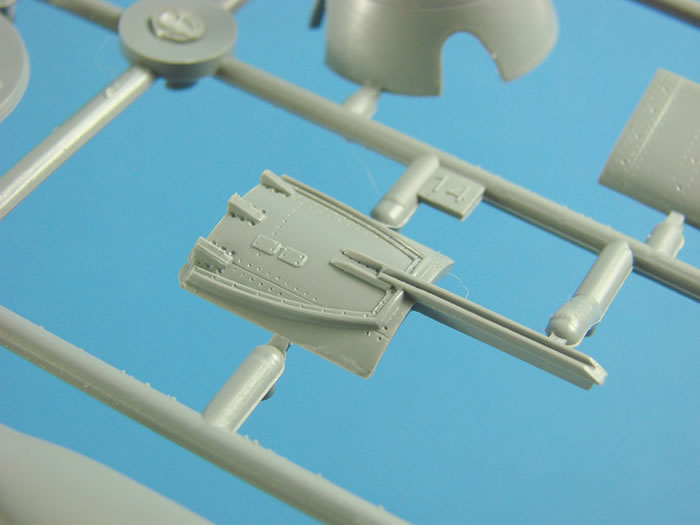
This release is supplied with a weapons bay for the port wing, and to fit this, you will of course need to cut away the moulded plastic. Fear not though, as replacement resin panels are provided. I’ll look at those soon.
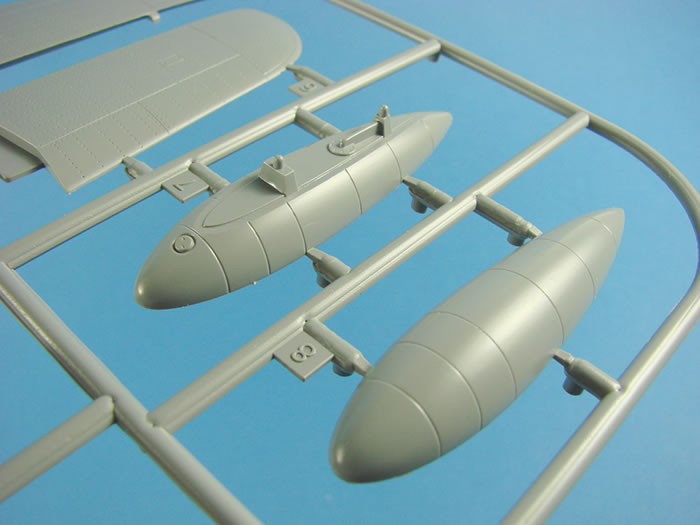
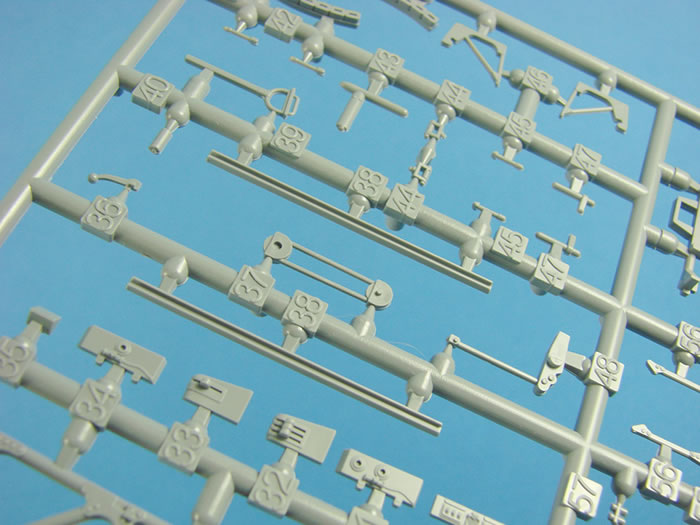
SPRUE C
You will be able to pose the elevators dynamically, as these are moulded separately to the stabilisers. All parts here are the traditional upper and lower halves, and external detail is of the same high standard that we have seen so far, including rivet and fastener detail and trim tab actuators/actuator fairings.
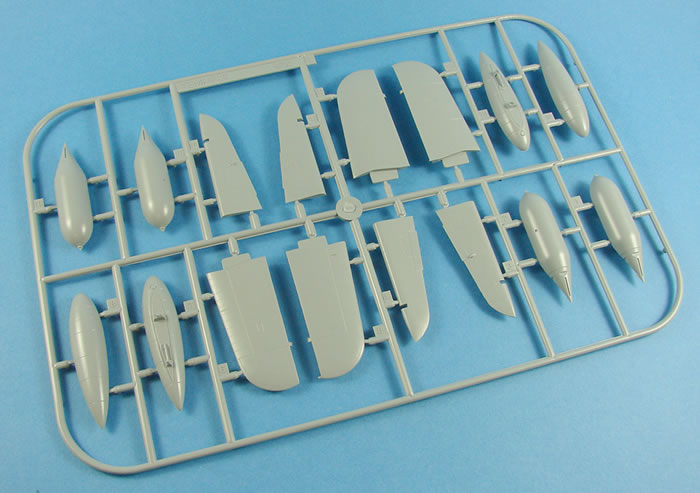
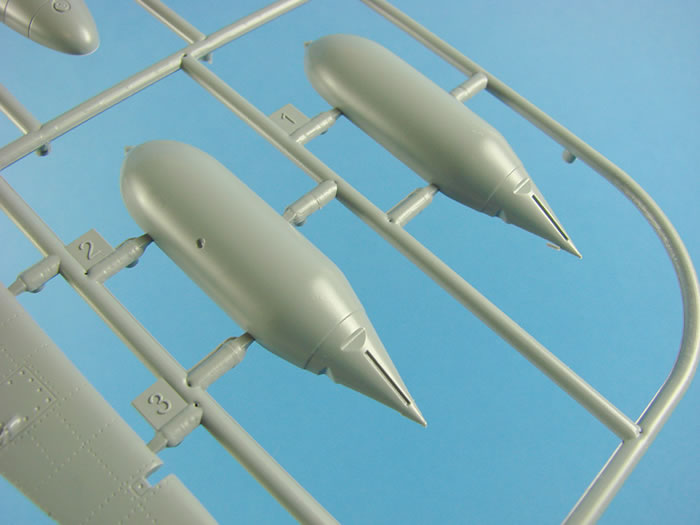
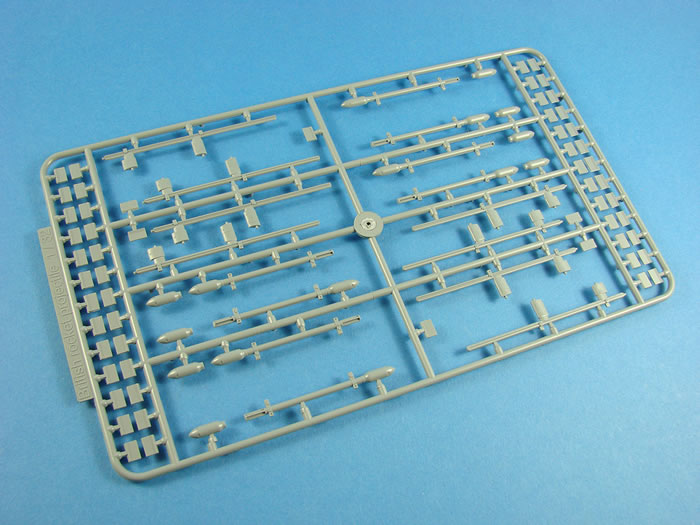
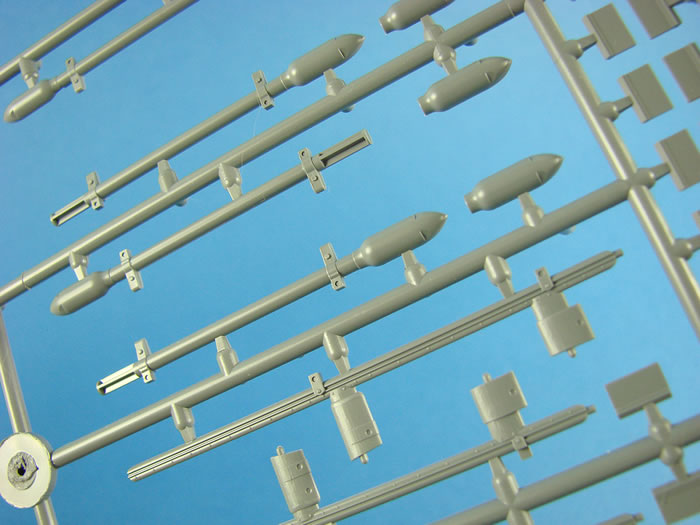
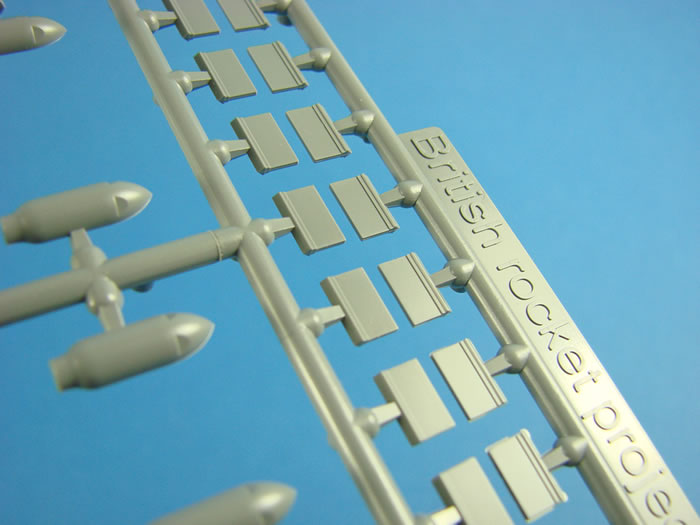
Other parts included here are for external drop-tanks and bomb bodies. Bomb fins are separately moulded. Bombs and tanks are moulded as halves also, and with the latter, you will of course need to reinstate any panel line detail that may be lost from seam eradication. The fuel filler cap is nicely engraved, but I think the detail to the rear of this is supposed to represent a pipe, and is instead moulded as a fillet. If this is the case, cut away and replace with a little length of bent, rigid wire.
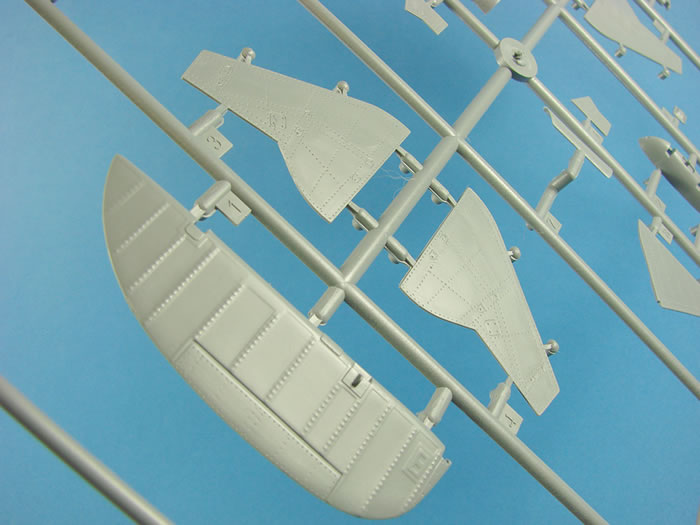
SPRUE D
This sprue looks very Eduard-esque in design, with its large radius corners.
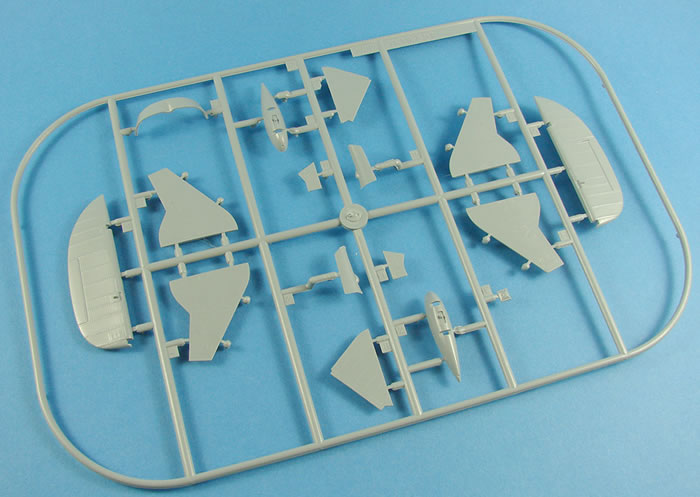
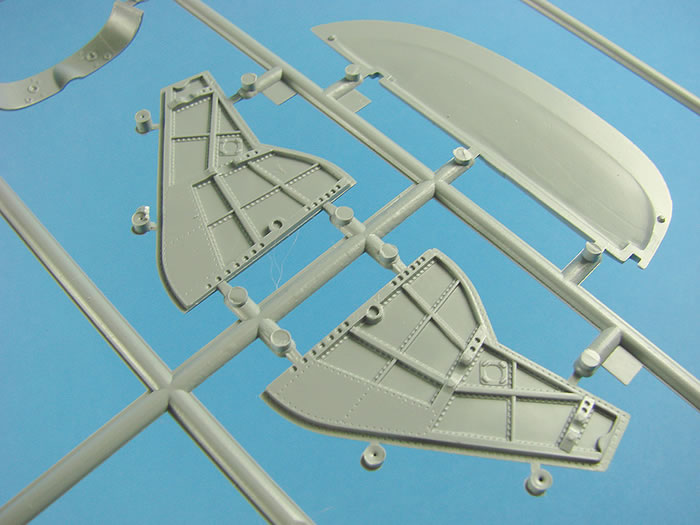
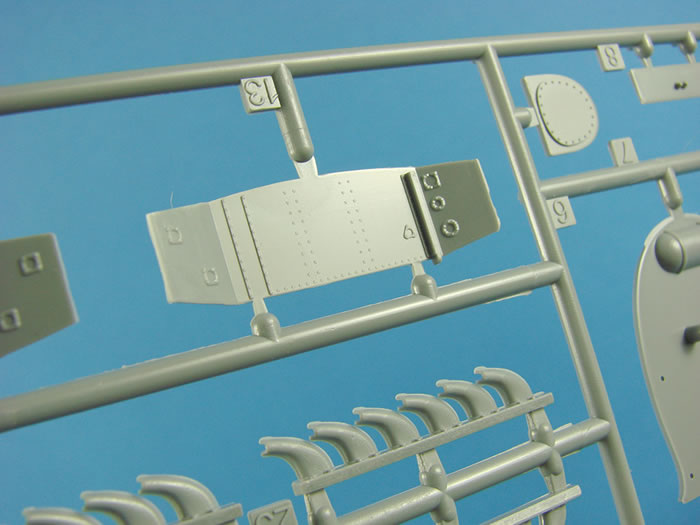
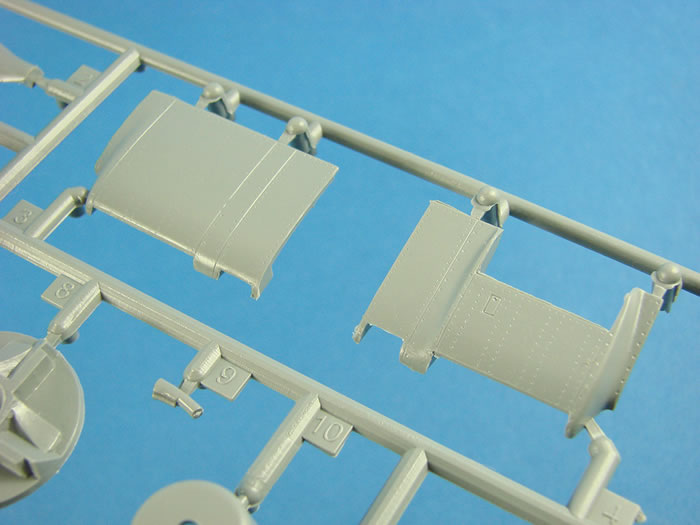
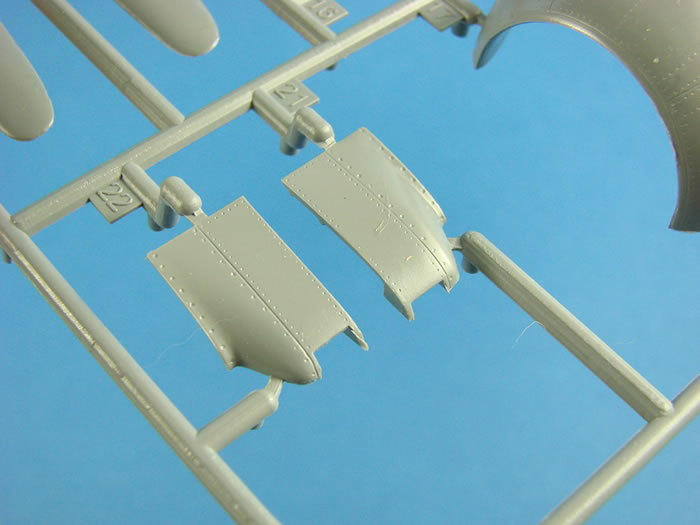
Here we have the fabric covered rudder, complete with its rib tape detail and metal trim tab. This is the only fabric covered area on the Tempest, and I do like the representation here. The multiple undercarriage door parts are just beautiful…both inside and out, with some great detail there, and no pesky ejection pin marks to worry about. Small tags have instead been placed externally to the main doors, and these just require snipping off, followed by a quick swipe of a sanding stick. Et voila!
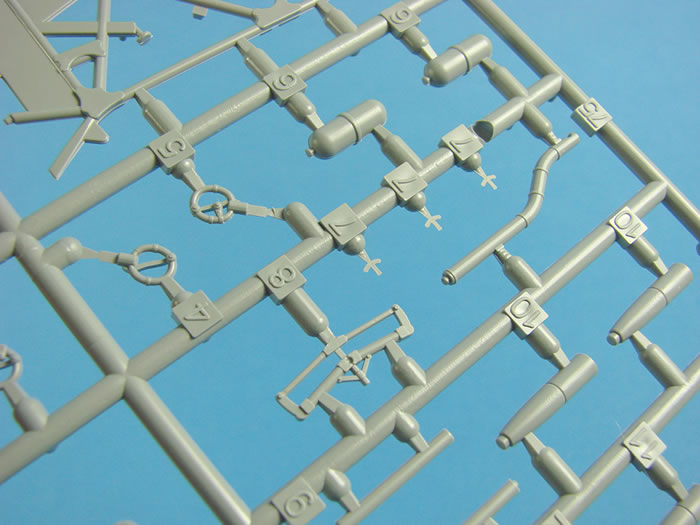
SPRUE F
Notice the jump here, with no ‘E’. The missing sprue pertains to the original Mk.V kit, and this one, Sprue F, is specific to this new release.
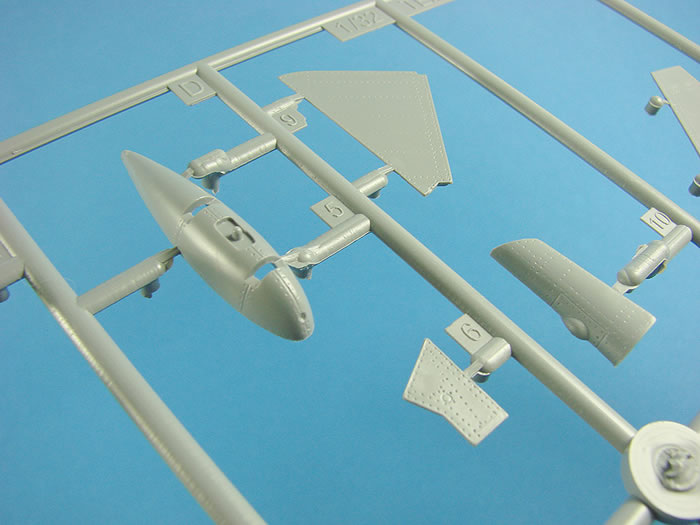
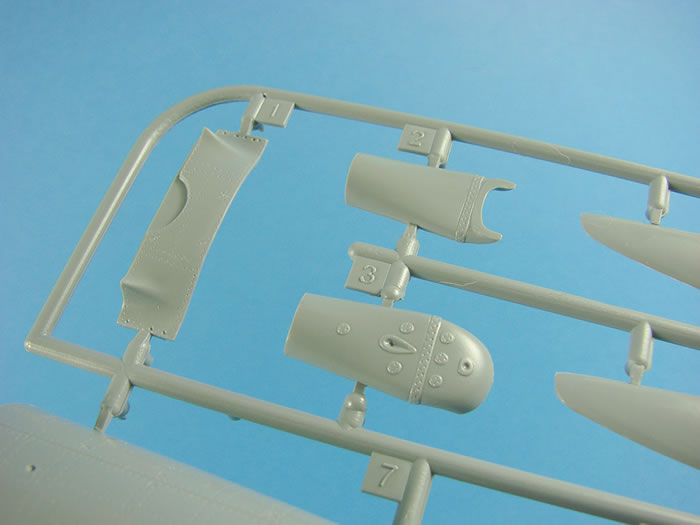
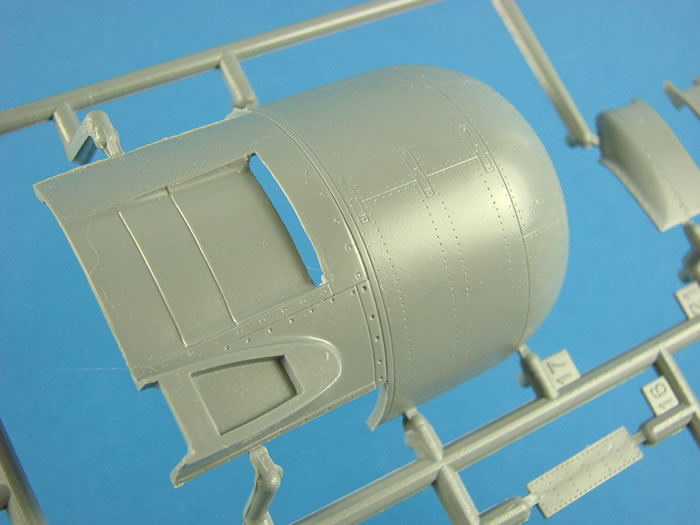
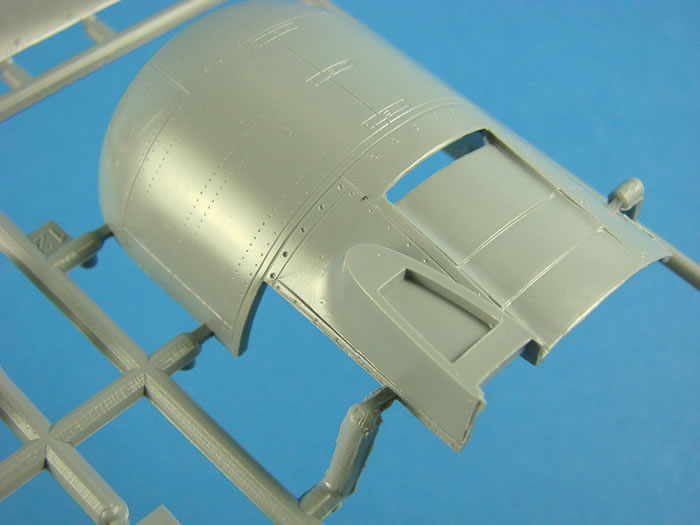
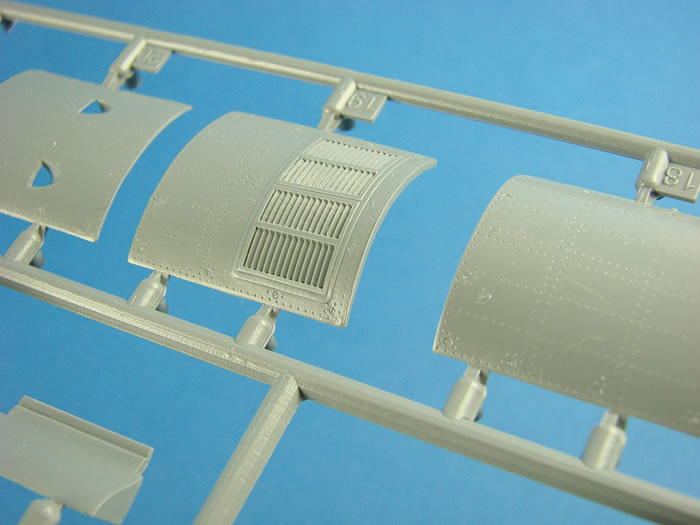
All parts here are slated for use with the Tempest II, and the most obvious parts here are for the new nose/engine cowl for that meaty Bristol Centaurus radial engine. Incorporating the wing leading edge profile, these parts are moulded with the openings for the side exhaust ports, and the upper rear cowl plate is also separate. Two options are included for that plate; one of them having a grille, presumably for something to do with the tropicalized version (air filter?). External surface detail is excellent, with finely engraved panel lines, fasteners and latches. As per the fuselage, subtle rivets make up the rest of the detail. I do think it would’ve been good to have designed the cowl with a single piece forward ring, which eradicates the need to remove the internal seam. However, the parts look great, so I’m going to assume this won’t be a task that will bother me too much. The radiator and carburettor intake parts are also to be found here, along with the associated channel and flap parts.
A whole new four-blade Rotol prop and spinner are included on this sprue, with the spinner back-plate design making it easy to ensure all prop blades are set at the same angle. Lastly, there is an alternative rear turtle deck part that will be used for 5 out of the 4 schemes. This part has provision for storing compressed gas (oxygen?) bottles.
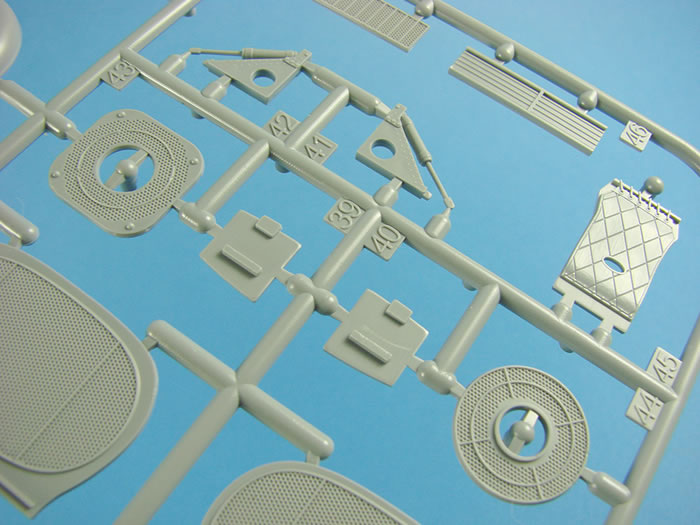
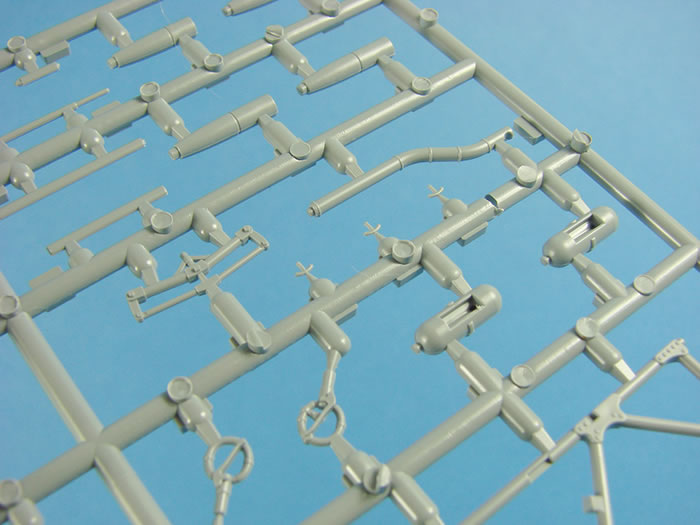
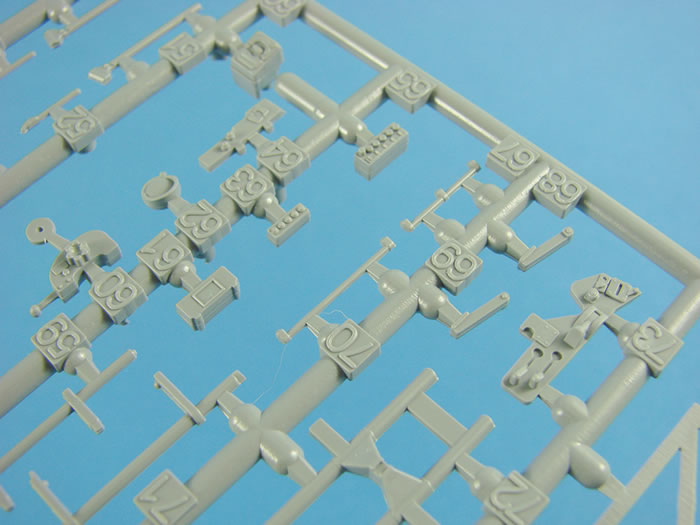
SPRUE H
There are a significant number of parts here that won’t be used, pertaining to the various radiator parts for the Mk.V kit.
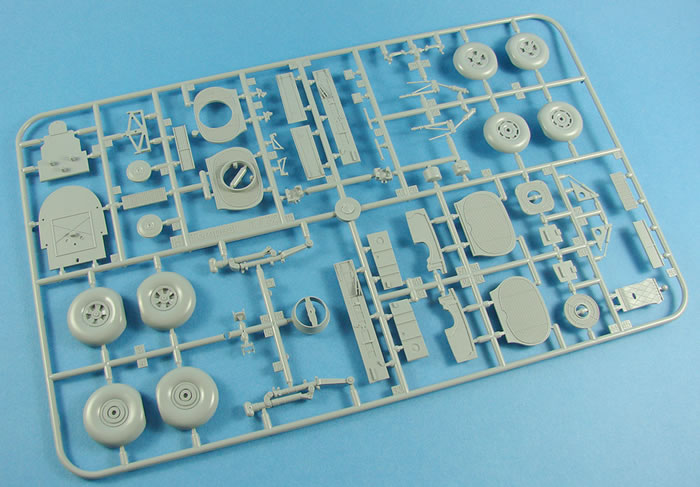
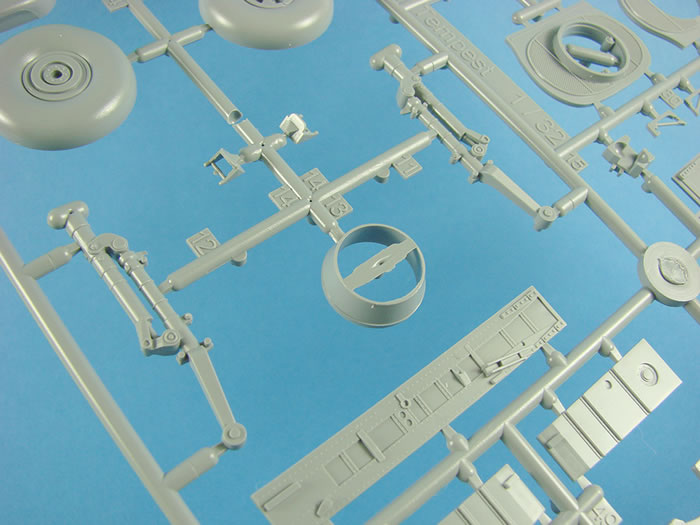
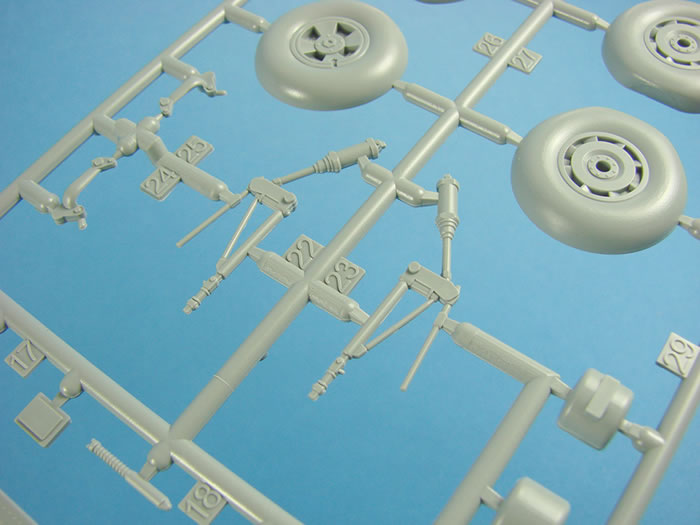
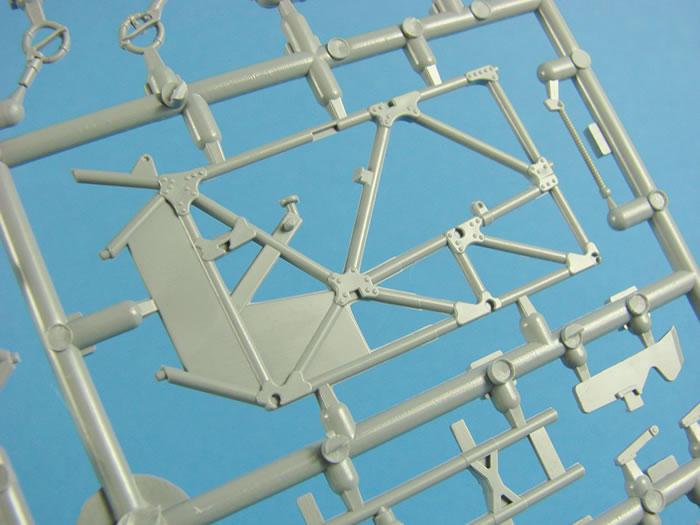
Also, note that none of the wheel parts are slated for use, as there are resin alternatives included in this Hi-Tech boxing. Other parts which will be used are the main gear struts and actuators, and the various wheel well wall parts. It is noted that the finish on this sprue seems to be of a slightly better quality than the main component sprues, with a higher level of finish/polish. That’s no detriment to the rest of the it whatsoever, but simply a casual observation. Looking at how refined much of the detail is here, I’m going to stick my neck out and say it’s Tamiya-esque. Simply gorgeous details that you’ll bury away in those gear bays. Even the sprung-loaded rods look very authentic and filigree. I am particularly impressed with the gear struts and the detail definition here. Please be careful with the removal of parts from this sprue, as so many of the landing gear parts have some very fine detail protrusions. If in doubt, use a razor saw. The cockpit seat is cancelled on the parts inventory, again because of the resin alternative that this kit provides. Other parts here include the bulkheads, cockpit frame, main strut knuckle plates and wing intake radiator grille.
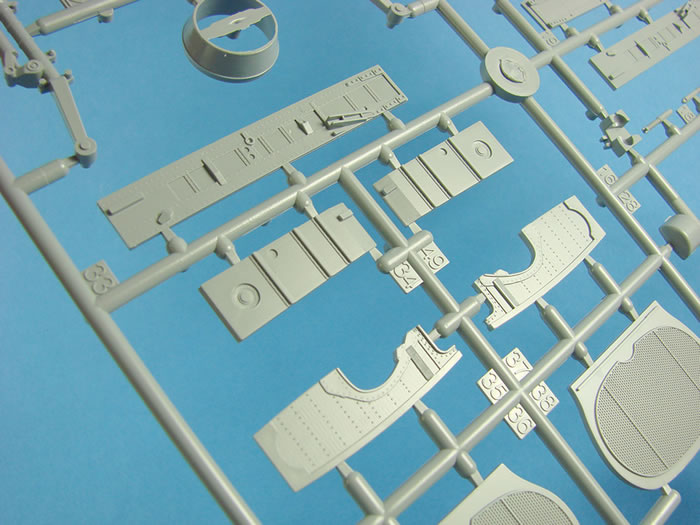
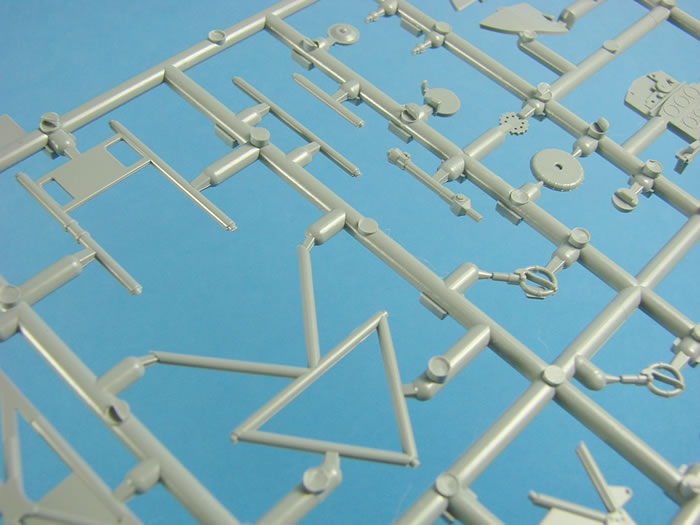
SPRUE I
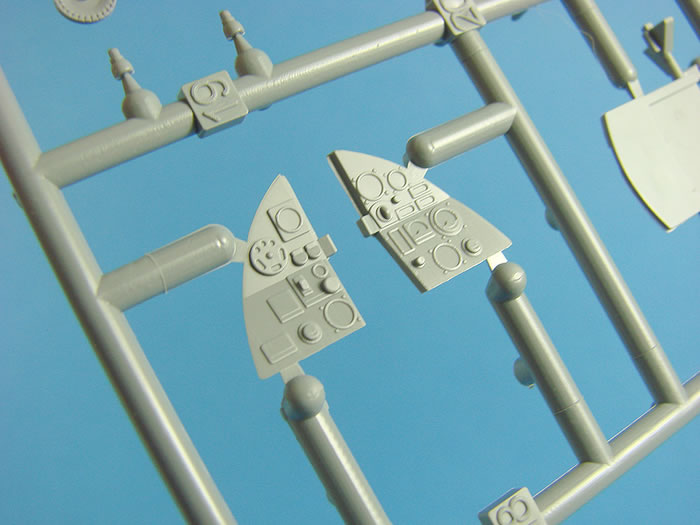
A small sprue, but one with perhaps more parts on it than any other. One area that features heavily here is the cockpit. For me, a nicely detailed cockpit is the very heart of a satisfying project, and this cockpit it certainly better than most I’ve seen in quite a long time. Two detailed tubular side frames are adorned with various fixing plates and panels and brackets, and there are numerous console parts, throttle, spacers, torsion rods and linkages etc. The main instrument panel is moulded in three parts; central panel and two angled panels that fit to its sides. Be careful here as there are two different sets of side panels. The instructions clearly show what you should not use; in this case Part #50 (x2).
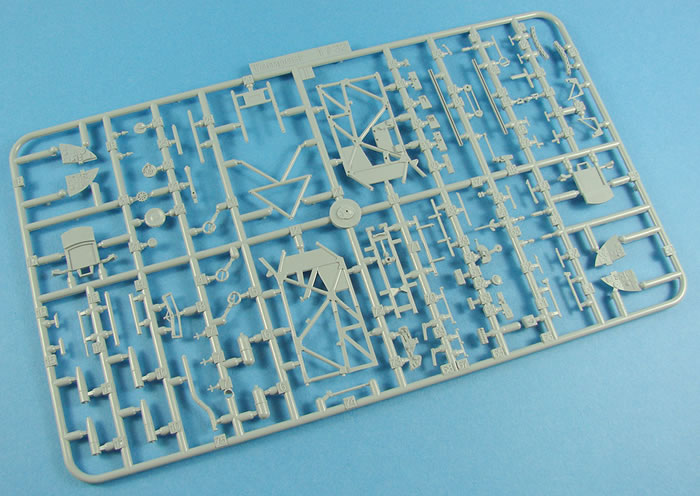
Here you will also find the canopy rails and three different types of joystick grip, although none of these are shown as for use, with resin parts favouring these all along the way. Presumably these, like the seat and other parts, will be used in any future, standard boxing that isn’t classed as ‘HI-TECH’. The plastic parts are actually still very nice. This sprue includes the cannon fairings for the Mk.V kit. DO NOT USE these on this model, as this version had the shorter Hispano barrels.
Again, watch out for the numerous parts that won’t be used here, and there are a fair few of them.
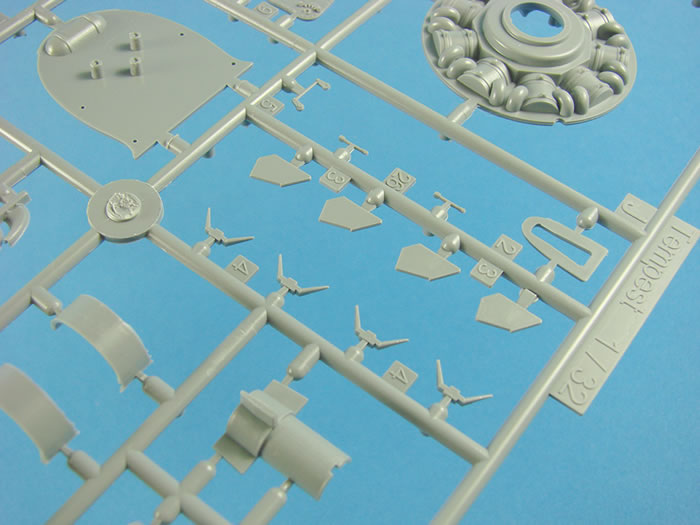
SPRUE J
Another bulkhead is supplied here, for the rear of the cockpit, and the exhausts for the previous release are here. Unlike that release, I’m pleased to see that Special hobby has included the exhausts in this release, as resin parts! It was a little disappointing that Special Hobby didn’t include the resin ones in the original Hi-Tech Mk.V kit, so this is a welcome move.
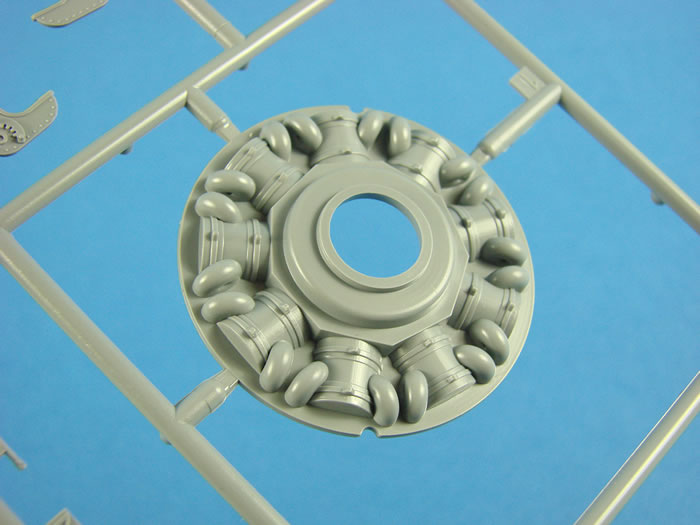
More parts on this sprue need to be ignored, such as some intake parts for the previous kit, and a number that have been superseded by the resin components supplied here. Of course, the main player here is the radial engine facia that we had to ignore on the previous release. I do think this looks rather simplified though, with a lack of cooling fins on the cylinders, and a number of other absent details. This probably won’t matter too much though, as the wide diameter of the spinner will render much of this to be obscured anyway. Maybe someone will eventually sell an aftermarket part for those of us who like details that can barely be seen J
SPRUE K
This is the clear sprue that of course contains the windscreen and the bubble hood.
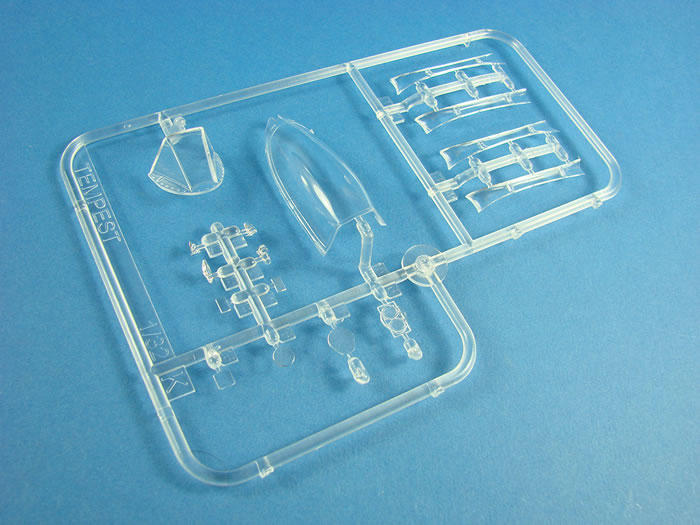
A number of other parts here are drop tank fairings that I think were made from clear acetate or similar, although I have seen a photo of a Pakistan machine where these were painted in grey. It is nice to see these though, and they’ll certainly show off that wire modification I mentioned earlier, for the drop tank itself. Finally, note the various wingtip, fuselage, tail and wing-underside lenses for the various lights that were fitted to the Tempest. Clarity is very good, and unlike my previous sample, there is no scuffing to be found here. I’m very happy with these parts, supplied in a separate sleeve.
Plastic Summary
This kit is almost flash and seam free, with nice tight sprue gate points that are generally well placed so as not to cause problems. I can’t see any sink marks either, except for a couple on the reverse of a part, so they don’t count. Ejector pin marks; there’s only two I can see that need removal, and that will take just a few minutes. Plastic quality is excellent, and the quality of the mouldings are very high quality.
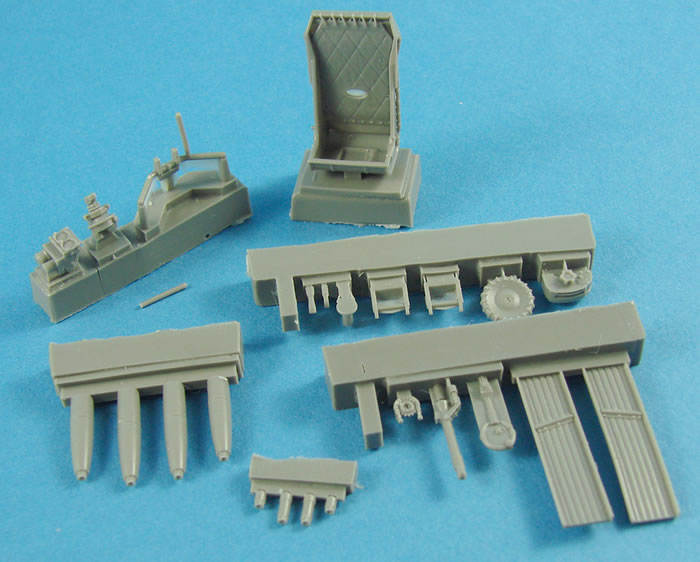
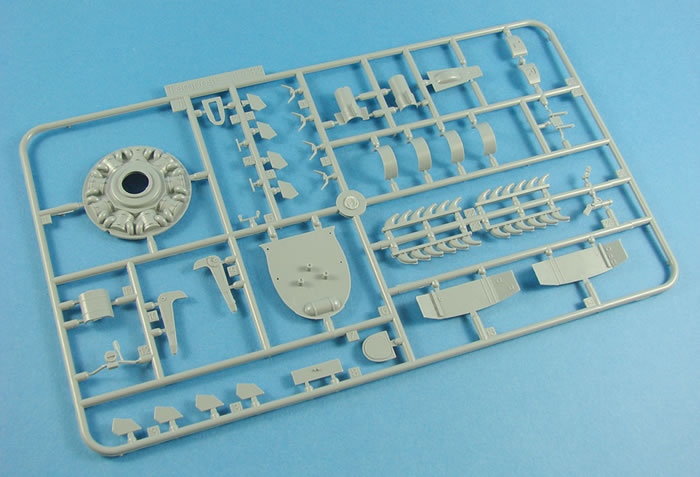
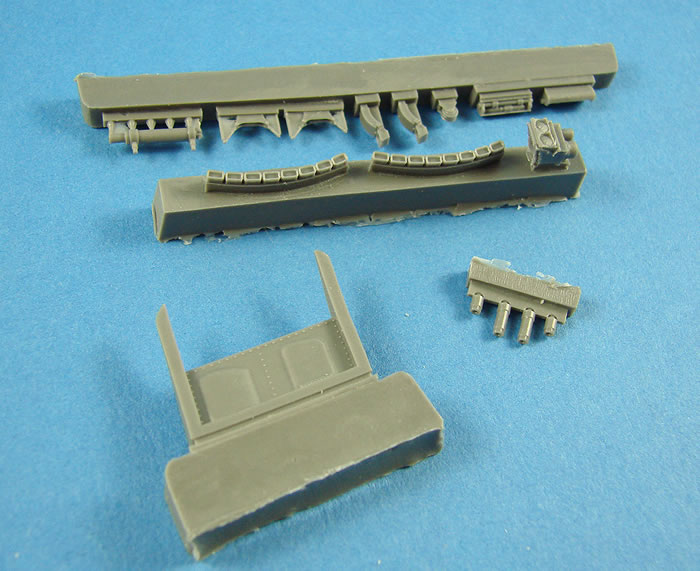
Resin Parts
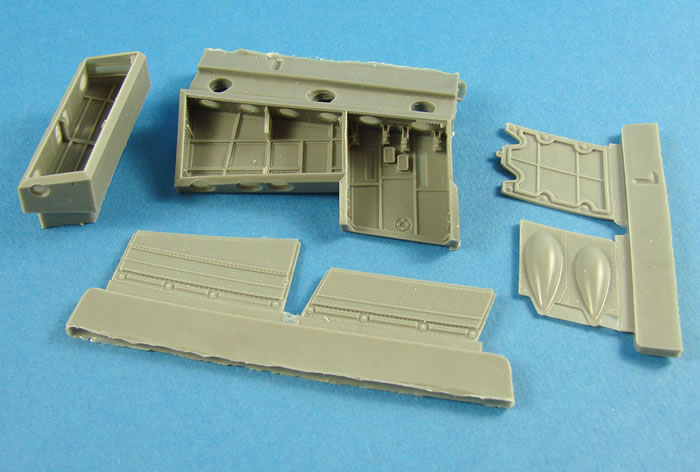
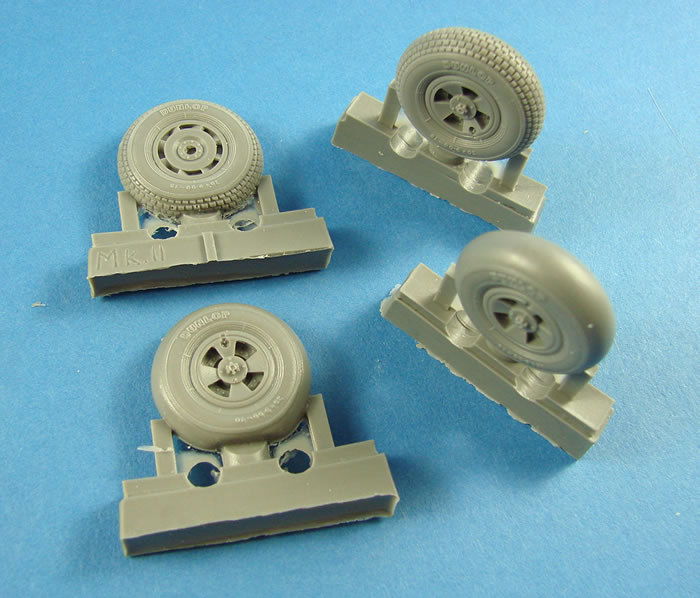
One box of resin parts is included here, and the parts are cast in dark grey resin. These include:
-
Two styles of weighted main gear wheels (treaded and un-treaded)
-
Anti-shimmy tail wheel
-
Cockpit components; tread boards, pedals, throttle quadrant/levers, control stick/grip, seat, trim wheel, internal windscreen frame)
-
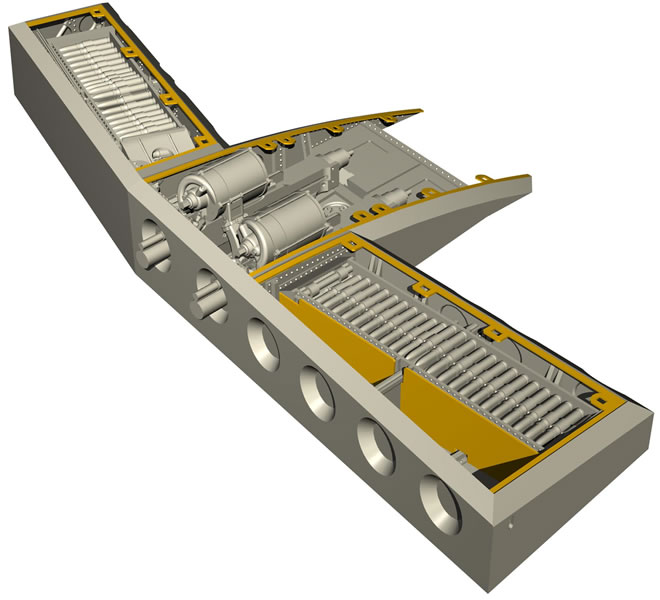
Entire port-side weapons bay, including ammunition, cannon and bay doors
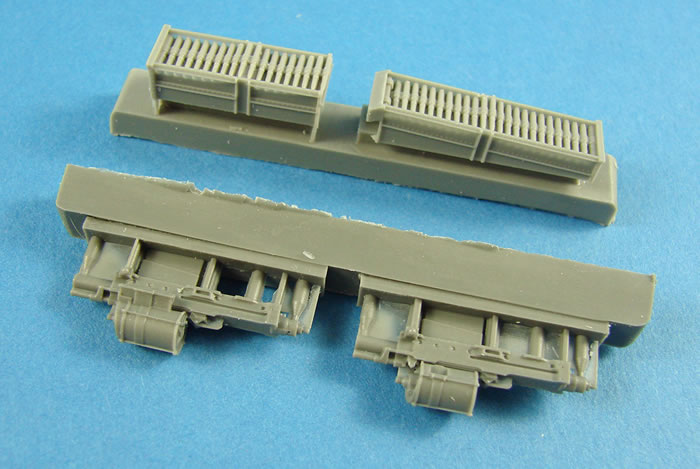
These parts are also very high standard, with fine detailing. A few parts, such as the foot boards, will need dipping into hot water to remove warping. Casting blocks will generally be easy to remove too, and there shouldn’t be any nasty surprises here. Note that the weapons bay is PORT only.
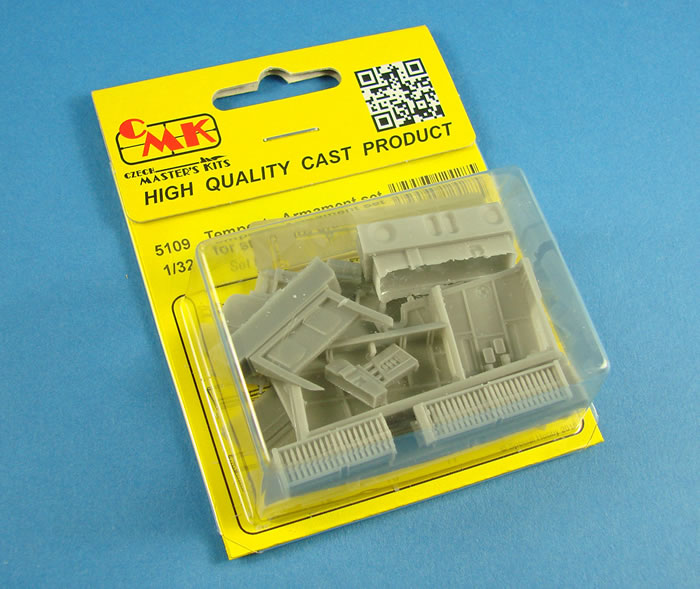
If you wish to build the model with a starboard side open, then you will need to purchase the extra CMK resin set #5109, also from Special Hobby. I think this is a good compromise as I imagine a number of modellers will be happy displaying a single bay, with the kit reflecting that cost.
The extra CMK set costs €20,70, and is available HERE.
Photo Etch
A single fret is included here, containing parts for the fabric seat belts, control grip trigger, whip aerial and mount plate etc.
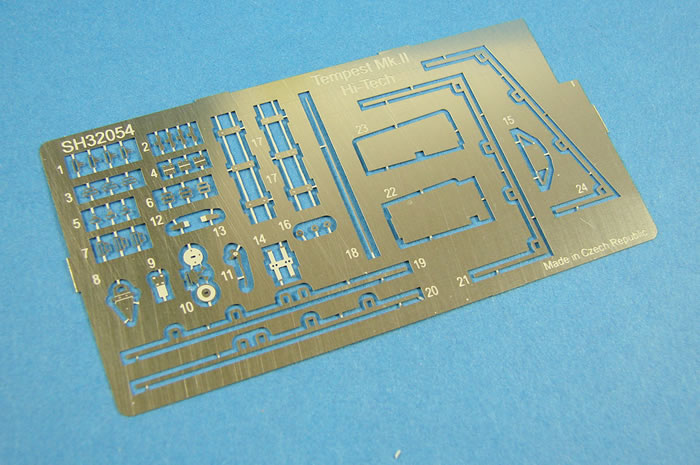
This small stainless fret also contains a small notch that you need to align on the ailerons, and use as a scribing template for the small trim tabs. Extra parts are included here for the weapons bay modification.
Seatbelts
These are produced by HGW, from their microfiber material, and should need no introduction.
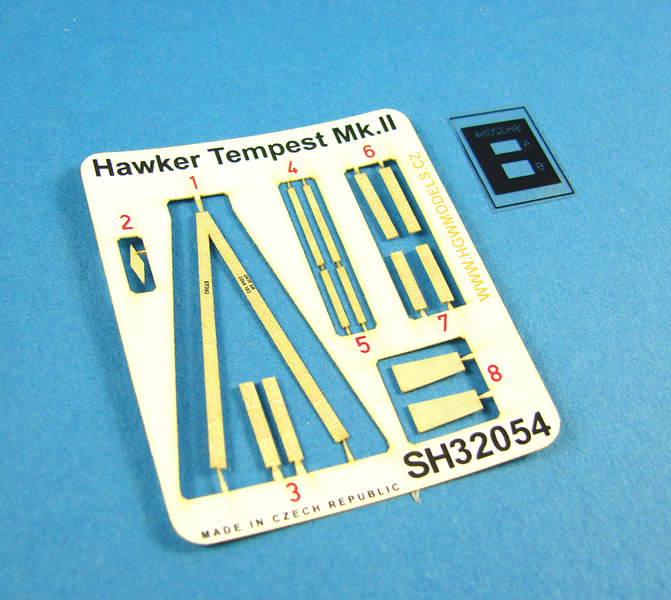
Being laser-cut and pre-printed, all you need to do is to snip and assemble. Just remember to peel the backing paper from them first!
Masks
A small sheet of vinyl masks is included, for the canopy, lights and wheel hubs.
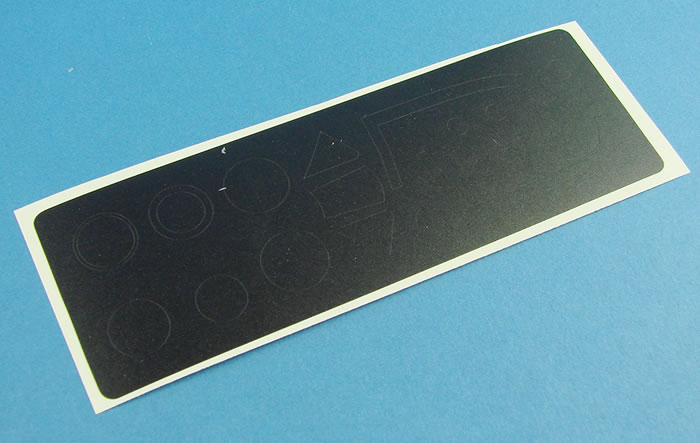
These are sharply cut and exhibit no shrinkage.
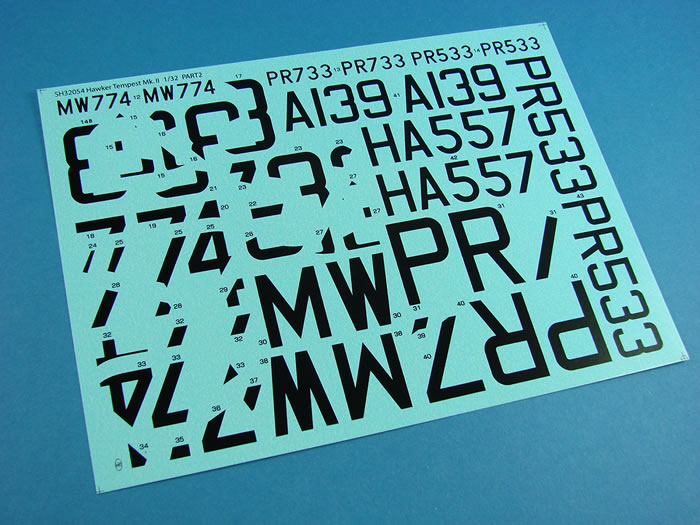
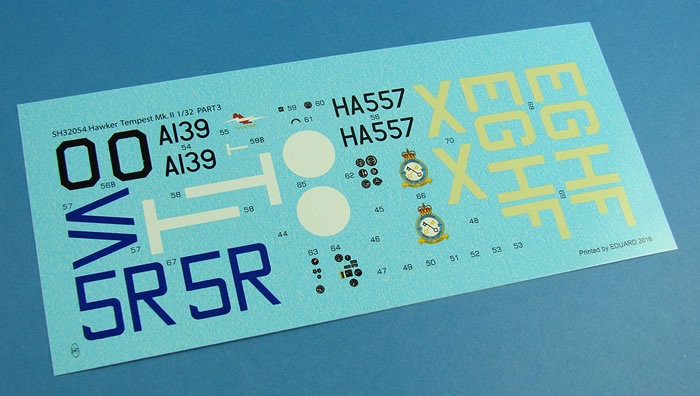
Decals
FOUR sheets are supplied here, printed by Eduard.
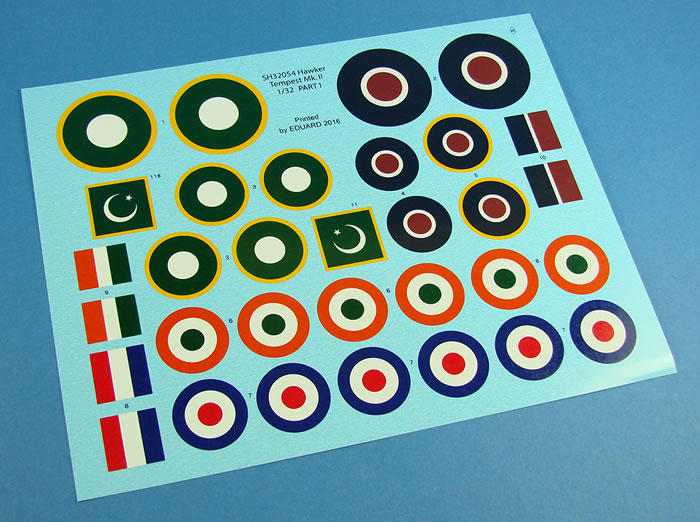
The largest contains roundels, other national emblems, and fin flashes. A slightly smaller sheet holds he various serials and codes, with black being the single ink colour of this sheet.
A third sheet contains more fuselage serials, codes emblems etc. along with the instrument panel decals. The latter is printed in banks of instruments, and I would be tempted to punch these out to remove their carrier film. Their definition is excellent and they can certainly be used without having to resort to an aftermarket product.
The last sheet is mainly stencils.

The lack of rivet banding decals for the drop tank acetate covers does indicate that they should indeed be grey despite the instructions showing how they should be fitted! Printing is excellent throughout, with minimal carrier film, solid colour and perfect register. The schemes offered are:
-
MW774, HF-X, No.183 Sqn. RAF, Chilbolton, August 1945
-
PR533m 5R-V, No.33 Sqn, RAF, Kuala Lumpur, Malaya, 1949
-
PR733, EG-X, flown by S/L R.E. Mooney, CO of No. 16 Sqn. RAF, BAFO, Fassberg, West Germany
-
A139, ‘T’ (ex PR809), No.14 Sqn. Royal Pakistan Air Force, 1948
-
HA557, ‘0’ (ex MW704), Royal Indian Air Force, late 1950s.
Instructions
This is printed in a glossy A-4 format, similar to that of Eduard, with a profile on the front page, and a history of the type given in both English and Czech. There are then over two pages dedicated to a parts map, which is useful for knowing the parts not to use, and then we are into the construction. A series of excellent line drawings are annotated with splashes of colour to signify paint and other nomenclature, such as drilling and mask use etc.
Illustrations are very clear, and should present no problems. Colour call-outs are supplied throughout construction and refer to both Gunze and Alclad II paints, and the last pages of the manual are given over to the 5 schemes, with each being shown in all 4 planforms.
It has to be said that I love Hawker designs, but for me, the ultimate Hawker piston aircraft has to be the Tempest II; My favourite incarnation of the Typhoon/Tempest lineage.
Detail is excellent straight from box, but the resin and PE parts elevate this model tremendously. Try to get this version, if you can, before it sells out, as the masks, seatbelts and other accessories make this kit an attractive purchase.
Whereas some modellers criticised the nose shape of the Mk.V (even though I still can’t see where it’s wrong!), the simpler, cleaner lines of this radial-engine machine looks correct in every way to my eye, and along with the cleaner Hispano installation and the semi-elliptical wing with the leading edge intakes, this will sure build up into an attractive display piece.
For me, it has to be the Pakistani machine, and with both gun bays open. Watch this space!
My sincere thanks to Special Hobby for the review samples seen here. To purchase directly, click the links in the article.
Tempest II Mask Sets
If using masks is more to your liking, instead of decals, then there is a solution for you, specifically for the schemes within this kit. THREE individual sets are available for this release, created by MH Models (www.mhmodels.cz).
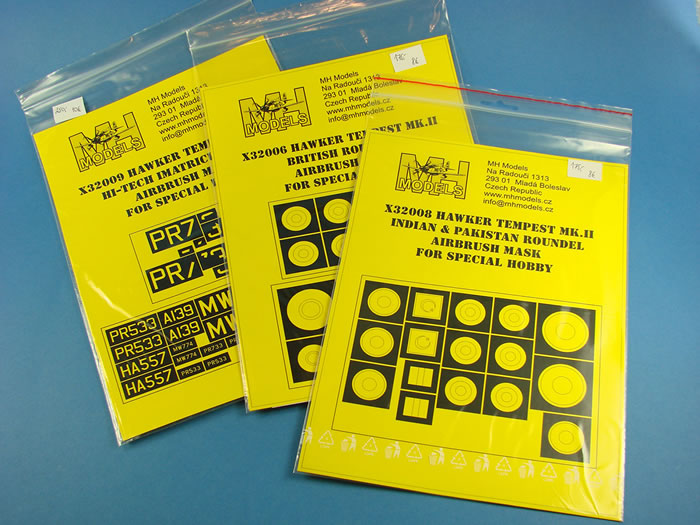
These are finely cut from high quality vinyl that exhibit no post-cutting shrinkage.
-
Hawker Tempest Mk.II British roundel airbrush mask for Special Hobby
-
Hawker Tempest Mk.II Indian & Pakistan roundel airbrush mask for Special Hobby
-
Hawker Tempest Mk.II Hi-Tech imatriculation airbrush mask for Special Hobby
My sincere thanks to Special Hobby for the review sample
Review Text Copyright © 2017 by James Hatch
Page Created 6 January, 2017
Last updated
6 January, 2017
Back to HyperScale Main Page
Back to Reviews Page

|
 Home
| What's New |
Features |
Gallery |
Reviews |
Reference |
Forum |
Home
| What's New |
Features |
Gallery |
Reviews |
Reference |
Forum |