Roden's 1/48 scale
De Havilland DH.4A
by John Cate

Hobby Boss' 1/72 P-61A Black Widow is available online from Squadron.com
Summary
Description: Roden De Havilland DH.4A Passenger Transport
Kit No.: 431
Scale: 1/48
Review Type: Build
Author: John Cate
Introduction
August 25, 1919:
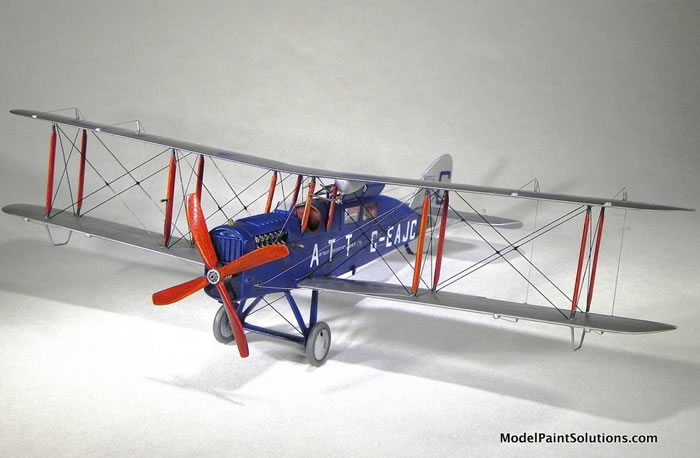
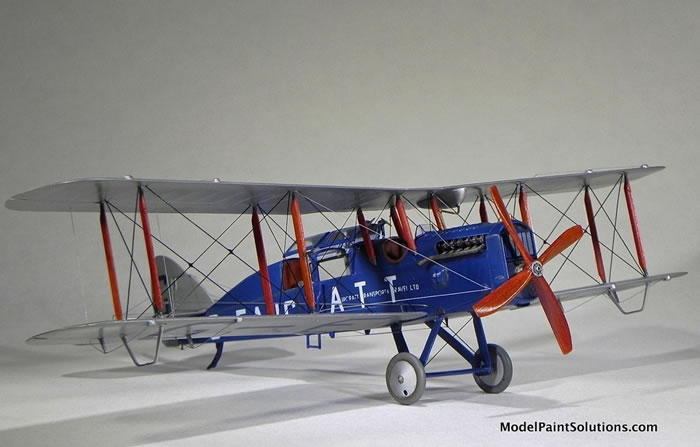
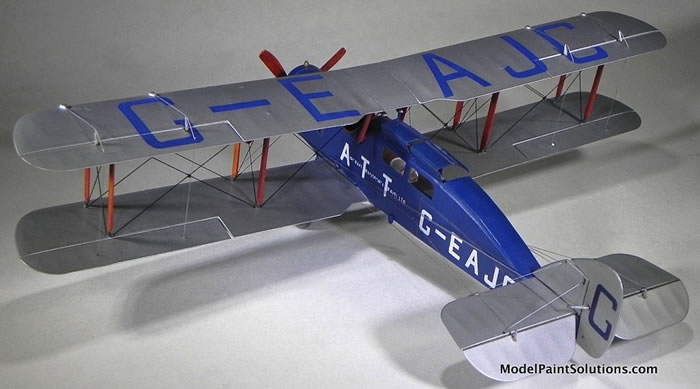
The world's first scheduled international passenger air service flight takes place using a De Havilland DH.4A (U.K. civil codes G-EAJC) of Air Transport and Travel Ltd.
G-EAJC was converted into a passenger transport from a DH-4 bomber on the Airco production line and then transferred to Air Transport and Travel on August 19, 1919.
Lt. E. H. "Bill" Lawford piloted G-EAJC from Hounslow Heath, Middlesex (now in London) to Paris carrying one passenger, a consignment of leather, several brace of grouse, and some jars of Devonshire cream.
The Kit
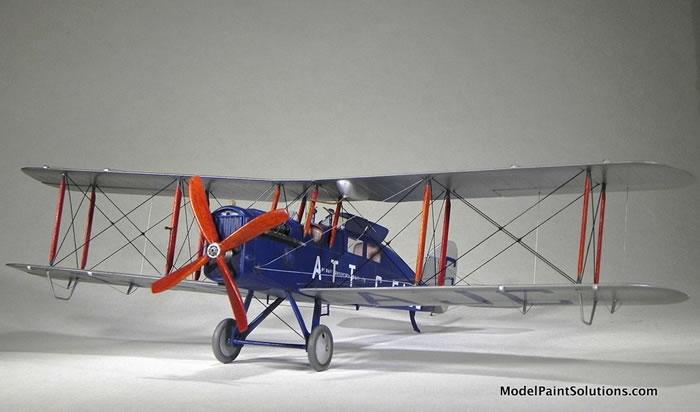
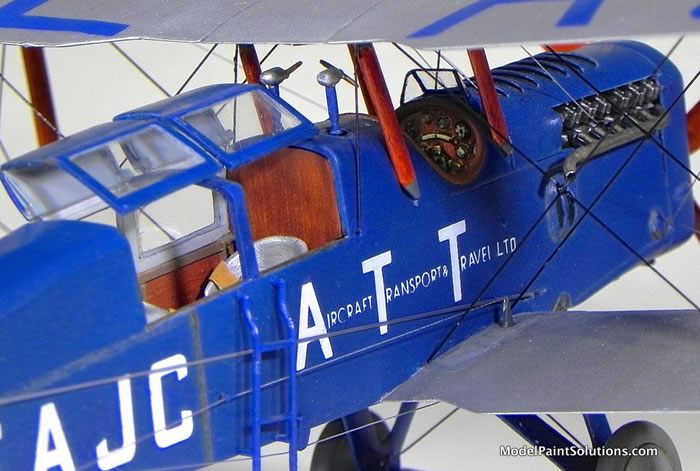
The Roden DH.4 Passenger Transport (kit#431) is a very good start for an accurate model with nearly all of the changes made to the DH-4 Bomber airframe reflected in the model. Be sure to use the prop with correct rotation for a Rolls-Royce Eagle VIII engine! No changes to the wings/struts, wing stagger, or passenger cabin/seats were required as the kit parts are molded fairly true to the photo record based on internet searches and my small library.
The Build
The finely molded parts were carefully cut from the trees with modeler's nippers and knives. Careful work is required to remove the usual size sprue attachment pips. Wing rib and other surface details are very good except for the top of the left upper wing, which in my kit was too faint. Luckily the large civil codes obscured that.
The fuselage halves are composed of only the sides from radiator shell to wing trailing edge. They include the underside center section from wing to rudder post.
The molded structural detail on inner fuselage halves left dimples on the outside of the parts that were easily filled without obscuring details. The passenger cabin/upper rear fuselage assembly is composed of halves from upper longeron (just under the windows) to the top. Bulkhead parts that attach both forward and aft of the cabin assembly ease alignment. I glued tabs made from plastic sheet stock to the joining edges at underside and turtle deck for reinforcement.
The upper /lower nose panels were glued to the fuselage sides and radiator shell with Tamiya Extra Thin glue and blended with a little sanding. Filler was needed in a couple of places including the join of the lower wing underside and the fuselage, the bottom rear fuselage seam, and turtle deck seam behind the passenger cabin. For filler I used small smears of Vallejo acrylic putty and Mr. Surfacer 500 applied with a small brush. Before the final sanding, bottled Tamiya Surface Primer was brushed over any dimples or seams.
Improving the Models Structural Integrity
Assuring the structural integrity of a large plastic biplane model (circa 1918) is very different from models of WW II aircraft. To add strength I inserted many brass wire pins into pre-drilled holes when joining wing struts and other parts to each other. The molded-on pins of the struts are inadequate for a strong assembly without a complex jig to hold the wings and fuselage during gluing. I did not need one. I cut both ends of each strut in order to drill and insert brass wire pins (except the lower ends of cabane struts under the center section, which were epoxied to the molded recesses.
When adding pins to the ends of struts, be sure to not change the length of the strut or mix up the various struts. There are full sets on the kit trees for all DH-4 variants. The originals had a particular end that you can restore with gap-filling CA before sanding and painting.
During assembly, I glued the two inner interplane struts to the lower wing first with CA. I then glued the top wing to them before adding the outer wing struts. The cabane struts were inserted into the holes in the center section underside, epoxied to the recesses forward and behind the cockpit and then CA glued to the center section. All wing strut holes were drilled deeper and wider to accommodate the wire pins I inserted into the strut ends.
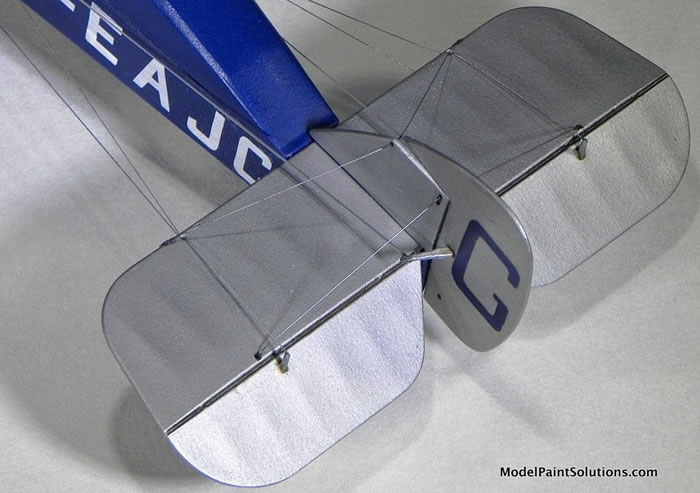
The narrow landing gear is highly stressed by the large wingspan so it’s pinned at the wheels and the joins to the fuselage. The control surfaces were easily cut from the wings and horizontal stabilizers and reattached with wire pins. The elevators were re-attached with the wire bent in order to replicate a more relaxed position.
The tail skid absolutely needed thick wire and plastic reinforcement. The tail fin is thick enough to pin to the fuselage with brass wire through the tailplane. I also pinned the exhaust manifolds to the pipes and cylinder heads. Of note, pins can allow easy component removal and/or replacement during the build until final gluing.
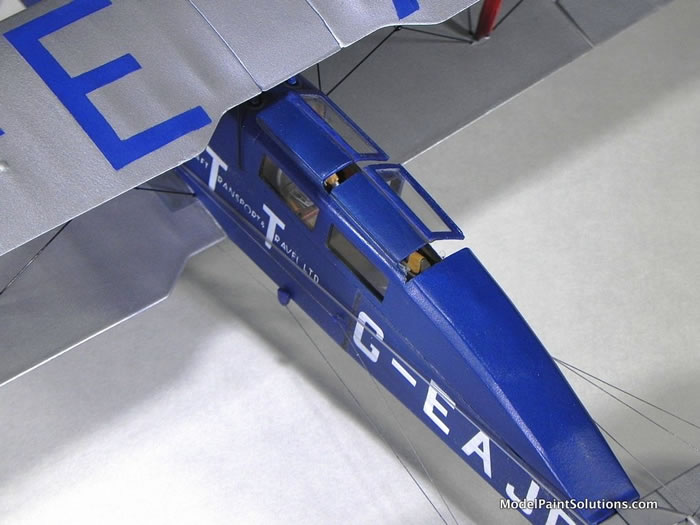
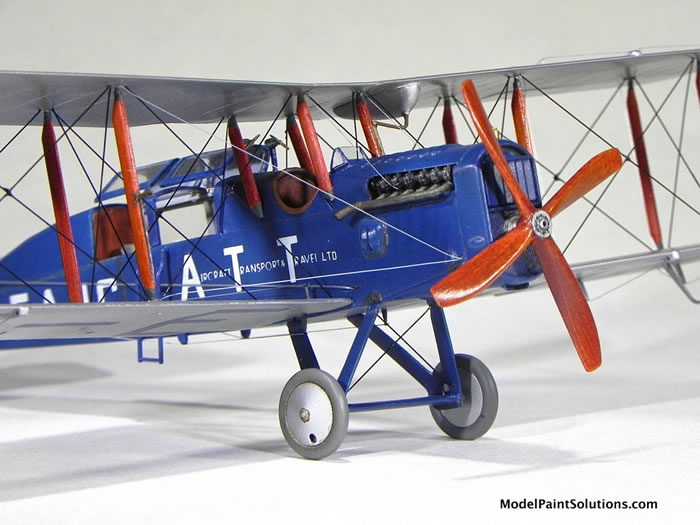
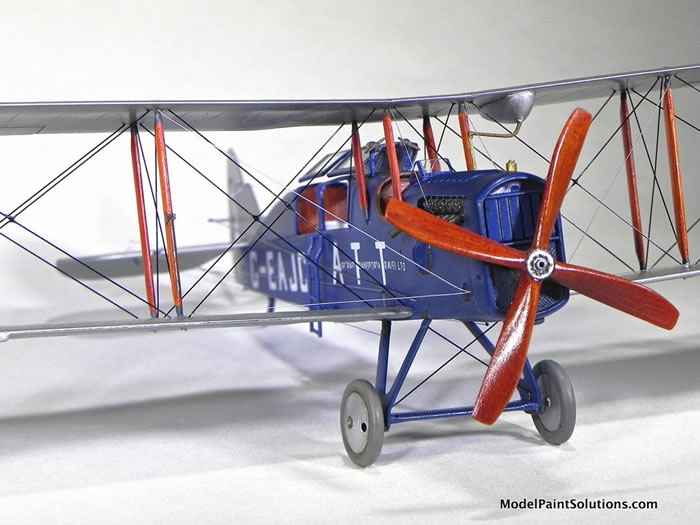
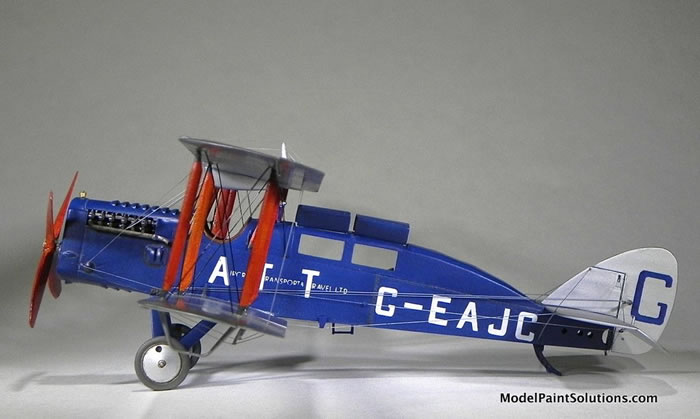
The passenger cabin was exposed by sawing open the roof and right window panel in order to reveal the woodgrain treatment done with tube oil paint brushed over sprayed Clear Dope Linen (pale yellow cream) acrylic paint.

The nicely molded seats have excellent cushion details and were equipped with aftermarket Eduard P.E. Royal Flying Corp lap belts. The cabin roof and right side windows were cut, re-assembled and pins added to the lower corners to replicate being folded. All four windows were attached carefully with straight Pledge/Future clear acrylic floor finish.
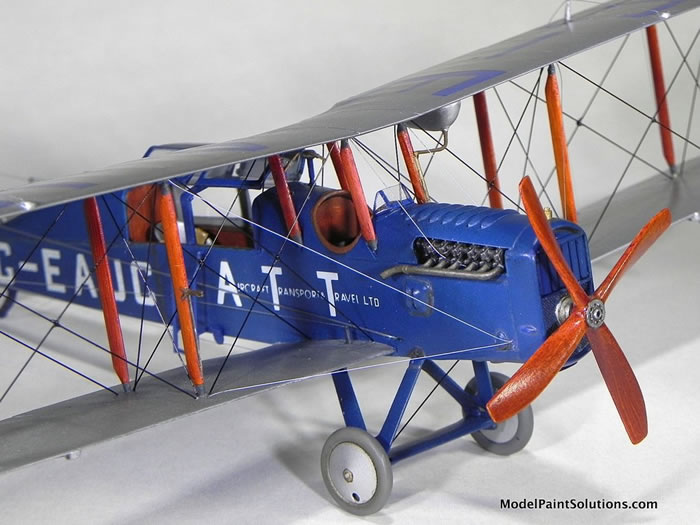
The pilot's windscreen supplied in the kit is appropriate only for the bomber version. I bent a replacement from clear vinyl sheet using photographs of G-EAJC as a guide and attached it with "Gator's Grip" white glue.
Painting, Markings and Rigging |
Colors and Markings
The paint scheme provided in the instructions is fair. It’s important to be aware of how pre-pan-chromatic film rendered blue and red in order to determine which colors are guesses. I used "Airco DH4 Vol. 1" by J.M. Bruce published by Albatros Productions of Great Britain and web searches for old images for clarification and to make my own informed guesses.
The paints used were Model Master and Polyscale Acrylic except for a few enamel or lacquer paints on small details and Tamiya spray can TS-17 Gloss Aluminum on fuselage/wings/tail where fabric was on the original.
Clear Coats were Pledge Floor Care Finish (formerly Future Acrylic Floor Finish) thinned with 20% polypropylene alcohol. This was sprayed over the color coats before and after decals. For a final topcoat I used Model Master Semi-Gloss Acrylic.
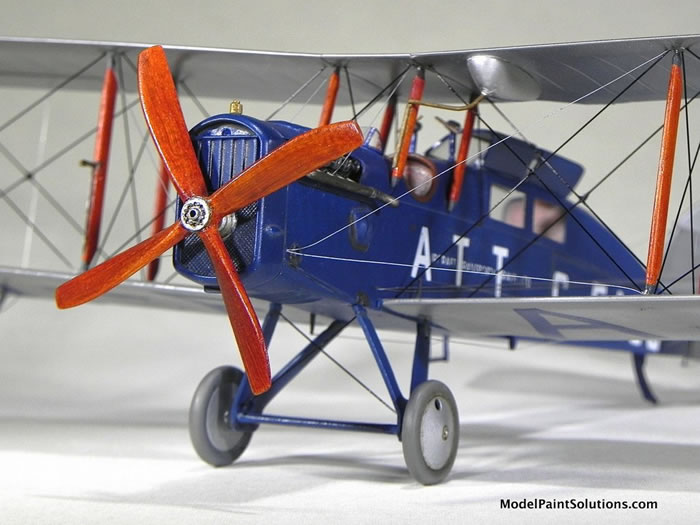
The wood grain effect was done by first airbrushing the parts with acrylic Clear Dope Linen. Then, with no clear coat, artists oil Burnt Sienna (from a tube) was streaked over the top with a brush. The parts were then set aside for a week to dry. Semi-gloss clear was sprayed on the struts and interior. The gloss finish of Pledge/Future was left on the prop.
Panel washes were done with Black, Raw Umber, or mixed Gray from artists tube oils thinned greatly with mineral spirits. When dry these were sealed with a semi-gloss top coat.
Decals
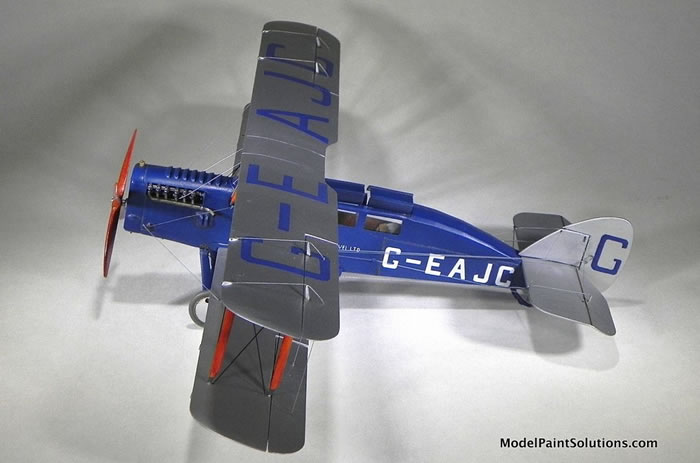
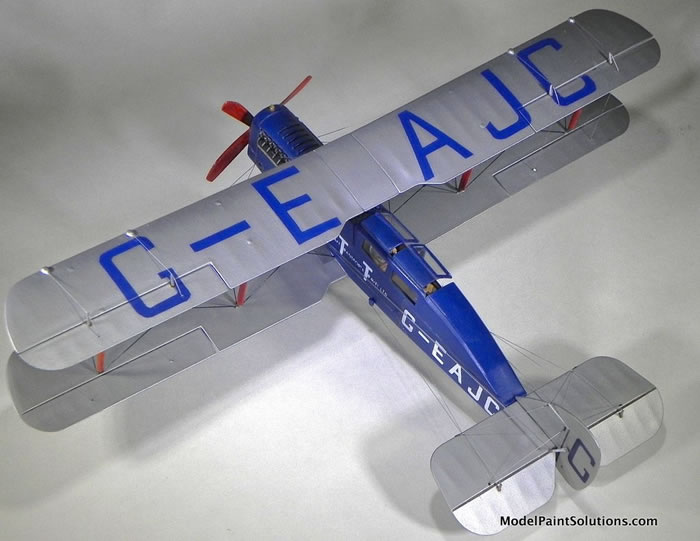
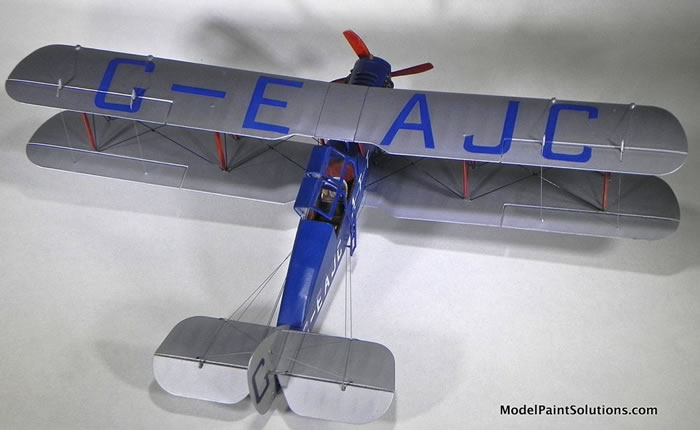
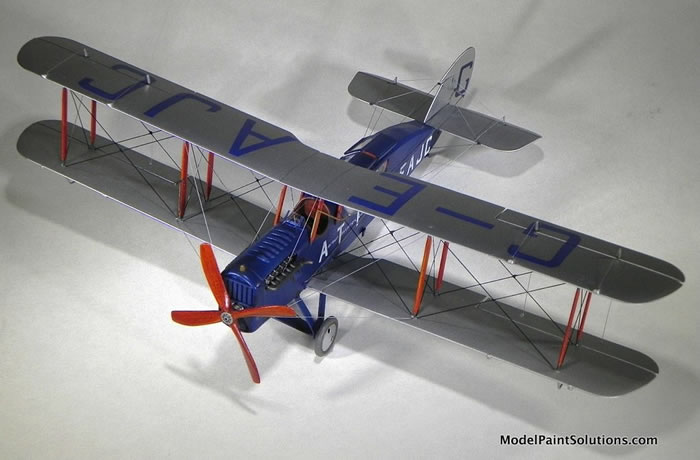
Based on photos of G-EAJC, the civil code letters on the upper and lower wings were ~30% larger than the decals. I opted to airbrush the code letters using stencils cut from frisket paper using tracings of enlarged kit decal letter images of the correct font and size as guides.
The decals for the “G’s” on the rudder are usable. However, the "LTD." that occurs after the company name is not on the decal sheet and was added using letters from an after-market decal sheet.
The decals were applied with Mr. Mark Softer. Based on previous experience with Roden decals be mindful for bubbles can occur under the clear decal film.
Rigging
All rigging was done with monofilament line. The beauty of using monofilament is twofold: 1) It tightens with carefully applied heat and 2) It never slackens even in direct sunshine unlike the elastic line Wingnut Wings suggests. Coloring monofilament with a Sharpie marker does not affect this.
In general, I plan and drill all the rigging holes before any critical gluing. In addition, the holes are drilled as close to the angle of wire as shown in drawings and photos of the aircraft. I did not fuss with turnbuckles, which don't show up on the better photos any better than nuts and bolts. Blobs of white glue painted dark gray represent the clamps that hold the intersecting interplane brace wires.
The interplane and landing gear heavy brace wires are .008 in. fish line blackened with Sharpie marker before being glued into blind holes at one end and pulled through "thru" holes, CA glued, and clipped at the other end. The silver Sharpie colored (could be light gray) control and light brace cables are .005 in. "invisible" monofilament sewing "thread". Drawings from “The official DH4 rigging notes" provided in "Airco DH4 Vol. 1" (by J.M. Bruce) along with DH-4A photos were references for the different gauges of wire and cable used on the airframe.
The system of control cables is very prominent on the DH.4 and was something I wished to accurately replicate. The rudder system right out of the box is only correct for a DH-4 bomber. It was modified to reflect the changes made when reconfiguring the airframe into a transport and required lots of research to model correctly (I hope). My primary reference was again "Airco DH4 Vol. 1" as it includes a two-page reprint of "the drawings from the official DH.4 rigging notes" and Albatros' own excellent 1/48 drawings by Ray Rimell.
For more details on this build visit Modelpaintsolutions.com.
Review Text Copyright © 2018 by John Cate
Images Copyright © 2018 by John Miller
Page Created 17 August, 2018
Last updated
17 August, 2018
Back to HyperScale Main Page
Back to Reviews Page

|
 Home
| What's New |
Features |
Gallery |
Reviews |
Reference |
Forum |
Search
Home
| What's New |
Features |
Gallery |
Reviews |
Reference |
Forum |
Search