Eduard's 1/72 scale
Grumman F6F-5N Hellcat
by John Miller
S
u m m a r y : |
Description and Item No.: |
Eduard Kit No. 7079 - Grumman F6F-5N Hellcat |
Contents and Media: |
44 parts in grey plastic, two parts in clear plastic; 17 photo-etched parts; markings for six aircraft; die-cut self adhesive masks. |
Scale: |
1/72 |
Review Type: |
First Look |
Advantages: |
The kit has simple straightforward engineering with crisply inscribed surface details and a nice selection of color PE parts and quality decals. |
Disadvantages: |
None noted. |
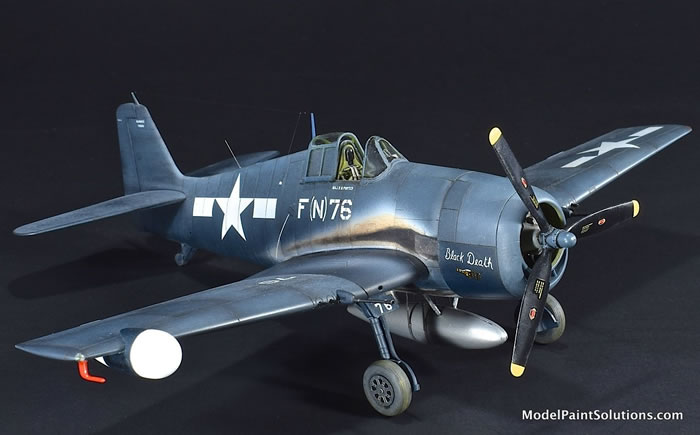
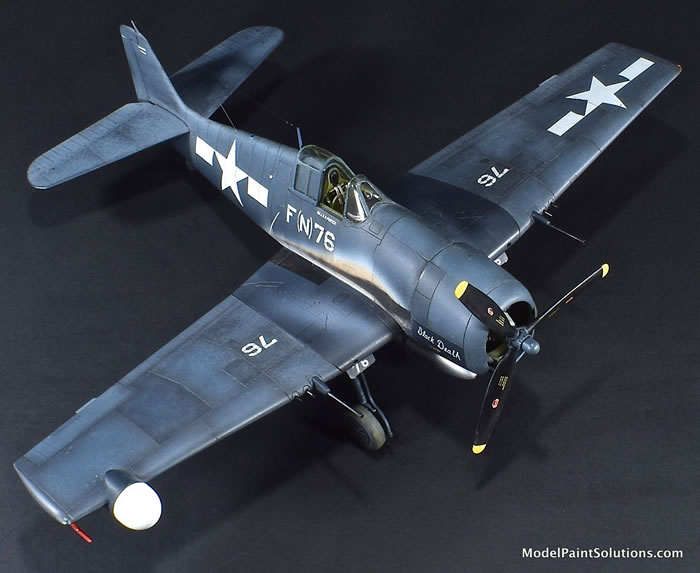
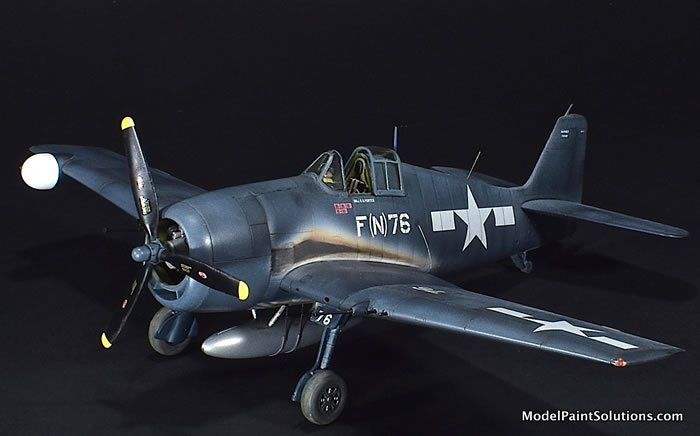
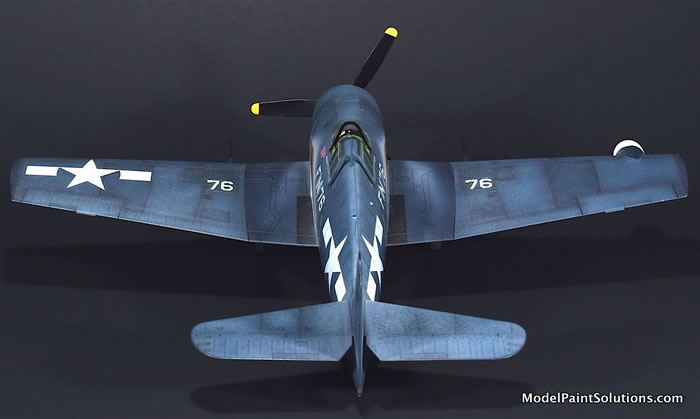
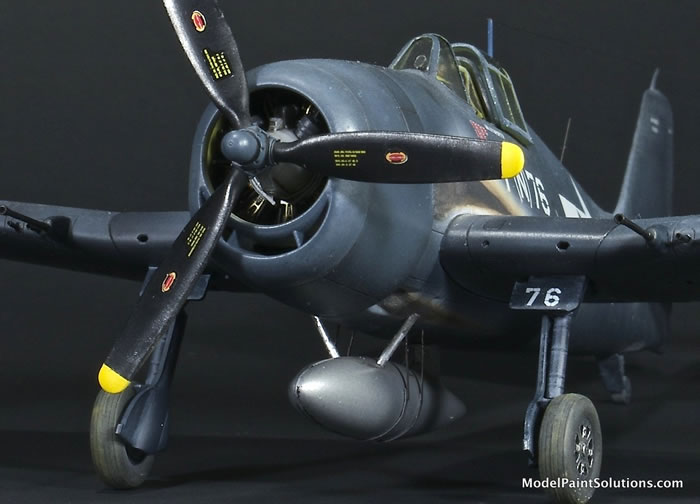
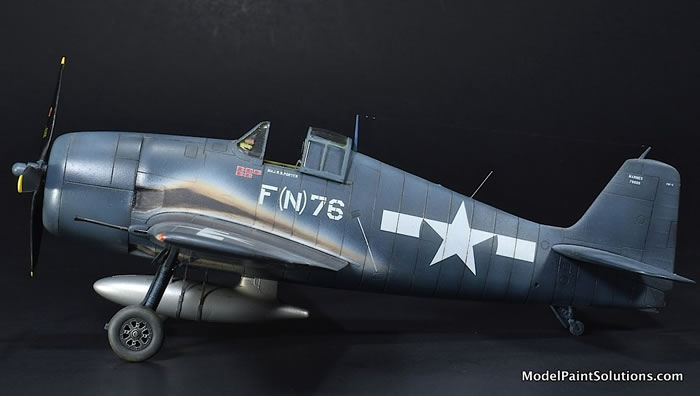
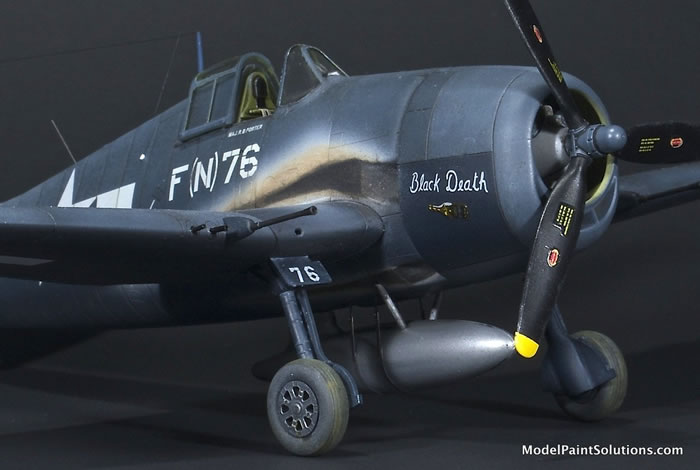
The F6F-5 variant of Grumman’s Hellcat featured several improvements, including a more powerful R-2800-10W engine employing a water-injection system and housed in a slightly more streamlined engine cowling, spring-loaded control tabs on the ailerons, and an improved, clear-view windscreen, with a flat armored-glass front panel replacing the F6F-3's curved plexiglass panel and internal armor glass screen. In addition, the rear fuselage and tail units were strengthened, and apart from some early production aircraft, the majority of the F6F-5's built were painted in an overall gloss sea-blue finish. After the first few F6F-5s were built, the small windows behind the main canopy were deleted. The F6F-5N night-fighter variant was fitted with an AN/APS-6 radar in a fairing on the outer-starboard wing. A few standard F6F-5s were also fitted with camera equipment for reconnaissance duties as the F6F-5P. While all F6F-5s were capable of carrying an armament mix of one 20-mm (.79-in) M2 cannon in each of the inboard gun bays (220 rounds per gun), along with two pairs of .50-in (12.7-mm) machine guns (each with 400 rounds per gun), this configuration was only used on later F6F-5N night fighters. The F6F-5 was the most common F6F variant, with 7,870 being built.
(Edited from Wikipedia)
The Eduard Hellcat: what’s to say? It’s a beautifully engineered kit that’s packed full of detail and pretty much set the standard for Hellcats in “the one true scale.” All of the major components fit perfectly with little to no work making it a nearly effortless build. Thus, it was a good choice for a kit on which to try a new trick or two and practice some others that, for me, have required multiple attempts to get moderately competent.
The main technique I wished to practice on this build is the use of rendered oils for weathering. Let me say up front, Mike Rinaldi, author of the beautiful “Tank Art” series of books, I am not. Weathering with rendered oils has been a bit of an uphill battle for me in large part because using a hairy stick (paint brush), in general, is one of my weaknesses as a modeler. As with any modeling technique, the path to competency is practice, so here we go...
The Build
The kit was built right out of the box and was a blast to assemble. As I do with all my builds, the sprues were soaked in a 1:1 solution of Isopropyl Alcohol (91% preferably 99%) and Windex (with ammonia) for at least 2 (sometimes over night). The sprues were then rinsed in very warm water and allowed to dry before assembly commenced.
After removal from the sprues and prepping with a fresh X-Acto blade and Alpha Abrasives #600 Grit Paper, the cleaned parts were affixed to a piece of wood with wads of putty for ease of handling while painting/priming. I say “painting/priming” because the parts were shot with a mix of Mission Zinc Chromate Green (lightened ~10% with Mission White) and Mission Clear Primer. Combining Mission Clear Primer with any Mission paint negates the usual priming step saving time and, most importantly, using as few (and as thin) layers of paint as possible. Using fewer layers of paint avoids the possibility of covering or fouling finely inscribed details. This pays off later when an enamel wash willingly wicks along these details as opposed to being stopped by clogged panel lines.
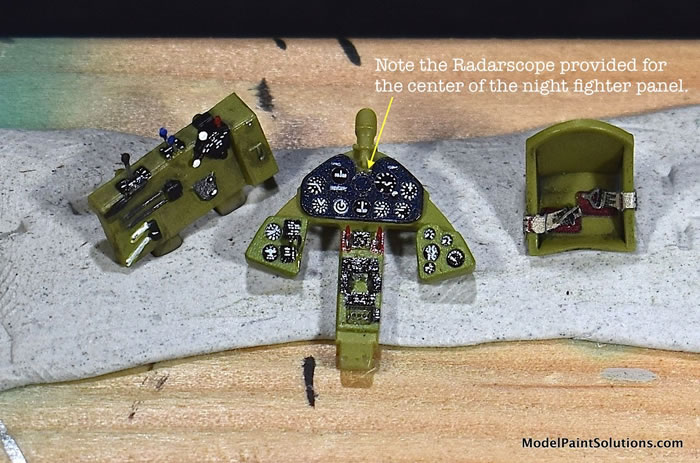
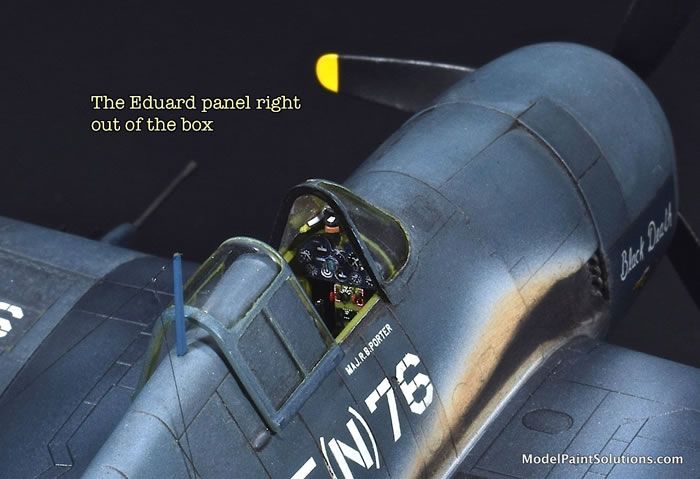
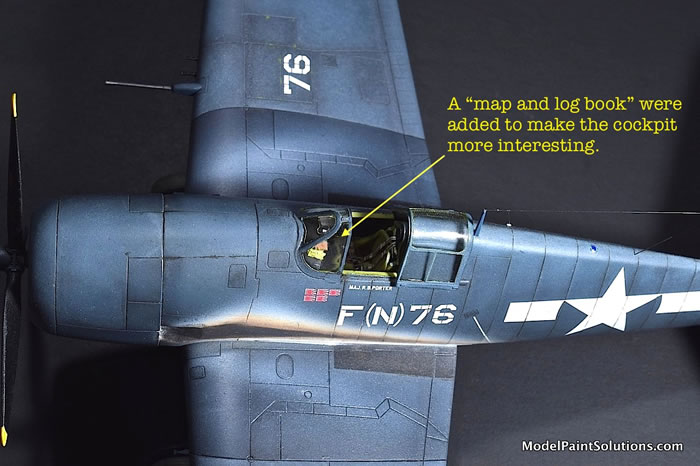
As usual, the build begins with the pilot’s office and the detail right out of the box is ample and accurate. After assembly, an enamel panel wash (Tamiya Dark Brown) brought out the details and gave the cockpit appropriate depth. The radarscope in the center of the panel, a feature common to the –N night fighters, was very nicely replicated by Eduard.

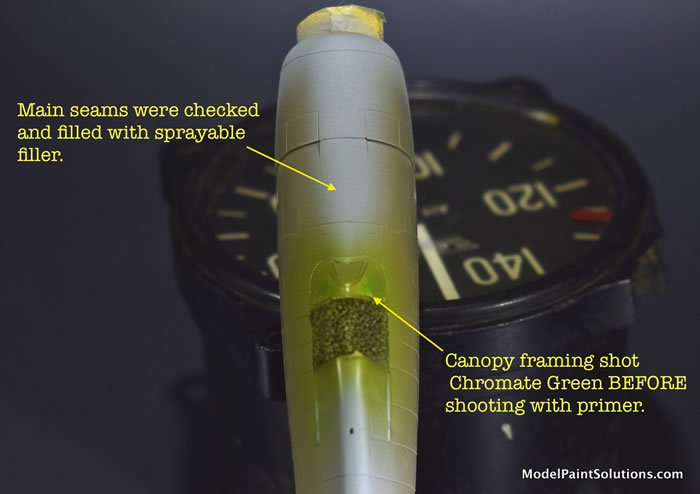
The cockpit was then trapped between the fuselage halves and after a little sanding and blending the main seam was shot with a mix of Sprayable Filler to ensure all was good prior to priming.
With the fuselage complete I set about assembling the nicely detailed R2800 radial, which is crisply molded with separate magnetos and a photo-etch ignition harness that really adds to the level of detail. Once assembled, this was trapped between the cowl pieces and the nose cowl piece that accurately captures the well known “smile” of the lower chin intake. Well done, Mr. Eduard.
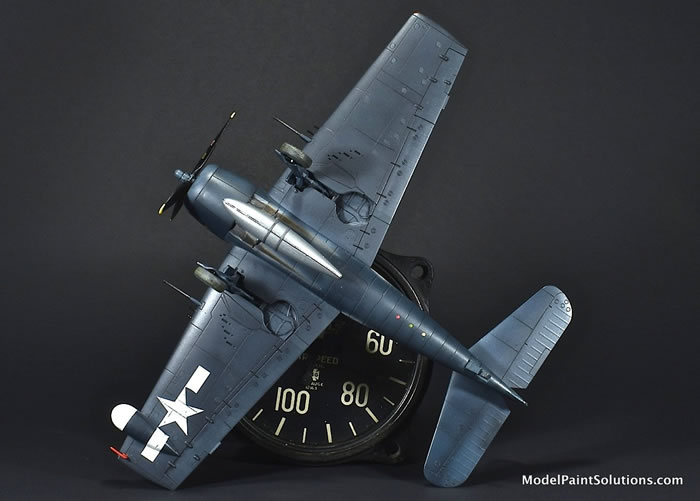
The left and right wings (comprised of halves) come together nicely with thin, scale appropriate trailing edges. The solid wing tip navigation lights were carefully removed and replaced with clear versions complete with red and green “bulbs.”
The join between the wings and fuselage is darn near perfect requiring no fiddling or filler: nice. The addition of the single-piece horizontal stabilizer/elevator assemblies largely completed the model.
The nicely molded clear parts were cleaned up, buffed with a Kimwipe, and dipped in Future (Pledge with Future Shine). Once dry the windscreen was affixed with Odorless CA Glue (Bob Smith Industries).
After applying the kits die cut masks, the canopy was shot with the same mix of Mission Zinc Chromate and Clear Primer. This was done prior to priming to ensure the inner faces of the canopy frames would appear zinc green when viewed from the outside after painting.
A New Format
As demonstrated by the order of paint and primer used on the Hellcat canopy, the sequencing of primer, paint, clear coats, decals, and washes is often the topic of discussion during most airbrushing classes I’ve taught and one of the more frequently asked questions I receive from modelers through Model Paint Solutions.
In an attempt to address this aspect of the modeling process, the painting and finishing techniques used on this Hellcat will be presented in the sequence they were performed with explanatory text as required. Therefore, with the canopy masked and shot zinc chromate, the model was primed, painted, and weathered using the following sequence of steps (I-XV):
I) Priming:
The model was primed with Mission White Primer diluted 1:1 with Mission Thinner. This was applied with an H-S Evolution fitted with a 0.20mm tip at a pressure of ~15psi first as a dry coat followed by a wet (fill) coat.
II) Pre-shading:
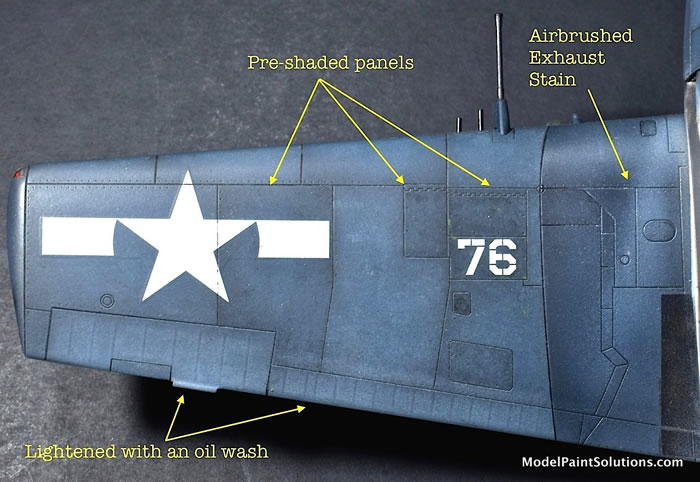
Pre-shading of major panel lines was done with Mission Black diluted for Fine-Line work and applied using an H-S Infinity fitted with a 0.15mm tip at a pressure of ~10 psi.
III) Spraying the Primary Blue:
The overall dark blue, primary color was obtained by adding a few drops of Mission Black to Mission USN/USMC Sea Blue. This was diluted for modulation using Mission Clear Primer and applied using an H-S Evolution fitted with a 0.20mm tip and a pressure of ~12psi.
IV) Spraying Lightened Primary Blue:
In an attempt to replicate the differential bleaching of the wing that occurred where areas were protected from sunlight when the wings were folded, all of the panels outboard of the wing fold were shot with a mix of the Mission USN/USMC Sea Blue that had been lightened with ~15% Mission White.
V) Spraying Darkened Primary Blue:
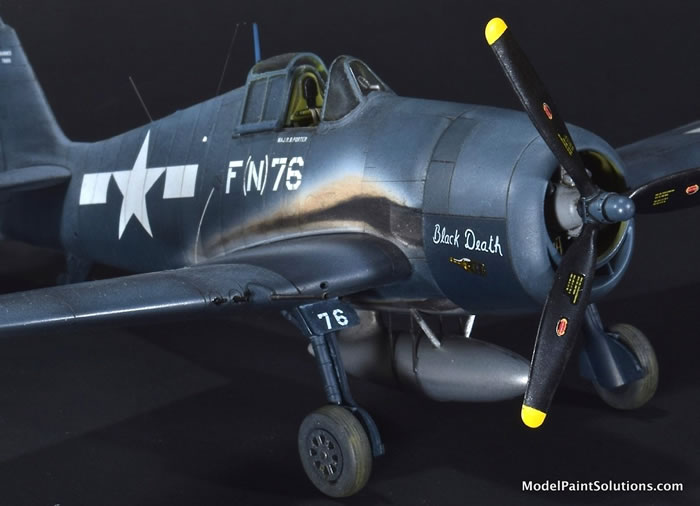
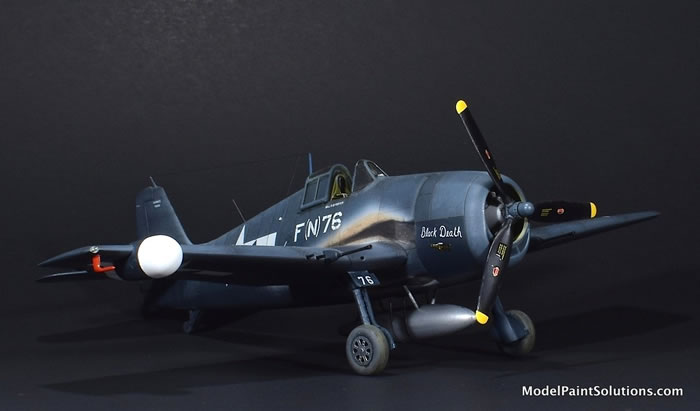
From the brief history of the aircraft provided in the instructions the aircraft was turned over from a previous pilot before receiving the “Black Death” inscription on the starboard cowl. Assuming the ground crew would have wanted a clean “canvas” for their artwork, the starboard cowl panel was masked off and shot with the Mission USN/USMC Sea Blue Primary color mix to which a bit more Mission Black was added. This same mix was shot on the inboard wing panels to darken them up a bit versus the outer panels.
VI) Clear Coat #1:
In preparation for decaling the model was given an overall coat of Mission Clear Primer diluted to 30% with Mission Thinner. This was applied using an H-S Evolution fitted with a 0.20mm tip at a pressure of ~15psi.
VII) Decals:
The kits decals were applied using conventional techniques and Micro-Set and –Sol.
VIII) Clear Coat #2:
To protect the decals from subsequent weathering steps they were sprayed with a coat of Mission Clear Primer diluted to 30% with Mission Thinner applied as described above.
IX) Enamel Pin Wash:
After allowing the Clear Primer to dry over night, the kits panel lines were darkened with a pin wash of Tamiya Dark Brown Enamel Panel Liner. Excess wash was easily removed when dry with a cotton bud moistened with Mona Lisa Odorless Thinner.
X) Clear Coat #3:
To prevent subsequent steps that require Mona Lisa Odorless Thinner from affecting the underlying enamel panel liner, the model was given a light coat of 30% Clear Primer applied as described above.
XI) Enamel Wash with Rendered Oils:
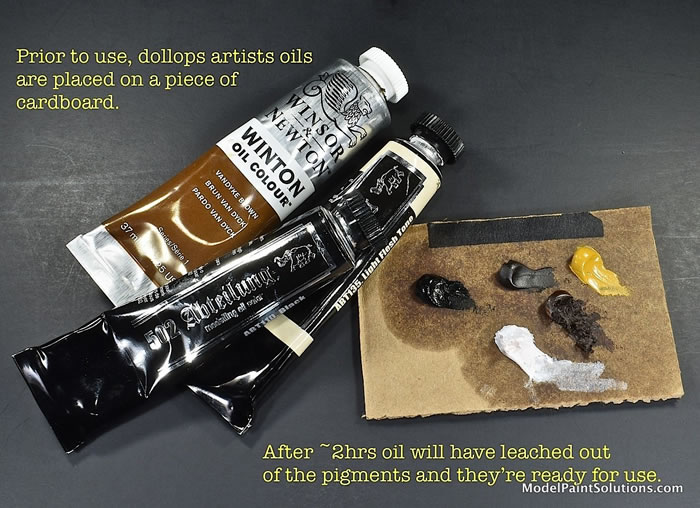
With the paint scheme, decals, and pin-washed panel lines protected under a coat of Clear Primer, I set about preparing the artists oils for weathering. This is done by placing a dollop of the artist oil on a piece of cardboard where it’s allowed to sit for at least 2-3 hours before use. This allows the heavier linseed oil to wick from into the cardboard leaving the pigments to be blended for weathering.
Once the oils are blended to the desired color, I prepare a wash by placing a very small dollop (a little bigger than a ball point pen tip) into ~2ml of Mona Lisa Odorless Thinner. I do this in a 2ml Spin Tube so I can vigorously shake the rendered oil into solution.
To weather or bleach a panel, a small drop of lightly colored oil wash is placed onto the center of the panel (or control surface) using a microbrush or a small paintbrush. I’m careful to place a drop of the right size that will spread (or wick) to cover the entire panel but not wick beyond the inscribed line at the panels’ periphery. Using this controlled approach, some panels can be bleached more than adjacent panels leading to a patchwork effect.
XII) Clear Coat #4:
With the airframe weathered to my satisfaction the oil washes were sealed with a coat of Mission Clear diluted to 30% with Mission Thinner.
Exhaust Stains: The Moment of Truth
As stated in the intro, one of main reasons for building the Eduard Hellcat was the opportunity to use rendered oils for the overall weathering and particularly the exhaust stains. Well, the moment of truth had arrived.
After spending a few hours looking at pics of really dirty Hellcats in my meager library (and many more on-line) I decided to apply a series of blended artists oils ranging from light tan to black-brown over a base of Mission White previously airbrushed onto the sides of the fuselage.
XIII) Spraying the White (Oxidized) Stains:
A few drops of Mission Elfenbein, which has a decidedly bone color, was added to Mission White, which was then diluted for Fine-line spraying (see below). The white (oxidized) areas on the sides of the fuselage were then sprayed with this mix using an H-S Infinity fitted with a 0.15mm tip at a pressure of 8-10 psi.
XIV) Replicating Exhaust Stains with Rendered Oils:
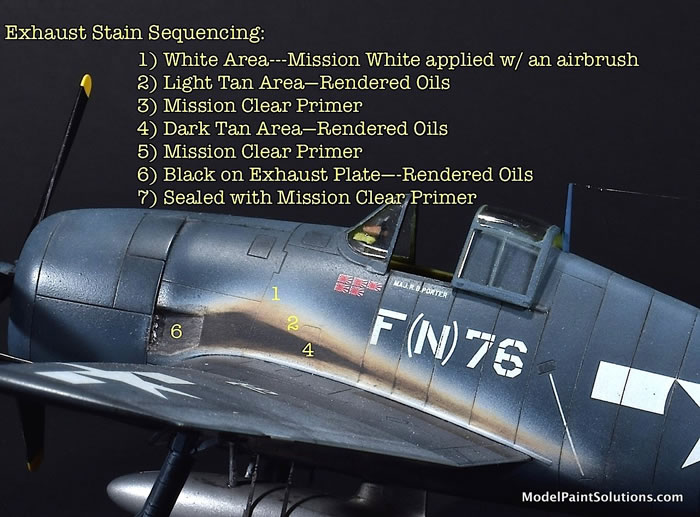
As detailed in the accompanying photograph, the dark exhaust stains were replicated with rendered oils applied with a brush and blended in-place with brushes lightly moistened with Mona Lisa Odorless Thinner. The lighter shades (tan) were applied first and after a few hours to dry were sealed with a light coat of 30% Mission Clear Primer. This was done to lessen the chances of having the underlying tan area disturbed when the overlying dark brown area was blended by brush and Mona Lisa Odorless Thinner. By protecting each layer of rendered oils with a coat of Clear Primer, the oils can be layered sequentially with no mixing.
XV) Replicating Surface Oxidation:
To replicate pronounced bleaching of the empennage the horizontal stabilizer/elevator assembly and vertical stabilizer/rudder all were sprayed with Vallejo Satin diluted to ~25% in Vallejo Thinner and applied with an H-S Infinity fitted with a 0.15mm tip at ~12psi. This was applied strictly as a dry coat until the finish had taken on the frosty, powdery appearance indicative of having been over-applied.
After this was allowed dry ~20 minutes the surfaces were buffed with my bare fingers using strokes aligned with airflow (nose to tail). Prior to this my hands were thoroughly degreased by washing with a strong soap and, while buffing, were wiped regularly with a dry paper towel.
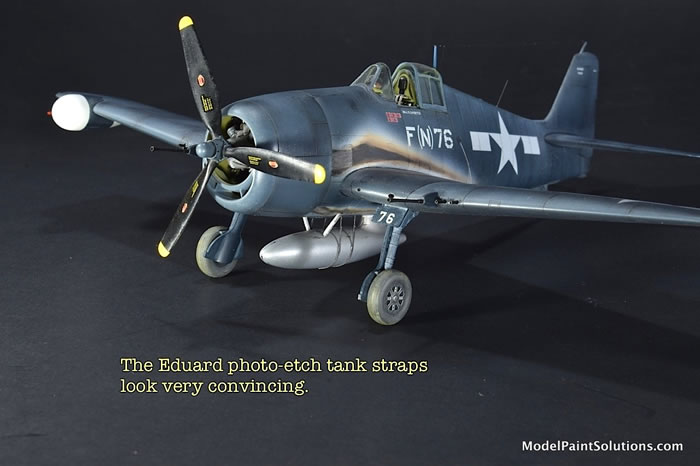
With the final finish established, the gear, propeller, and radome were assembled, painted and affixed. The fit of all these parts was spot on. I opted to finish the drop tank in natural aluminum by first spraying the tank Mission Black followed by Mission Aluminum tweaked with a few drops of Mission White Aluminum. The photo-etch tank straps look awesome once assembled.
Once the canopy was glued in place with Odorless CA glue and the pitot tube was painted red, a feature peculiar to night fighter versions, this F6F-5N was done! What a blast!
Okay, that was fun! I hope you found something useful there. This kit assembles quickly with little effort and has a huge amount of detail right out of the box. Best of all it provided me with another model on which to practice my use of rendered oils. Although I’m not there yet, the experience gained on this Hellcat will be the stepping-stone for the next rendered oil weathering finish I attempt and, hopefully, it will be just a bit better still. Thanks for reading along J
Cheers!
--John
For more painting details from this build visit Modelpaintsolutions.com.
Text and images copyright © 2019 by Model Paint Solutions.
Text and Images Copyright © 2020 by Model Paint Solutions
Page Created 19 June, 2020
Last updated
19 June, 2020
Back to HyperScale Main Page
Back to Reviews Page

|
 Home
| What's New |
Features |
Gallery |
Reviews |
Reference |
Forum |
Search
Home
| What's New |
Features |
Gallery |
Reviews |
Reference |
Forum |
Search