|
Hasegawa's
1/48 scale
Messerschmitt Bf 109
G-2
by Brett Green
|
 |
|
Messerschmitt Bf 109 G-2 |

HyperScale is proudly supported by
Squadron
Background
Earlier this year I sold a number of built models. Four
of these were mailed to the USA. I have sent quite a few models overseas
from my home in Australia without incident so, lulled into a false sense
of security, for the first time I sent them by regular air mail.
Of course, Murphy's Law intervened, and one of the
parcels containing
a hybrid Hobbycraft 1/48 scale Bf 109 G-6 model vanished in transit.
After it was clear that the model had not simply been
delayed, I offered my client a choice from a few other completed Bf 109s
in my collection. In a moment of madness I also suggested that, if he
preferred, I might build him a new 1/48 scale Gustav.
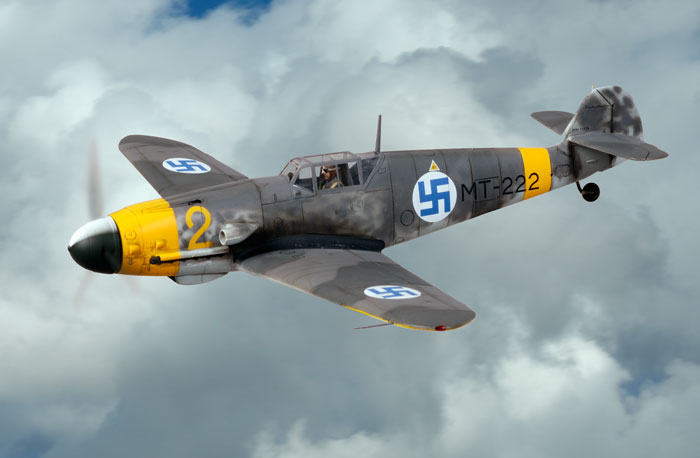
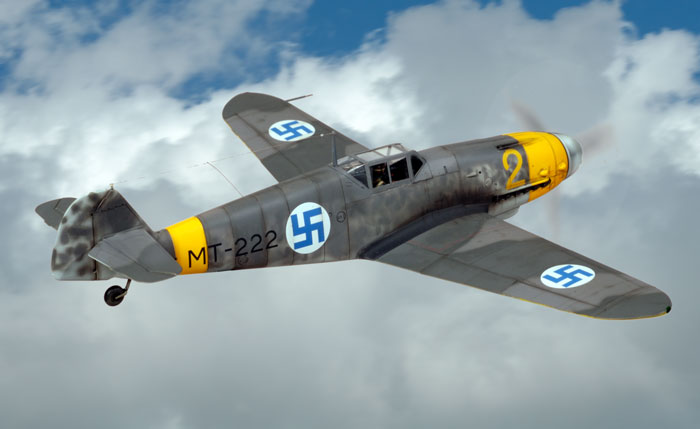
And so it was that I found myself with a very specific
brief to build a Finnish Bf 109 G-2, in flight, and with a pilot wearing
goggles and his oxygen mask on his shoulder.
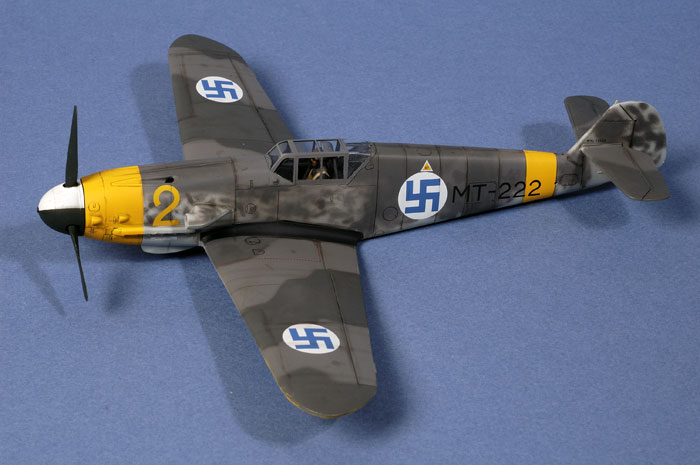
This model was to wear the markings of Finnish pilot
Ilmari Juutilainen (1914-99) who was reportedly never shot down in over
400 sorties while scoring at least 93 victories, making him the highest
scoring non-German ace of WWII.
Hasegawa's 1/48 scale Messerschmitt Bf 109 G
Hasegawa's original 1/48 scale Messerschmitt Bf 109 G-2
dates back to 1991 and was derived from their earlier Bf 109 F kit. In
fact, the fuselage still bears the hallmarks of the Friedrich,
including hatches and panel lines which must be filled and sanded flat
for the later variant.
Surface detail is by way of fine, crisply recessed panel
lines. The cockpit is fairly basic, but looks okay under a closed canopy
and a coat of dark RLM 66 Grey.
Landing flaps, radiator flaps and leading edge slats are
all supplied as separate parts.
The kit is generally very accurate, but the fuselage is
around four scale inches too short (the length is missing directly in
front of the windscreen), and the spinner shape is slightly off.
These are nice kits that build up well, but there is one
notable construction problem. The separate cowls will not fit without
some extra work.
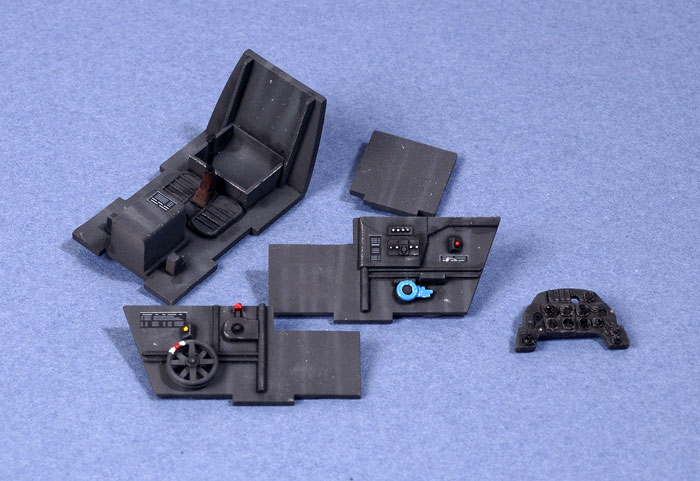
Cockpit
With the pilot installed and the canopy closed, very little of the
cockpit would be visible. Adding extra detail here would be gilding the
lily, so I simply painted the kit parts. I applied a slightly heavier
than usual weathering technique just in case some of the cockpit
elements could be seen past the elbows of the pilot.
A few cockpit placard decals from Reheat completed this small task.
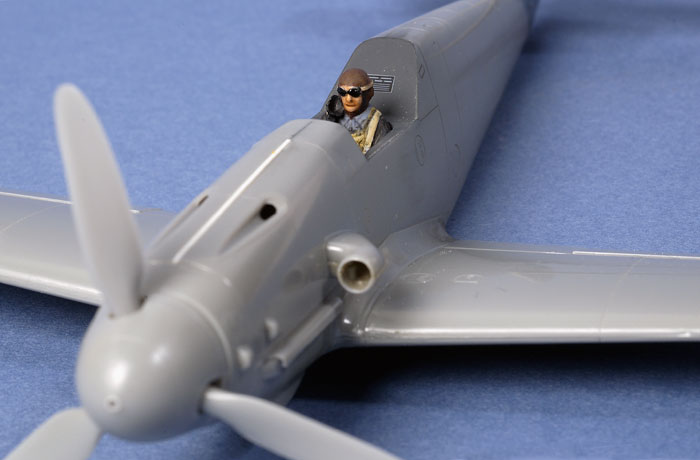
Next was the pilot. My client supplied a resin seated pilot and also the
oxygen mask as a separate part. The supplied pilot had his goggles up on
his helmet, but my brief was that he should be wearing them over his
eyes. The first job was to carefully remove the raised goggles and strap
from the helmet with a hobby knife and a sanding stick.
I then found a spare Tamiya pilot and sliced the prominently raised
goggles from his helmet, cutting slightly into his head in the process.
This was not a problem as the figure was discarded after his surgery
(please be assured that no real pilots were harmed during this
conversion).
The Tamiya goggles were now glued to the resin figure's face, and a new
strap added from lead foil. The oxygen mask was glued to the pilot's
right shoulder, and the hose fashioned to disappear between his arm and
his body.
Figure painting has never been my strong point, so I focused on the main
features. At least I did not have to paint the eyes!
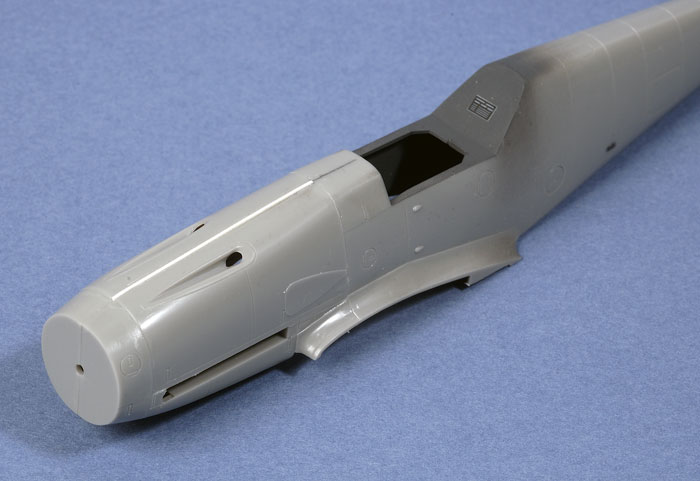
Airframe
Now I addressed the issue of the ill-fitting engine cowl.
First, each cowl half was glued to each fuselage half. This is
contrary to the instructions but, in my opinion, it is the best way to
avoid gaps and steps. The most important thing is to ensure that the
front and rear sides of each cowl half line up with the fuselage sides.
Once these sub-assemblies were thoroughly set, the fuselage halves
were joined. The fit was perfect except at the cowl hinge line, where
there was a uniform gap of nearly 1mm. When the fuselage halves were
set, the gap was easily filled with a strip of styrene. If this is
carefully installed, the strip can also serve as a very slightly raised
hinge for the cowl.
Click the thumbnails below to view larger images:
[../../photogallery/photo00007605/real.htm]
I was a little concerned about assembling the flaps and slats in the
closed position. I had always assumed that Hasegawa designed these parts
to be dropped. Fortunately, the flaps fitted very well with no
modification required.
The slats stood slightly proud of the wing leading edges, but a few
minutes with Mastercasters' sanding sticks fixed that problem.
Test fitting the painted pilot in the cockpit, and the cockpit tub in
the fuselage, proved that the pilot was too big. Removing his legs below
the knees brought him down to a more appropriate size.
I seem to find a different gap at the wing root every time I build
one of Hasegawa's 1/48 scale Bf 109s. This time, the gap was very narrow
so I simply used Tamiya masking tape, attached from wing tip to wing
tip, to close the gap and, as a bonus, ensure the correct dihedral.
The balance of assembly was straightforward. No after-market
accessories were used. The only further modification required was to the
main wheels. These were too thick to permit the undercarriage doors to
sit flush with the bottom of the wing with the gear up, so the wheels
were thinned with a coarse sanding stick.
To my chagrin, I forgot to fill and sand the hatches relevant to the
Bf 109 F. By the time I realised this, the paint job was almost finished
so I decided to leave them unfilled.
As this model was being depicted in-flight, I glued the canopy parts
in place before painting and masking.
Painting,
Decals and Weathering
|
Paint
 I
have just upgraded my old Aztek A470 airbrush to a new metal bodied
Aztek. This was my first opportunity to test it out. I
have just upgraded my old Aztek A470 airbrush to a new metal bodied
Aztek. This was my first opportunity to test it out.
I am very impressed with the weight
and more robust feel of the new metal airbrush in my hand, yet the shape
and operation is happily familiar. The trigger and adjustment wheel
operate more positively on this airbrush too. Most importantly, the
results are very pleasing.
Chris Wauchop bought one of these
metal bodied Azteks around a year ago and he has been encouraging me to
get one ever since. I am glad that I did!
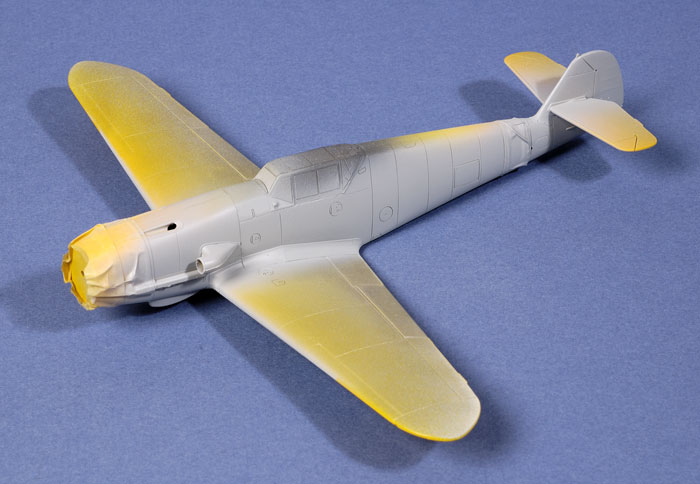
One of the prominent features of Finnish Bf 109s is their yellow nose,
fuselage band and wide under wing markings. However, I often have
trouble getting yellow paint to cover properly. I also find that acrylic
yellows take a long time to dry and are very prone to fingerprints and
damage even weeks after application. Recently I have managed to avoid
these problems. I started with a coat of white primer on the nose, mid
fuselage and lower wingtips. I usually follow this with a coat of Tamiya
Spray TS-34 "Camel Yellow", but my last can was empty and my local hobby
shop was out of stock. Instead, I used a Mr Color lacquer spray. The
color was horribly pale, so I took to the car and went further afield to
seek out my trusty Tamiya "Camel Yellow". A single coat was enough to
make a decent match with the yellow on the decal numbers.
Once thoroughly dry, the yellow sections were masked using Tamiya
masking tape.
I based my painting on a photo of the starboard side of this aircraft in
Apali Oy's "Finnish Fighter Aces". This series has recently been made
available again by Kari Stenman, and is a must for fans of Finnish WWII
aviation. The photo shows the starboard fuselage side with an almost
solid grey coverage further darkened by a broad, murky exhaust stain.
Even so, some subtle features can be made out. These include an
apparently overpainted fuselage band, a heavier application of colour on
the spine (with quite a clear demarcation), and some tight, heavy
mottling around the forward fuselage.
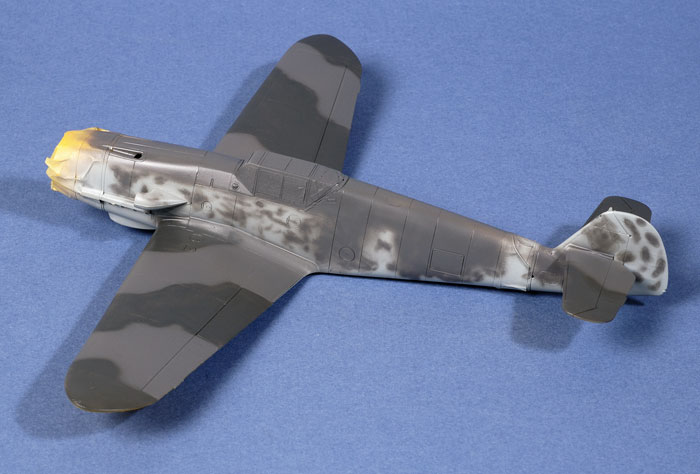
The first camouflage colour was Gunze acrylic RLM 76, applied to the
lower surfaces and fuselage sides.
Next, Gunze RLM 75 was applied to the top of the wings, tailplanes and
fuselage spine. A first-pass mottle of RLM 75 was also sprayed onto the
fuselage sides and fin. This was followed by a disruptive coat of Gunze
acrylic RLM 74 Grey Green. The camouflage pattern on the wings was
sprayed freehand.
I took care to emphasise the "overpainted"
fuselage band on the rear fuselage, and the dark spine. The heaviest
mottling on the fuselage seems to be directly in front of the national
markings, so a fairly heavy coverage of RLM 74 was applied here. In the
photo, the entire tail surfaces were a solid grey but this appears to be
the exception rather than the rule. Instead, I painted the tail in a
more typical pattern, with overpainted hakenkreuz and heavy, hard-edged
mottling on the rudder.
Click the thumbnails below to view larger images:
[../../photogallery/photo00024143/real.htm]
Decals
 The
model received a coat of Polly Scale Gloss acrylic before the markings
were applied. I find that the Polly Scale clear finish can be more
easily controlled than Future when spraying, does not run on horizontal
surfaces, yet still delivers a hard, shiny finish ideal for decals. The
model received a coat of Polly Scale Gloss acrylic before the markings
were applied. I find that the Polly Scale clear finish can be more
easily controlled than Future when spraying, does not run on horizontal
surfaces, yet still delivers a hard, shiny finish ideal for decals.
I used Techmod decals from sheet
number 48078. These were very thin and settled down beautifully into
panel lines. The only opacity issue that I encountered was with the
lower wing national markings. Although the white appeared perfectly
opaque over the greys of the upper surfaces, the yellow and light blue
were slightly noticeable under the white of the decals on the bottom of
the wings.
For weathering, a very thin mix of Tamiya XF-64 Red Brown and XF-1 Flat
Black was sprayed along selected panel lines. Narrow streaks and spots
were also sprayed onto the larger areas of the wings and the fuselage to
represent subtle staining.
A thin wash of Tamiya Semi-Gloss Black acrylic paint was applied with a
fine brush to selected panel lines.
The completed paintwork was sealed
with two thin coats of Polly Scale Flat acrylic.
Click the thumbnails below to view larger images:
[../../photogallery/photo00005515/real.htm]
The finishing touches were now
applied, including the pitot tube (from fine wire), wing tip lights
(painted using Tamiya Clear Red and Clear Green), aerial wire from nylon
monofilament and resistors formed using small blobs of Krystal Kleer.
The exhaust stain was applied last of
all. At my client's request, the stain was a little less prominent than
seen in the photograph.
I would not have chosen this scheme if I was building a Finnish Bf
109 G-2 for myself but, ultimately, I enjoyed the challenge of trying to
highlight the subtleties of an otherwise heavy and dark scheme.
Similarly, I would not have considered carving up a pilot figure, but
I must admit the result is interesting.
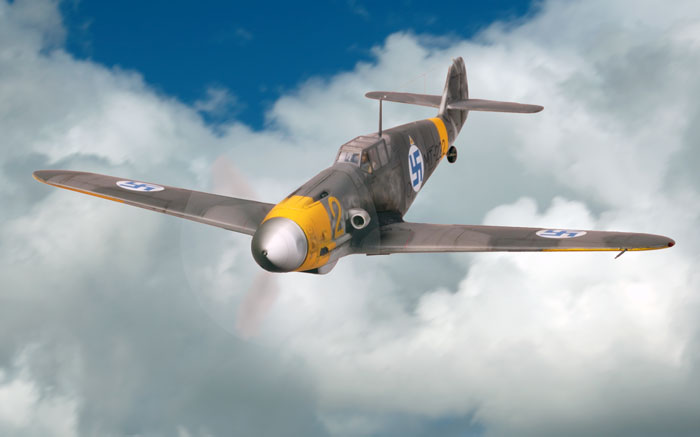
This project also presented the opportunity to do a few in-flight
composite images, which are always fun, even if they are time consuming.
I just hope this Gustav has a happier landing in the USA than
the last one!
Photography
The model was photographed in
HyperScale's studio using a Nikon D70 digital SLR. Illumination was via
two studio flash units - one Bowens 250 and a generic 100 flash - on
stands and illuminating from a high 45º angle from each side of the
front of the photography table.
The camera was fitted with a Micro
Nikkor 60mm lens.
ISO was set to 250, and the manual
shooting settings were 1/100 of a second at f.29. The high aperture
ensures good depth of field.
For the in-flight photos, the model was
placed on an acrylic Flexi Display stand in front of a light grey
background. The propeller was spun by holding a hair dryer in front of
the spinner. A series of photos were taken from different angles.
The photos were opened in Photoshop CS
and the model was "cut" from the images. They were then merged with
photos of a cloudy sky
in Photoshop CS, resized to 700 pixels in width and saved as 75 dpi .jpg
files using Photoshop's "Save for the Web" option.
Model,
Images & Text Copyright © 2007 by
Brett Green
Page Created 27 June, 2007
Last Updated
24 December, 2007
Back to
HyperScale Main Page |
 Home
| What's New |
Features |
Gallery |
Reviews |
Reference |
Forum |
Home
| What's New |
Features |
Gallery |
Reviews |
Reference |
Forum |