|
Hasegawa + Hawkeye 1/48 scale
Messerschmitt Bf 109 T-2
by Floyd Werner
|
 |
|
Messerschmitt Bf 109 T-2 |

This 1/48 scale
Bf 109 T
Conversion
is available online from
Meteor Productions
Aircraft Carrier.
When you mention these words you think of American, Japanese, British
- but German? Yes the Germans were actually working on two
aircraft carriers when war broke out. Using airframes that were
currently in production, like the Ju-87 Stuka and the Messerschmitt Bf
109, the carrier would terrorize the Atlantic. Fortunately, the carriers
were shelved before they could be finished but the Bf 109s were
produced. A little known variant, the Bf 109 T was in production when
the carriers were cancelled. There were actually two variants, the Bf
109 T-1 and -2. The T-1 was actually the carrier designed aircraft. The
T-2 was the land based version.
The Toni featured longer wings. The T-1 was to have a catapult and
hook assembly for carrier use. The Bf-109 were known for its week
landing gear assembly can you imagine what would have happened had the
109 had to land in rough seas? It would have been a terrible design. The
T-1 was converted to the T-2 specifications and assigned to the JG5 and
JG77 defending Norway. A neat piece of history is that a T-2 is credited
with downing the first B-17 of the war. A British B-17 enroute to bomb
targets in Norway. The Toni was based on the E-7 airframe so it was a
dated design, however, the Toni continued to serve in JG300 and JG11 in
1944.
The Kit
I started this project with a Hasegawa Bf 109 T kit. You get your
basic Hasegawa Bf-109E kit molded in light grey blemish free plastic.
The clear parts are provided on one sprue. The decals are provided on a
sheet with markings for two Bf 109 Ts. An additional instruction sheet
for the modifications are added to the kit’s normal instructions. To
make the Toni Hasegawa provides you with cream colored resin for the
separate elongated wing tips, separate slats and additional lengths for
the ailerons. This did not make sense to me as the fabric detail on the
ailerons is very nice and to fill in the seam would make the detail
vanish.
The Hawkeye Design conversion
Hawkeye actually gives you a nicer conversion set. In addition to the
longer wings you get separate slats and separate ailerons. They are one
piece ailerons not requiring any filling like the Hasegawa design. You
are also given the less familiar square intake such as on the Bf-109F-0
which you will need for some Tonis. The carrier catapult gear and
arresting hook are also provided if you want to add them.
Cutting Edge Cockpit CEC48379
The kit cockpit is adequate but not good enough for me. I elected to
use the Cutting Edge set as it is the best fitting and easiest to use.
Also you get a great seat with seatbelts which saves you some work.
Molded in bubble free light grey plastic, the Cutting Edge set is a
vital upgrade if you ask me. You are also treated with an acetate
instrument panel.
I elected to assemble the fuselage halves first and this proved to be
hassle free. No filler was needed. What more can you say? Perfect. You
are provided with a steel radiator. Don’t use the splitter plate as it
wasn’t used on the Toni. Now is a good time to add the forward cowling,
but don’t forget to add the guns. I speak from experience. I did. What a
pain to add later. I added two access panels on the fuselage below the
cockpit for the MW50. These were peculiar to the Toni.
Cockpit
The Cutting Edge cockpit was assembled outside the fuselage and
preshaded with Model Master Enamel Interior Black and painted with Model
Master RLM 02. Details were picked out with Apple barrel brand acrylic
paint and some Model Master Metalizer Magnesium. The instrument panel is
up to you. You are provided with a resin instrument panel or a sandwich
affair with acetate instruments. The sandwich affair is the way I
selected. It looks realistic to me.
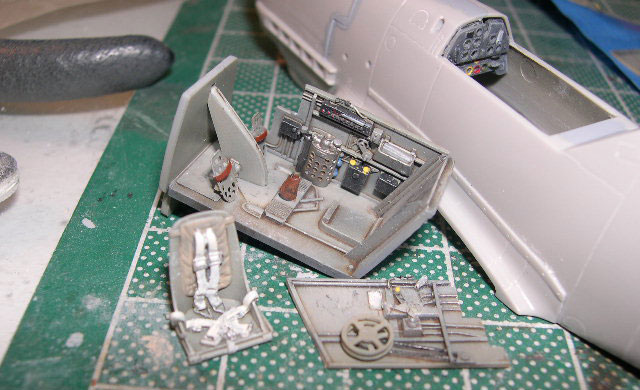
I painted my instrument panel RLM 66. The whole cockpit is inserted
from the bottom. It fit like a champ. I left the seat out until later.
It didn’t occur to me until later that the Tonis were rebuilt to T-2
standards so that the interior could have been RLM 66. I did paint the
cockpit sill the RLM 66 which was seen on some Emils.
Wings
The wings also include some steel screens for the radiators. They are
see through but I decided I could live with it. The wings were hassle
free. I assembled them as per the instructions and then cut the ailerons
and slats as well as the ends off as per Hawkeye’s instructions. I left
the pour stub on the wing pieces as this would add some strength to the
join. All I had to do was whittle the pour stub a little for a perfect
fit. I filled the seam with superglue and then rescribed the line.
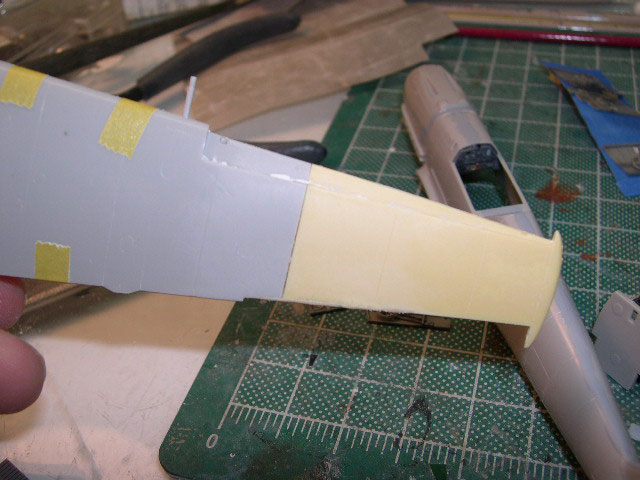
While I was at it I scribed the wing spoilers on the upper surface.
They might have been faired over but if your building a Toni why not
have them?
Assembly
Add the wings up to the fuselage and you’ll find nothing wrong. The
fit is perfect. No filler necessary. The horizontal tail planes are the
same way. You can tell you have them properly aligned when the support
braces fit perfectly. I left the supports off until after painting to
make it easier for me. With that everything is ready for paint.
Washing the model with dish detergent made it ready for primer. I
primed my model with Tamiya Primer White. The Hasegawa panel lines are
very thin and the primer filled a couple of them in. I rescribed the
ones that I noticed. Adding Model Master Enamel RLM 66 for preshading
set the model for the first stage of weathering.
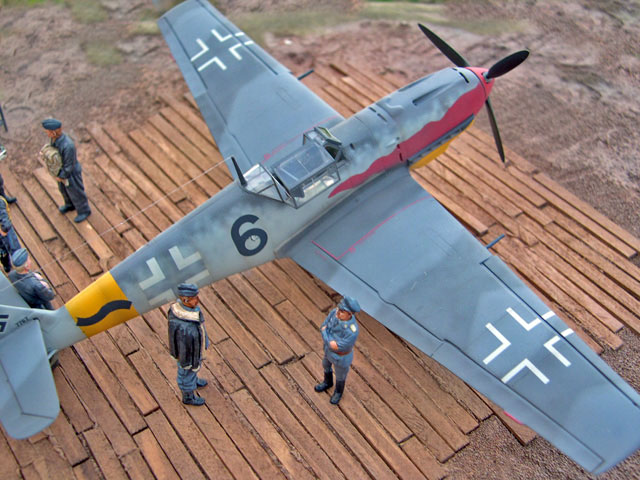
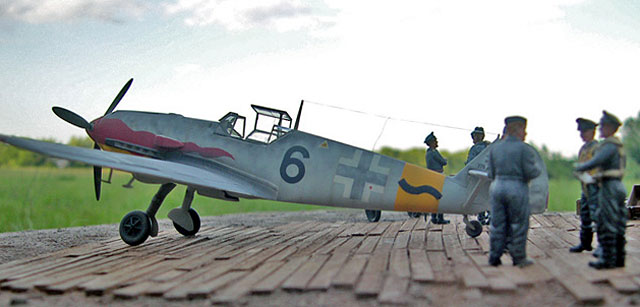
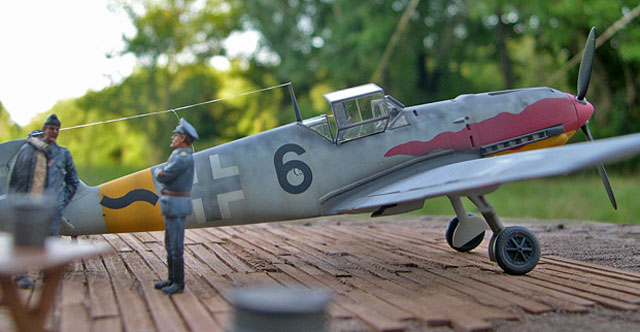
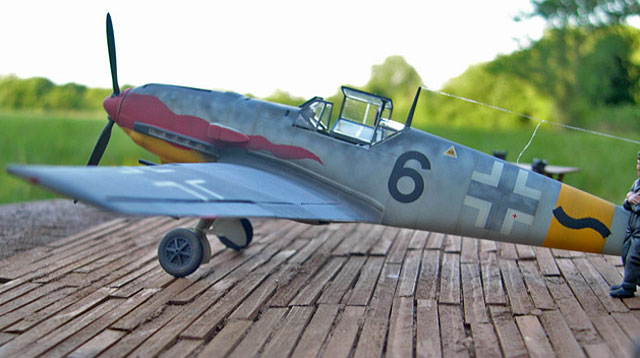
I wanted to depict the aircraft of Oblt. Herbert Christmann as he was
flying with JG11. What was so special about this Toni? What other
Luftwaffe aircraft has red flames down the sides? Well other than one on
fire.
 The
RLM 04 yellow RVD band and lower cowling were added. Now I must say that
the lower yellow cowling is open to debate. I have two photo of the nose
and it looks to be a different color to me or at the very least a
cleaner and newer cowling. I opted for the yellow cowling. If I’m wrong,
prove it. Claes Sundin agreed with me see
http://www.messerschmitt-bf109.de/display.php?lang=de&auth=e&name=version_display&fotonummer=1152 The
RLM 04 yellow RVD band and lower cowling were added. Now I must say that
the lower yellow cowling is open to debate. I have two photo of the nose
and it looks to be a different color to me or at the very least a
cleaner and newer cowling. I opted for the yellow cowling. If I’m wrong,
prove it. Claes Sundin agreed with me see
http://www.messerschmitt-bf109.de/display.php?lang=de&auth=e&name=version_display&fotonummer=1152
Masking this off it was time to paint the RLM 76. For me Model Master
Enamel RLM 76 was the color of choice. Aeromaster RLM 75 was applied
next. I applied it as a normal paint scheme with a hard line. Gunze RLM
74 was then added to the model. Now that I had a hard edge camouflage
applied I needed to add the overspray of RLM 76. I thinned the MM RLM 76
down and then squiggled it up toward the top.
It seems that a certain werknummer series had this unique paint
scheme. Others have interpreted it as saying the wings have squiggles. I
could not agree and after looking at the four photos I think the
evidence indicates that the squiggles are the figment of someone’s
imagination. There are no other photos of any Tonis painted this way or
any other JG11 machine having them. Once I was happy with that I had to
make the IV Gruppe symbol for the yellow band as no decal manufacturer
seems to have noticed it, but it is plainly visible in the JG77
reference book. This was masked with Tamiya tape and painted. I needed
to paint the flame as well as I wanted the spinner to match the flame. I
used Tamiya tape to mask this area off and sprayed it with Tamiya Flat
Red. Removal of all the masking tape revealed a really cool looking
airplane. A coat of Alclad Gloss Base was used to prep the surface for
decals. One thing that I noticed was that the forward and center section
of the canopy were darker than the aft section. I figured the front was
painted RLM 66.
Decals
The Hasegawa decals are often cited for being too thick, I disagree.
When you look at them on the sheet they certainly do look thick but when
applied to the model with a good setting solution they perform
flawlessly. I used Mr. Mark Softner and the results were wonderful.
Another coat of Alclad Gloss Base and once completely dry a follow up
coat of Model Master Acrylic Flat. There were some inaccurate decals for
the Toni I was doing. The photos clearly show that the underwing crosses
are plain white. This and the missing IV Gruppe are the only problems
that I found. Well at least that I can remember.
Weathering
The photos of the real machine showed remarkably little weathering. I
used a wash of burnt umber artist oils over the whole machine. This was
followed up with very thinned Tamiya flat black and red brown airbrushed
on select panel lines. Gunze Oil was streaked along the bottom from
panel lines aft. Silver pencil was used to add chipped paint. Some Mig
Pigment European Dust was added to the wheels, lower wings and the wing
root area. Everything was sealed with a coat of Model Master Acrylic
Flat.
Final Assembly
Adding the little parts such as the mass weights, pitot tube, and the
canopy sections and this baby was done.
Why Hasegawa elected to make the ailerons like they did is beyond me.
Moving to the Hawkeye Design was an easy transition. The Hawkeye Design
Toni conversion is excellent and fits as designed. You get the new type
of intake, if you didn’t use it you could use it for Galland’s
Bf-109F-0. You’ll have to check your references to see which intake your
particular Toni has. Also the addition of the catapult and arrestor hook
are a very nice touch for the Hawkeye set. The Hasegawa Toni conversion
is not bad in itself. The basic kit is excellent with the exception of
the see through effect because of the lack of engine, also the
radiators, both the engine and the wings are also see through. If you
don’t worry about them like I didn’t you will find this kit to be a
great little model. The Toni is a unique looking airplane with its
extended wing tips. The Hasegawa conversion should fit as well as the
Hawkeye one. You will just have to work the aileron on the Hasegawa
conversion. The flame motif on this airplane should appeal to most
modelers for its unique look and splash of color. This model will stand
out in your collection as it does in mine.
Hawkeye Design Bf 109 T conversion- Highly Recommended, if you can find
it. I believe that Meteor Productions has the molds for this conversion
now. Hopefully they will release it again plus some decals.
Cutting Edge Bf-109E cockpit- Highly recommended. The best Hasegawa
Bf-109E interior in 1/48th scale, period.
Hasegawa Bf 109 T- Highly Recommended.
-
Sea Eagles: The Messerschmitt Bf 109
T, Francis L. Marshall, Air Research, ISBN 1 871187 22 2
-
The Messerschmitt Bf 109 T Die Jaeger
der Graf Zeppelin, Francis L. Marshall, Marshall Verlag, ISBN
3-0000-82204
-
Jagdgeschwader 1 und 11, Teil 3
1944-1945, Jochen Prien and Peter Rodeike, ISBN 3-923457-251 (Teil
3)
-
Profiles in Norway No. 3, Camoflage &
Markings of the Messerschmitt Bf 109 T in Norway 1941-1944, Kjetil
Aakra & Arild Kjaeraas, ISBN 82-92542-02-7
-
Air Magazine No 28, November 2005,
Patrick Laureau
This Bf 109 T conversion is
available from Meteor Productions for USD$19.99
Model, Images and Text Copyright © 2007
by Floyd Werner
Page Created 30 August, 2007
Last Updated
24 December, 2007
Back to
HyperScale Main Page |
 Home
| What's New |
Features |
Gallery |
Reviews |
Reference |
Forum |
Home
| What's New |
Features |
Gallery |
Reviews |
Reference |
Forum |