|
Fujimi's
1/48 scale
Messerschmitt Bf
110 C-1
by Charles Whall
|
 |
|
Messerschmitt Bf 110 C |

Fujimi's 1/48 scale Messerschmitt Bf 110 C/D is available from
Squadron.com
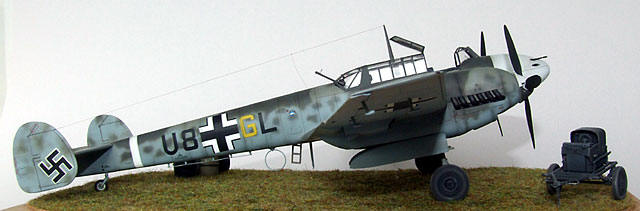
This is the
Fujimi 1/48 Bf 110C/D kit shown built as the C-1 variant from the Battle
of Britain period.
Whenever
building a kit, I always like to research what happened to the aircraft
and its crew-particularly during the Battle of Britain. Unfortunately,
reference material does not give any information regarding the fate of
U8 + GL and its crew.
Even the
excellent ‘The Battle of Britain Then and Now’ proved fruitless.
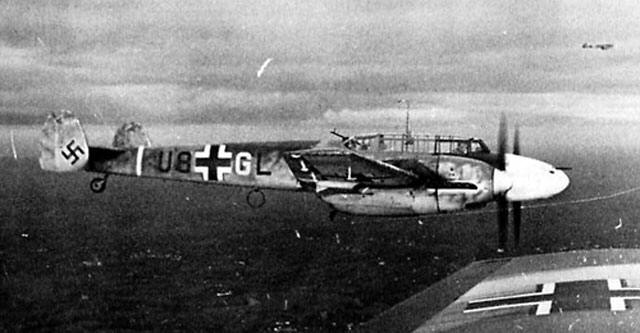
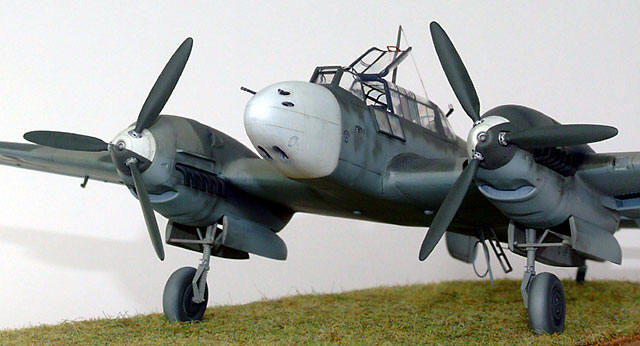
This C-1
carries the white nose and thin white band around the rear fuselage,
common to many aircraft of this unit in the later stages of the Battle
of Britain. The recess for ‘parking’ the rear machine gun has been
faired over on this aircraft. The photo shows the first style of radio
mast on the lower port fuselage, and the early style canopy clearly
lacking the D/F loop remote control on the canopy windscreen port side,
common to the C-1 sub-variant. The rear central Bordfunker’s
canopy panel is a revised and updated version; the original fitted to
C-1’s was fully enclosed and did not provide for the Bordfunker’s
machine gun to be left in the firing position with the canopy
fully closed. An armoured windscreen has also been fitted.
Detail Sets:
-
Eduard 48253
& various spare etch parts and wire,
-
Ultracast
Bf109 spinners and props
-
Quickboost
1/72nd .303 Brownings
-
True Details
wheels
-
Aeromaster
Bf110 stencils 148-021
-
E-Z canopy
masks (brilliant!!)
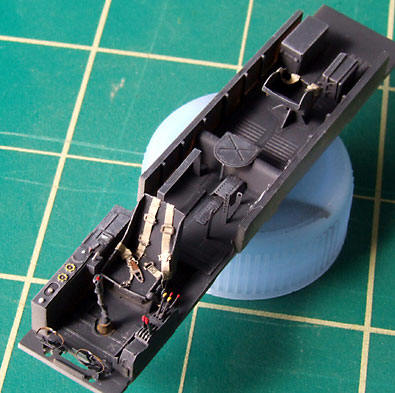
I made a
number of modifications to the Fujimi kit. The rather bland
cockpit/radio/gunner sections were enhanced with the excellent Eduard
set. This included the handgrips and a miniscule MG15 crosshair,
throttle/mixture levers etc. I painted the cockpit a dark grey to
represent RLM66-most of my references seem to show this area as much
darker than the usual RLM02-but that’s another argument! I added wire
detail to enhance the gunner/radio area.
Click the thumbnails below to view larger
images:
[../../photogallery/photo00007261/real.htm]
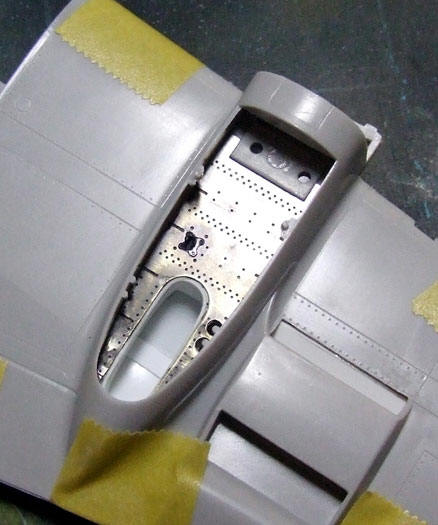
External
parts included oil cooler flaps replaced in the open position, elevator
trim tab actuators and oleo suspension. The wheel wells also received
some extra attention since the kit is devoid of any detail here. I used
my Dremel tool on the kit parts to open the holes into where the wheels
would retract. Thin styrene sheet was used to reproduce the internal
structure of this area-being careful to make sure the structure would
fit within the wing area. I then placed the etched detail over the kit
parts and fitted the wheel well assemblies in place. I also built the
internal structure for the radiator, as the kit would have shown this as
a large gap. Wells were painted RLM02 as per references.
Click the thumbnails below to view larger
images:
[../../photogallery/photo00008535/real.htm]
I replaced
the aerial sections on the lower fuselage with wire. The kit parts for
the 7.9 MG17 guns in the nose were poor so I replaced them with two
Quickboost 1/72 scale Browning machine guns, which I think do the job
fine! The gunners’ MG15 was replaced with a Verlinden resin one.
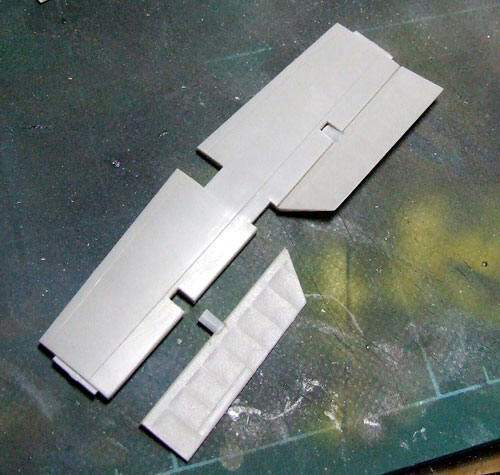
I
repositioned the elevators by cutting off the kit parts, rebuilt the
hinges with some styrene section and replaced the elevators in the
raised/’parked’ position (yes, I know…guess who stuck the elevators on
the wrong way round-not realising until I was about to fix the section
onto the kit lol!)
The ailerons
were cut and repositioned in order to replicate the way they rested
naturally .
I replaced
the kit spinners and props with the excellent Ultracast resin sets. When
I offered them up to the engine section, they were quite a bit larger so
I filed back the kit parts and the resin parts until they matched up-a
relief I can tell you!
True Details
resin wheels replaced the kit parts but I am unsure if the smooth tread
was not used until later versions as most of my references show a radial
tread on the tyres.
Hair was used
for the radio Antennae wire with white glue for the isolators.
I made the
base using Cedar and routed the edges. Static grass was used (I still
cant work out how people get it to stand up!!), and I added a Verlinden
starter cart and oil barrels.
In all, a
great kit considering its age, but will certainly be outclassed by the
new Eduard 110 family IMO. I am sure looking forward to those-they look
superb!
Primed with
Alclad grey, the model was painted using Gunze acrylics in an 02/71/65
scheme of the day fighting Zerstörer aircraft. I was glad my references
showed this was not the usual splinter scheme normally associated with
Luftwaffe aircraft of the period, but a more informal scheme.
Cockpit is
RLM66, wheel wells are RLM 02, propellers RLM 70, spinners are 50/50 RLM
21/71. Nose and tail band are RLM 21 white-there seems to be another,
partially over-sprayed tail band where the ‘U’ is situated but I didn’t
include this. Other paints used were Vallejo/Model Air acrylics.
Exhaust
stains were airbrushed using highly thinned black/brown Tamiya acrylics.
Chalks were used for weathering/dirtying areas and a Prismacolour pencil
for the paint chipping on walkway areas.
Prior to the
application of decals the model was sprayed with Future floor wax. The
kit decals went on without any problems and I used the Aeromaster Bf110
stencil set. Vallejo Model Color flat coat acrylic was used to seal the
decals and give the model a flat finish. The kit swastikas were printed
slightly out of alignment on the white/black sections but isn’t too bad.
Photos were
taken using my Fuji Finepix 9500S using a sheet of white card as
background.
I just
experimented until I was happy with the results.
-
Aviation
Signal Bf110 Zerstorer in Action Squadron Signal.030 (Jerry L
Campbell)
-
The
Messerschmitt Bf110 in Colour profile (John Vasco & Fernando
Estanislau)
-
Warbird
Modelling/Battle of Britain (Finescale Modeller Special Edition)
Click the thumbnails below to view larger
images:
[../../photogallery/photo00005244/real.htm]
Model, Images and Text
Copyright © 2007 by Charles Whall
Page Created 25 October, 2007
Last Updated
24 December, 2007
Back to
HyperScale Main Page |
 Home
| What's New |
Features |
Gallery |
Reviews |
Reference |
Forum |
Home
| What's New |
Features |
Gallery |
Reviews |
Reference |
Forum |