|
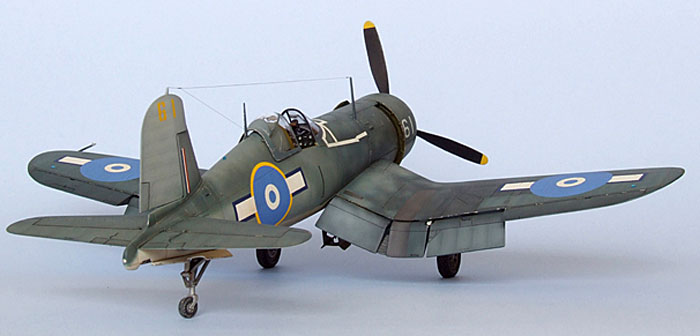
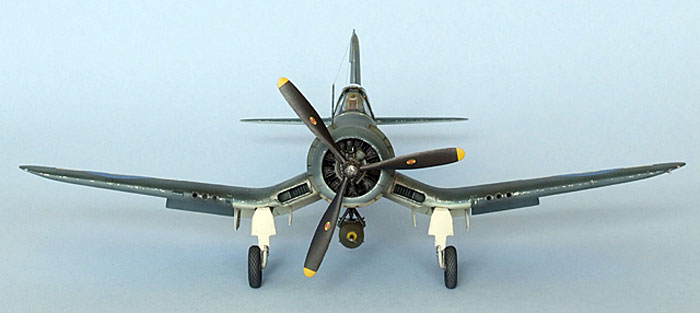
Tamiya's 1/48 scale
F4U-1A Corsair
by
Bruce Salmon
|
 |
|
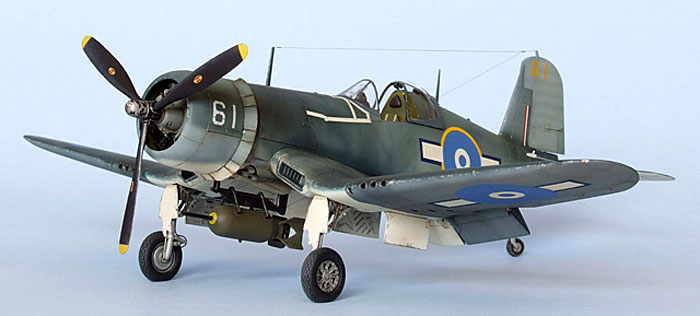
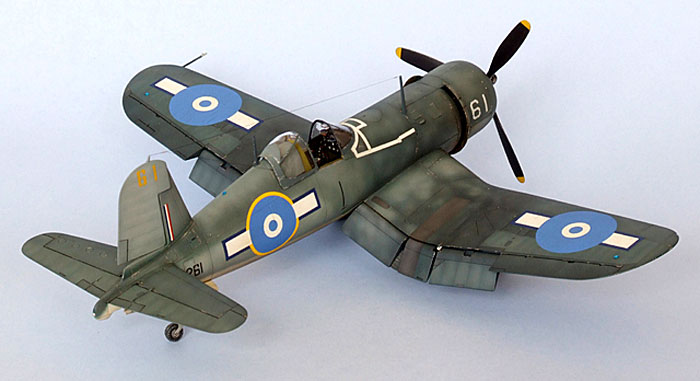
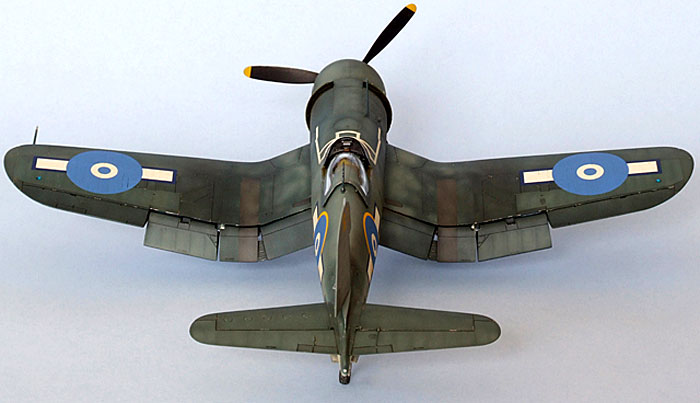
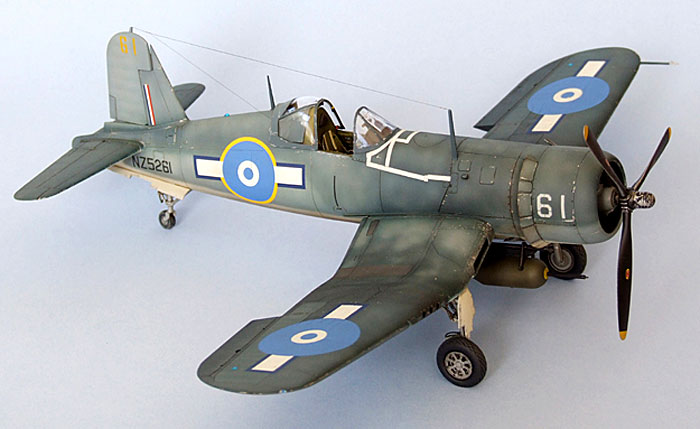
Chance-Vought F4U-1A Corsair
NZ5261, 30 SU, Royal New Zealand Air Force, Green Island |

Hasegawa's 1/48 scale A6M2a Zero Type 21 is available online from
Squadron
When I finally got around to building a Corsair there was only one
kit and one aircraft that would do.
The aircraft I chose to model, NZ5261, was flown by an RNZAF fighter
pilot named Bryan Cox who taught me navigation for my commercial pilots’
licence. During class he would often drift off topic into one war story
or another. This story in particular grabbed my attention.
The incident takes place on 15th January 1945 on Nissan Island in the
Green Islands group (usually just called Green Island). At the time
NZ5261 belonged to 30 SU (Servicing Unit) and operated by 16 Squadron.
Individual pilots did not have their “own” aircraft but flew whatever
was available from the pool.
Rostered off flying for the day after 8 consecutive days of operational
flying and on his 20th birthday, Bryan Cox spent the morning lying on a
raft in the lagoon at Green Island, watching clouds drift by.
Meanwhile, Lieutenant F.G. Keefe of 14 Squadron bailed out of his
burning Corsair having been shot down by Japanese ack ack while on a
morning strike to Toboi Wharf in Simpson Harbour, Rabaul. The strike
involved 36 RNZAF Corsairs from 14 & 16 Squadrons (Green Island) and 24
Squadron (Bougainville).
After lunch there was a briefing for a rescue mission which involved
dropping to him a native bamboo raft by Ventura (Bryan Cox flew NZ5261
on this mission). While Keefe was swimming towards the harbour entrance
sections of Corsairs overhead kept watch to prevent his capture and an
American Catalina stood by for when he was out of range of the coastal
guns.
Unfortunately the tide turned carrying Keefe back into the harbour.
Later, 12 more Corsairs arrived and kept the Japanese busy while the
Ventura made a successful raft drop. Late in the afternoon the Corsairs
turned for base and the approaching dusk.
Halfway back to Green Island a black tropical storm stretching across
the horizon and down to sea level lay in their path. Low on fuel and
with no alternative airfields the Corsairs had to continue on. In tight
formations of 4 they entered the cloud at low level and it rapidly
became pitch dark. With scant navigational aids and suffering the
effects of spatial disorientation the formations inevitably broke up,
including the aircraft flown by Bryan Cox. He was saved only by chance
when a flash of lightning illuminated the Green Island coastline. 8
Corsairs failed to return, 3 from 16 Squadron and 5 from 14 Squadron.
Keefe was captured by the Japanese and died 2 weeks later.
For the full story read “Too Young to Die – The Story of a New Zealand
Fighter Pilot in the Pacific War” by Bryan Cox, Century Hutchinson 1987
NZ5261 survived the war and returned to New Zealand only to be sent to
the Rukuhia graveyard along with most other RNZAF Corsairs and later
scrapped.
Aftermarket Products Used:
Eduard PE set (49 215) F4U-1D Corsair
Eduard PE set (FE224) F4U-1 Corsair placards
True Details (48045) diamond-tread wheels
True Details (48504) 1000lb bomb
Ventura decal set (V4880) RNZAF F4U-1 Corsairs, Pacific Theatre
Construction began where it always should – good references!
Unfortunately these are hard to come by. Photos are often grainy,
under/over exposed or don’t fully show the thing you are interested in.
For the most part you can’t really go by what others have modelled and
internet walkarounds of museum aircraft are generally rubbish let alone
the fact that many of said aircraft are incomplete or the wrong colours
or a mix of types… the list goes on.
Well I thought I’d just get cracking and glue together as much as I
could. I started out with the -1D kit (which was already in my stash)
then realized later that the aircraft I wanted to model is a -1A.
Meantime I continued on with the -1D until later on when I would need to
buy a -1A for the bomb rack & propeller.
Wings
Originally I was going to have the wings folded so cut and glued the
parts to that effect. Then I changed my mind and decided to have only
one wing folded… then I changed my mind again to have no wings folded… a
lot of unnecessary extra work. This is pretty much how the whole build
went!
Next I tackled the main gear wells. These needed the sidewall edges
built up as Tamiya has not moulded them deep enough. Next I added lead
wiring to the gear door rams and other bits and pieces. With that
finished the outer wing halves were attached. Now that the model is
complete I wish I had dremelled off the moulded on kit rams and scratch
built new ones. The wells were then painted Humbrol 226 interior green,
the details picked out then given a wash & drybrushing. Soon after I
discovered that the wells were actually painted white so had to do it
all over again.
The zero length rocket launchers were left off as RNZAF Corsairs didn’t
use them. Only the FG-1Ds sent to Japan at the end of hostilities had
them attached.
I then built the flaps and drilled out the lightening holes (which you
can’t really see) filled & sanded the join lines, starboard inner step
hole etc. The flaps were left off until final assembly. The wingtip nav
lights were cut out and new ones made from clear sprue. I even put bulbs
in them by drilling a small hole and painting the hole either clear red
or blue. I glued these on, positioning them accurately with the aid of a
10X hand lens, and sanded them to shape. Luckily it all went perfectly
first time round. I also drilled out the formation and IFF lights by
using a drill of the same diameter and drilling only as deep as the tip
of the bit.
The Landing light under the port wing was filled as they were deleted
from this position early in production and moved to the leading edge of
the outer wing section right next to the fold. The same position on the
starboard wing is where the gun camera goes (if fitted). A new pitot
tube was made from brass tube and wire. The wing fuel tanks were deleted
in the -1A so their filler caps and drains were also bogged and sanded,
so too were the depressions in the wing tips. On the tailplane the
rudder and elevator trim tab actuating rods were removed to be replaced
with PE ones during final assembly.
Engine & Cowling
I used the kit engine adding the Eduard PE harness and a bit of
scratchbuilt detail such as the propeller governor and oil scavenge
pump. The engine was painted Tamiya XF1 Flat Black and drybrushed with
Humbrol 11 silver & raw umber oils.
The cowl flaps would be open so I detailed the inside with
appropriate actuating wires. These and the inside of the cowl was
painted interior green, weathered and the whole sh-bang glued together
(The exterior camouflage was painted at the same time as the rest of the
model but attached during final assembly). Interestingly the cowl
assembly doesn’t line up properly with the fuselage and points a bit too
skywards so too does the engine itself. I’ll make sure next time to push
the prop into its housing to line up the engine properly while it is
glueing.
The exhaust openings in the fuselage were then dremelled out and new
pipes made from evergreen tube.
Cockpit / Fuselage
This is where the Eduard colour photoetch comes into its own. The
instrument panel is primo, a new seat and seatbelts and a plethora of
tiny levers to add… making sure of course that I was using only the same
bits as for a -1A. I also added a bit of wiring and the big hose of the
cockpit heater. Note: The under-floor window was an early design used to
aim aerial bombs (housed inside the outer wing panels) against the
perceived threat of massive bomber formations. In production aircraft it
was often replaced by an aluminium panel (as I have done). The cockpit
was painted interior green and given a wash and some drybrushing.
Next I attacked the tailwheel well – it’s a big hole so it was going to
need some detail. The references again let me down here and I had to
“invent” some bulkheads etc. Once painted (interior green) and with the
fuselage now sealed up I found the info I needed. Luckily the hole was
big enough to do some un-modelling and by this time had the second kit
to use as a template - it’s now mostly accurate.
The fuselage fuel tank cover plate, just ahead of the cockpit, had the
outer ring of “screw heads” filled as this is actually flush riveted and
the rudder was removed and repositioned (makes the aircraft seem more
“alive”).
Little Bits
The main landing gear was given brake lines and springs made by
winding fine wire around a long piece of strong stiff wire. The Eduard
“springs” were just flat PE and totally useless and the kit didn’t have
any.
Tail wheel-well doors had their actuating wires added from stretched
sprue.
The kit’s Brewster bomb rack was savaged with a knife and given brass
tube sway bars and wire bracing.
The tailwheel was given the PE treatment, and a bit of dremelling for
good measure. The arrester hook was not attached as ground-based
aircraft did not use them.
The True Details wheels had their horrible “flat tyre” bulges sanded
off.
The kit canopy (once painted) had its opening levers scratchbuilt and
mirror attached
The True Details 1000lb bomb was assembled and sanded. I made mine
into a cookie cutter by adding a 2ft pole (12.5mm in 1/48) to the front
with evergreen rod. The arming propellers came from my Eduard P-40N PE
set.
Painting
Once the model was fully assembled, sanded and rescribed where
necessary, it was time to paint. This is where the real fun ‘n’ games
began and I seemed to be operating outside the learning curve for a
while…
I use only enamels and I never pre-shade my models (post-shade only) so
it was straight into a coat of Tamiya XF2 white toned down with a tad of
Humbrol 28 camouflage grey for the undersides. Then I masked the lower
outer wings and sprayed Humbrol 144 intermediate blue. For the sides I
lightened this with white so that the border with the underside white
would not be too dark for p-shade weathering effects. Then I went back
to straight int. blue for the higher bits. From here on I started to
lose the plot.
After p-shading the panels of the int. blue with progressively lighter
shades I decided that I didn’t really like the colour – it seemed a bit
too grey. So I mixed my own colour using various paints I had available,
sprayed and p-shaded them for a couple of hours then decided that the
int. blue was alright after all and sprayed that again. Next came the
top colour - sea blue. Initially I used Tamiya XF17 sea blue but after
spraying and p-shading that a bit it was just way too green. Next to be
tried was a mix of Humbrol 77 navy blue with a tad of Tamiya X3 royal
blue… Ugh, much too blue.
Eventually I bit the bullet and bought the correct colour - Xtracolor
X121 gloss sea blue. I resisted the Xtracolor to begin with because it
was a gloss paint and on a previous model took ages to dry. Nobody here
stocks Model Master Enamels anymore, which is a crime if you ask me. I
found out quite by accident that if you add 1 part Tamiya X21 flat base
to 5 parts Xtracolor gloss you will get a mostly matt finish and a fast
drying paint. That little problem solved the painting continued.
The upper surface was very weathered by p-shading. In some places I
darkened the mix again, lightened it some more in others and then tied
it all together with a heavily thinned coat in about the mid tone range.
All fabric areas were masked separately and painted in lighter hues. The
most realistic weathering is achieved by having many subtle layers.
Once dry I sprayed Humbrol Gloss Cote on the places where the decals
would go. Well this crap wouldn’t dry and after several days resembled a
cracking lakebed during a drought. Not wanting to sand it and risk
damaging my paint job I decided to spray straight over it with
commercial grade Wattyl Estapol polyurethane high performance interior
clear house varnish (gloss). I applied several coats to fill in the
cracks from the Humbrol mess and within 24hrs it was as hard as nails.
Local modelling legend Andy Hosking has used this product for at least
15 years without any signs of yellowing.
Decals
I used the new decal set from Ventura (V4880) RNZAF F4U-1 Corsairs,
Pacific Theatre. All I really wanted was the national insignia and the
tail code numbers. These decals are tricky to apply and their glue is
very strong. As soon as they touch the model they stick instantly and
you cannot slide them around at all. I must’ve been away in la la land
at the time because I put them all in the wrong places – they would have
to come off! I used the “sellotape on top ripping off the decals”
method. Man they were stuck on strong! So strong in fact that they only
came away, in small pieces, by actually ripping up the varnish layer
too. Lucky I had that initial rubbish coat of Humbrol underneath I guess
(nope it still hadn’t dried).
Back to painting again to fix the damage! More Estapol went on and
another set of the same decals. This time I cut close to the decal edges
so I could slide them off the backing paper into their exact positions
and sliding it back underneath to make minor corrections. You need two
hands to wrangle the decals while holding your model delicately between
your knees. I noticed on both sets that the white from the bars stuck
out beyond the blue edges – Gad! More masking and painting! Local
modeller Craig Sargent supplied me with the 61 decals for the cowl. I
used 2-3 applications of Gunze Mr. Mark Softer to get the decals to suck
down and they still seemed to be settling after 3 days!
Weathering
Once I was satisfied with the work I sprayed the entire model with
Estapol satin ready for an oil wash. I use satin because I like some of
the wash to stick to the surface which makes the paintwork look a bit
more discoloured. I use Winsor & Newton Artisan water mixable oil
colours. I mix mine in “BAR’S BUGS” car window washer concentrate,
straight out of the bottle (no dilution). First up is a light general
overall wash for the entire model using raw umber. I apply this to one
section at a time (e.g. port wing then starboard wing etc.) using a soft
1cm wide brush in the direction of the airflow. I use the brush to soak
up excess so it doesn’t pool and leave those dreaded tide marks. If I
want to take more off I wash the brush in water to clean it first. Once
that is dry-ish (overnight) I then apply darker washes, by adding some
black to the original mix, to places that are usually grubbier.
Note: tide marks (especially when you are trying to simulate an oil
spillage) are caused by applying your oils onto a gloss surface - it
repels the oil into a droplet shape which dries leaving circular marks.
To avoid tide marks you need to apply your oils to a matt surface which
breaks the surface tension of the droplet and allows it to spread.
Gun and Exhaust stains are then sprayed using Tamiya X19 smoke in
successive layers until I get the right shade. This is a gloss and dries
slowly so be careful you don’t get too close with your airbrush and blow
a hole through to the paint underneath. This is unsightly and not so
easy to fix. Sometimes I add a tad of Tamiya XF64 red brown when I am
doing exhaust stains and also use Tamiya XF57 buff closer to the engine
end to simulate the lead oxide from the burnt fuel.
Paint chipping comes next and for that I just use Tamiya XF16 flat
aluminium applied with a tiny brush (yep it takes a fair while). A matt
coat of Estapol follows and then some drybrushing of raw umber around
the engine and other areas such as aileron hinges, where grease and oil
would leak from. A mix of Humbrol 11 silver and raw umber is applied to
high traffic areas (the oil paint makes it easier to brush). Now we are
ready to add the final bits and bobs that were also weathered.
Final Assembly
First on was the cowl assembly, then the undercarriage and doors
which went together without a hitch. The flaps were a bit of a mission
to install and necessitated further sanding and painting. Once on its
feet I made all the various lights by first painting the drilled-out
areas silver and when dry adding a drop or so of epoxy glue. I let the
epoxy dry for a couple of days then painted over it with clear red,
blue, etc.
Next came the armoured cockpit glass which is a bit “gappy” where it
fits the fuselage and needed some filling and painting over at the base
to hide any messy stuff. I attached the rest of the canopy with
industrial strength white glue then used said glue to fill any cracks.
The join line was then painted with a thin coat of sea blue.
I made the aerial wire with stretched sprue and attached it with white
glue and the insulators made from drops of white glue dabbed on with a
pin. The aerial was then painted black with a brush and the insulators
aluminium. Things got tricky again as I attached the daisycutter bomb in
the wrong position and had to remove it and repaint the damn thing. I
then found another photo of NZ5261 and discovered it also had 61 on the
rudder so this had to be masked up and, using a PE stencil, painted all
while trying to avoid “pinging” the aerial wire (whew!).
This model certainly wore me out and I was glad to finally see the
back of it. Most of the problems were my own fault and I should have had
it done in half the time. The end result was worth all the agony.
I would like to thank Pete Mossong our resident Corsair expert for his
timely and sometimes not-so-timely help with all the hard to get
references.
Model, Images and Text Copyright © 2007
by Bruce Salmon
Page Created 06 August, 2007
Last Updated
24 December, 2007
Back to
HyperScale Main Page
|
 Home
| What's New |
Features |
Gallery |
Reviews |
Reference |
Forum |
Home
| What's New |
Features |
Gallery |
Reviews |
Reference |
Forum |