|
Aki Products' 1/72 scale
Blackburn Firebrand
TF.Mk.5
by Brett Green
|
 |
|
Blackburn Firebrand TF.Mk.5 |

HyperScale is proudly supported by Squadron
Aki Products' 1/72 scale Firebrand in the Box
The Blackburn Firebrand was a big, brutish, beautiful British
Fighter / Torpedo bomber which suffered a long gestation period but was
ultimately underpowered and unsuccessful. The prototype flew in 1942
with
the type only entered limited Fleet Air Arm service after the Second
World War.
Aki Products is a limited run manufacturer from Japan. Under the lid, Aki's 1/72
scale Blackburn Firebrand TF.Mk.5 looks very different from most limited run resin kits.
For a start, the parts are attached to fine resin runners which look
very much like conventional plastic kit sprues. There is also an amazing
amount of detail cast on to individual parts. For example, the lower
wing has rocket stubs cast in place, and the fuselage halves feature
sidewall and tail wheel well detail on the inside.
Another major leap forward is the provision of large locating plugs
(they are too big to be called pins). There plugs work very well,
ensuring perfect alignment for the fuselage halves and the wing parts.
The other major component, the one-piece horizontal tail surfaces, slot
into a positive recess in the empennage.

Surface detail is exquisite. Panel lines and selected rivets are
perfectly consistent and crisply engraved. Control surface hinge lines
are appropriately emphasised, as are various raised lumps and bumps.
Trailing edges of all flying surfaces are razor sharp.
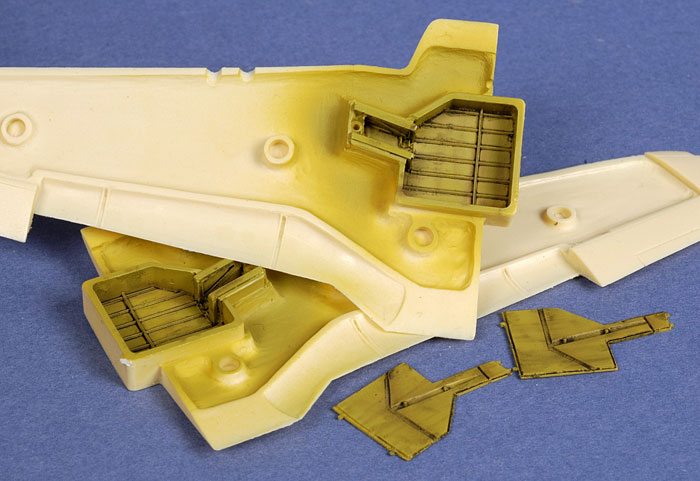
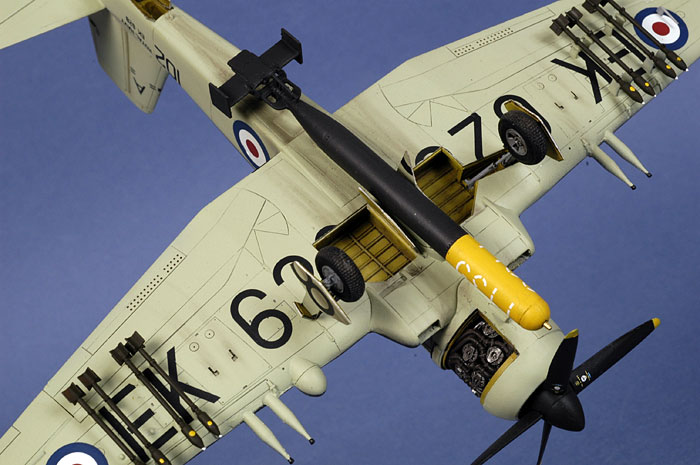
The wheel wells are cast on the underside of the top wing halves.
These are fully boxed in and feature full structural detail.
A full engine is also supplied, complete with separate clear cowl
covers.
Markings are supplied for a single Firebrand in FAA service.
Registration and colour saturation are excellent.
Instructions are supplied on one piece of A3, folded paper. The three
construction steps are well illustrated and quite straightforward
despite the scarcity of English text. A full colour marking guide
contains callouts for all the decal numbers.
With any limited run resin kit I would
normally expect to spend an hour or two cutting parts from casting
blocks and cleaning up waste material. However, in the case of Aki's
Firbrand, very little conventional cleanup was
required. The parts were simply snipped off the one or two fine connection points
and tidied up with a hobby knife and sanding stick. Some of
the parts do suffer from light flash, but this was easily removed
with a sharp blade or, in some cases, even a small stiff brush.
With the parts prepared, I pre-painted
the wheel wells and interior elements. The wheel wells and inside of the
gear doors were sprayed Tamiya XF-4 Yellow Green. Weathering was added
via fine streaks of a thin back/red brown mix sprayed randomly, followed
by a wash of thinned oil paint (Lamp Black and Raw Umber mixed at a
ratio of around 50:50).
The three sections of the
undercarriage doors are cast as a single piece, so they need to be
sliced apart if the aircraft is posed on its legs. However, I chose to
leave the gear doors in one piece until painting and decaling was
complete.
The gorgeous Bristol Centaurus engine
is made up of just six parts, but they deliver an authentic miniature of
this complex powerplant. Some of the construction looks a little scary,
such as the two delicate manifold parts hugging the cylinders, but the
parts literally clip into place.
Before assembling the engine, I primed
all the parts with Tamiya Primer straight from the can, then painted the
cylinders and mount Alclad Magnesium. The crankcase received a coat of
medium grey, while the manifolds were painted in a 50:50 mix of Flat
Black and Red Brown.
Following painting, the lovely little
engine was assembled with a few spots of super glue. A poly cap is
installed in the body of the engine to provide a simple and effective
mounting point for the propeller shaft - another nice touch.
Finally, an oil wash was applied to
the cylinders, crank case and manifold.

Click the thumbnails below to view larger
images:
[../../photogallery/photo00018156/real.htm]
The cockpit looks deceptively simple on the sprues, but its full
detail is revealed under a coat of paint. I managed to break off and
lose the spade grip on top of the control column, so I replaced it with
a tiny look of copper wire.
The real cockpit was black, but I sprayed mine Tamiya
XF-63 German Grey for a scale effect. Once again, an oil wash was
applied to help bring out the detail in this deep shadowy pit. Switch
detail was picked out with a fine brush and a toothpick in various
colours.
The only after market accessory added to the entire
model was a set of Eduard Color-Etch harness straps.
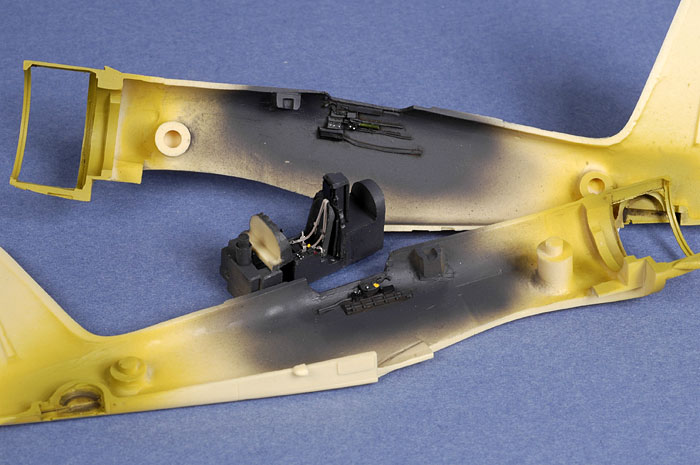
With the engine and cockpit complete, construction moved
ahead quickly. The large locating plugs on the inside of the fuselage
and the wings work perfectly to ensure accurate alignment. Clever
engineering also guarantees razor sharp trailing edges. The flaps are
moulded to the lower wing and the ailerons attached to the top. This
provides realistic hinge lines for the control surfaces.
One of the cannon barrels had broken off the wing in
transit. This was glued back onto the leading edge once the wing was
joined.
The only problem I had was of entirely of my own making.
I did not notice a tiny piece of resin waste in front of the lower side
of the starboard aileron, and this interfered slightly with the fit of
the wing halves.
The cockpit tub is inserted into the completed fuselage
prior to mating with the wings. I admit that I came perilously close to
gluing the wings and fuselage together without installing the cockpit.
Fortunately, I realised that the tub was missing just as I was reaching
for the super glue!
Click the thumbnails below to view larger
images:
[../../photogallery/photo00022593/real.htm]
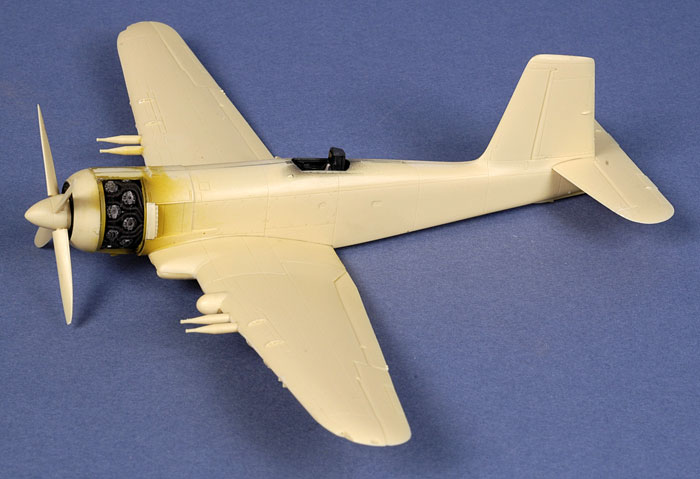
If you plan to display your model with the engine cowls closed, you may need
to trim the cowl parts before installation. I trimmed a little off each side
of the starboard cowl before gluing the part in place. Even then, there was
a small step at the front-top which I needed to sand flat once the glue had
set.
Fit was superb, with only a few swipes of Mr Surfacer required here and
there.
 The
cockpit and engine bay openings were masked with tape. I tacked the gear
doors in place to act as a mask, and also to ensure that the paint and
decals would be consistent with the rest of the lower surfaces. The
cockpit and engine bay openings were masked with tape. I tacked the gear
doors in place to act as a mask, and also to ensure that the paint and
decals would be consistent with the rest of the lower surfaces.
I primed the entire airframe with Tamiya Grey Primer
straight from the can. I like Tamiya primer, being fast
drying and a good way to quickly check for any persistent gaps or other
surface imperfections before the final colours are applied.
All remaining painting was
done with the Testor Aztek
metal bodied airbrush fitted with the "Fine"
tan tip.
Click the thumbnails below to view larger
images:
[../../photogallery/photo00029961/real.htm]
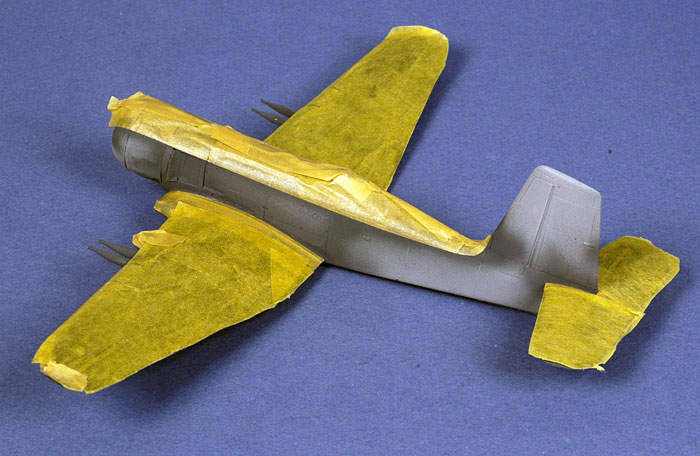
Before applying the camouflage colours, I sprayed the
general area behind the exhausts using Alclad Magnesium, then masked the
square panels.
Upper surface camouflage was applied first because I
thought this would make masking easier. Tamiya XF-24 Dark Grey was used
as Extra Dark Sea Grey, thinned with lacquer thinners. Following
masking, the fuselage sides and lower surfaces were Xtracrylix XA1007
Sky. I shaded the dark grey with a few random spots and streaks of a
lighter shade, but they did not show up on the paintwork at all.
When I applied a coat of Polly Scale Gloss, however, the
shading leapt out as unrealistic and highly contrasting pale blemishes.
I can only assume this has something to do with the lacquer thinners
reacting with the gloss coat. Regardless, I had no choice other than to
overspray the shading in an effort to subdue the effect.
After these paint repairs and another coat of Polly
Scale Gloss, the kit decals were applied. These are as impressive as the
rest of the kit, settling down beautifully into panel lines with the
assistance of Micro Set and Micro Sol decal solutions. The large serial
numbers on the bottom of the wings are particularly tricky as they have
to fit between the rocket stubs, but they survived my ham-fisted
efforts. After a couple of near disastrous attempts, I eventually
decided to slice these large decals into piece that could be
individually applied between the rocket stubs. This worked well.
A thin layer of Polly Scale Flat Clear was sprayed over
the model before the airframe was very lightly shaded with a thin mix of Flat Black
and Red Brown. This was sprayed along control surface hinge lines in a
limited way, in a light exhaust stain, plus some general staining on the wing roots and on the
mid cowl deck.
A finishing coat of Polly Scale Flat sealed the
weathering.
Click the thumbnails below to view larger
images:
[../../photogallery/photo00016200/real.htm]
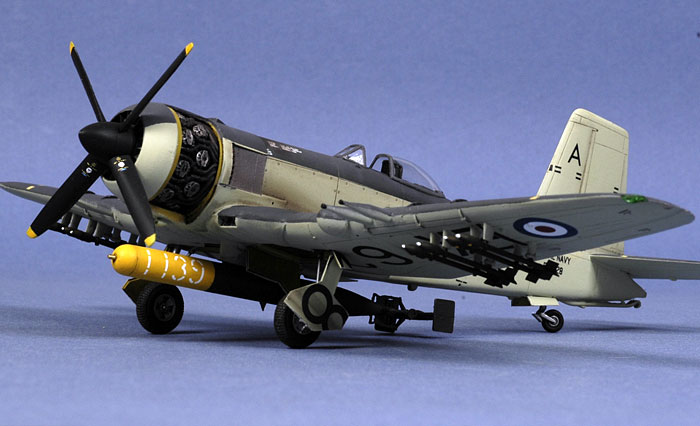
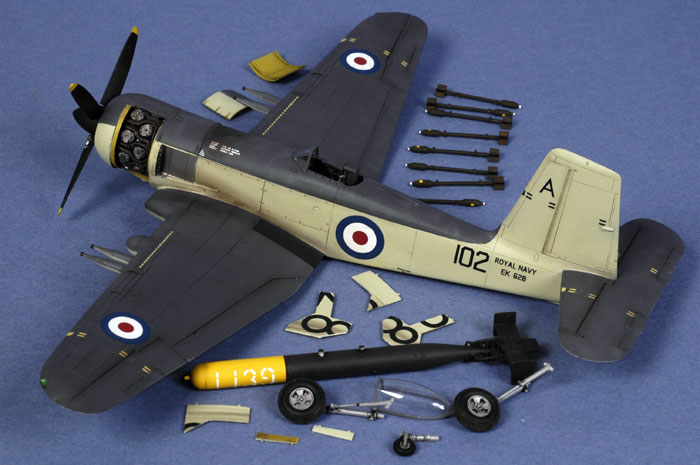
Finishing Touches
The front of the torpedo was painted Xtracylix Trainer Yellow, while the
rear section was sprayed with the ubiquitous Flat Black and Red Brown
mix. The rockets received a coat of Dark Green. The tips were painted
with a spot of white, and the bottom of the warheads had some yellow
added to suggest stencil markings.
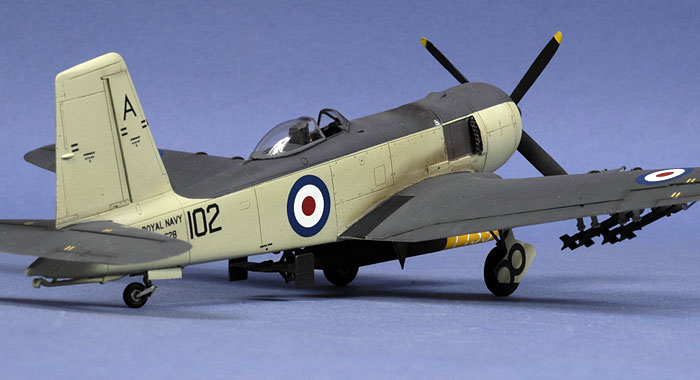
Separate canopies are provided for open and closed configurations. The
clear parts were treated to a bath in Future floor polish, which
transformed them from somewhat dull resin parts to sparkling jewels. The
canopy and windscreen were masked and painted, while the wing tip
navigation lights were glued into place and coated with Tamiya Clear Red
and Clear Green.
The propeller and undercarriage gear were painted. The tyres are a soft
vinyl material. These were lightly dusted with Tamiya pastels.
The one-piece gear doors, with decals in place, were removed from the
bottom of the wing (first carefully slicing the decals along the join
lines), then separated into their three respective parts.
The undercarriage legs virtually snapped into place in their locating
holes, ensuring correct height and alingment.
The position of the torpedo was a bit problematic. Installed according
to the instructions, the tail almost drags along the ground. Someone
suggested that the aircraft must have been overweight as rockets and
torpedos were not usually carried at the same time! I would suggest
cutting the rear pin off the torpedo mount before assembly. I made a
quick fix to mine by loosening the front locating pin and changing the
angle (i.e., pushing the front down). This instantly lifted the tail of
the torpedo a few millimetres from the ground.
The photo below shows the model after this modification.
We modellers live in fortunate times to be presented with such a
great choice of niche subjects.
The price we usually pay for these niche subjects in limited run kits
is extra effort in preparation, alignment and assembly. Most of this
heartache has been eliminated by Aki's clever engineering and incredible
casting in their Firebrand kit. In this case, the price we pay is
actually the price. At USD$80.00 for a 1/72 scale kit, it is
certainly not cheap. Even so, value is in the eye (or perhaps the
wallet) of the beholder, and this remarkable level of detail and
innovative engineering could easily justify the price tag.
This was by far the easiest resin kit I have ever built. The
engineering is bordering on the ingenious in many areas. I started the
kit around 2:30pm last Sunday, and finished it around 2:30pm Wednesday,
spending only between 12 and 15 hours over the four day period.
Aki's 1/72 scale Blackburn Firebrand Mk.V sets a new high-water mark
for a beautifully detailed resin kit that could be built by a modeller
with only moderate experience.
Thanks to
Coopers
Models for the sample
kit.
The model was photographed in HyperScale's studio using a Nikon D70
digital SLR. Illumination was via two studio flash units - one Bowens 250
and a generic 100 flash - on stands and illuminating from a high 45º
angle from each side of the front of the photography table.
The camera was fitted with a Micro
Nikkor 60mm lens.
ISO was set to 250, and the manual
shooting settings were 1/100 of a second at f.29. The high aperture
ensures good depth of field.
The model was photographed against a
plain blue cardboard background.
All of the images were optimized
(brightness and contrast) in Photoshop CS, resized to 700 pixels in
width and saved as 75 dpi .jpg files using Photoshop's "Save for the
Web" option.
Click the thumbnails below to view larger
images:
[../../photogallery/photo00001523/real.htm]
Model,
Images & Text Copyright © 2007 by
Brett Green
Page Created 08 August, 2007
Last Updated
24 December, 2007
Back to
HyperScale Main Page |
 Home
| What's New |
Features |
Gallery |
Reviews |
Reference |
Forum |
Home
| What's New |
Features |
Gallery |
Reviews |
Reference |
Forum |