|
Eduard's 1/48
scale
Dassault Mirage
IIICJ
by
Jon Bryon
|
 |
|
Dassault Mirage IIICJ |

Eduard's 1/48 scale Mirage IIIC
is available online from
Squadron
I started building this kit
alongside the French version.
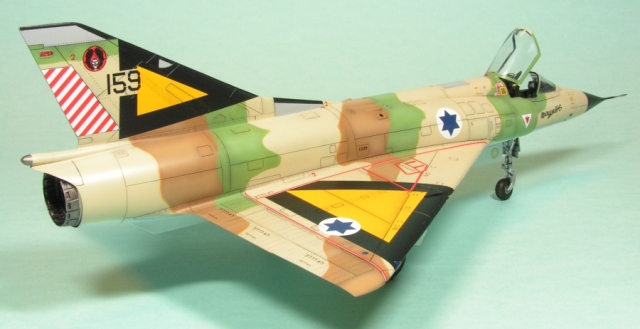
However, I was determined to build this aircraft as #159 because of the
numerous kill markings on the nose, yet I discovered that the original
#159 had an Atar 9C engine, rather than the 9B provided in the kit.
Since the Atar 9C and 9B look completely different this project stalled
while I decided what to do. I placed a message on an internet forum and
a very nice gentleman from Germany told me of some resin conversion sets
he had that provide the new engine. Unfortunately, the first set was
lost in the post, but eventually I received the new resin engine and
rear fuselage, along with some replacement wheel wells. A very friendly
chap from the US sent me a spare Redux resin seat he had and I also
acquired the Isradecals set for Israeli Air Force Mirages. With the Atar
9C in hand, construction recommenced.
My Mirage did not go together very easily. There was significant mould
misalignment, especially on the tail fin and some smaller parts, and the
scribing was incomplete in several places, most noticably around the
rear wing roots. The scribing was, however, better than on my other
Eduard Mirage. Nevertheless, I rescribed the entire kit for consistency
and spent a while cleaning all the parts up.
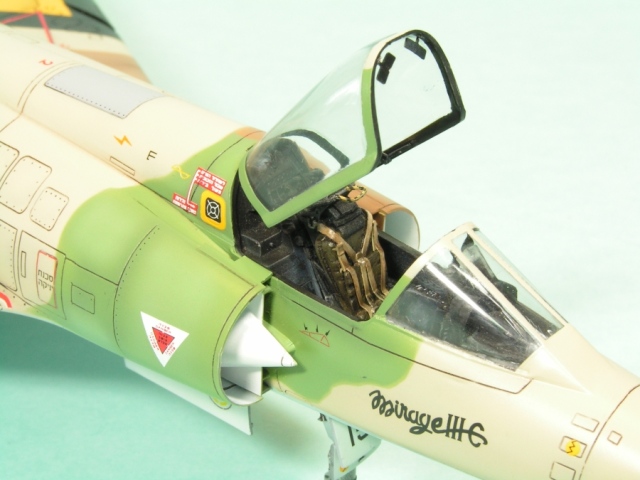
I used the coloured photoetch parts for the cockpit that came with the
Profipack boxing, but some didn't fit that well. I used few of the other
photoetch parts; most were simply too fiddly for me. The Redux seat is
very nice and just needed the Eduard seatbelts and ejection handle to be
added. I didn't use the replacement resin wheel wells as I had already
constructed the kit examples when I received them and they don't provide
much extra detail.
For the first time I exclusively used superglue for construction of the
major components rather than liquid polystyrene cement. I did this to
try and elimate ghost/sunken seams and it worked; this is probably the
best kit I have built in terms of seam elimination. I will now be using
superglue for all major assembly of future kits. Fit of the model is
average to poor -- the fuselage halves were warped as was the lower
wing; the wing to fuselage fit was improved by adding a spreader bar of
old sprue inside the fuselage, but the fit was still very poor around
the nosewheel well; and there was a significant gap at the base of the
fin on the port side. The replacement resin rear fuselage and engine
were of good quality and fitted quite well. The hardest part was
recribing in the panel line; I can't find dymo tape in China or a
suitable alternative.
The windscreen was too narrow and I caused some stress cracks to appear
as I squeezed it to make it fit. The front of the windscreen was also
too high. I really wish that when the windscreen fairs into the
fuselage via a solid slope (as on many jets) manufacturers would mould
the whole assembly in clear plastic rather than making the windscreen
meet a raised plastic lump; the fit here was extremely poor and I'm not
happy with how it looks on the final model. I used a small amount of
superglue on the windscreen, which had been dipped in Johnson's Klear,
and there was a small amount of fogging.
The Isradecals instructions comprise a booklet containing lots of black
and white photos of Israeli Mirage IIIs throughout their service
lifetime. The vast majority of the Mirages shown don't seem to have
aerials along the fuselage spine, so I ignored Eduard's instructions and
didn't add any. On Atar 9C equipped Mirages I also couldn't see any
probes (I don't know what they are) which Eduard would have you add near
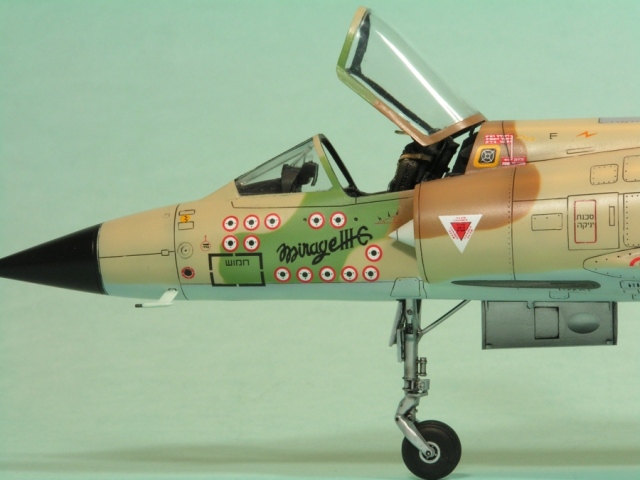
the engine on the rear fuselage, so I also left these off. The nose
pitot was replaced with brass rod, wire and superglue. I mislaid the kit
gun barrels so used some made from brass rod.
Many people have commented on the inaccuracy
of the Eduard kit markings for #159. I used Yoav Efrati's article on the
Mirage IIICJ (Scale Aircraft Modelling December 2004) as my guide, along
with the instructions from Isradecals. In short, the main things which
concerned me were the colour of the ID triangles (not orange enough and
in the wrong place on the wings), the 101 Squadron badge (too small),
the rudder stripes (red and white should be of equal thickness) and the
tail number (wrong font), hence the (expensive) purchase of the
Isradecals set.
The Isradecals instructions, whilst providing lots of photos, are
actually pretty useless for decal placement and the camouflage scheme.
The camouflage scheme they show for the plan and port views contradict
each other, and what the starboard side looked like is anyone's guess. I
used the Eduard instructions to help, but there is a lot of difference
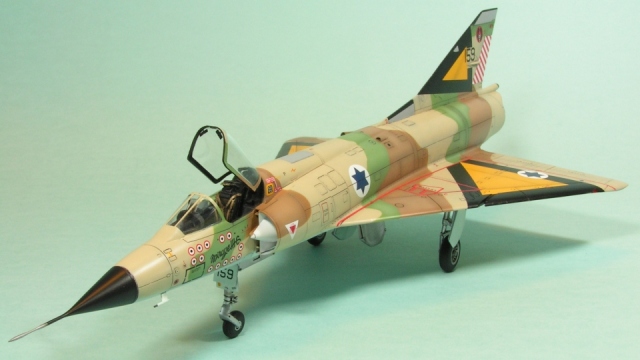
between them and the Isradecals interpretation. I initially primed the
model using Mr Surfacer 1000 and used this colour for the four panels on
the spine/tail. Isradecals' artwork implies the panel on the forward
fuselage spine should be grey, but this is not clear. I did find a photo
on the web of several camouflaged Israeli Mirage IIIs in flight and they
had the panel in grey, so that's why mine is grey too. I preshaded using
black and painted the black sections of the grey panels. The four-tone
camouflage was applied using Mr Color lacquer acrylics. Eduard
misidentify the correct Mr Color numbers; they should be 314 (blue), 313
(tan), 312 (green) and 310 (brown). I post-shaded the colours by adding
a little white. The overall effect is too patchy, but this was my first
attempt at using a double-action airbrush and I wanted to see what I
could do; I make no pretence of accuracy! The scheme was masked using
rolls of blu-tac to get a soft edge between the four different colours
and Tamiya tape to fill in the gaps. No paint was pulled up by the tape
(a first for me when using this brand of paint). Johnson's Klear was
airbrushed on as a gloss coat.
Onto the decals. Obviously I used the aftermarket set. I first applied
the underside ID triangles. The fit was good and I applied Mr Mark
Softer to bed them down. That was a mistake. The decals did not settle
into the detail and bubbled a little in some places. Concerned, I tried
a new approach for the upper wing triangles. I flooded on Mr Mark Setter
and added the triangles without wicking away any excess water or
setting solution. This worked wonders and sucked the decals right down
into the scribed detail. I followed this practice with all the other
decals and didn't use any Mr Mark Softer since it was unnecessary. Once
the triangles were on, I sprayed them with Klear and then added an oil
wash to the panel lines of the entire plane. I also did a little
post-shading along the panel lines on the triangles. The effect is too
strong, but I was experimenting. The remainder of the decals were
applied, some from the Eduard sheet as they are not provided by
Isradecals. The stencils are mostly guesswork since Isradecals provide
practically no information on them and the photos are not clear enough
to show what should and shouldn't be there. In addition, the placement
guides for various decals contradict each other in some photos. The most
tricky part was applying all the kill markings. Each roundel consists of
three decals: The red/white roundel, a black centre dot and the green
dots between the red and black circles. That tried my patience; the kill
markings account for a total of 39 decals. The finesse of these markings
is far better than provided by Eduard, but I failed to get them all
lined up. The Eduard markings were out-of-register anyway and I believe
they rendered the Syrian roundels upside-down; Isra certainly illustrate
them the other way up. Unfortunately, some of the Isradecals were also
out-of-register; the red/white kill roundels were a little out, and some
of the red walkway markings had a fine white line along them. This was
disappointing from such expensive decals that were otherwise excellent.
 I
used my usual mix of Polly Scale Flat and Satin varnishes to try and tie
the final finish together. I say 'try' since the Mr Mark Setter stained
the surface in places and left a thickish residue that is hard to clean
off. This is a shame since the product works very well. I am still not
satisfied with the final finish, but then there's always something
wrong! I
used my usual mix of Polly Scale Flat and Satin varnishes to try and tie
the final finish together. I say 'try' since the Mr Mark Setter stained
the surface in places and left a thickish residue that is hard to clean
off. This is a shame since the product works very well. I am still not
satisfied with the final finish, but then there's always something
wrong!
The smaller parts were added along with the
undercarriage, which was extremely difficuly to get aligned correctly.
The last addition was the open canopy.
This build was a little frustrating overall,
since I felt the promise of what Eduard provide in the box was not met.
In the box the kit looked great -- photoetch
provided, noseweight provided, lots of markings and big decal sheets,
coloured placement sheets, etc. But the realisation was not so positive:
Less than stellar fit, warped parts, mould misalignment, missing
scribing, inaccurate decals.

The Isradecals set helped, but the
instructions were very weak and leave the modeller to make a lot of
guesses; the out-of-register decals were a little hard to swallow in
such an expensive set as well. But I am pleased with the final product
and grateful to be able to add this beautiful plane in very interesting
markings to my collection.
A very special thanks to Petr Pastera and Eric Larson for providing the
resin parts.
Click on the thumbnails
below to view larger images:
[../../photogallery/photo00023729/real.htm]
Model, Images and Text
Copyright © 2007 by Dr Jon Bryon
Page Created 04 November, 2007
Last Updated
24 December, 2007
Back to
HyperScale Main Page |
 Home
| What's New |
Features |
Gallery |
Reviews |
Reference |
Forum |
Home
| What's New |
Features |
Gallery |
Reviews |
Reference |
Forum |