|
Hasegawa's 1/48
scale
Curtiss P-40N (Kittyhawk IV)
by Greg Goheen
|
 |
|
Curtiss P-40N (Kittyhawk
IV) |

Hasegawa's 1/48 scale Kittyhawk Mk.IV is available online
from Squadron.com
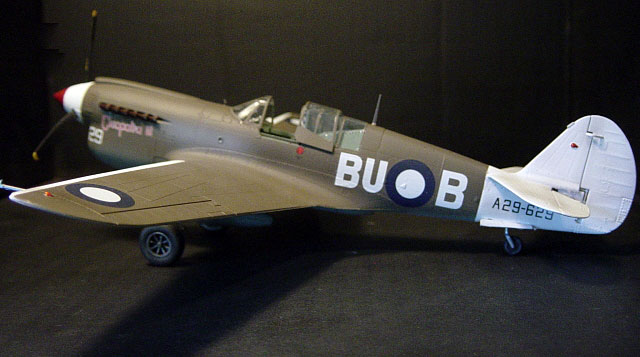
Most recently completed for a retired friend of mine is Hasegawa’s
1'/48 scale Kittyhawk Mk. IV of the Royal Australian Air Force. My
friend actually chose the kit, being an avid collector of 1/48 scale
aircraft and keeping me more than busy with various builds over the past
six (6) months.
As usual, the Hasegawa kit is a fantastic example of exemplary machining
along with cleaver engineering to allow one basic mold for the main
fuselage to be used on various Kittyhawk/P-40 versions whilst offering
differing tailpiece sections appropriate to the version one is building.
This kit, #09732, is superbly produced with some of the most elegant and
accurate engravings I’ve seen in some time. (remembering that Hasegawa
recently re-did their molds on the P-40 kits). Therefore, there was no
need for aftermarket resin or photo-etched parts with the exception of
the seatbelts I robbed from my spares box.
Construction was very straight forward and without any problems. The
interior pieces were painted RAF Interior Green and given a light wash,
while the exquisitely molded instrument panel was given a few light
coats of Gunze flat black before being drybrushed, after which various
dials and details were picked out in white and red.
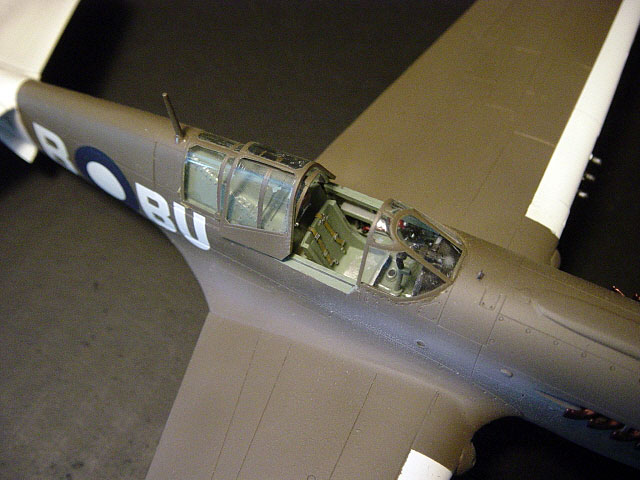
The dials were then treated to several tiny drops of Future to give
them a nice glass-like appearance. Assembly was problem free and
virtually free of any seam lines. I merely applied a light coat of Gunze
Mr. Surfacer, wet sanded after curing and the result was pristinely
clean and free of blemishes.
Paint
Painting, although a straightforward Olive Drab over Medium Gray, was
going to prove somewhat intricate with the wingtips (top and bottom)
having a very distinct Satin White paint, as well as the entire tail
section. After priming to check one last time for any surface
imperfections it was time to begin. Model Master Gloss White was
selected as the correct color, knowing I could tone it down with
dullcoat after decals and weathering had been applied. After the White
had fully dried and cured (approx. 2 days) I felt it was safe enough to
mask the leading edges to being with the Medium Gray underside. Painting
was then straightforward and both the Medium Gray and Olive Drab were
finished in one evening. However, for some tonal variations I went to
task the following day by lightening various panels with a scaled blend
of Olive Drab ligh tened with White, concentrating towards the middle of
some panels.
Markings
Kit decals were provided for the RAAF No. 78 Wing, “Cleopatra III”
and were simplistic yet strikingly elegant with the white/blue roundels.
Several coats of Future were applied to give me a nice smooth finish
to work with and the decals were set with (drum roll please) Solvaset!
Yes, I like being a bit different than everyone else who uses those
other Micro products (which are perfectly fine) as I’ve found Solvaset,
while more aggressive with some extremely delicate decals, works just as
well.
Weathering and Top Coat
I offered very little exhaust staining for this particular build,
starting with my own mix of Gunze flat black and mahogany (Yes, I did
say I like being a bit different) heavy watered down with alcohol. I
then added a thinned down mix of some various gray tones from Gunze and
settled with the very subtle effect I had concluded with. Exhaust
nozzles in this kit are fantastic and no need to throw them away. I
merely hallowed the ends out, primed with Model Master Gloss Black and
then oversprayed with various shades of Alclad II copper, brass and
burnt iron (all custom mixed down after the various base shades had been
applied.
 Finally,
before sealing with Testor's Dullcoat, I worked up another mix of Gunze
Flat Black and Mahogany (heavily thinned down again) and began to
post-shade the model. While I know the masses out there are hooked on
pre-shading I’ve found that post-shading panel lines is far more
realistic. Topside there was very little to do over the Olive Drab so my
concentration was on various bits of the white leading edges and tail
section for added emphasis. The underside was sprayed with a slightly
darker concentration to desired effect. She was then given several coats
of dull flat before affixing her Future dipped glasswork and various
fiddly items. Lastly, location lights were picked off with chrome silver
as a base and then Tamiya clear red/clear green was used over the top. Finally,
before sealing with Testor's Dullcoat, I worked up another mix of Gunze
Flat Black and Mahogany (heavily thinned down again) and began to
post-shade the model. While I know the masses out there are hooked on
pre-shading I’ve found that post-shading panel lines is far more
realistic. Topside there was very little to do over the Olive Drab so my
concentration was on various bits of the white leading edges and tail
section for added emphasis. The underside was sprayed with a slightly
darker concentration to desired effect. She was then given several coats
of dull flat before affixing her Future dipped glasswork and various
fiddly items. Lastly, location lights were picked off with chrome silver
as a base and then Tamiya clear red/clear green was used over the top.
Click
the thumbnails below to view larger images:
[../../photogallery/photo00014966/real.htm]
Text, Model Images
Copyright 2007 by Greg Goheen
Page Created 03 September, 2007
Last Updated
24 December, 2007
Back to
HyperScale Main Page |
 Home
| What's New |
Features |
Gallery |
Reviews |
Reference |
Forum |
Home
| What's New |
Features |
Gallery |
Reviews |
Reference |
Forum |