|
Andrea
Miniatures’ 1/32 scale
Type VIIC U-Boat
by
Suresh Nathan
|
 |
|
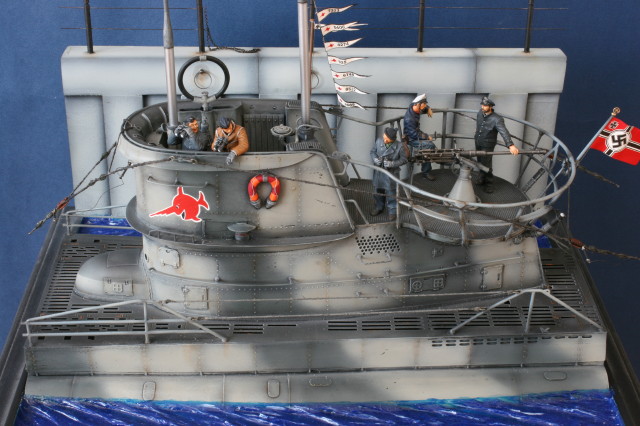
Type VIIC U-Boat Conning Tower |

Andrea's 1/32 scale Type VIIC U-Boat Conning Tower is available online from
Squadron
Andrea Miniatures of Spain has a series of 54 mm submarine-themed
products ranging from a full 32nd scale 6 foot monster to sections of
the UVII-C reproduced. They are all multimedia resin, white metal,
photo-etched brass and dry transfer affairs. I picked up this kit about
a decade ago and never dared to attempt it for fear that my modeling
abilities were not up to scratch. I finally picked up the courage to
attempt it and here is how it went.
The Kit
The first thing that confronts you when you get the kit is the box
art which is a build of the kit by Baldomero Sáiz (the model designer)
and Raúl Latorre (the figure designer). That just about demoralizes you
into putting the kit back on the shelf. About five years later, I
decided to do a trial fit. The upper section of the conning tower did
not fit the lower section. This was upsetting considering the cost
involved. I wrote to Andrea in Spain and they gave me a full replacement
– no questions asked (Bravo Andrea!). You can see in the illustrations
that this part is bright yellow as opposed to the beige resin of the
rest of the kit. That’s as far as I got.
Recently I decided to get to it.
The kit is made of three main resin sections. The hull
is a framework of resin atop which sits a photo-etched brass deck in two
pieces (that don’t line up-more on this later). In the original design
you could see the framework of the hull through the deck which I felt
looked unrealistic. I therefore cut out and repositioned the framework
so they could not be seen through the grills. The rest of the kit went
together with a lot of superglue, accelerator and filler (see below).
Many of the parts don’t fit well (no this isn’t a snap-tite kit) and
will require cutting and re-shaping to get it to fit right. In
particular, the coning tower (as opposed to the hull) deck plates have
to be reshaped so that the seams line up nicely. The long railing at the
bottom was a challenge to do and required some fancy solder work to get
it to look right. I was successful with the first attempt but botched up
the second. So I re-did the whole thing in superglue again. This proved
to be a bad idea because it must have come apart at least 10 times in
construction!

Click the thumbnails below
to view larger images:
[../../photogallery/photo00015831/real.htm]
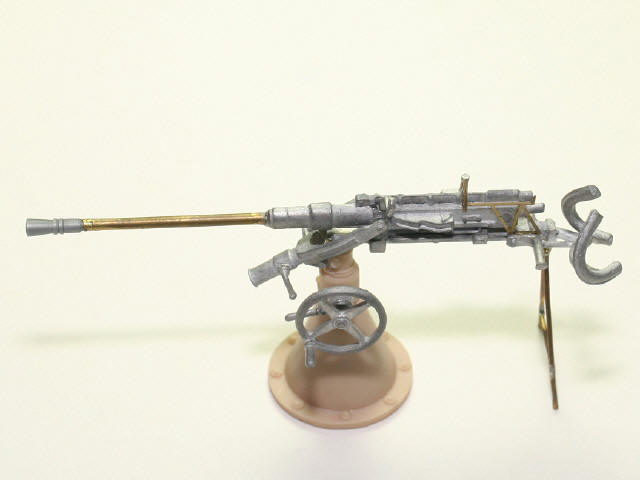
If there is a focal point in this piece, it’s the main
AA gun. While acceptable, I felt the gun barrel and muzzle had a
squashed oval cross section and so replaced it with brass rod and a
muzzle turned in a lathe. Also, the tripod was missing (decided to let
Andrea off the hook this time) and so I soldered a new tripod in brass.
Construction took a lot out of me so I set it aside and
did a few other lighter projects…….
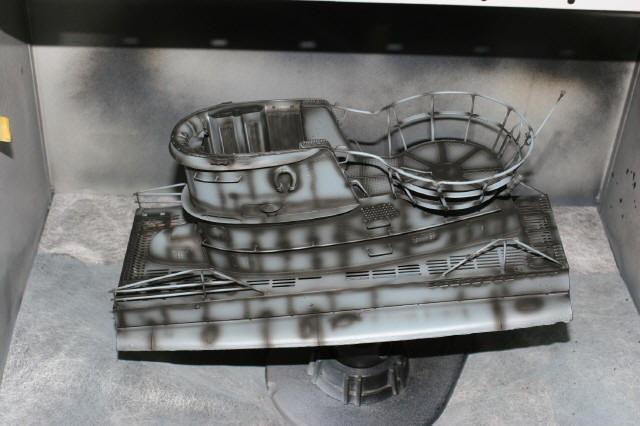
I returned about 6 months later with primer. I had read and experienced
that these kits are best primed with a lacquer-based paint and so used
Tamiya grey lacquer as a primer. Other primers tend not to stick too
well to resin. This showed up a number of flaws and lost rivets which
required re-filling, sanding and replacement of rivets. In addition, I
had discovered that the kit instructions had omitted to include the
little detail about hollowing out the circular antenna housing. The kit
was primed again and pre-shaded with black paint.
Click the thumbnails below
to view larger images:
[../../photogallery/photo00020123/real.htm]
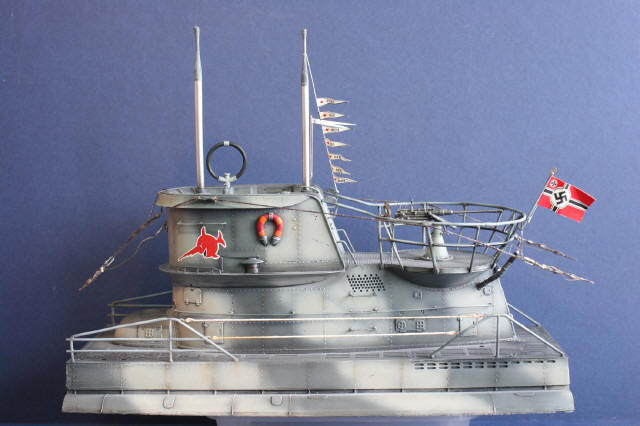
I chose the indistinct banded camouflage scheme as per the box art
(not very original but I figured with all the markings provided, this
combination referred to a very specific ship). Nevertheless, there are 6
camouflage patterns and 4 marking options – ample except that there
isn’t enough documentation to decide which to use. If you’re not
particular about the historical implications then just go for whatever
combination you like (but then these things tend to haunt you later).
Next came a layer of Future floor wax and the sawfish decals. These
are dry transfers and go on like skin.

I used a turpentine wash of burnt umber Humbrol paints and minimal
dry-brushing in a combination of browns. Also I used a filter of red
brown oils along panel lines. Finally the kit was complete with all
riggings, pennants, flags, wiring, lights, etc. Of interest, the kit
instructions call for 2 mm rods drilled into the main hull to support
the rigging. I just did not like that solution and experimented until I
came up with the idea of using stiff rods to simulate the rigging.
These seemed to do the trick and now the rigging seems to float in
space.
This is a very special kit and I wanted a special base. I had toyed
with the idea of a wolf’s den but realized the geometry of the coning
tower did not allow for a convincing portrayal. Hence I decided to show
the sub passing by a wharf. This gave an interesting backdrop to the
piece.
I created a wharf after consulting my references using scraps of would
glued together with white glue. After filler I sanded the whole thing
down.
I used spray lacquer for the base and marked out the outline of the sub
on the base. The idea was to paint the base with a representation of the
hull so that the viewer would just see this through the water.
The wharf was pre-shaded and painted essentially the same as the hull.
The hull was painted on the base and dark green used to simulate deep
water.

Click the thumbnails below
to view larger images:
[../../photogallery/photo00015477/real.htm]
The kit was glued in place with epoxy resin. You can see how the
camouflage carries onto the base.
Acrylic paste was tinted with Tamiya clear blue and used to model the
water – ripples, waves and all. I used to use polyester resin for this
but acrylic paste is a lot more user-friendly, cleans up with water and
smells great (as opposed to resin)! Once secured, I completed the
rigging and painting of the kit and wharf and detailed the wharf with
scratch-built bits.

When dry, the water was highlighted and another layer of clear
acrylic paste applied.
The figures were all works of art.

I decide to reposition the heads differently from what
was recommended by the manufacturers to show the senior officers talking
and the junior officers looking out to sea. I felt this was more
congruent. The figures were painted with Vallejo for the uniforms and
oils for the faces. Keep in mind that these are 54 mm and when magnified
can show up surface imperfections that can’t actually be seen in the
real thing!

Although heavier than normal, the figures secured
sufficiently well with white glue.
All told this was a challenging build especially considering it was
essentially out of the box. Would I do it again? Heck yes.
Click the thumbnails below to view larger
images:
[../../photogallery/photo00030246/real.htm]
Model, Images and Text Copyright © 2007
by Suresh Nathan
Page Created 23 October, 2007
Last Updated
24 December, 2007
Back to
HyperScale Main Page
|
 Home
| What's New |
Features |
Gallery |
Reviews |
Reference |
Forum |
Home
| What's New |
Features |
Gallery |
Reviews |
Reference |
Forum |