Hasegawa's 1/32 scale
Focke-Wulf Fw 190 D-9
by
Bruce Salmon

|
Focke-Wulf Fw 190 D-9 |

Hasegawa's 1/32 scale Fw 190 D-9 is available online from Squadron.com
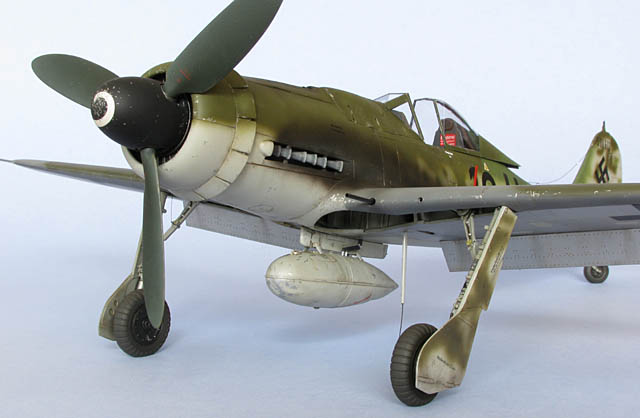
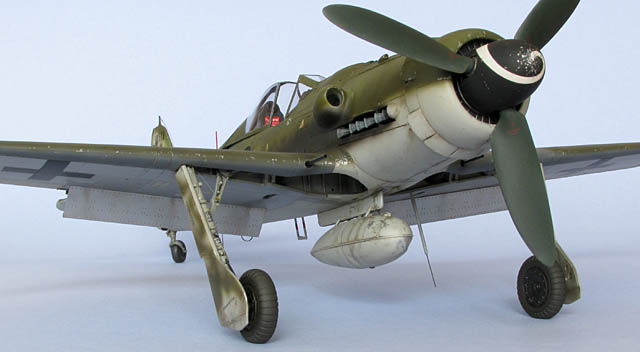
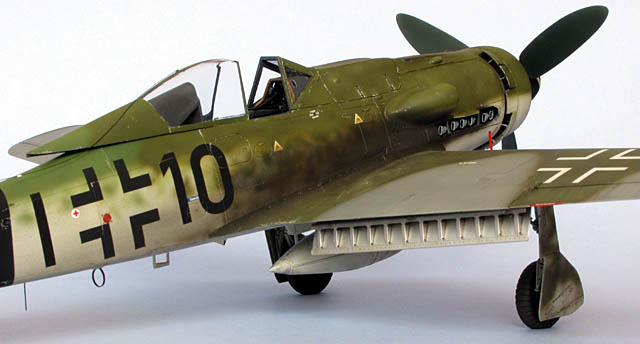
The ‘Dora’ has always been one of my favourite WW2 aircraft and this kit is my first venture into 32nd scale WW2 subjects. To make a large canvas more interesting I chose to model a late war aircraft with as many different colours as possible in its camouflage scheme.
Black 10 was found abandoned at Celle Germany by Canadian troops in spring 1945 (back cover Squadron/Signal Walk around Number 10 Fw190D) III/JG 26 (W.Nr. 500613)
Since the kit was so large I decided to do it justice by ‘going to town’ on it which necessitated sinking a load of cash into aftermarket goodies. 32nd scale aftermarket is way more expensive then 48th scale! No trips to Showgirls for a while – “sigh”. Thankfully I got the kit for free.
Aftermarket Products Used:
Eduard PE set (32 100) Fw190D-9 Exterior
Eduard PE set (32 101) Fw190D-9 Landing Flaps
Eagle Editions (EP#40-32) Fw190 D Series Cockpit
Eagle Editions (EP#42-32) Fw190 D-9 3 Piece Gun Cowling
Eagle Editions (EP#44-32) Fw190 D-9 Tail Wheel
Eagle Editions (EP#48-32) Fw190 Main Tyre and Wheel Set
MDC (CV32027) Fw190 D-9 Exhausts
MDC (D32002) Luftwaffe Instrument Dials
EagleCals (EC#21) Yellow Tailed D-9s
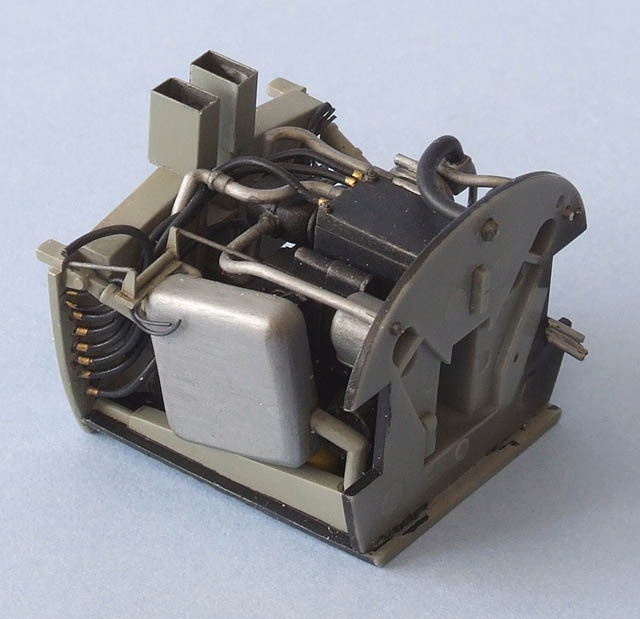
ENGINE INSERT
I started out with the engine insert while waiting for my resin to arrive. This was detailed with loads of extra hoses and wires using various sizes of lead and brass wire.

Note: if you are adding the PE cartridge ejector chutes you should first cut the plastic ones down so that they are just short stumps. Doing this in reverse is really difficult!
WINGS
First I built the Eduard PE flaps. These are gems and look very realistic. They are quite complicated to bend and you need to have a bit of a think beforehand so you don’t bend yourself into a corner.
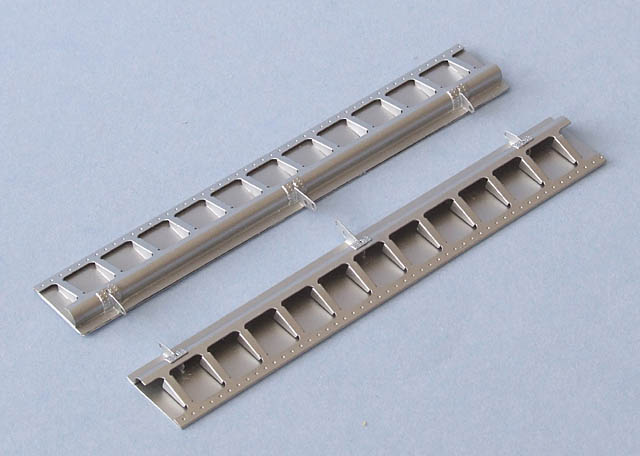
The internal plastic flap detail was removed from the wings and the PE flaps dry fitted to check for any problems. A load of super glue was used to ensure a permanent bond. The wheel well PE detail was then added and the wings glued together. The wells were further detailed with wiring and in this case painted RLM 02 although they could well have been bare metal. The upper trailing edge of the wing above the flaps was thinned to scale thickness and lastly the underwing panels were added but proved a bit gappy.
FUSELAGE
The interior of the fuselage was thinned out to accept the resin cockpit. The MDC exhaust pipes were dry fitted and had to be shimmed as they sat in too deeply. I scratch built an interior for the supercharger air intake and then painted and glued it in place.
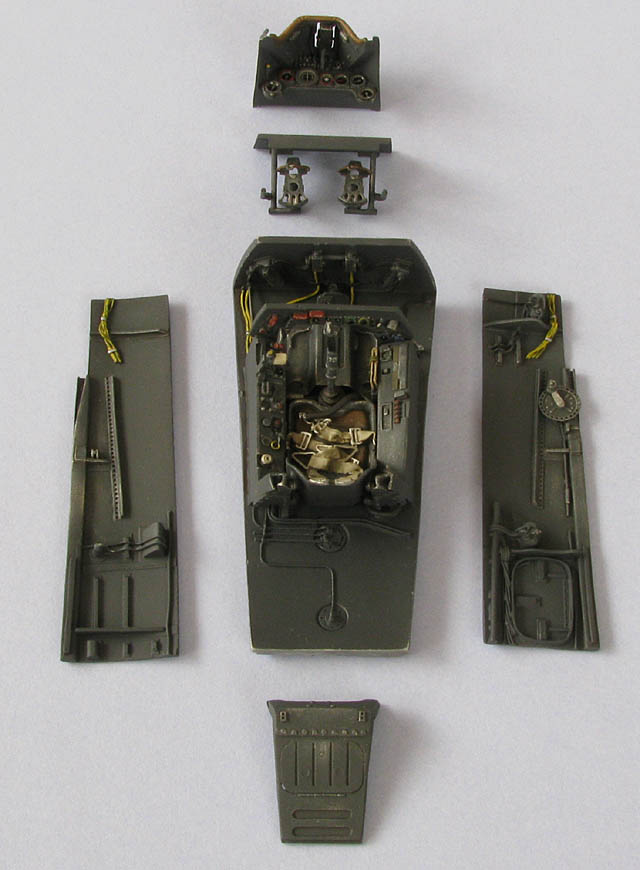
COCKPIT
The Eagle Editions cockpit is quite nice although the fit of some parts is troublesome. The attachment of the seat to the cockpit floor is extremely tight as both the floors that I received were a bit bent. When the whole thing was eventually glued together it wasn’t all that straight either.
I had problems with the resin parts in that some were broken and some badly warped, necessitating replacement. At the time Eagle Editions was changing their resin makers so it was a 6 month wait before the replacement parts showed up. The first of the new mouldings were a bit dodgy in quality so I hope they improve their techniques.
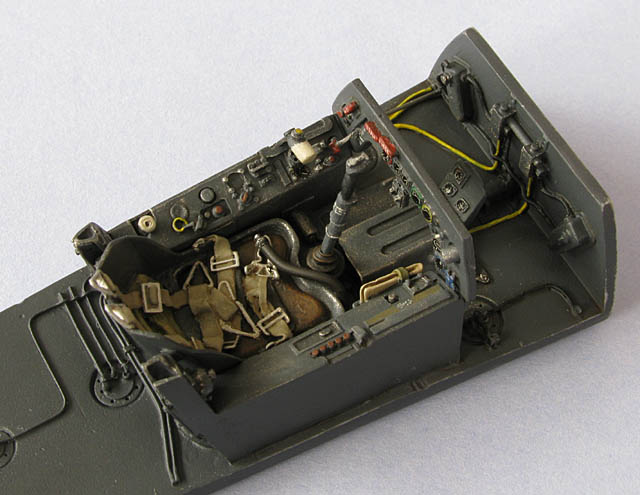
Eagle suggests that you use the kit decals with their resin dash board. I tried this by punching out the kit dials (a very fiddly process). Unfortunately the offerings from the kit are horribly inaccurate so I soaked them in window cleaner overnight to remove them. Interestingly this made the enamel paint wrinkle which necessitated a whole clean-up and repaint process. In the meantime I ordered the MDC instrument decals which they use in their 190 resin cockpit; these proved to fit perfectly with no punching necessary. Incidentally in doing this I found that the Eagle DI bezel is way too big.
The interior was painted, given an oil wash and drybrushed to help pop out the details.
Another bugbear was that there were no instructions for assembly of the PE harnesses should you wish to use them. (Eagle Editions - must do better)
The next trick is to close up the fuselage halves. The engine insert doesn’t fit in the fuselage all that well and if you have removed its locating points (necessary for the resin cockpit to fit) then you will have a few issues of conflict to resolve.
Once this was all done I added the rear upper deck PE part.
Avoid using the rear upper deck PE as it will cause you loads of headaches and brings about problems of its own (sliding canopy won’t fit flush, ejector rail slot is too narrow, no support underneath) better to ‘tart up’ the kit part.
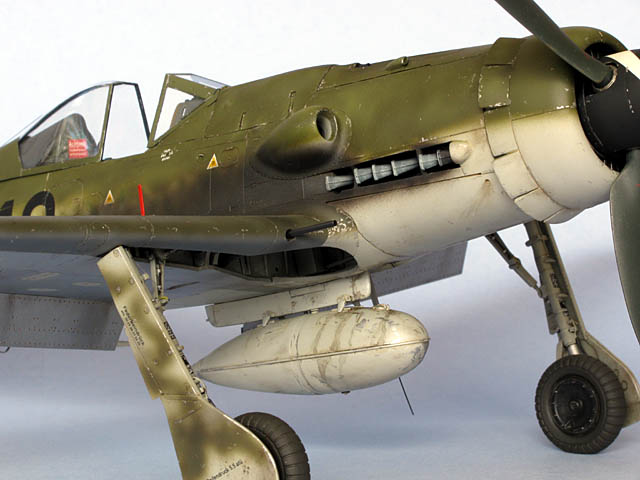
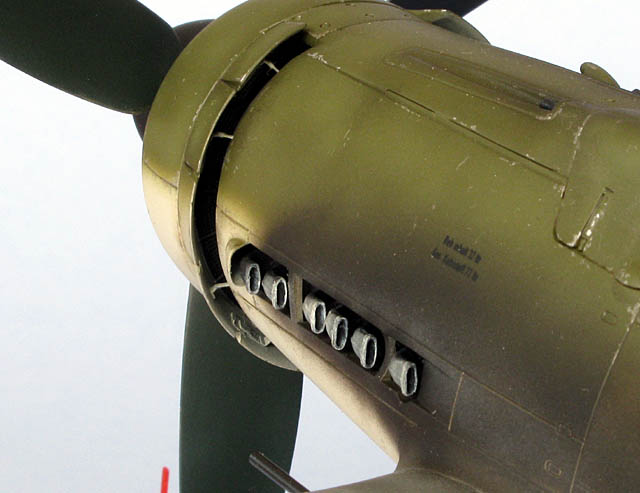
GUN COWL
The kit’s Dolly Parton gun cowl was replaced with the Eagle Editions 3-piece gun cowl - the fit was not that good. Also the windshield fairing does not fair in well with the gun cowl and the kit windshield will also need some surgery to ensure a better fit.
At this stage I discover that the kit canopy cannot be used in the open position. The front edge of the sliding part is supposed to run along the cockpit rails and the kit part hangs over the sides by miles. What to do, what to do? I decided to leave this dilemma till the end of the build.
RADIATOR COWL
The radiator cowl was built, PEd and the interior painted. I don’t know why Hasegawa would use rubber grommets to attach the radiator cowl to the fuselage so I decided I would glue mine in permanently. I did this after painting the whole model so that I wouldn’t get any overspray on the interior paintwork.
Incidentally the propeller is not accurate in shape but I have not attempted to alter it.
TAIL
The resin tail wheel goes together nicely and after a bit of dremelling it fits into the well perfectly. I left off the forks and wheel till later to avoid breakages.
Join the tail section to the fuselage as per the instructions or you will have extra bogging and sanding work to do (ask me how I know this!)
The elevators are cut out and repositioned and the rudder offset – making sure that they match the controls in the cockpit.
The wing was then joined to the fuselage. The front and rear underside join proved a bit gappy (a Hasegawa trait).
Lastly I liberally sprinkled on approximately 15,700 rivet holes (yes I counted them - seriously!) with the aid of the Hasegawa Rivet Gauge HSG TL12 (number 2 gauge) and HSG TL11 Rivet Scriber. On reflection I wouldn’t buy the scriber as it dulled quickly and was not pointy enough - the holes it makes are almost too shallow to see.
OTHER MODIFICATIONS
-
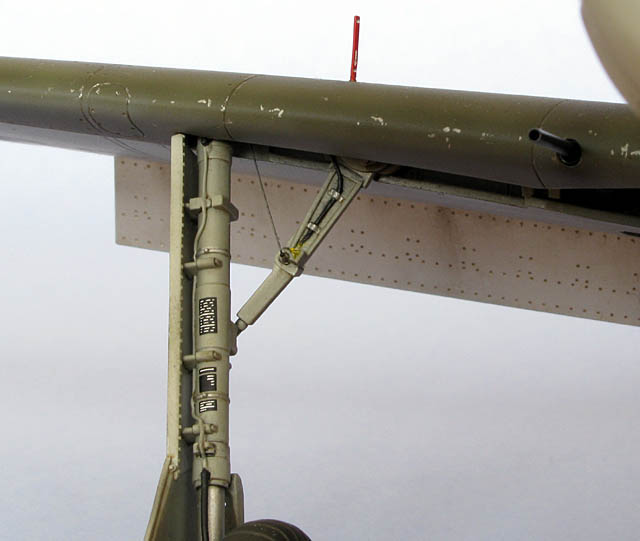
New aerial mast constructed – mine eventually broke off after catching on things one too many times.
-
Wing cannon made from brass tube (made 3 sets before settling on the ones I liked).
-
Pitot from brass tube and wire.
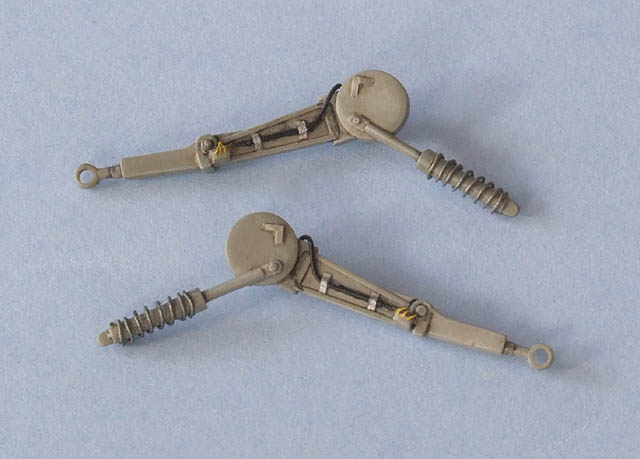
-
Landing gear wiring added including tail wheel retract cable.
PAINTING
Firstly I sprayed a coat of primer to check for any issues with the build and to make sure the paint sticks well. I cannot guarantee the accuracy of my paint scheme but rather it is my interpretation of the late war colours. All the crosses were masked and sprayed.
Paints used are as follows (all enamels):
Fuselage: Xtracolor X210 RLM 81 Brunviolett / X212 RLM 83 Hellgrun / X208 RLM 76 Lichtblau. Cut with Tamiya XF3 Yellow and/or XF 2 White to lighten
Topsides Wings: X211 RLM 82 Dunkelgrun / X207 RLM 75 Grauviolett
Undersides Wings: Mr Color 8 Silver and 8 mixed with some 28 Steel to highlight different panels. Leading edges X207 RLM 75 Grauviolett. Ailerons and wing tips X208 RLM 76 Lichtblau. Wheel wells X201 RLM 02 Grau
Cockpit: XF63 German Grey
Spinner: XF1 Black. Blades XF27 Black Green
German Brown Tyres: XF1 Black 3/ H62 Leather 2/ XF2 White 1
Guns: Humbrol 27004 Gun Metal (buffing metalizer)
WEATHERING
I began weathering directly over the paint as I didn’t want to add any more layers that might obscure all those lovely rivets. Following this line of thought I also decided that the decals should also be applied after weathering.
The model was given an overall wash with raw umber oil mixed 50/50 with burnt sienna. Some panel lines were darkened with further darker washes and oil stains added with a black wash and drybrushing. Finally some restrained chipping was achieved using Tamiya XF16 Flat Aluminium applied with a fine brush.
DECALS
Next I sprayed some gloss varnish only where the decals were to go. I started out with
Aeromaster decals (32-012) Too Little Too Late Fw190D-9s as this has depicts the very aircraft I am modelling. As it turned out the Aeromaster decals failed to adhere and basically just curled up and fell off. Not only that but they are highly inaccurate. Avoid this set. Not wanting to repaint (remember the rivets) I bought an EagleCals set that had very similar markings. Thankfully they worked just fine.
Gun smoke staining was then applied with Tamiya X19 Smoke using the same for the exhaust stain followed by a well thinned black/brown mix and a streak of XF55 Deck Tan to simulate the lead–oxide residue. The exhaust pipes also had a drybrushing of white oil paint on the openings.
A matt-ish varnish was then sprayed to finish the job. It would appear that the 2 days I spent riveting was mostly wasted time as the matt coat tended to greatly diminish the appearance of the rivet holes. The only ones I can see without an Optivisor are the deep ones I made with the sharp pointy scriber.
I had more problems… the polyurethane varnish was not drying properly. In the cold of winter (10 degrees Celsius and high humidity) it stayed wet for so long that the thinner (turpentine in this case) had time to attack and lift the paint before it dried. This occurred mainly along the edges of the exhaust stain which required a light sand and respray (a difficult problem to repair well). Addition of lacquer thinner solved the drying issue.
FINAL ASSEMBLY
Last on are all the breakables:
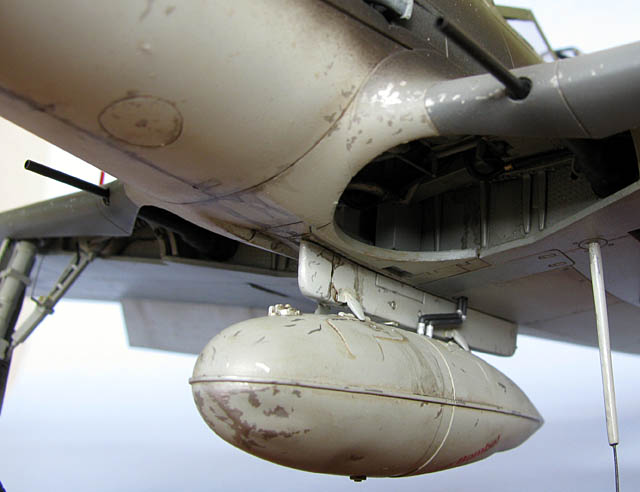
Flaps (60 degrees angle max.), gun barrels, exhaust pipes, drop tank, aerials and antenna wire (made from thin copper electrical wire) and the gunsight ‘glass’.
The last thing to do was to tackle the canopy issue. Initially I heated the canopy in near boiling water to bend in the edges. This proved fruitless as the rear end tended to twist as it was thicker than the rest – I had it just about right and then it shattered. After acquiring a new canopy I decided to try another tack.
This time I cut the canopy in half longitudinally with a razor saw and scratchbuilt a whole new join from plastic card. It was a bit fiddly but went together far more easily than I had imagined (don’t know how you would fix the early straight canopy). When it was ready to paint I first dipped it in Future to give it a nice shine. After 3 attempts at this I couldn’t get it to dry without having hairs stuck in it so the Future idea was scrapped. Both the inside and outside were then masked and painting went off without a hitch.
The fight was not yet over… attaching the canopy to the cockpit was a struggle - all to do with the now slightly narrower canopy and that troublesome rear decking. It took days to get the fit reasonably right and with a good dollop of epoxy glue the beast was finally tamed. The antenna wire was shaped and then glued in positioned and painted.
This build rapidly turned into an exercise in patience and perseverance (the whole project took about 18 months) – every stage seemed to have a disaster waiting to happen. The fit of the kit parts is superb except for the usual Hasegawa wing to fuselage issue.
I soon discovered that you have to put a lot of extra work into a 1/32 scale aircraft as so much more is visible and you can’t get away with things that you could easily hide in 1/48 scale. I think a 1/32 scale Spitfire XIV bubbletop would be a good companion if somebody would care to kit one.
Model, Images and
Text Copyright © 2009 by Bruce Salmon
Page Created 7 January, 2009
Last Updated
9 September, 2009
Back to HyperScale
Main Page

|
 Home
| What's New |
Features |
Gallery |
Reviews |
Reference |
Forum |
Search
Home
| What's New |
Features |
Gallery |
Reviews |
Reference |
Forum |
Search