|
Kinetic's 1/48 scale
Dassault Mirage 2000B
by Mick Evans
|
|
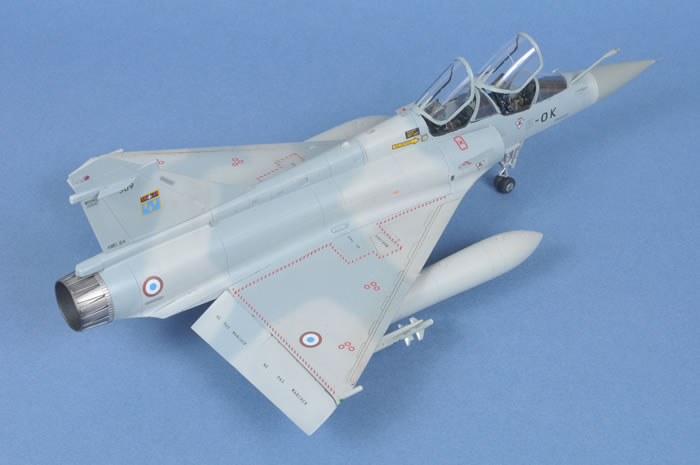
Dassault Mirage 2000B |

Hasegawa's 1/32 scale Messerschmitt Bf 109 G-4 is available online from Squadron
Kinetic Models 1/48 Scale kit no 48032
Mirage 2000 B/D/N
Price USD $29.98 from Lucky Model
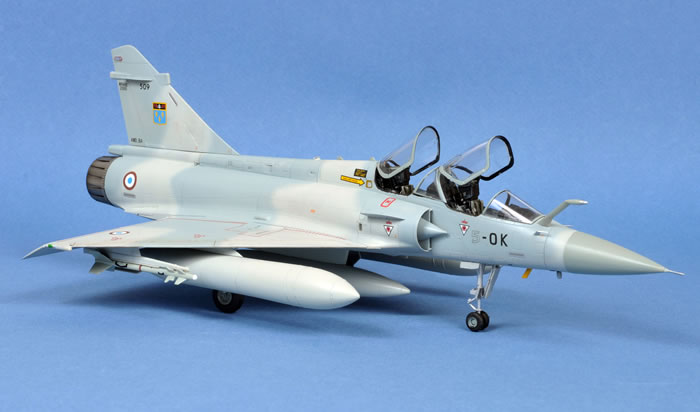
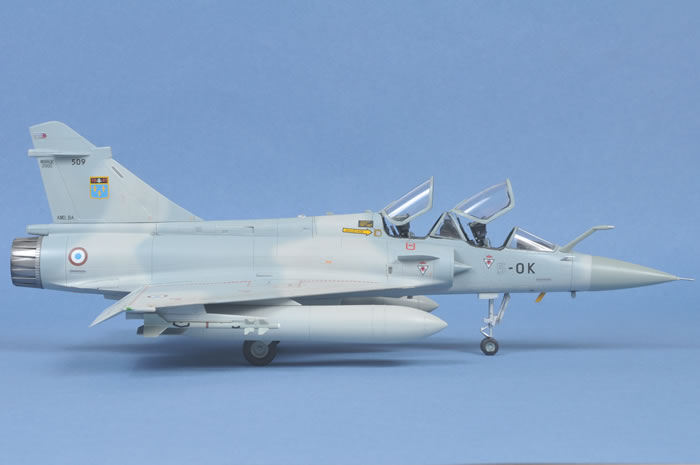
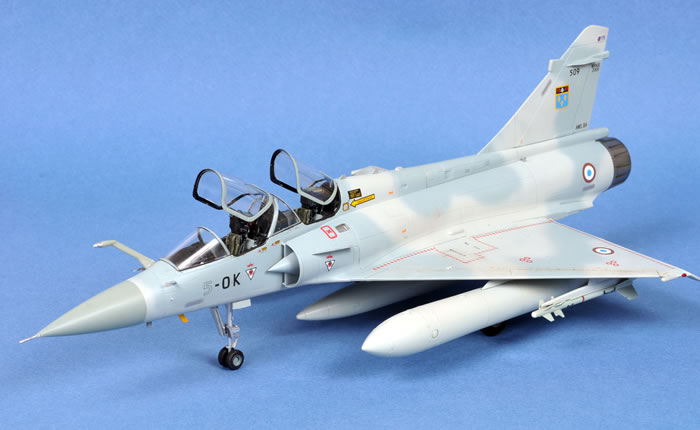
I posted an in-box review of the Kinetic Mirage 2000 B/D/N back in late November 2010 in which I concluded that the kit very nice and certainly an improvement over all previously released Mirage 2000 kits, but I also highlighted some potential issues.
The key items were the non-blown canopy, bulbous drop tanks, wing anhedral and wing root thickness.
During the build, a further issue became evident and this was the ECM pod above the engine nozzle.
Fortunately, most of these can be readily addressed. I will outline exactly how in the article below.
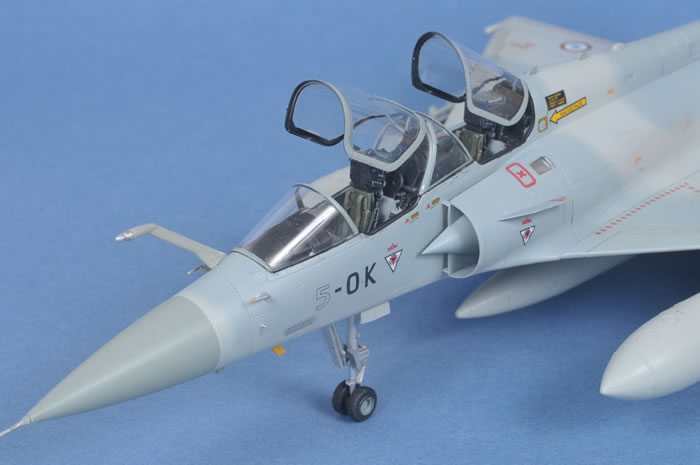
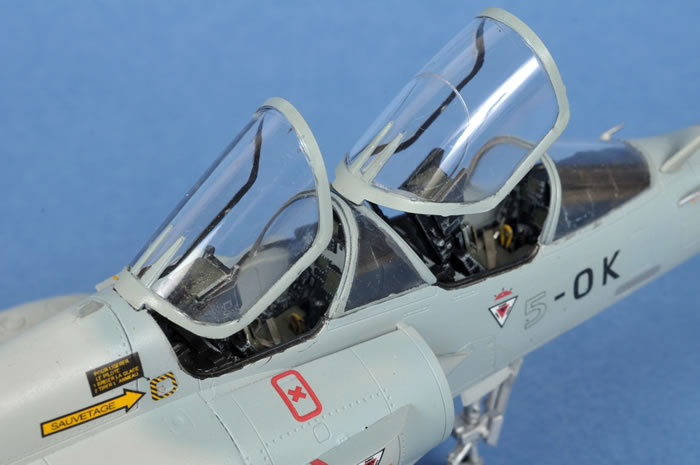
Canopy
The canopies on the model are not blown as they would be on the real aircraft. Blown canopies in model kits require slide mould technology and usually leave a seam line down the middle of the canopy that has to be removed.
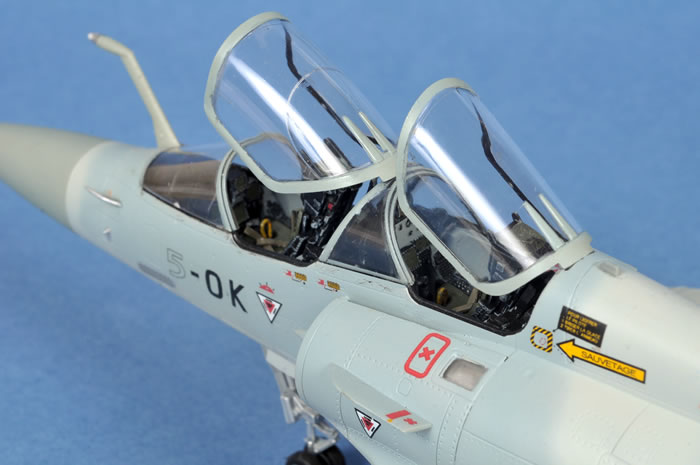
The Mirage 2000 canopy is subtly blown and in 1/48 scale is not largely evident. This is not a major concern for me personally, but for some modellers it will be an issue in the terms of accuracy.
The canopy does not in any way impact on the accuracy or width of the nose area.
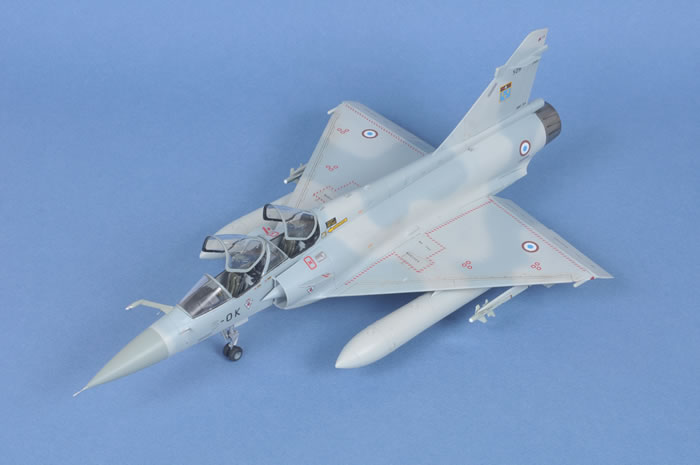
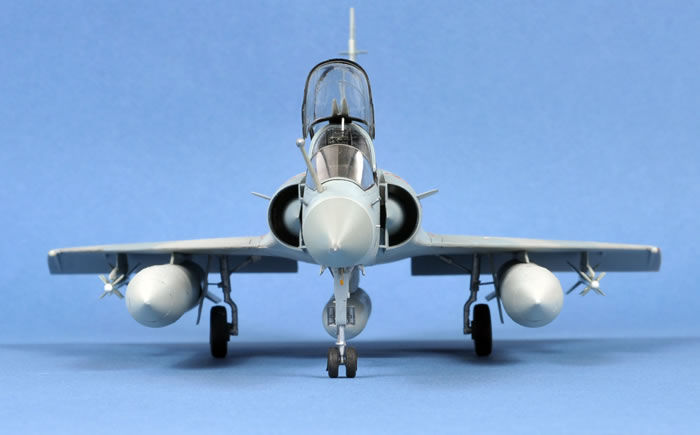
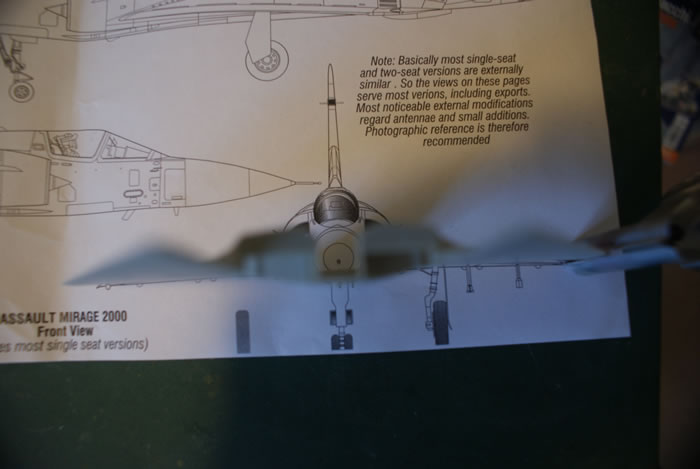
Wing Anhedral
The wings were a different story. These have no anhedral being totally flat and due to some mould distortion the upper wings cause dihedral when married to the lower wings. I also had some comments sent to me by people concerned with the wing root thickness, wing height on the intake/fuselage and wing tip curvature.
These issues sent me into a lot of research on drawings and photographs with the conclusion being that the Mirage 2000 has approximately 3-4 degrees on anhedral.
The kit wing is dead flat across the bottom wing, I did some measurements with a straight rule and put a protractor on the drawings. On the drawings with the straight rule from point to point the highest point the wing drawing outline gets above the rule is about 1.2mm, which means that the wing tip edge prior to fitting the wing tip needs to be deflected 1.2mm. Out came my trusty verniers to measure the dry assemble wing root. The wing thickness at the wheel well is 7.5mm on the kit and 7.8mm on the drawing. The drawings and photographs show the centreline of the wing bisecting the intake lip at 3mm out of 91mm of wing height and on the kit it is about the same, this is a difficult one to quantify, but looks correct. The wing tip on the Mirage 2000 is flat and is not curved like the Mirage III/V series. So in my opinion the wings are correct except for the lack of anhedral issue.
So how to add the correct wing anhedral? It took me about ten minutes to do but only after much deliberation.
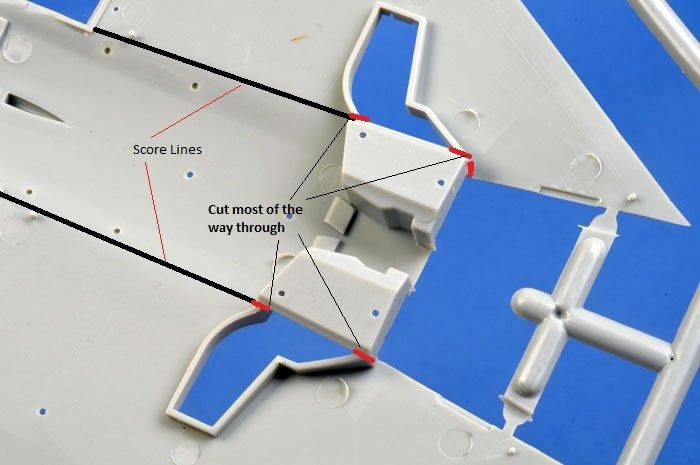
First I cut the wheel wells as indicated in the photograph with a razor saw not quite all the way through, next I scored the internal surface along the wing root also as indicated in the photograph. Next I bent the wings along this score line until a steel ruler could be placed across the lower wings. The correct deflection should see both wing tips touching the steel ruler while the steel ruler rests on the lower fuselage bulge between the main wheel wells. I the stacked the wheel well saw cuts with wedges of plastic, glued filled and sanded smooth. This was then fitted to the completed fuselage. The next issue was a small gap now appeared at the upper wing root to fuselage line. This was caused by the upper wing root mating surface now being the wrong angle. Another 5 minutes of careful trimming and sanding of the fuselage and wing root faces fixes this issue, but remember to sand the fuselage faces before fitting the lower wing. My wing root joint required no filler just liquid cement. I was then left with a small mismatch at the wing tip which would leave a gap when it fitted the wing tip, this was corrected with a shim of plastic card.
There were concerns that if you fixed the wing anhedral then the main undercarriage and pylon angles would be wrong. We are only talking 3 degrees. Firstly the undercarriage was not a tight fit, so it needs careful alignment even if you did not fix the anhedral. Some of the locating lugs on my pylons were already broken off, so I removed them all drilled a hole where they had been, so I could fit new locating pins from plastic rod and then sanded a slight angle to the wing pylon mating surface, before refitting the locating pins.
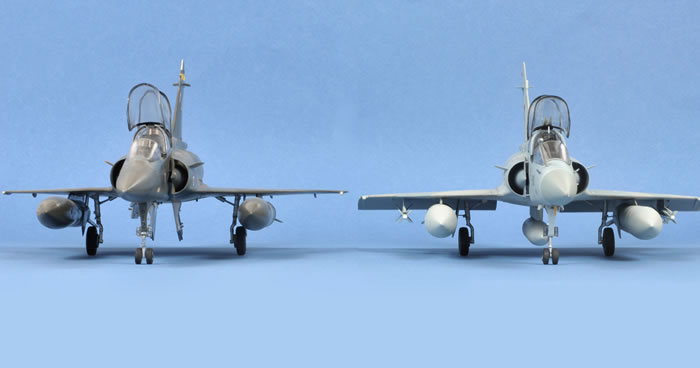
Heller Mirage 2000 without anhedral (left) and Kinetic Mirage 2000 following modification (right).
Tail ECM Fairing
The other issue to be corrected is the tail ECM fairing fitted just above the engine. It is too wide and both halves require significant sanding of the mating surfaces to achieve the correct width.

The instructions have you displaying the main undercarriage doors in the open position, I have only found one photograph of a Mirage 2000 with these doors open. The kit doors are moulded for the open position and need the hinges removed and some minor sanding to make them fit. Fortunately they are slightly oversize and do not leave a nightmare of hideous gaps to fill.
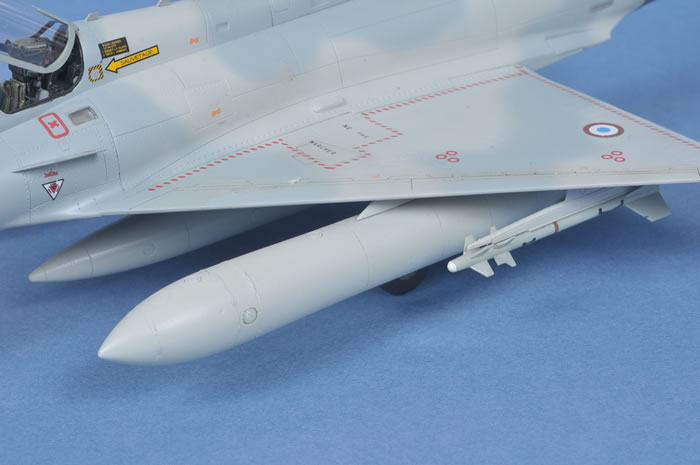
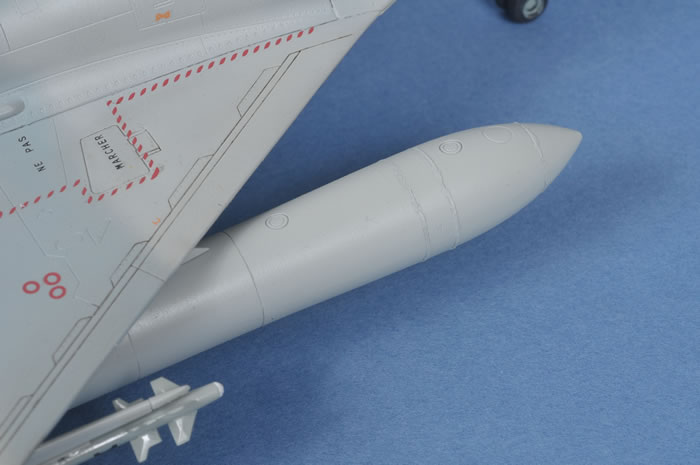
Wing Tanks
The last issue was the wing tanks. As I wrote in my in box review I had some reservations around the 2000 litre wing fuel tanks as these have a prominent bulbous nose. I compared these to the Heller tanks and they are close to being correct but not as prominent and this is caused by the slimmer rear being just a bit too wide.
The bulbous front end is the correct width but the fatter rear end reduces the impact of the bulbous front end. I went a long way to correcting this by scribing the seam lines deeper and then sanding the entire back end of the tanks for some time reducing the width and increasing the effect of the bulbous front end. I was careful not to sand the bottom so as not to remove the moulded detail.
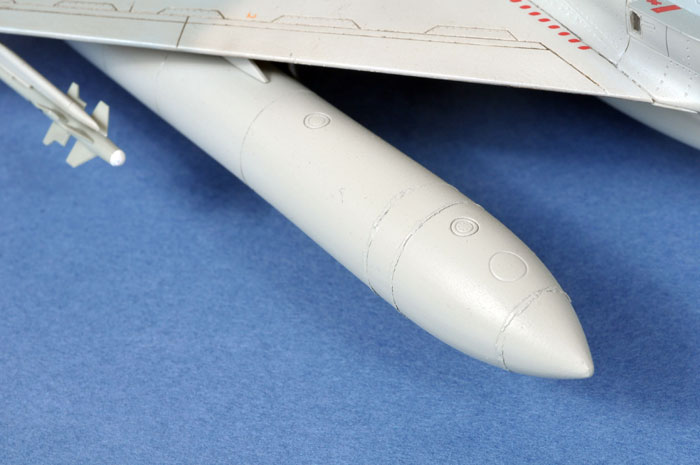
While this is not entirely accurate and perfectly round it is difficult to notice. I did have a spare set of Heller tanks but I chose not to use them as the moulded detail was not as good and I wanted to propose a simple solution for all who purchase the kit. Another issue is the front bulbous part of the kit tanks has engraved panel lines whereas the real tank has prominent weld lines. I viewed some after market Mirage 2000 bulbous 2000 litre tanks and these had horrible raised lines to represent the weld lines. The weld lines are almost flush so a modeller would not be incorrect to just fill the engraved lines but the welds are visible. I tried something new to address this. I lined each engraved line with Tamiya tape spaced about the width of the engraved line. I then filled the engraved line with Tamiya putty smoothing it to the same height as the tape. While the putty was still wet I removed the tape creating a jagged edge similar to a weld. I then ran a wetted finger over the putty to smooth the edges of the putty a bit. I had to redo a few areas as the putty came away with the tape, and a learned quickly to pull the tape off at an angle rather than straight up. The welds are still a bit over scale but certainly not as bad as the prominent raised lines on the aftermarket tanks and they look more like weld lines.
The cockpit has sufficient detail on the cockpit tub and instrument panels. The panel detail matches that of the Mirage 2000-5 with CRT displays, I am not sure that they represent the 2000B/D/N unless the cockpits were upgraded since initial production. Eduard produce an etched metal panel set for the Heller kit and I am sure these will easily fit. I went with the kit panels and found that after completing the kit you need to really look close to even see the instrument panels, let alone see that they are the wrong version.
The ejection seats represent the Martin Baker Mk10 seat quite well but do not have any harness detail. The front seat is depicted with the prominent canopy breaker horns fitted on each side of the headrest which are not present on the rear seat. As with their F16 Kits Kinetic may release seat harness and instrument panel detail as an aftermarket item and this we will have to wait and see. I made some rudimentary harness straps from wine bottle foil to suffice until some after market seats or belts come out.
Kinetic has provided separate wheel hubs that sandwich between the two tyre halves allowing you to paint the parts without masking and only requiring the tyre seam to be painted post assembly and this was a really great fit..
Kinetic must be congratulated on proving position able inner and outer elevons. These are almost always in the drooped position when there is no hydraulic power on the aircraft. This is something totally overlooked by most manufactures of previous Mirage kits, the elevons on all Mirages are only in the streamlined position under aircraft hydraulic power.
Alternative engine nozzles are supplied in the closed and open position. Unfortunately the two piece closed nozzle has better interior petal detail than the open nozzle. Once again with the SNECMA series engine which powers almost all Mirage versions the exhaust nozzle is fully open whin the engine is unpowered. The nozzle only closes as military power is increased prior to afterburner operation and the nozzle operates under engine operated hydraulic power. Kinetic missed mentioning the engine nozzle fitment in the instruction sheet, it just appears in step 6 and two further issues occurred with 3 sprue C parts that are not mentioned in the instructions but appear to be fitted in step 15. These are two part C32 which are two small square panels that are fitted under the rear lower fuselage just in front of the tail cone panel line and part C34 which is the rear part of the lower rear bulge fairing I think these should have been annotated in step 7 of the instructions or there could be a complete step missing, I have notified Kinetic so they can correct the instruction sheet in further releases.
This is a very nice kit and building it confirms that it is certainly an improvement over all previous releases.
The non-bulged canopy will be disappointing to the perfectionists but for me the blown canopy is neither here or there. The kit looks great when complete.
The wing anhedral issue was easy to fix and certainly improves the look of the finished kit. The simple thing is modellers of all levels of skill can easily build this kit and turn out a great result whether they do the corrections or not.
Kinetic do have a French weapons set in the pipeline but there is no timeline for available yet.
This is excellent work from Kinetic and I hope they keep rolling out the nice kits.
Thanks to Kinetic Models for the review sample.
Price USD $29.98 from Lucky Model
Model and Text Copyright ©
2011 by Mick Evans
Images Copyright ©
2011 by Brett Green
Page Created 17 January, 2011
Last Updated
18 January, 2011
Back to
HyperScale Main Page

|
 Home
| What's New |
Features |
Gallery |
Reviews |
Reference |
Forum |
Search
Home
| What's New |
Features |
Gallery |
Reviews |
Reference |
Forum |
Search