Classic Airframes' 1/48 scale
Avro Anson C.1
by Jon Bryon
|

|
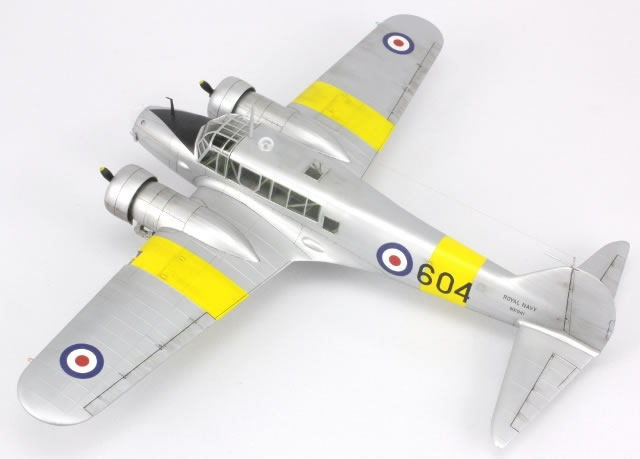
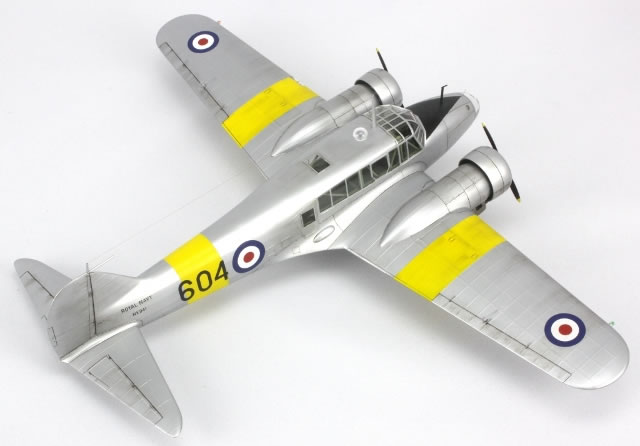
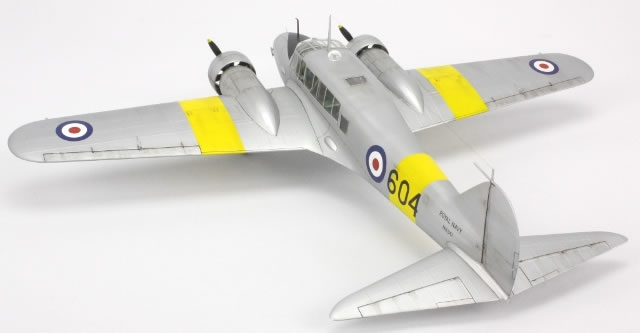
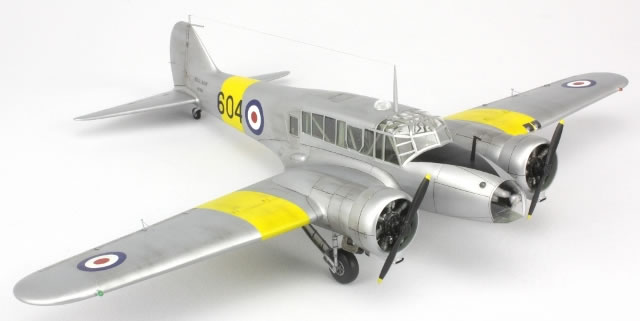
Avro Anson C.1
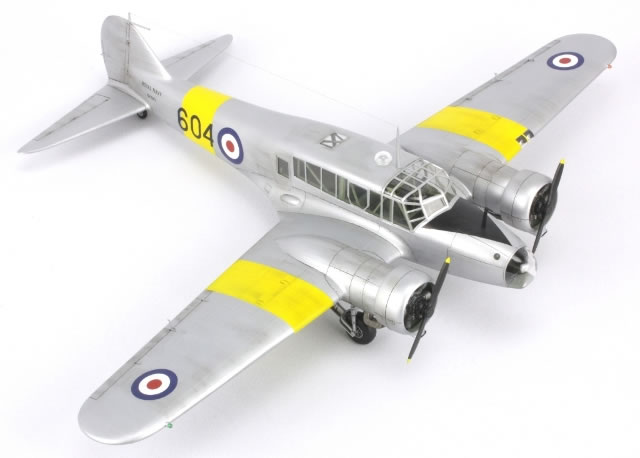
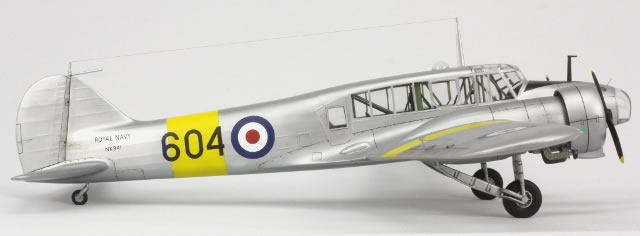
Royal Navy |

Special Hobby's 1/72 scale Firefly Mk.I is available online from Squadron.com
One of the strange pleasures I derive from our hobby is looking at my large (by my standards) pile of unbuilt kits and choosing which one to pluck from obscurity and build next. I know that many of them will never be built and it is with anticipation that I pull a model from the stash and declare, 'It's your lucky day. You shall be built!' And so it was with this Anson, a kit I never thought I'd actually build.
The Classic Airframes Anson is a good kit. I did not build it very well, but that does not detract from the kit itself. The plastic is nice and smooth, but not with that slightly icky super-smooth glossy surface that some other CA kits have. The recessed detail is nice, the fit excellent, photo-etched metal is well utilised and the decals are flawless. However, there are a couple of shortcomings, which I may as well list here:
-
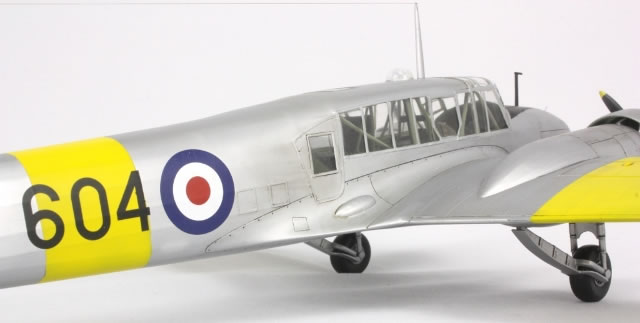
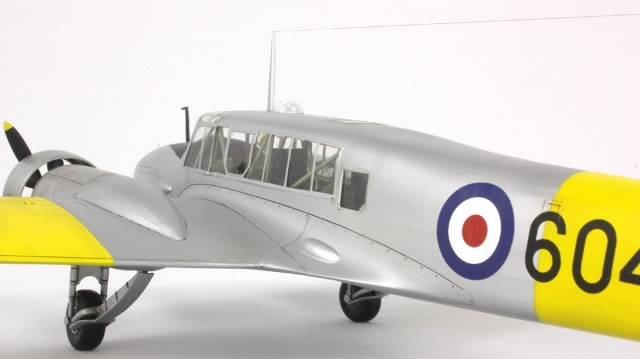
The instructions are not great. Some parts are missing identification, some parts are not mentioned at all, no guidance is given as to which options are suitable for which markings option, placement of many parts is super-vague, and I was screwed when it came to the engines (see below!). The profile for the markings I wanted to use - the Royal Navy option - is wrong (I think) in that it omits the prominent anti-glare panel visible in a photo of NK941 (admittedly in earlier markings), on the profile in the Warpaint Book (second edition) and the box art.
-
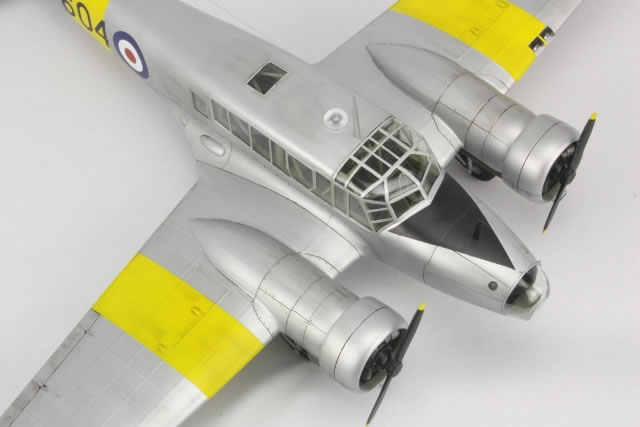
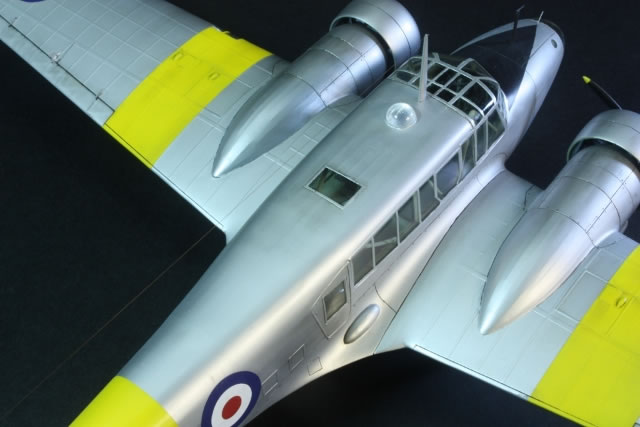
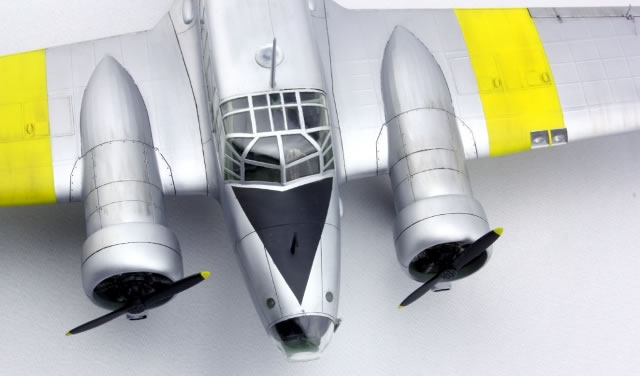
The canopy framing is wrong. I didn't realise this until after I'd started masking, so simply masked where the frames should be and left the moulded frames alone. I also think the cowlings are too big for this version, but since I haven't measured them, that's just my subjective opinion.
-
The raised surface detail is horrible. It's horrible because it doesn't seem to bear any relation to reality, and it's horrible because it will be removed at the wing to fuselage and tailplane to fuselage areas during regular seam removal and would be a pain to replace. Ideally I would have removed all of this detail, but I'm 34 and I want to build some other kits in my lifetime; there is a *lot* of it to remove. I did spend some time sanding it down, but you can't tell. Under a camouflage finish it wouldn't be so obvious, but it stands out like a sore thumb under silver.
The interior is well appointed. Locations for various things are not well defined and a great deal of trial fitting is necessary. My main problem was restoring the interior framing to a round cross section. After construction I was surprised at how little was visible through all those windows so I wish I hadn't spent as long painting and detailing the inside. The whole interior structure is then inserted in between the fuselage halves. I had to do a lot of trimming, mainly around the gun area, to get things to fit, but it all went in in the end.
The fuselage halves were joined (fit was excellent) and the blanking piece fitted instead of the dorsal gun turret. This did not fit so well and required extensive sanding, which obliterated much of the fabric detail (which in this area is very nice indeed). There should be a visible seam here as on the real thing, but I just prefer the seamless look and sanded it all out. The canopy was installed at this time, and also fitted very well. Of course I still needed to use superglue and Mr Surfacer as a filler, but the gaps were all small. The nose glazing also fitted extremely well. The gun trough, according to the photo of NK941 I had, needed to be filled in, and this was done with Tamiya two part putty and Mr Surfacer. The outline was still visible, but then I don't think the real thing had a completely smooth surface here either. I then decided the mask the canopy.
This was where things started to go wrong. There are a lot of windows to mask. I hate masking. I used a new (to me) Tamiya product: yellow masking tape that comes in flat A4 sized sheets. I cut this into strips and filled the insides with Gunze masking fluid. A few days later the strips started coming adrift; clearly this masking tape is less sticky (and thinner) than standard Tamiya tape that comes in rolls. I then had to mask again. I hate masking...I was not enjoying the model at this point! In addition, it was at this point I realised the canopy framing was wrong in several places compared to photos and profiles. The box art and markings profiles are correct, so follow those. But having spent ages fairing in the canopy and then masking the windows (twice!) there was no way I was going to do it again. I left the moulded frames and modified the masking I already had to match the photos and profiles. Then I attached the astrodome, with Tamiya Extra Thin Cement, my usual glue of choice. I've never had a problem before, but this time it crazed the astrodome, which is why on the model it looks like it has really bad condensation inside. Oh well.
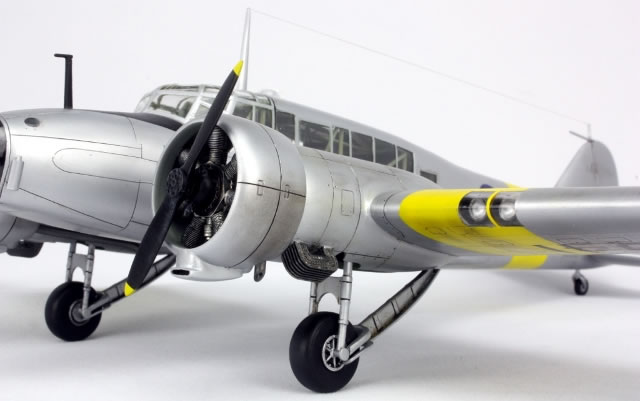
With that all done, I attended to the wings. I needed to add the leading edge lights, which are provided in the kit but you have to cut the insert out of the wing yourself. Easier said than done, and I had to fill the gaps with superglue and sand all the framing away to get a smooth fit, but I am pleased with the result. The wheel bay bulkheads need to be fitted before the wing halves are joined, and are vague in their positioning. My only advice is to spend a lot of time looking at photos to see where the undercarriage should stick out of the wheel bays and get the bulkheads to produce this result. I used a lot of tape and dry fitting to try and ensure my model has a square undercarriage, especially with wheels that are parallel to the centreline of the fuselage. To my great surprise (more due to luck than skill), my undercarriage is pretty square! I did find at the end of the build that the bays are a little narrow for the legs to fit in, but there is enough flexibility in the plastic to get away with it and as long as you don't turn my model over (which you shouldn't do anyway; I'd kill you!), you won't notice.
The wings themselves are a good fit and fit well, via a butt joint, to the fuselage. There was a small step that needed sanding away (and unfortunately necessitated removal of some of that surface 'detail') and then the join line was restored with a needle and scriber. The tailplanes were similarly uneventful except for the fact I fitted the port one at a crazy angle and didn't notice until it was too late. I wasn't about to break it off and start again, so at this point I had an Anson with a messed up canopy and wonky tailplane...my enthusiasm was beginning to wane as the mistakes began to mount.
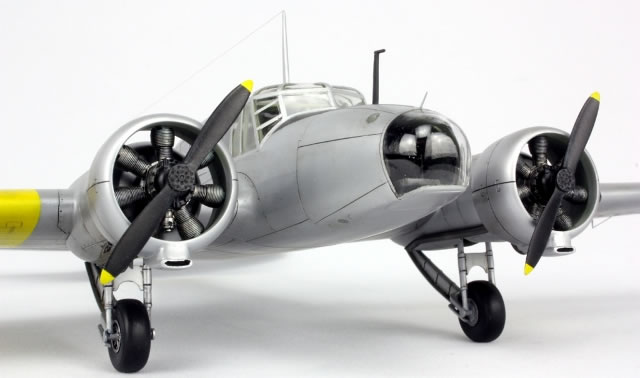
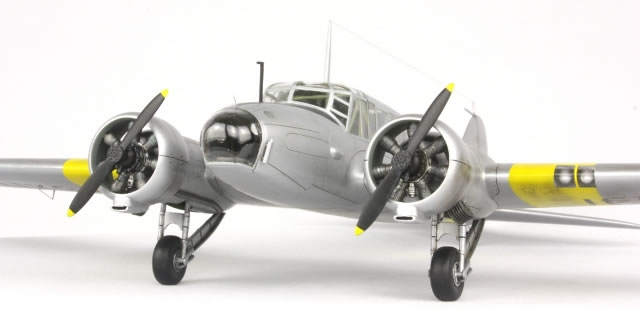
The engine nacelles fitted well to the wings, just needing some superglue and rescribing to complete, and I constructed the cowlings and left them off. I didn't test fit them; if I had, I may have noticed that I think they're too big, but then I wouldn't have been able to do anything about that anyway...
In this boxing the engines are plastic and it is here that hidden dangers lurk! I did not discover until right at the end, as I was fixing the cowlings in place after painting, that the engines have a front and a back which are different but both fit to the wing and allow the engine casing to be fitted. What this means is that I fitted one casing to the back of one engine and to the front of the other and did not notice until it was far too late, because both engines still fitted fine to the wing. The end result is that one of my cowlings is about 2-3mm too far forward from the nacelle. My Anson was becoming increasingly wonky! My mistake, but also a poor show from the instructions and less than ideal kit design.
So eventually I had an airframe nearing readiness for painting. I sprayed the transparent areas British Interior Green and then gave the whole thing a good coat of Mr Surfacer 1000. As usual, I managed to get all kinds of bits of rubbish in the paint. This is, without a doubt, my biggest problem at present with my models.
Mr Color Silver was sprayed over the entire airframe, and then the wing and fuselage stripes masked out. I should have done it the other way round; I needed a good amount of yellow to get decent coverage and ended up with a step against the silver. To make things worse, for some reason I decided to use Mr Color 4, which is a bright yellow and, I fear, rather too lemony, and I got the dimensions of the fuselage band wrong. But at this point I was past caring and just wanted to finish! The anti-glare panel was masked by tracing the outline onto a piece of paper, cutting a template and then making a mask from the Tamiya masking paper; it worked very well for this kind of masking.
Johnson's Klear was airbrushed on ready for the oil wash and decals. At Telford last November I had decided to buy as many different wash products as I could find. In the engraving surfaces between moving parts I used Tamiya's enamel black wash, which is a wonderful, wonderful product. I have the grey and brown shades as well and will probably use this product the most, mixed to get different colours. It has excellent density, excellent viscosity, dries quickly and can be easily controlled with enamel thinner. I also tried AK Interactive's Brown-Blue enamel wash; this was actually a dark green in colour and will be useful over green camouflage; not quite as good as the Tamiya stuff (it's a little more viscous), but still pretty good. I also had a go with Abteilung oil paints in the other recessed detail; it took ages to dry and didn't stay in the detail very well. I'll probably move away from oil washes for this reason. I also had a go with Modelmates Slate Grey dye, which is water soluble, and this was excellent for the undercarriage. Lifecolor Tensochrome was used on the engines. This stuff doesn't flow terribly well and I'm not sure what use I'll have for it in the future. The only one I didn't have a chance to use was the Flory Models wash. Maybe on the next one...
The decals were perfect. There are only 18 in all, and I don't know why everyone doesn't use Microscale for printing decals.
The photo I had of NK941 showed a very tatty aeroplane, especially around the cowlings and tails. I had planned on using some grey and brown oils to have a go at staining the silver paint, but I was worried it would just all end up collecting in the raised detail and emphasising exactly what I didn't want to emphasise. So I compromised, and since this wasn't exactly turning out into a stellar model, thought I'd start experimenting.
I fixed all the bits and pieces onto the airframe - undercarriage, aerials, pitots, etched hinges, etc. - except for the props and aerial wire. I left off the photo-etched pieces on the horizontal tail surfaces since I could not see them on any photos. The engine detail is quite poor and even a cursory examination of the underside will reveal that the exhausts aren't attached to anything. From the front the engines in the cowlings are also worryingly 'see-through'. Once done, I airbrushed on a mix of Vallejo matt and satin varnishes, let that dry, then dotted some small dabs of oil around the cowling and wing leading edge. After allowing them to dry for a while I tried blending them in using a flat brush. I am not pleased with the effect, but want to pursue this method more in the future. I think I need to get a flatter finish - often the oil was just wiping off the surface - and I need a more consistent approach, not just doing it to a few places. This would represent a significant departure from my previous modelling techniques and, when I'm only building about one model a year, I'm a bit nervous of messing it up. But one needs to explore new things and maybe on my next camouflaged model I'll have another go. I very much like the style represented by modellers like Spence Pollard and Jamie Haggo and might start heading in that direction. (But, please guys give us more details! Especially on what clear coats you are using and exactly when they are applied.)
Now I was almost finished. I removed the masking and used a thinner soaked cocktail stick and those tiny Tamiya cotton buds to remove overspray that resulted from that lifting Tamiya tape and the mutiple attempts at masking. Some panes needed to be touched in with Johnson's Klear, but overall the canopy wasn't quite as bad as I feared it might turn out. The props were stuck on and a strand of my wife's hair served as an aerial wire. (This is the first time I have ever added an aerial wire to a model; I figured it's finally time!) The keen-eyed will notice that the tail mounted pitot (if that's what it is) and aerial attachment point were replaced with brass tube. There was no way the moulded plastic examples were going to survive!
So then she was done.
Aside from the inaccurate canopy framing, surface detail and (in my opinion) the cowlings, it's a nice kit; not that you can really tell from my model with it's poorly painted canopy framing, wonky tailplane, asymmetrical cowlings, lumpy paint and over-sized fuselage stripe. In terms of parts, the only thing missing in the kit is the ASW pod that should be under the nose.
I would have liked to at least attempt scratch-builing the pylon for this, but had no suitable photos or drawings.
I am very glad to have built this, but I think I'll go and build something more mainstream now...
Text and Images Copyright ©
2012 by Jon Bryon
Page Created 31 May, 2012
Last Updated
31 May, 2012
Back to
HyperScale Main Page

|
 Home
| What's New |
Features |
Gallery |
Reviews |
Reference |
Forum |
Search
Home
| What's New |
Features |
Gallery |
Reviews |
Reference |
Forum |
Search