Douglas C-47 Dakota A.N.A.R.E. Conversion Set and Decals
For the Italeri/Airfix Kit
Red Roo & Hawkeye Models, 1/72 scale
S u m m a r y : |
Catalogue Number: |
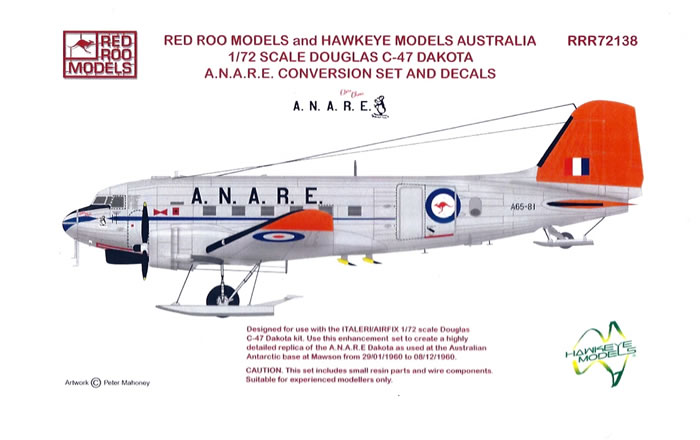
Red Roo Models Item No. RRR72138 - Douglas C-47 Dakota A.N.A.R.E. Conversion Set and Decals For the Italeri/Airfix Kit |
Scale: |
1/72 |
Contents & Media |
Twenty -two resin parts, one resin jig, two brass tubes, various lengths and thicknesses of brass wire, nylon thread, a strip of plastic mesh, and decals for one subject. |
Price: |
Available online from Red Roo Models for Aus$22.00 |
Review Type: |
First Look. |
Advantages: |
Well-researched, extremely thorough instructions, every item and miscellaneous material needed is supplied, and all the components are very good quality. Superb plans and and markings guide. The inclusion of an assembly jig for the skis and their airfoils is a nice touch. |
Disadvantages: |
The sequencing of some constructional drawings within the instructional text could be improved for better clarity and logical flow. |
Conclusions: |
Red Roo is unrivalled in my view for their thorough instructions and for supplying all of the odd components needed to complete their conversions. Certainly, this is the case with the one reviewed here. Hawkeye Model’s contribution of the markings guide maintains this standard.
The resin parts and decals are of high quality, and the base kit is readily available and easy enough to build. This combination should lead to a problem-free conversion in my view if the instructions are closely followed.
This nicely executed conversion should result in a most eye-catching model. It seems to be great value too. I recommend it highly. |
Reviewed by
Mark Davies

HyperScale is proudly sponsored by
Squadron.com
The RAAF’s support of Antarctic research began when it sent a DH Gypsy Moth floatplane to the ice as part of Sir Douglas Mawson’s 1929 expedition. After WW2, the RAAF formed a special Antarctic flight to fly Auster and DHC Beaver aircraft from the Mawson and Davis bases. A C-47 that had been modified for Antarctic operations joined the flight in June 1959. The RAAF originally received this aircraft, A65-81, in March 1945; it then served for fourteen years as a transport, and underwent overhaul and repair during this time.
A65-81 was modified by De Havilland Australia for its new role in the Antarctic. The ski and JATO modifications were in accordance with designs from Douglas. These changes also required the relocation of oil coolers from under the engine cowlings to their sides, so that the skis could retract when in flight. Other equipment fitted at this time included a radar altimeter, a Doppler radar, a second radio compass, and both oblique and vertical cameras.
Ownership of the aircraft changed from the RAAF to the Department of External Affairs, Antarctic Division. However, RAAF personnel would fly and maintain it whilst in Antarctica. The aircraft captain and flight CO, Sqn Ldr J.C. Kitchenside, christened the plane “Ann Cherie” after his daughters, and had a penguin painted on the left side of the nose. The paint scheme remained much the same as the RAAF’s had been, but the RAAF titles were changed to ANARE. Following lengthy trials, the C-47s” wings were removed and it was prepared for transport by ship to the ice.
A lack of cranes at Mawson Base and harsh weather conditions made reassembling the C-47 a challenge that took just over a week to complete. It was more than two weeks later before it was judged serviceable on June 15th, 1960. The C-47 flew in support of the research mission whenever conditions allowed. On December 2nd, it was relocated to Rumdoodle Base where a wind fence had been prepared to protect the flight’s aircraft. Despite this, terrible weather and strong winds that would wreak havoc struck on December 8th. Braving 100-knot winds four ground crewmen went to check on the aircraft by the wind fence. They found a beaver on its back with it wings ripped off and no sign of the C-47. Once the weather had abated a search party set out to find the lost Dakota, and it was eventually found jammed in a crevasse eight miles away! Declared a right off, with valuable equipment salvaged, “Ann Cherie” was left to the ice.
I think that polar exploration aircraft are appealing subjects for modelling. Their bright liveries and interesting modifications like skis and JATO bottles are the main reasons for this point of view. I also have a fondness for Antarctic subjects as I served there for a few weeks when I was in the NZ Army; I well remember US Navy C-130 I flew in to get there, and its very bumpy landing and take-off runs on the ice. I must therefore admit to a bias in favour of the subject matter, and that I was pleased to get to review this latest release from Red Roo and Hawkeye Models.
The Contents
The conversion is for use with the Italeri C-47 kit and Airfix’s re-box of this. I think that both Revell and Testors have also re-boxed the same kit. Whilst it is not quite as accurate as Esci’s C-47 kit, Italeri’s one is at least of similar quality and far more available; which makes it a sensible choice by Red Roo & Hawkeye.
The conversion comes in a sturdy flip-top box with a profile of the ANARE C-47 on the lid. The box top also features both Red Roo’s and Hawkeye Model’s logos as this is a joint production by these two companies. Inside are two heat-sealed pouches and a zip-lock bag containing the parts listed in the above table. CMR Moulding and Casting produce the very good quality resin parts. The decals are by Hawkeye Models and appear to be very good quality too; they come packaged in their own zip-lock bag. Rounding out the package are eight A-4 pages of instructions for the conversion by Red Roo, and eight more by Hawkeye Models for the paint and markings guide. Both come printed in colour, and the markings guide includes four pages of in-service photos with captions.
The instructions give a quick history of the RAAF’s support to Australian Antarctic research; then go on to provide a detailed history of the C-47 used in this role. They also list the references used to research the conversion. It is obvious that a lot of research effort has gone onto this conversion set.
The instructions describe each step of the conversion in detail, and use high quality graphics and colour plans. There are plenty of diagrams and written guidance about measurements for making holes, cuts, or fitting parts. A thorough familiarity with the instructions is vital, as they leave nothing to chance.
Whilst these instructions appear to be very well done, as I have come to expect from Red Roo, I did find them to be somewhat disjointed in places with their layout and sequencing of some diagrams and stages. I will describe these issues in detail later. However, I am sure that a trouble-free build will result if the instructions are read a few times to establish a clear understanding of them.
Those who mastered the conversion and assisted with its research are acknowledged at the end of the instructions.
The Conversion
The instructions include some steps that will enhance the finished model but are unrelated to the conversion. These include blanking off the engine nacelles to prevent a see-through effect, along with closing off the wing apertures within the wheel wells. They also advise to fill the trim tab on the starboard aileron, which should not be present. There are some internal strengthening plates to fit that serve to secure locating wires used later in the conversion. Red Roo advises to reinforce the fuselage seams with plasticard to avoid having them flex and crack.
The vertical camera fairing fits onto the rear fuselage at this stage, and there is a drawing of how to align its fit. This is Drawing 1; which like some others, is placed well ahead of its associated descriptive text in the instructions. Drawings 2 and 3 are even on a different page ahead of their accompanying text. The drawings only make sense when explained by the text covering the stage of the conversion to which they relate, as they lack descriptive titles. I studied the drawings but had to read further down or over the page to find out which conversion step the drawings supported. Placing the drawings nearer their explanatory text would aid prompt understanding, as would the use of titles for them. The slightly awkward layout may be to do with formatting to fit the pages, but it diminishes the clarity and flow of the instructions in my view.
The conversion supplies some plastic mesh to represent the cargo netting used in the real aircraft. This is to be painted khaki and installed before closing the fuselage. The instructions advise that the RAAF painted its Dakota cockpits with ultraviolet neutral cockpit green. They go on to provide FS 595B and Gunze colour equivalents to guide paint selection for this.
There are three main aspects to the conversion; adding skis to the undercarriage being the first and most obvious. This addition led to the second major change; requiring the engine oil coolers to be moved from the underside to the upper insides of the engine cowlings, so leaving room for the skis to sit flush with the nacelles when the undercarriage retracted. The third major change is the addition of JATO bottles. A variety of smaller steps and alterations need attending to, most of which I shall now describe.
The fuselage and wing kit should be assembled in accordance with the kit’s instructions. The UHF antenna base is then fitted and the holes drilled for the JATO bottles as per the plans and dimensional guidance provided. The JATO bottles have wire inserts cast within them that serve to anchor them within their locating holes. Various other parts are covered off at this stage; these include the radome, new astrodome, radio compass antenna, camera ports, and drift sight.
The only surgery required by the conversion is the removal of the kit’s oil coolers; not counting drilling of holes. Once this is done the resultant holes in the cowls are blanked off using the resin parts provided. Care should be exercised to ensure the holes left after removing the oil coolers matches the size of the blanking parts. The new resin oil coolers fit on the inside faces of the cowls in line with a 45° from a vertical datum line running through the engine’s centre. The instructions remind you to use the long carburettor intakes option that the kit provides. They also mention to leave the engine sub assemblies off until after the skis have been fitted and rigged, as their absence makes this process much easier.
A little bit of scratch building is required to make two radar altimeter antennae and a hydraulic damper strut for the tail ski. You make these using brass wire and brass tube respectively, as supplied with the conversion. A small criticism here; the two widely separated instructional paragraphs refer to the tail ski’s “hydraulic damper strut” and “damper strut”, but in the small constructional drawing call it a “shock strut”. Consistent use of terminology is important for clarity I feel, and would have helped in this instance.
The next step of the instruction covers rigging the antenna wires. They are most useful in this regard, although I would have expected this stage to fall towards the end of the instructions. This is a minor point however.
The main skis come with an assembly jig to aid the positioning of their stabilising airfoils on the struts rising up from the skis. This is a thoughtful touch, which should simplify what could have been a fiddly aspect of the conversion. The instructions provide plenty of guidance and advice surrounding this process, as they do for the tail ski. They also advise how to make the forward and aft limiting cables for the skis, for which the conversion includes some thread to make these.
I should also mention that the instructions are replete with detail painting instructions.
Now it is time to balance to my mild criticism of the instructional text and drawing sequencing. The three pages of coloured scale plans (not the paint and makings guide) are probably the key to understanding the steps and features of this conversion. These are very well drawn, include all of the key measurements, and have annotations covering the changes that need to be made. I would advise becoming familiar with the plans before reading the rest of the instructions, as I think things will be made a lot clearer. In fact, I rate these three pages of plans and their narratives as outstanding; and consistent with the high standards Red Roo sets in this area; but this is not to say that Red Roo could not have used a better layout in the main body of their instructions in my view.
Colours and Markings
Hawkeye models provide the colours and markings side of the conversion. Like Red Roo’s plans, their four-page decal and paint guide is superb with thorough and obvious attention to detail. These are printed in colour with four views of the aircraft. However, there are two sets of fuselage profiles to cover the aircraft with and without skis. The guide includes FS.495B codes as well as paint numbers for the Revell, Humbrol, Gunze, and Mr Color ranges. It goes on to gives detailed advice on how to get the best results when applying decals. Acknowledgement is also made of the reference sources used and those who helped research the colour scheme.
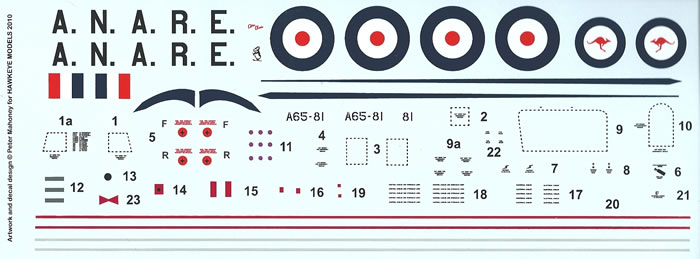
The decal sheet is well printed with good registration and what looks to be good colour density; I would assume that they would be of excellent quality to use. The sheet has national insignia, the ANARE logos, and quite a lot of stencilling; also provided are the four flashes for the fuselage sides and nose. The real aircraft had its inspection hatches sealed with red oxide doped linen patches for its journey to the ice. These hatches were later sealed with silver gaffer tape after being opened for inspection in the Antarctic. The decal sheet has red oxide and grey aluminium strips that can be cut to length to represent these seals. There is also one errata decal for some writing by one of the cockpit side-windows.
There are a number of notes to guide the modeller on some specific points about the colour scheme. For example, there is a note advising that the position of the underside roundels is subtly different on each wing, as portrayed by the markings guide.
Fourteen captioned images complete the paint and markings guide, and several of these are in colour.
I have reviewed several Red Roo conversions now, and I have found them to have the most thorough instructions of any conversions that I have seen. This is the case here as well, albeit that I think their sequencing and layout could be improved. This said; the instructions are easier to understand if the modeller first studies the superb conversion plans and their various annotations. Either way, the comprehensive instructions do take a few reads to become fully conversant with; but the time spent should pay dividends once the conversion starts.
Red Roo’s conversions also stand out from the crowd by including the items needed for any scratch building required. This is the case too; with the inclusion of items that many other brands would expect the modeller to furnish.
CMR Moulding and Casting make the resin parts I believe; and these are produced to a high standard. The inclusion of a resin jig to help fix the ski’s airfoils in place correctly is a nice touch.
Hawkeye Model’s contribution just serves to lift the package up a level or so. Their colours and markings guide is attractive, thoroughly researched, and detailed; yet clear and easy to follow. Their decals appear to be flawless.
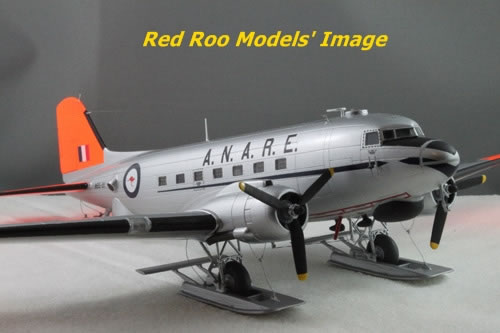
I think that this is an easy conversion from a construction standpoint. I foresee few if any problems if you follow the instructions. This conversion should lead to an imposing model given the skis, JATO bottles, and other Antarctic extras; plus of course its bright colour scheme.
This nicely executed conversion seems to be great value too. I recommend it highly.
Thanks to Red Roo Models for the review sample.
Review Text Copyright © 2012 by Mark Davies
Page Created 8 October, 2012
Last updated
8 October, 2012
Back to HyperScale Main Page

|
 Home
| What's New | Features | Gallery | Reviews | Reference | Resource Guides | Forum |
Home
| What's New | Features | Gallery | Reviews | Reference | Resource Guides | Forum | 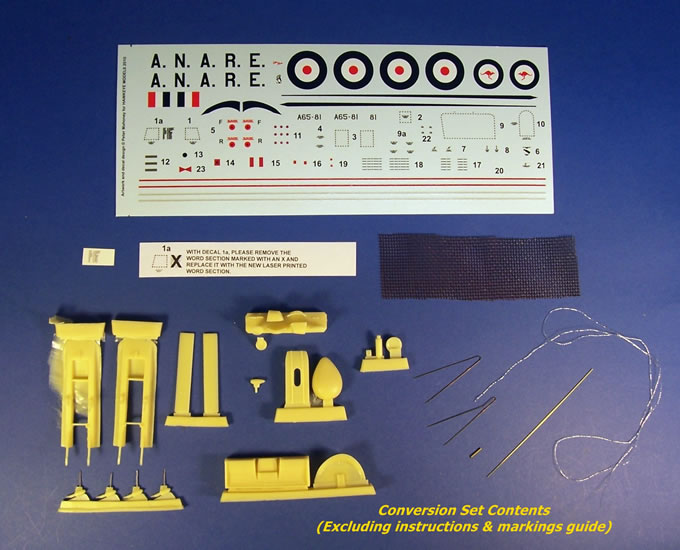
_fs.jpg)
_fs.jpg)
_fs.jpg)
_fs.jpg)
_fs.jpg)
_fs.jpg)
_fs.jpg)
_fs.jpg)
_fs.jpg)
_fs.jpg)
_fs.jpg)