Valom's 1/72 scale
Bristol Brigand B.Mk.I
by Roger Hardy
 |
Bristol Brigand Mk.I |

Valom's 1/72 scale Brigand is available online from Squadron
S
u m m a r y |
| Catalogue Number: |
Valom Kit Number 72030 - Bristol Brigand B.Mk.1 |
| Scale: |
1/72 |
| Contents and Media: |
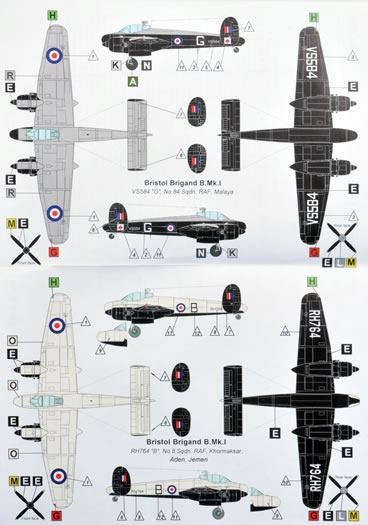
93 parts in grey styrene, four parts in clear plastic, six parts in cream coloured resin; one photo-etch fret plus photo negative instruments, rockets, decals for two subjects. |
| Price: |
£35.99 available online from Hannants
AUD$48.00 available online from NKR Models |
| Review Type: |
Build Review |
| Advantages: |
Superb surface detail, generally simple construction; good level of detail. Accurate, good fit of major components. |
| Disadvantages: |
No cooling fans on the engines. ‘Approximate’ fit of cockpit and undercarriage and instructions that could be better. ‘Howitzer’ gun emplacements under the nose. Wheels too narrow. |
| Conclusion: |
A well-detailed and relatively straightforward model of an interesting and previously neglected subject. Recommended. |
 Background Background
This kit was reviewed in the box by Brett Green at: http://www.hyperscale.com/2009/reviews/kits/valom72030reviewbg_1.htm so I won’t repeat it here.
The Kit
This was my first Valom kit. It is a limited run injection moulded kit but I was surprised by the excellent and subtle panel and rivet detail. There are also two resin engines and a photo-etched fret, mostly seat belts. There are no locating pins so a little extra skill will be required in the assembly. Brett’s review reported out-of-register decals but those in my kit were perfect, so Valom have sorted out that problem. Also, there was a clear DF loop which is a post-production improvement.
The construction starts with the cockpit and I assembled as much as I could to ensure that I had everything in the correct place as the fit of the parts and the instructions are ‘approximate’ to say the least. There is a former at the rear of the cockpit and the instructions would have you trim this but, Although I did, I don’t think it’s necessary and repaired the surgery with plastic card. There are two side-facing seats aft of the pilot’s but it’s not clear exactly where these should go. I followed the instructions but the seats were too far forward of any desk and I have no idea what the actual cockpit arrangement was, so I repositioned the seats to a more sensible position.
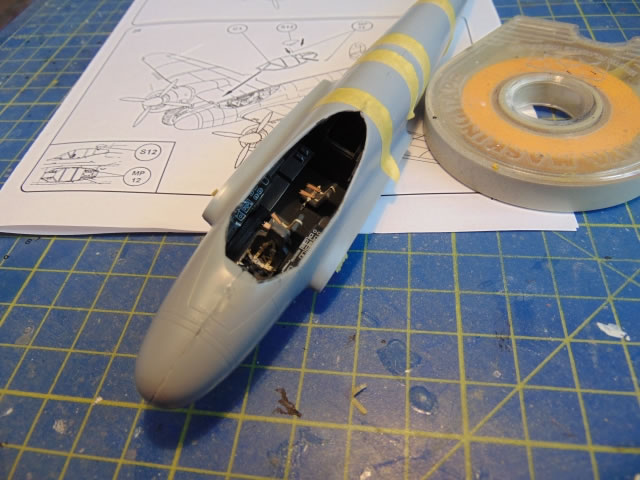
The photo-etched + film + plastic instrument panel didn’t fit without substantial trimming but maybe I’d positioned one of the cockpit sidewalls incorrectly (very easy to do). I was concerned that, with the large canopy, the cockpit was rather sparsely detailed but it’s not a major problem because the canopy is on the thick side and you can’t clearly see a lot inside the cockpit. RAF aircraft of this period had black cockpit interiors (not interior green as stated in the instructions) which really doesn’t encourage super-detailing, just seat belts and dry-brushing.
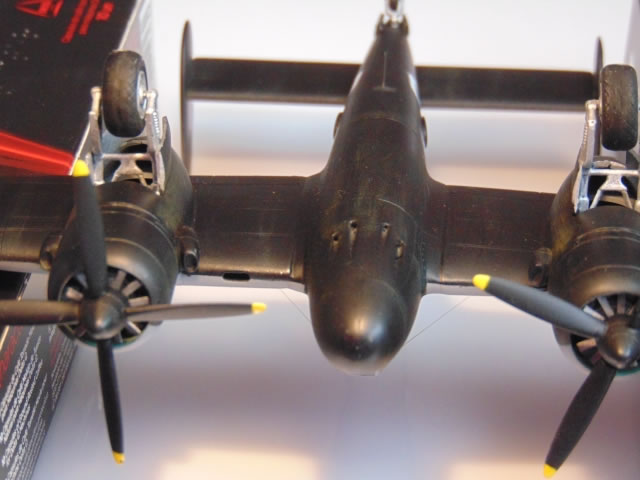
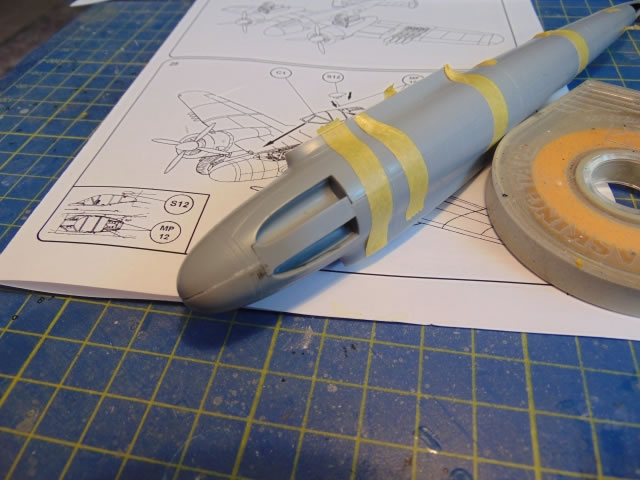
Whilst waiting for the cockpit paint to dry I added the bizarre parts under the forward nose, wondering what they were. In fact, they are meant to be the locations for the muzzles of the four 20mm cannon. Only, there are only two of them and they look as if they would house two 12” Howitzers! I filled the troughs with Milliput and used the shank of a 1.2mm drill bit to make the four new troughs. At this stage they’re rough but will hopefully look OK with a bit of trimming, fettling and drilling. Actually, I have seen a low-res photo of an unpainted prototype that appears to show these big troughs but I’ve seen better photos that show the same arrangement as a Beaufighter which is far more likely. Incidentally, photos of the Brigand are thin on the ground and I cannot find any evidence of shell shutes under the fuselage so maybe the shell cases were collected internally.
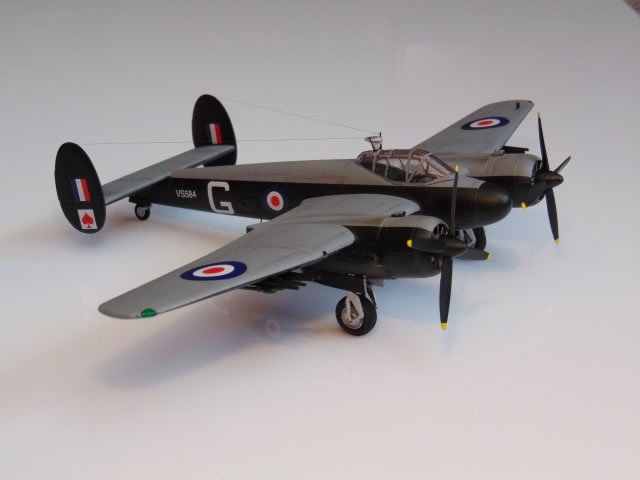
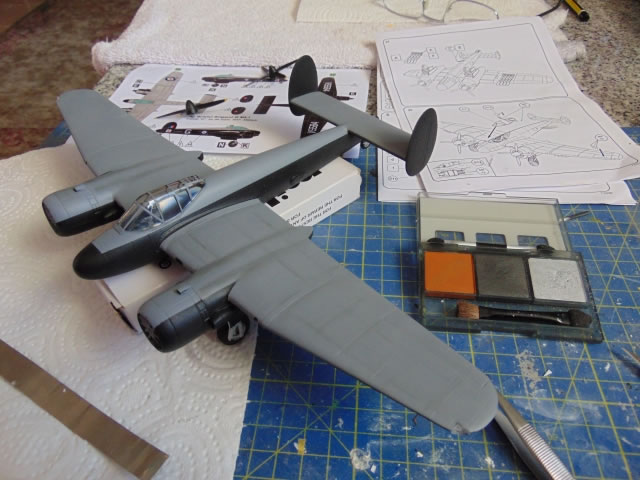
Assembling the nacelles is best done by taping the wing halves together then gluing the lower nacelle parts in place. The undercarriage has to be positioned in the upper wing half before the two halves are glued so you need to ensure nacelle alignment, top and bottom, at this stage. This was easier than I expected as was assembling the tail unit. At this point, I drilled the holes for the underwing rockets by reference to photographs; Valom could have marked them on the inside. Getting the undercarriage located correctly seems a little approximate but if you follow the guides moulded into the insides of the wing, everything slots into place well. I was a little concerned about the fact that the undercarriage legs are at right angles to the wing but this is correct as the wings have almost no dihedral. Assembling the wings and tail unit to the fuselage required a small amount of filler to the seams but less than I had expected. The fit of all major parts is good.
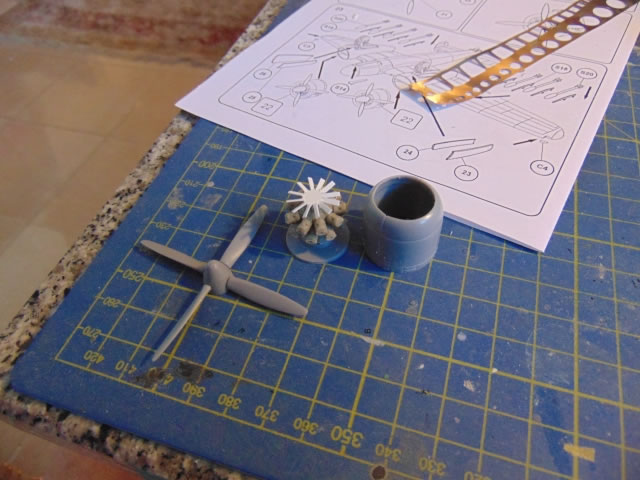
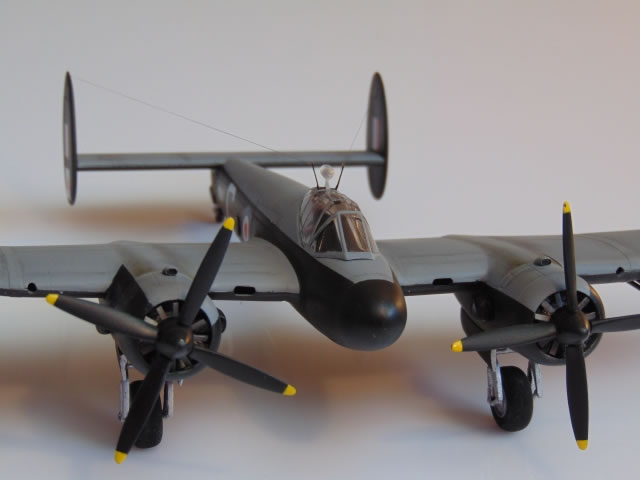
The engines are cast in resin and are very nice. The trouble is that they are quite tightly cowled and there should be a cooling fan in front of them so little of them will be seen, which is a shame. I made these fans from .015” plastic card I did 12 blades (but the real one had a lot more…impossible to do without p/e) and shortened the crankcase to take them, then made the propellers. These have individual blades that have to be inserted into the spinner (you need to drill the holes) which is a bit of a fag but not difficult to get everything lined up. The instructions would have you add the large resin intakes to the cowlings but photos show that these should be on the nacelles behind the cowlings. There is a small intake on top of the cowling.
The wheels need to be about 1.5mm wider in order to fit between the undercarriage legs; I did it with plastic card between the two wheel halves.
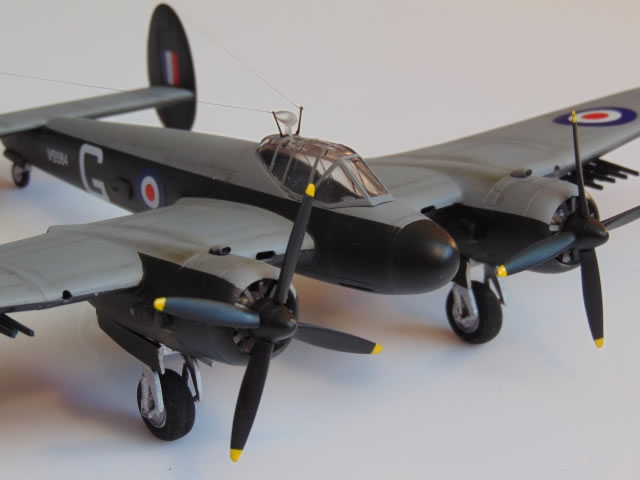
The canopy is rather thick but accurate and fits well. I was surprised to see a DF loop fairing cast in clear resin, which is correct and replaces the original solid plastic part that was included in Brett Green’s ‘first look’ review.
Painting, Markings and Finishing Touches |
Paint was applied with my Testor Aztek A470 airbrush.
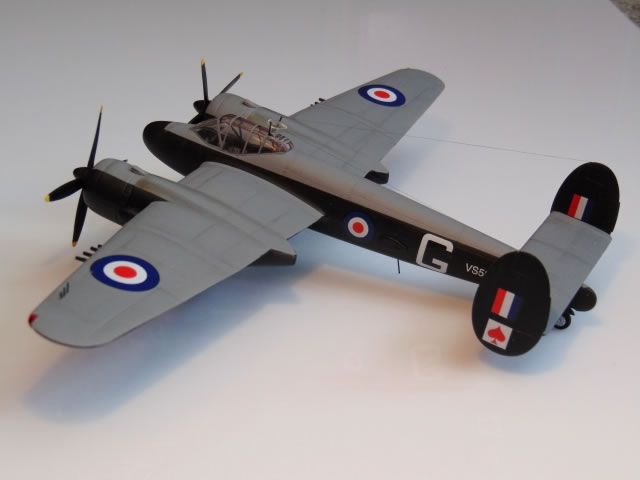
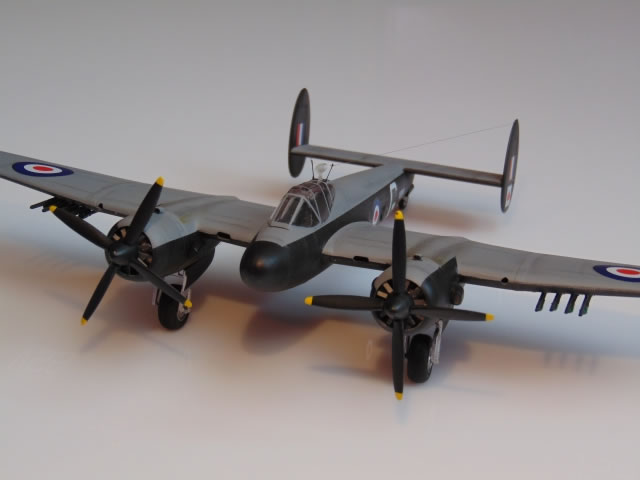
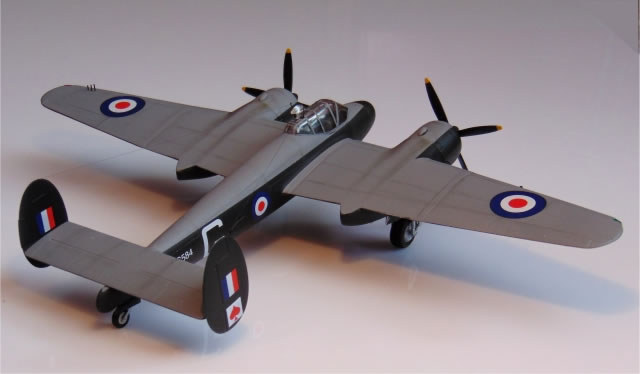
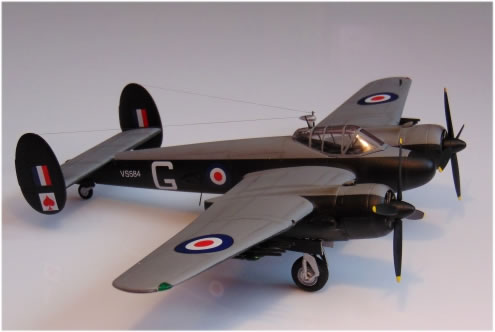
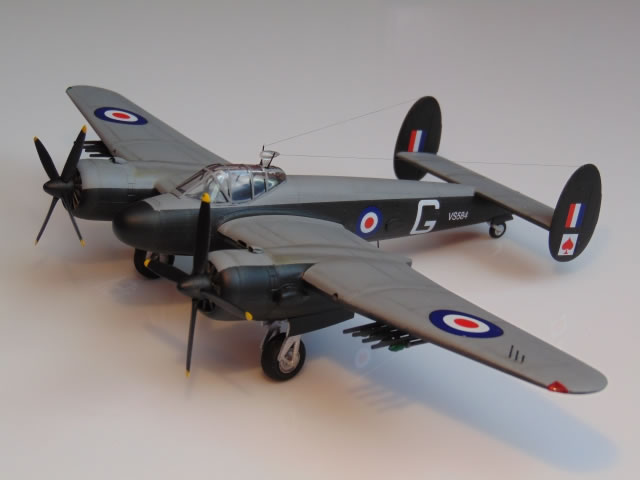
There are two colour schemes on offer; grey/black 84 Sqn and white/black 8 Sqn but I’ve seen photos of one of these and they were very scruffy. I chose 84 Squadron and used Alclad grey primer overall which, by coincidence, is a pretty good match for the upper colour, Medium Sea Grey (NOT Extra Dark Sea Grey as stated in the instructions). I then masked the grey and sprayed the underside colour, black. Incidentally, the demarcation between grey and black at the nose is a straight line as shown in the instructions, not curved as shown on most models that I have seen.
I used Tamiya’s ‘Weathering Master’ set to add some shading to the panel lines, gunmetal to the upper surface, orange rust for the underside. I like this method because it avoids the need for pre-shading (which I am rubbish at) and you can see the final result immediately. Incidentally, I tried to work out where the exhausts should be; I think there are two above the wing and at least two at the side and probably two down below. However, these are hidden when the cowl flaps are closed (as they are with this kit).
The decals are simple and thin but easy to handle. The white is slightly see-through but it’s barely noticeable. There are no maintenance instructions. Hooray! The decals wrinkle when applied but leave them alone and they straighten out as they dry. I used Microset but not Microsol as they didn’t need it. The roundels seem to have a darker rim which is slightly bizarre but not really obvious on the finished model.
Final Bits
I added the rocket rails and rockets plus the various little aerials, then I sprayed the aircraft overall with Alclad ‘Klear Kote Light Sheen’ (sic) which is nicer than a matt finish but not as shiny as satin. I think it looks more realistic for matt aircraft. Finally I added the aerial wires from the cockpit masts to the fins; I used Uschi van der Rosten fine elastic thread which is really fine (actually, barely visible) and easy to use.
Well, that’s it, really. It’s a much bigger aircraft that I had expected and, with two 2500HPCentaurus engine, it must have been a mighty beast, effectively two Sea Furies joined at the hip! I knew that this was a limited run model and would therefore need a bit more work but, overall, I found it easier to build than I had expected and I appreciate the fine surface detail. It looks accurate and there are only a few areas where an expert modeler could improve it but you’d have to put in a lot of effort to make any significant impact. It lacks detail on the inside of the undercarriage doors and things like that but the biggest omission is the fans on the fronts of the engines which are almost impossible to scratch build and need to be in photo-etched metal. I appreciated the clear DF loop and other thoughtful little details. I didn’t appreciate the approximate fit of the undercarriage (and my undercarriage legs are at slightly different angles) but did appreciate the finished result. I also like the effect of the Tamiya weathering set. This model looks right, sits right and is really the only game in town if you want to build a Brigand. Recommended!
Model, Images and Text
Copyright ©
2014 by Roger Hardy
Page Created 3 November, 2014
Last Updated
3 November, 2014
Back to HyperScale Main Page
|
 Home
| What's New | Features | Gallery | Reviews | Reference | Resource Guides | Forum |
Home
| What's New | Features | Gallery | Reviews | Reference | Resource Guides | Forum |