Hasegawa's 1/48 scale
McDonnell Douglas
F-15DJ Eagle
by Jon Bryon
|
|
McDonnell Douglas F-15DJ Eagle |

Hasegawa's 1/48 scale F-15E is available online from Squadron.com
In the summer of 2002 I first stepped into Hannants in north London. I'd never been anywhere like it; the variety of stock was incredible. Sadly it's now gone, moved to smaller premises and a shadow of the previous emporium, but for the next few years I punctuated my rather sad graduate life with guilty visits down to Colindale. Unfortunately the prices weren't generally as incredible as the choice, but there was the occasional bargain. I'd spotted a Hasegawa 1/48 TF-15A Bicentennial Eagle on the Hannants website reduced to £14.99. In the shop the price on the shelf was still £25 or so, but a quick mention of it to the chap at the till saw me walk out with the limited edition boxing at a bargain price (especially when you see what Hasegawa Eagles go for these days!)
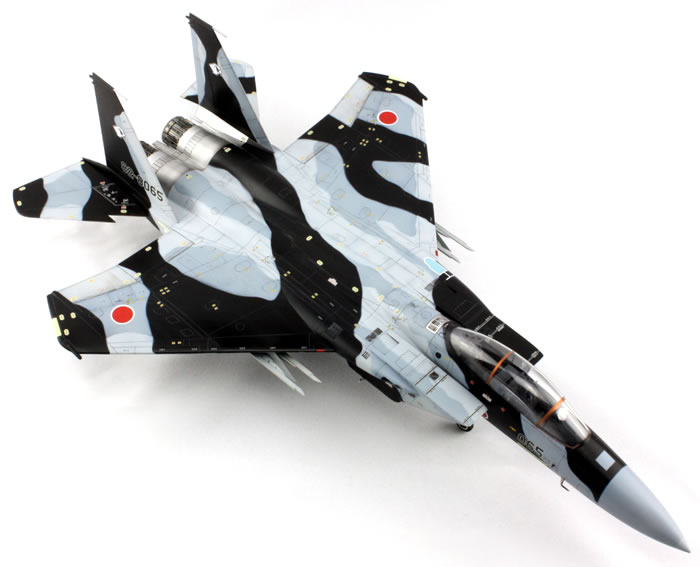
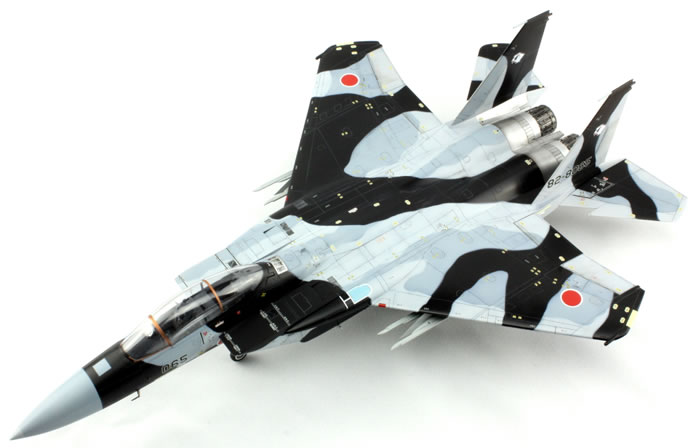
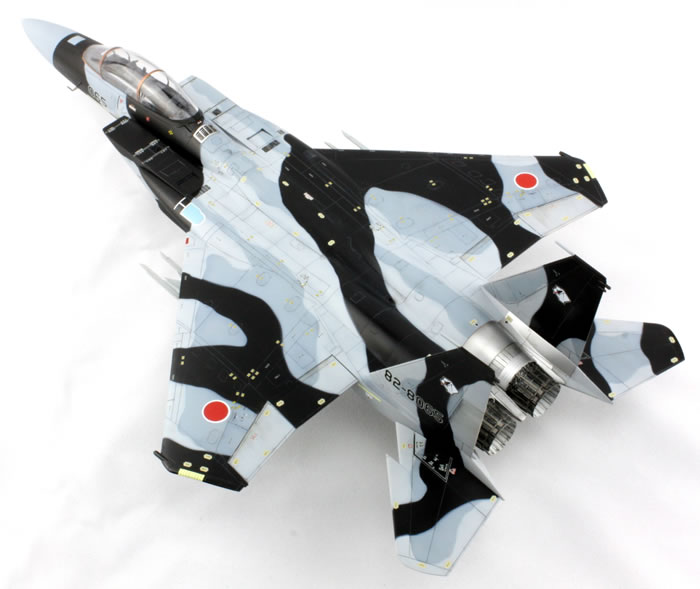
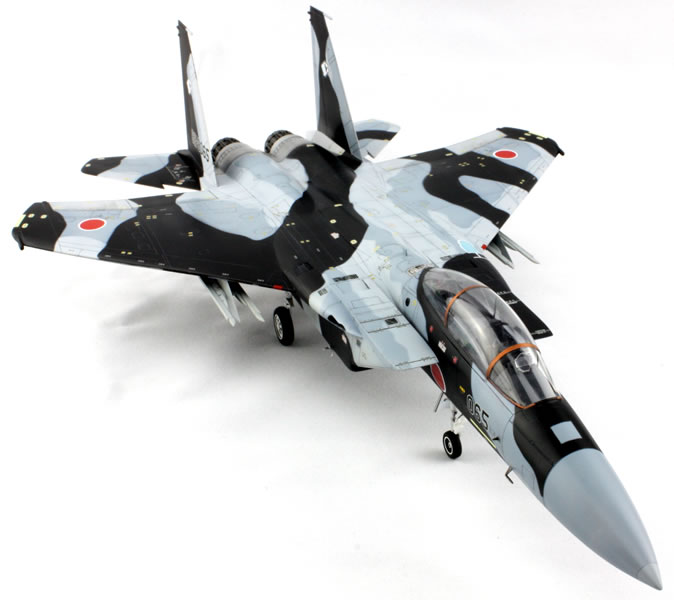
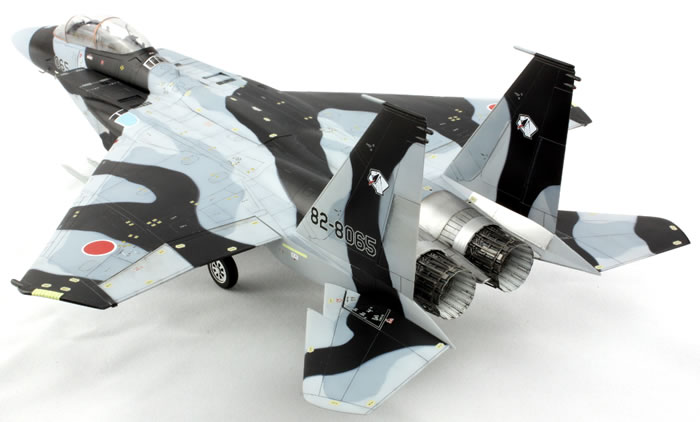
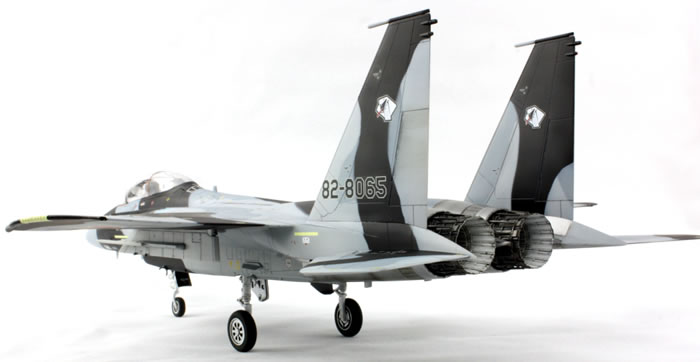
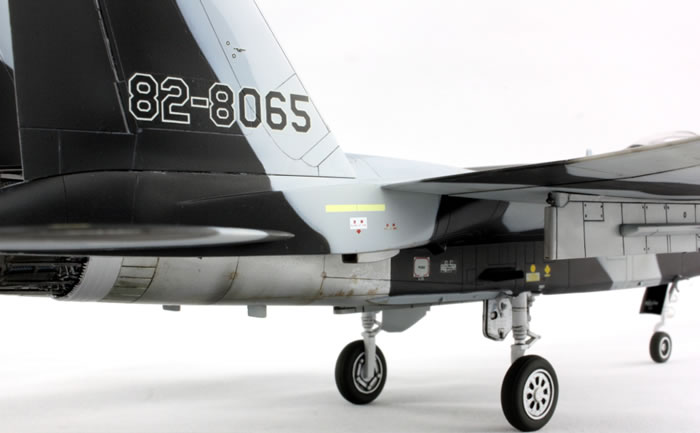
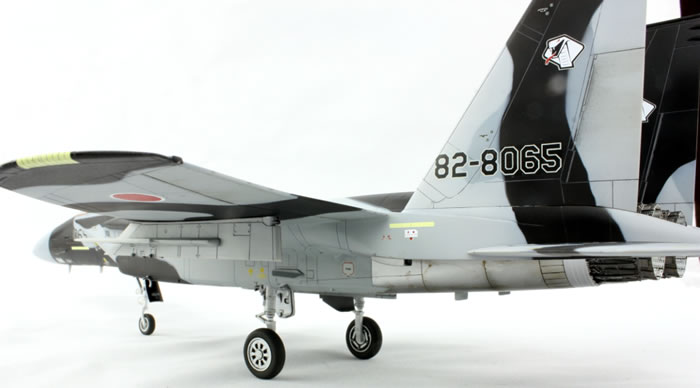
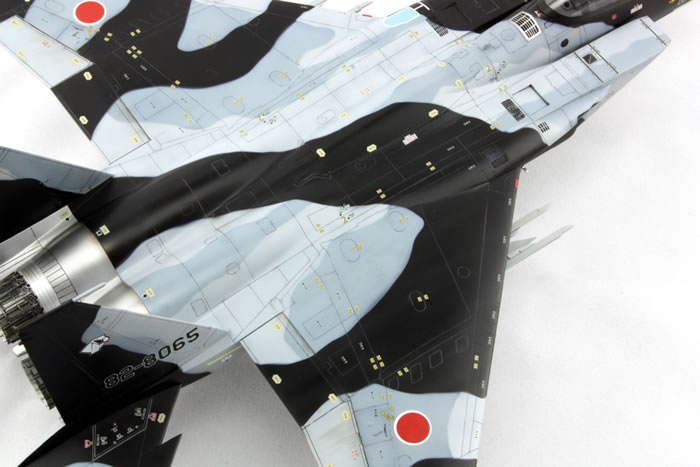
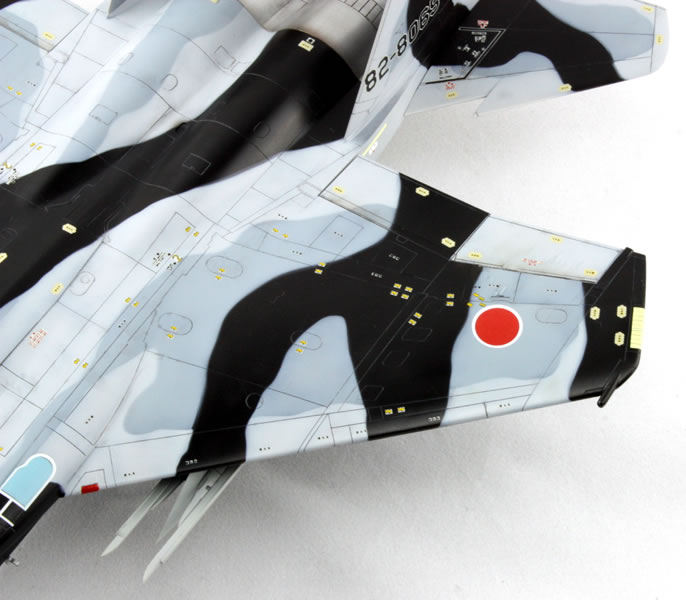
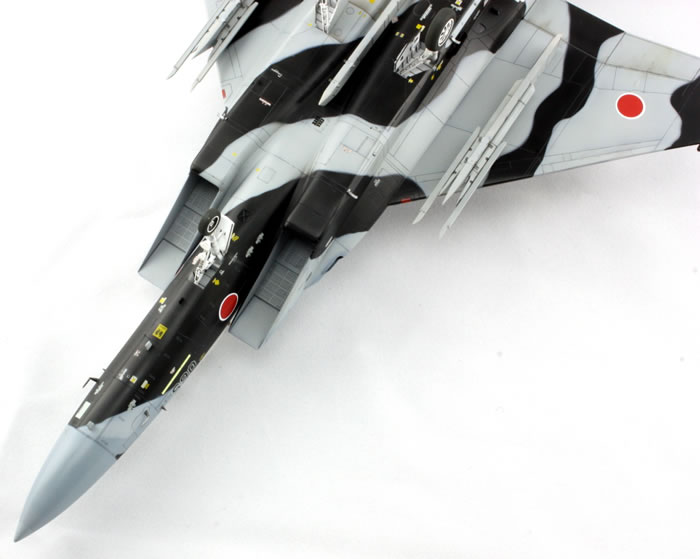
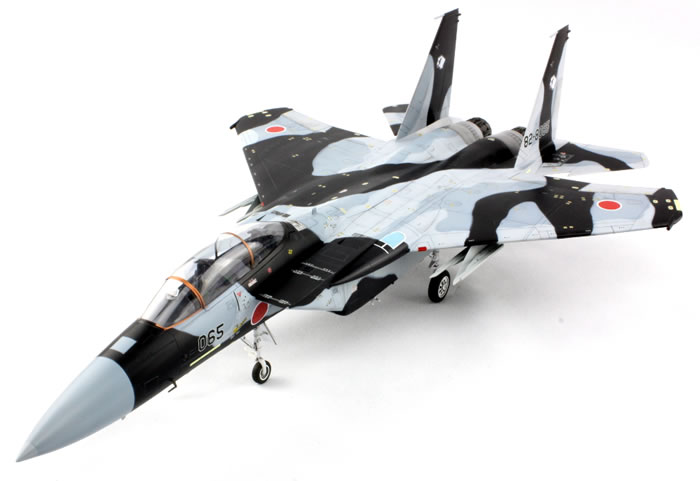
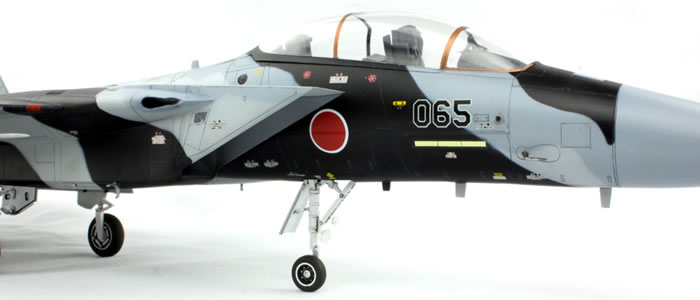
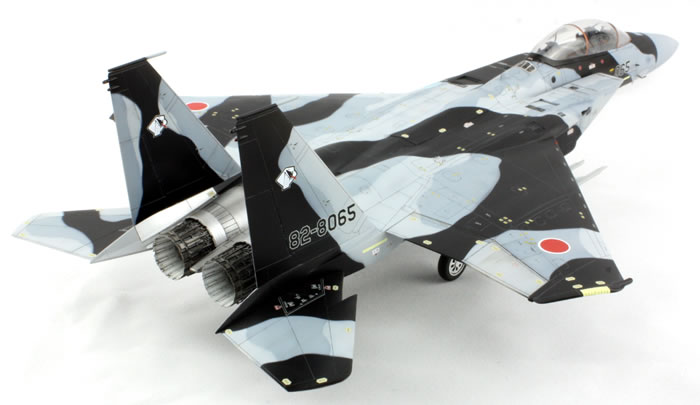
The actual kit is the standard Hasegawa F-15D/DJ with a supplemental instruction sheet and new decals. Of course I had no intention of building a gaudy TF-15A with misshapen star and bars (as included on the enormous decal sheet). But since I already had a standard F-15D in my collection, what could I build it as? This dilemma was solved on a subsequent visit to Colindale, where I stumbled across a Two Bobs decal sheet for Japanese Aggressor F-15DJs. 065, with its disruptive black camouflage looked, to be frank, cool, so I immediately purchased the sheet.
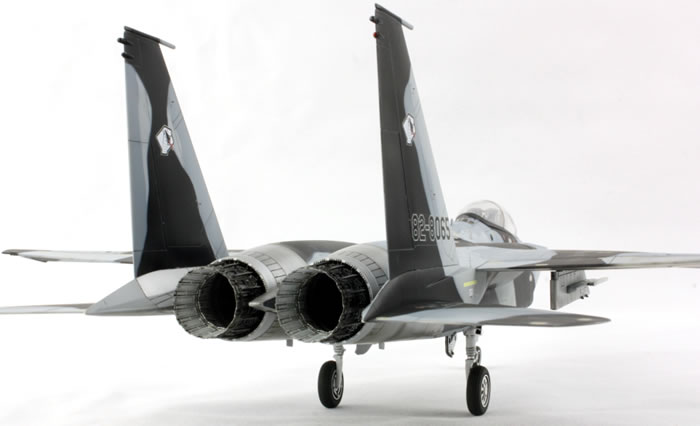
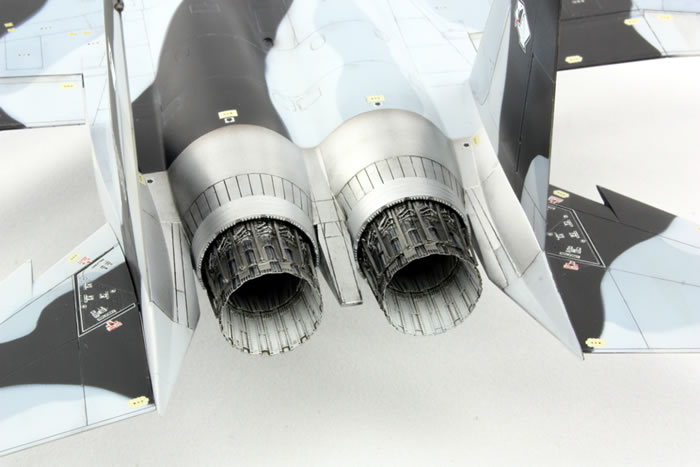
That left me with one final problem to solve: this boxing of the Hasegawa kit only came with feathered exhausts; not applicable for a Japanese Eagle. So on yet another subsequent visit to Hannants I bought an Aires resin exhaust set. It was advertised for the Revell F-15E, but I took a risk and hoped it would fit a Hasegawa Eagle. It fits exquisitely well, which makes me wonder how it fits the Revell Strike Eagle...
The rate at which I build my stash is slowing year on year, and so it wasn't until autumn 2012 that I finally made a start on this kit. When it came to opening the box, it was clear time and shipping to China had not been kind. Various small protrusions on the airframe were missing, such as one of the angle of attack sensors, but worst of all the entire 'shoulder' of the fuselage containing the lower half of the gun opening had been torn off and was missing. That was going to be fun to replace...
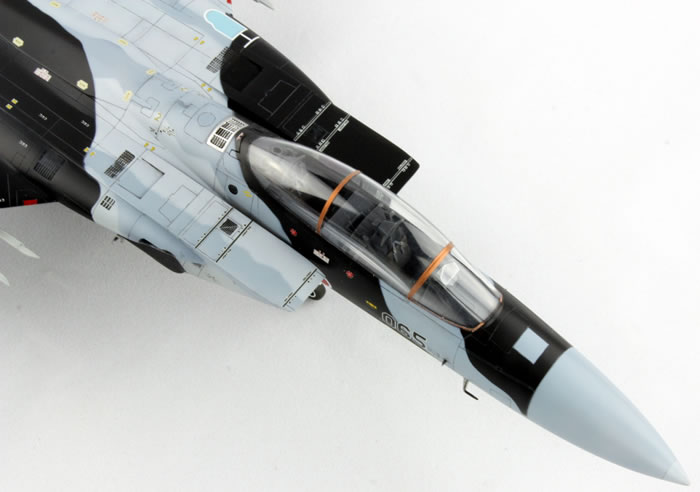
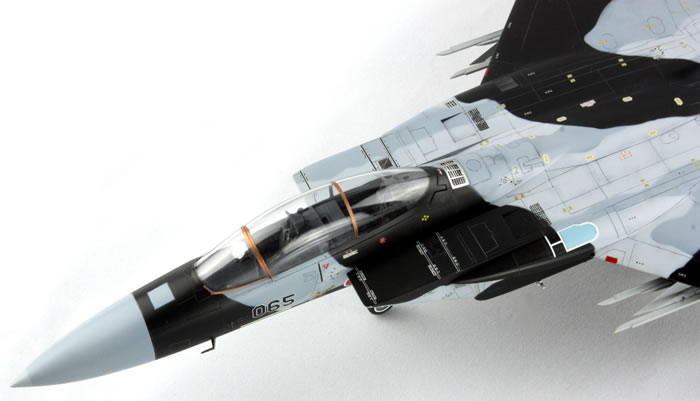
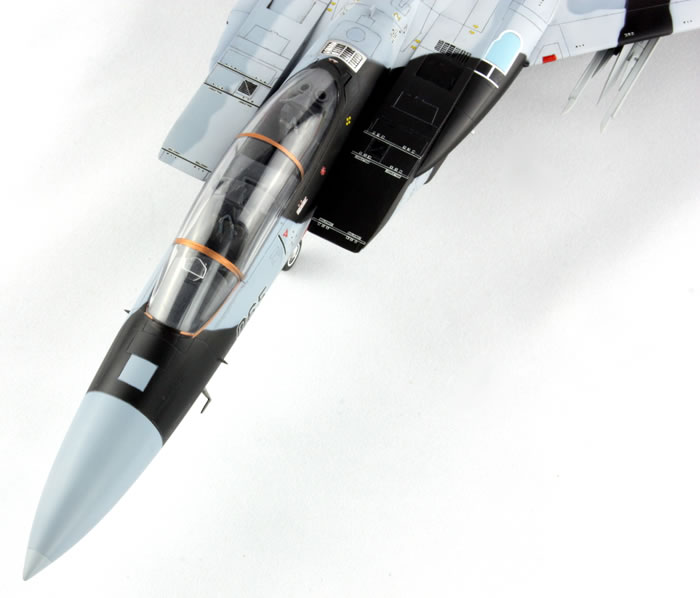
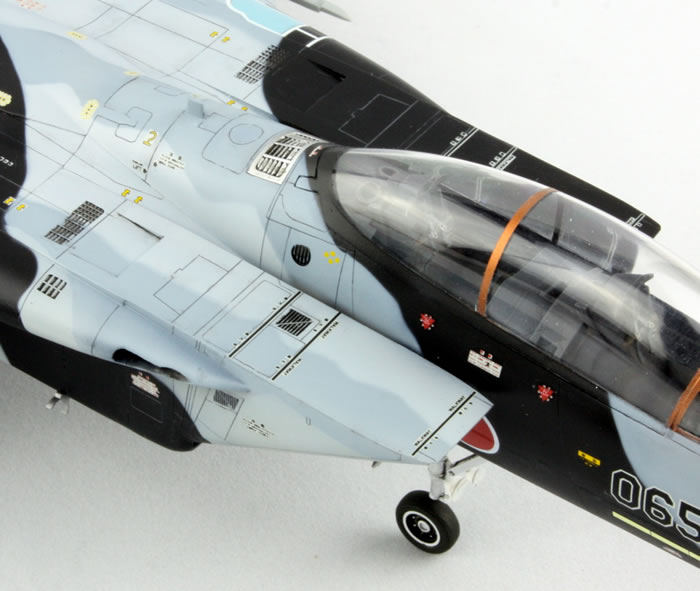
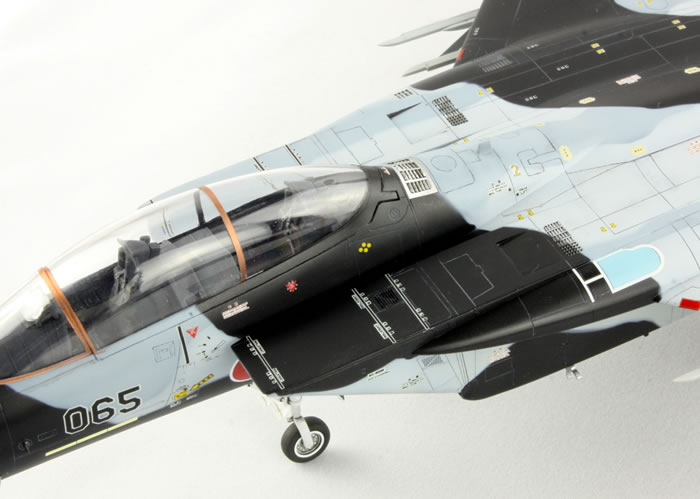
I built this F-15 in tandem with another Hasegawa single-seater (see later article). These kits are essentially very good, but progress was slow. The cockpit is adequate and the only addition I made was seatbelts constructed from Tamiya tape and Reheat etched buckles. That took a while because the seatbelts are many and complex. I've started using Lifecolor acrylics for different shades of black since I purchased their excellent 'Black' set; for the cockpit I (unsurprisingly) used 'Deep Cockpit Black'. The paint is fairly fragile but brushed over the sprayed grey base colour beautifully. I left off the ejection handles for the kit seats since I couldn't see them on photos of the real thing.
By far and away the most time on this kit was spent on the intake trunking. Removal of ejector pin markings and the long seams took months. As usual with a Hasegawa kit, I deviated significantly from the construction sequence in the instructions to make life easier when it came to removing seams. To that end, I first attached the trunking to the lower fuselage and eliminated the intake seams. Then I made up the intakes themselves (parts B5,6,11,12) and attached them to the lower fuselage, *not* the upper. The interior seams were removed and at this point the grey/white demarcation masked and sprayed; accessing this later would be impossible. More time was spent on this process than on the rest of the kit (including painting!). The result is two very smooth intake interiors that are almost impossible to see.
I deviated again from the instructions and found a sequence that gave me no bad seams to deal with. Before assembling the two fuselage halves I glued the completed nose assemly to the upper fuselage half. Once dry, this nose/upper fuselage construction was joined to the lower fuselage half. This eliminated any tricky joins between the forward and rear fuselages; getting a step here would be difficult to deal with. All major components were attached using superglue, which I find far better for seam elimination compared to regular liquid glues.
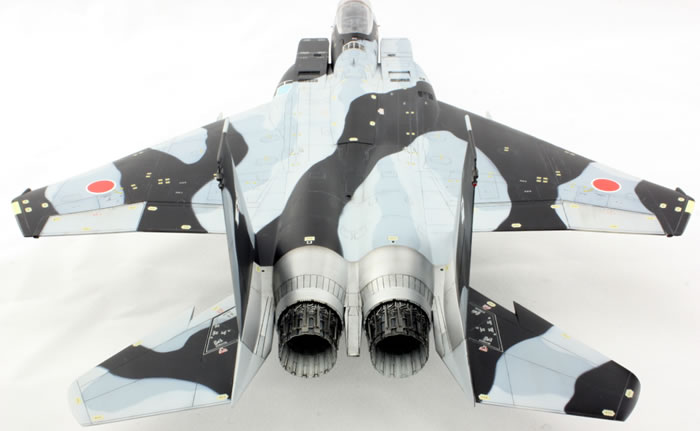
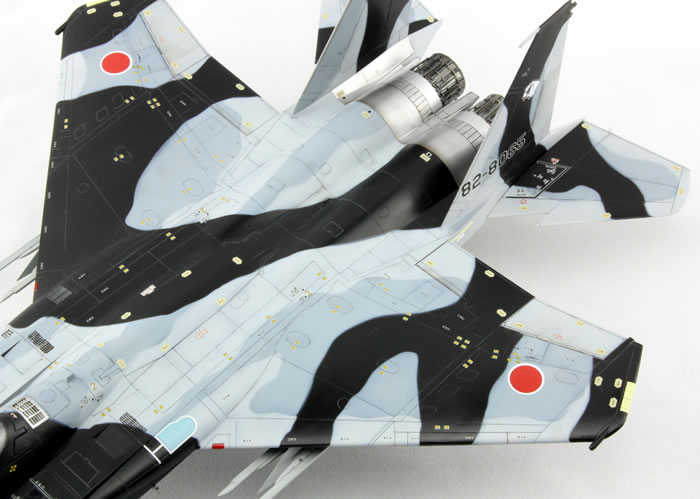
So far so good. The wings were next and the fit here was less satisfactory. The wings themselves are in two halves that have a signficant seam on the underside that is simple but time-consuming to remove. The holes for the outer pylons were also plugged and sanded smooth. Where the wings join to the fuselage is not a panel line, and the whole joint needs to be removed. Again, this was simple but time consuming. The tricky bit is retaining all the surface detail.
Most of the kit was gently rescribed since some panel lines were indistinct and incomplete. This was especially true on the fuselage sides under the wings. By now I had a basically complete airframe with separate fins and tailplanes for painting.
I assembled the undercarriage and painted it as instructed. I used Lifecolor Tire Black, sprayed on and with the rims touched in by brush. It paints beautifully, but as mentioned above, is fragile. The undercarriage doors that are usually shut were faired into the lower fuselage before painting; it is perfectly possible to insert the front nosegear after the larger door (D27) has been glued shut. The blade antennae under the front fuselage were removed as they hindered seam removal. I would replace them near the end of the build.

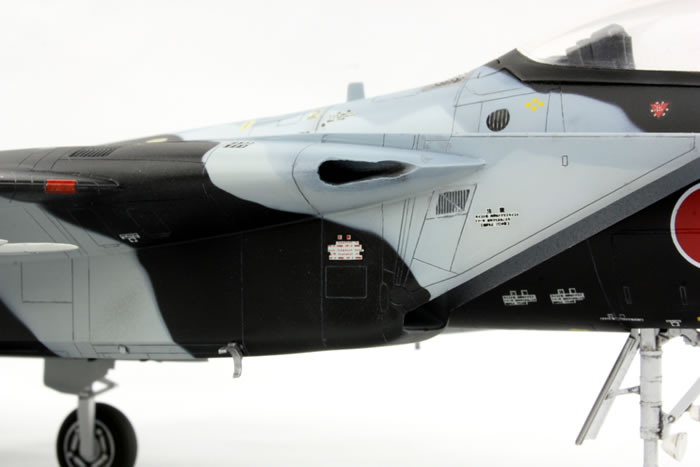
For my purposes the Hasegawa Eagle is adequately accurate. You can find plenty of details that are wrong by reading various internet forums. My only concession to these was to sand away the framing on a starboard grill near the wing/fuselage join. I couldn't find a picture that showed whether the arrestor hook was faired or exposed, so I left it as is, and the air ducts on the upper fuselage just to the rear of the canopy are moulded open, which is possible but not common. Hasegawa surface detail is pretty inaccurate in many areas, but again, I left it. As appropriate for a JASDF Eagle, I replaced part C14 with C13 on the port side fin tip.
I had to deal with that missing fuselage section which contained the lower half of the gun opening. Because of that opening, the shape is very awkward to replicate. In the end I opted for superfine white Milliput. To get the general shape, I used a lump of Milliput to make a female mould from my other Hasegawa kit. Once that was dry, I placed Milliput in the area that needed to be built up, wetted the area, and then pushed the female mould in place. The gun opening gave me something to key the mould against. This produced a rough approximation of the final shape that I then worked with various sanding tools to get to something I was happy with. Considering I have no scratchbuilding skills at all (and have no interest in developing them), I am pretty pleased with the result.
Before painting could commence, I cemented the airbrake closed and the canopy in place. The fit was average. The canopy mould line was removed with Micromesh cloths and polished out using Tamiya compounds. I actually had to do this twice because I tried to rescribe in the framing removed by sanding, and ended up with a mess. The whole canopy was sanded down again...nothing went fast in this build!
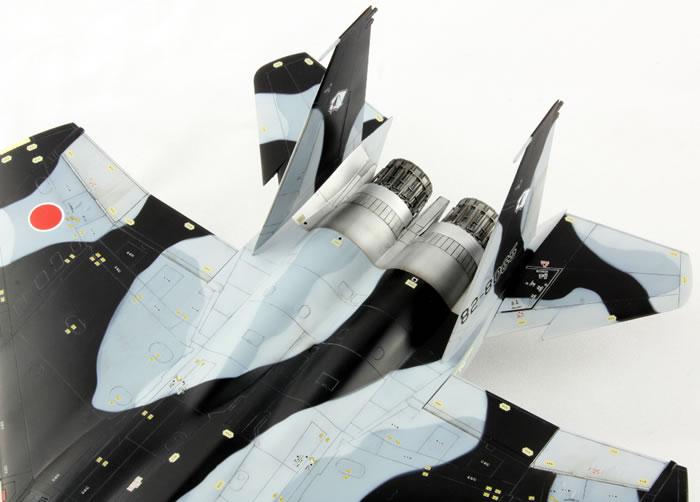
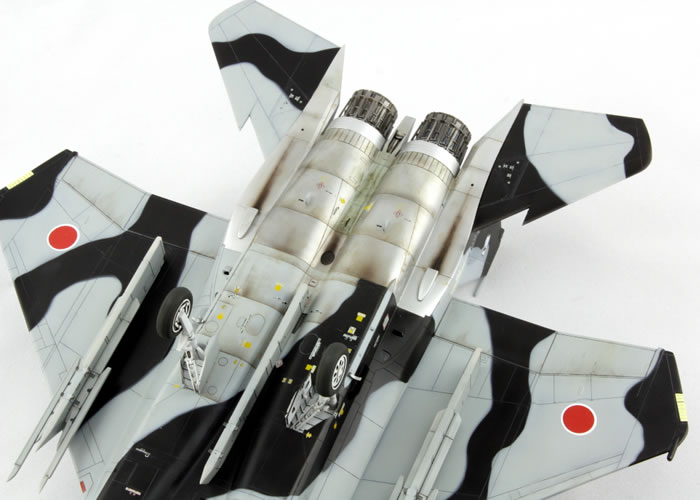
The Aires resin exhausts are beautiful and posed no trouble at all, save for some tiny missing detail no doubt caused by the thousands of miles this kit has been carted round the world.
And so, after about 14 months, I began to paint the model. After spraying the canopy framing black, my primer of choice was Mr Surfacer 1000, although this is a primer I'm becoming increasingly dissatisfied with (see later). After some polishing with Micromesh, the metallic areas near the engines and the grill behind the canopy were painted with various shades of Alclad II and masked with Tamiya tape. I like preshading, and did so with Mr Color gloss black. At the same time I roughly airbrushed the black part of the camouflage scheme. I also used bronze for the canopy framing, but should really have mixed in quite a lot of brown to tone it down. The wheel wells were masked with the undercarriage doors (which fit really well).
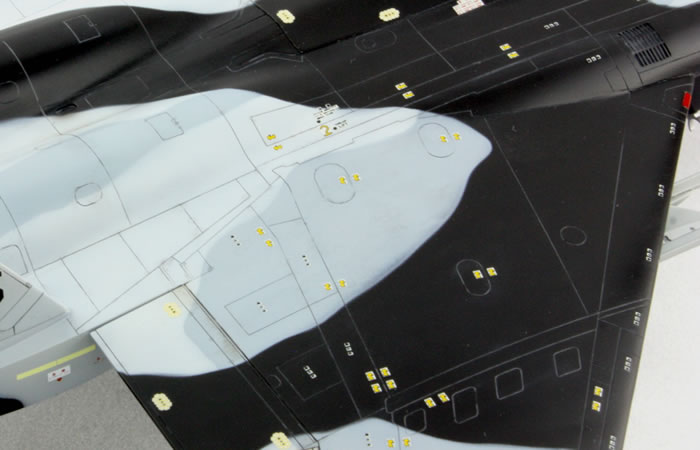
Some internet searching turned up four good photos of 065 in this scheme from 2001, although I only used three (for some reason I forgot about the fourth until after the model was completed, which is a shame as it would have helped with the upper demarcation quite a lot). These pictures were mainly obtained from http://www.f-15j.com/arc/archive.htm, which is an is an excellent resource. What became clear was that the Two Bobs instructions were not quite right; in particular there were differences for the black camouflage pattern. I tried to follow the photos reasonably closely, but was left to go with the Two Bobs interpretation for the underside and in a few other places.
The black pattern was masked using rolls of blu-tack and masking tape and the darker grey standard camouflage pattern was sprayed with Mr Color 307 to represent FS36320. With this masked off in the same manner, the rest of the airframe sprayed with FS36375. I started with Mr Color 308, but ran out after the upper surfaces were done and had to finish using Humbrol 127 (Mr Color is hard to obtain in the UK, and I was in a rush). Fortunately these two are very close in colour and the difference is invisible. At this point I had basically completed the colour scheme.
Then comes the stressful part: removing the masking. As with some other models I've primed with Mr Surfacer, I experienced significant lifting of large areas of paint, right down to the bare plastic. I still have no idea what causes this. I clean the model with a toothbrush under running warm water before priming, and only handle it wearing gloves. The primer is well-thinned, and Mr Color thinner is pretty hot, so I expect it to attach well. But this is becoming a recurring pattern and it is extremely frustrating and wastes a lot of time. I resprayed the affected areas, but it's not great.
To provide a barrier for my enamel and oil based washes, a coat of Johnsons Klear was sprayed on the model. I mixed some Tamiya black and grey enamel wash to get a dark grey colour, and did a pin wash across the entire airframe. I am pretty happy with the result. The panel lines in the black areas have come out quite light, which is not exactly realistic, but photos show these areas did weather back to the underlying grey colour. Pure black was used on the grills and moving control surfaces, and some oil paint streaked rearwards over things like the ailerons and some of the undersurfaces towards the rear of the fuselage. A little overblown, but I'm experimenting.
I like to use GS products for decalling (Mr Setter and Mr Softer) but have found these can react badly with Klear. To prevent this, and get a glossier surface, I sprayed the whole aircraft with Mr Color Clear Gloss. This is compatible with the setting agent. In contrast to universal advice, I have found that Mr Setter is far more important than Mr Softer for getting decals to settle over surface detail. And again in contravention of standard decalling practice, my method now is to make a puddle of Mr Setter, position the decal, and then leave it! No wiping away of excess fluid or pressing the decal down. This is particularly effective for stencils: they will simply be sucked down to the surface. Mr Softer can be used if necessary, but I only did so on a couple of decals. The Mr Setter leaves marks on the surface, but it doesn't matter; they disappear under the matt coat. I consider this model a decalling victory!
Except for one thing. Which isn't my fault: the roundels are out of register. This is very disappointing for aftermarket decals, especially when the roundels are on a separate sheet in order to avoid this very problem! I confess, I did not contact Two Bobs because I didn't want to wait weeks, but if you've got this set, go and check your sheet carefully now. The problem is not immediately evident on the sheet because of the pale colours, but it's annoyingly visible on the model and I didn't have any spares. Aside from this failing, the remainder of the sheet is very nice and the remaining mistakes (such as the No Step markings near the wingtips) are all mine.
Using some Lifecolor Tensochrome paints, I weathered the metallic areas and control surfaces a little more. These weathering agents are actually pretty horrible to use and I only did so out of stubborness for having spent so much money on them! They have incredibly high surface tension, so bead up very easily, and the pigment is quite coarse. They clog up quickly in the airbrush and don't thin that well with standard Lifecolor thinner. I personally don't understand how people use them; if you do, can you write a users' guide?
Then it was time for all the bits and pieces to come together: tail fins and tail planes (both fitted beautifully), the exhausts (ditto), the undercarriage (nice and simple) and pylons (also a surprisingly good fit). The AoA sensors were replaced with spiky bits from redundant antennae in Hasegawa's A-4 kits, and the pitot tubes attached with some care. From photos it was clear that one of the underfuselage blade antennae (the most forward one) was longer than those provided in the kit, so a replacement was sought from the spares box and attached along with the one which I'd earlier sliced off. Both were painted with Humbrol 127. Red lights were painted on the wing leading edge and the starboard tail fin's trailing edge. Once the whole thing was up and done, it was ready for the matt varnish.
This is a pretty big make-or-break point, since I've been let down by matt varnish in the past. This time I tried mixing 50% Mr Hobby Flat Clear and 50% Tamiya Semi Gloss Acrylic, and thinning with Mr Color Self Levelling Thinner. They mixed fine and sprayed beautifully. The end result is a little too glossy, so next time I'll increase the amount of Flat Clear, but the finish is lovely and has resulted in an even sheen with no marks. I removed the canopy masking - which was unusually successful for me - and considered her done.
I am pretty pleased with the end result. No major disasters, bar the out of register roundels, and I'm not blaming myself for that! After 18 months, I finally completed a model, and that was satisfaction in and of itself. I've not got to paint the sister model - a USAFE F-15C - but would I build another Hasegawa F-15? Well, it's a very nice kit and goes together fine, but those intakes are a killer and I don't fancy going through that again. And I also have a confession to make: I know the Eagle is an unparallelled fighter in its generation, but I just don't find it that exciting to look at...!
Text and Images Copyright ©
2014 by Jon Bryon
Page Created 2 June, 2014
Last Updated
2 June, 2014
Back to
HyperScale Main Page

|
 Home
| What's New |
Features |
Gallery |
Reviews |
Reference |
Forum |
Search
Home
| What's New |
Features |
Gallery |
Reviews |
Reference |
Forum |
Search