Wingnut Wings' 1/32 scale
Fe.2b (Late Version)
by Brad Fallen

Airfix's 1/72 scale Hurricane Mk.I is available online from Squadron
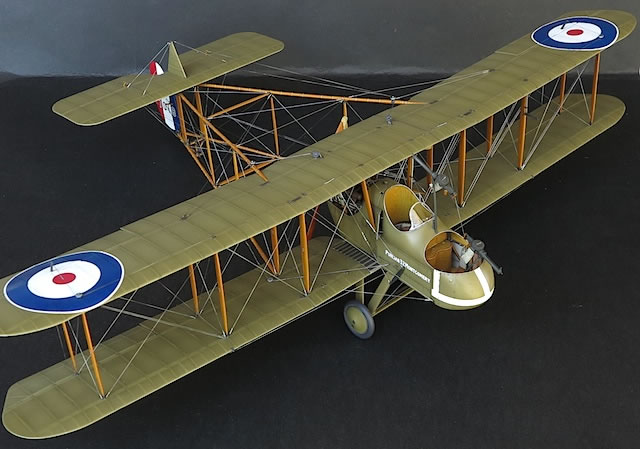
The Fe.2b was one of the Royal Flying Corps’ most successful and versatile aircraft: successful because it helped end the Fokker Eindecker’s supremacy in 1915-16, and versatile because after being outclassed as a fighter it fought on in other roles. While not a glamorous machine the ‘Fee’ had excellent flight characteristics and, from an aesthetic viewpoint, oozed character.
It was the latter that attracted me to it as a modelling subject when Wingnut Wings released their two 1/32 Fe.2b kits in late 2011. I bought the ‘Late’ boxing because I wanted to do one of the dark-painted night bombing options, rather than a PC10 or Clear Doped Linen day fighter. However I changed my mind when I started building the kit in late 2013. I wanted to make an eye-catching model, and felt I had a better chance of achieving this with the natural wood struts and booms of a day fighter. I was right, although I had no idea how much extra work this would mean!
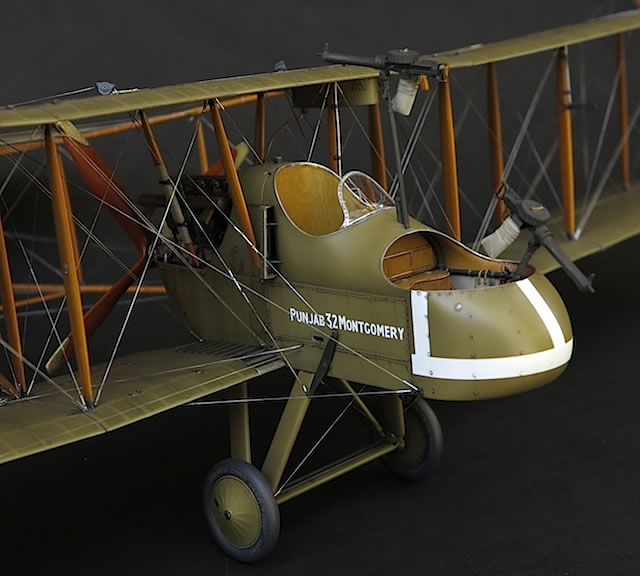
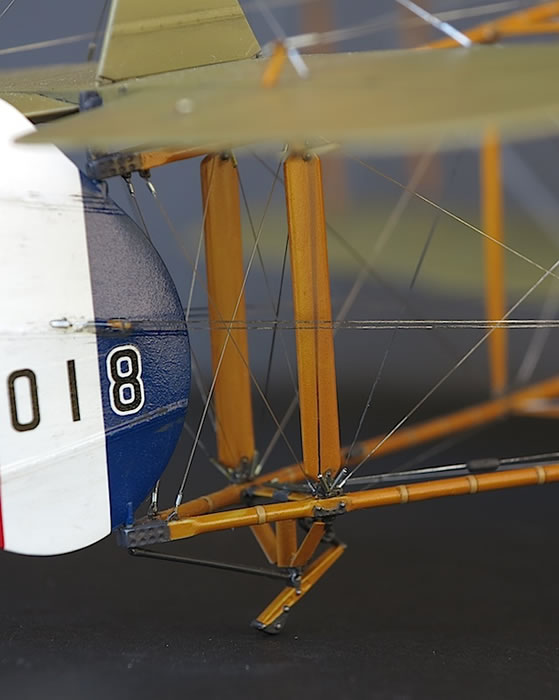
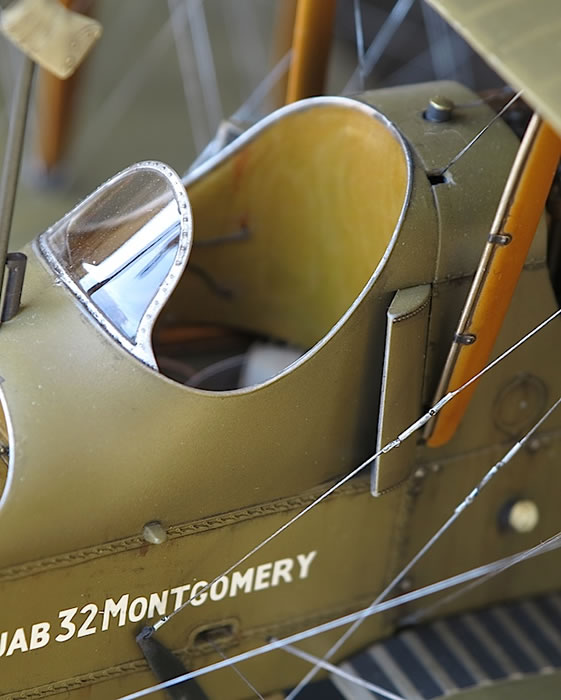
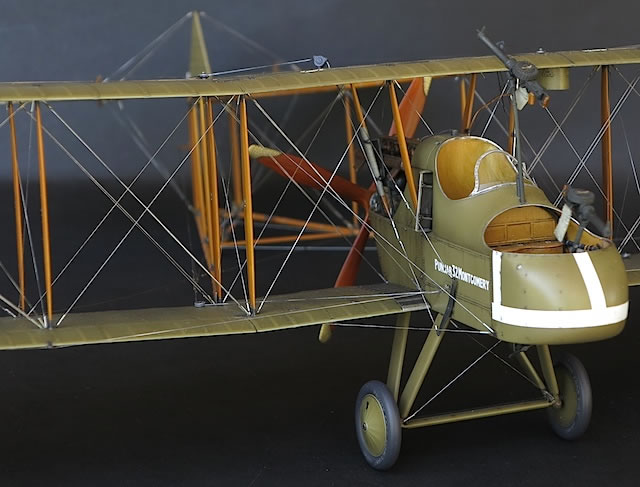
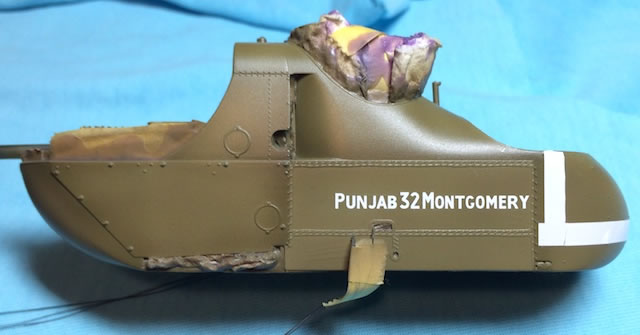
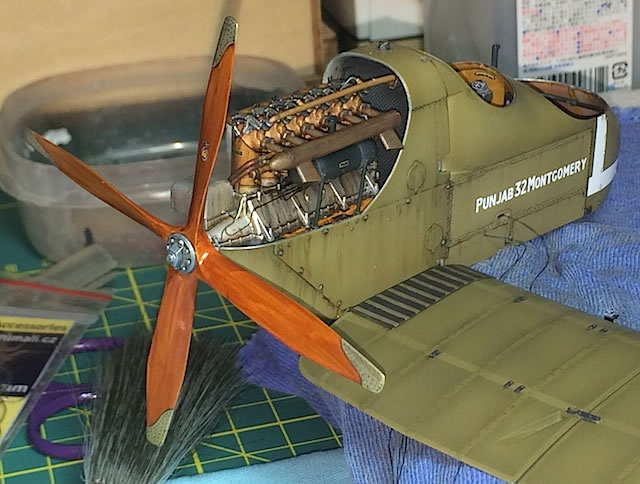
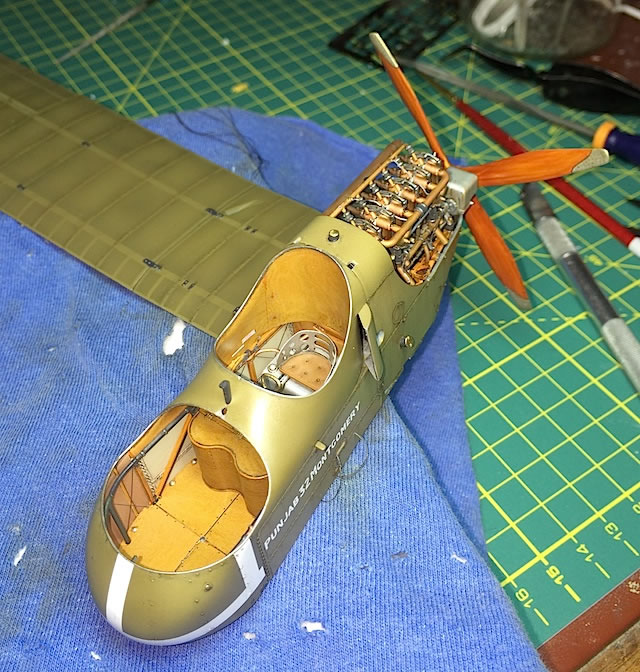
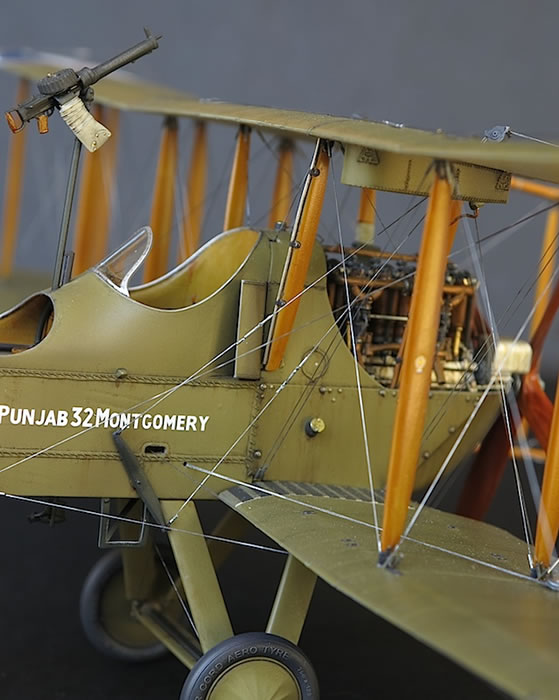
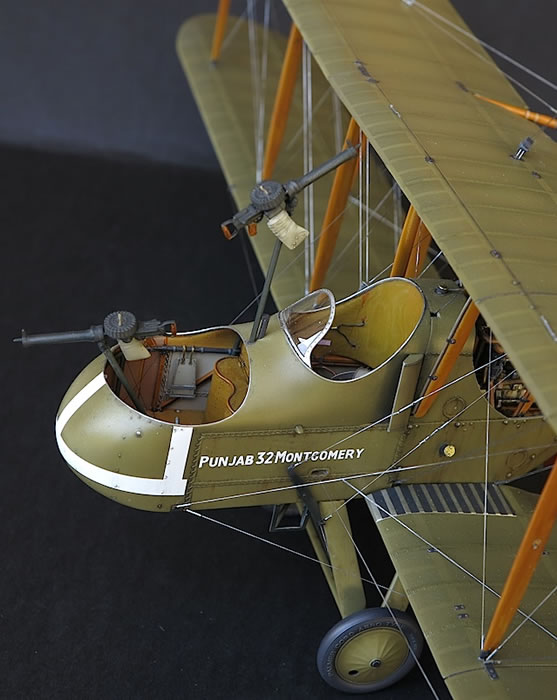
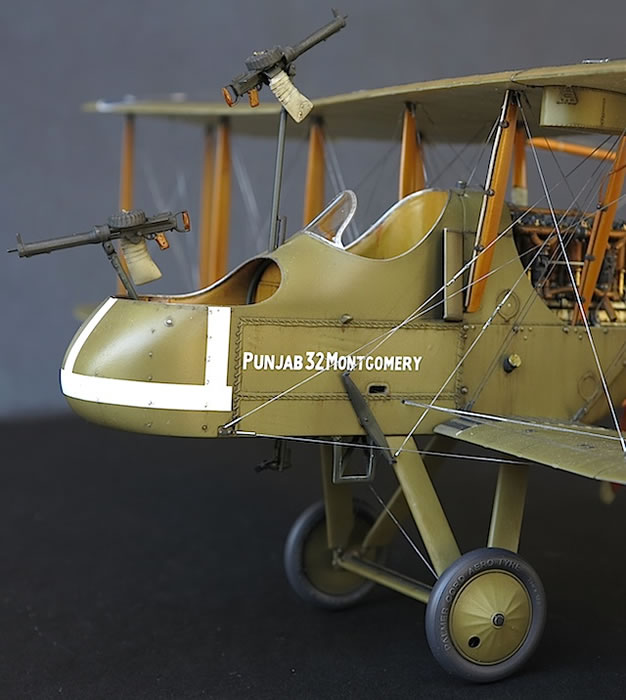
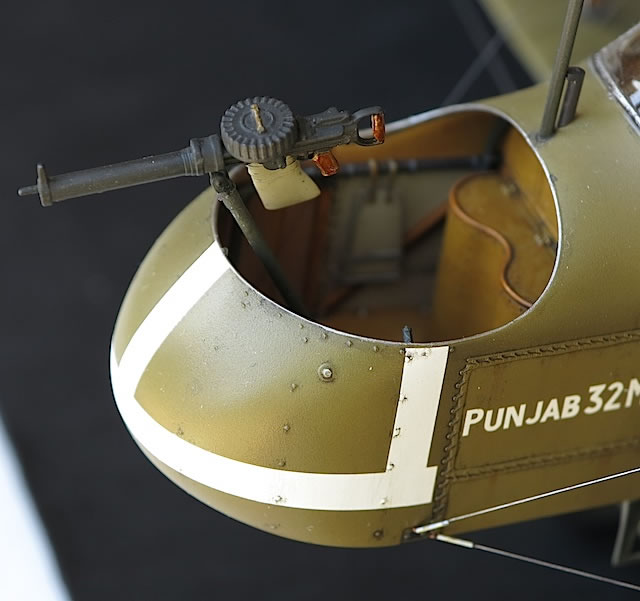
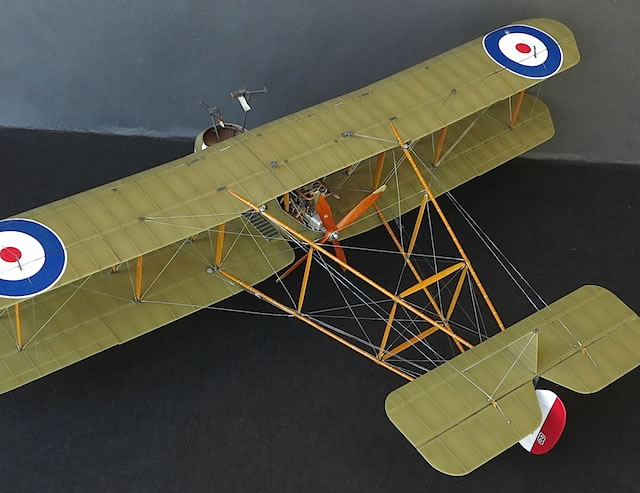
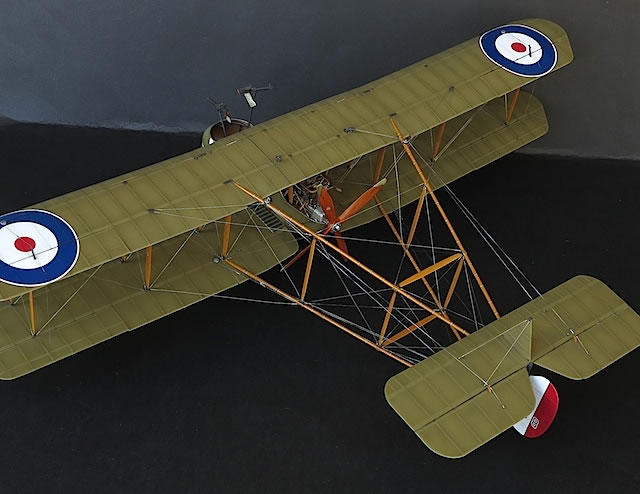
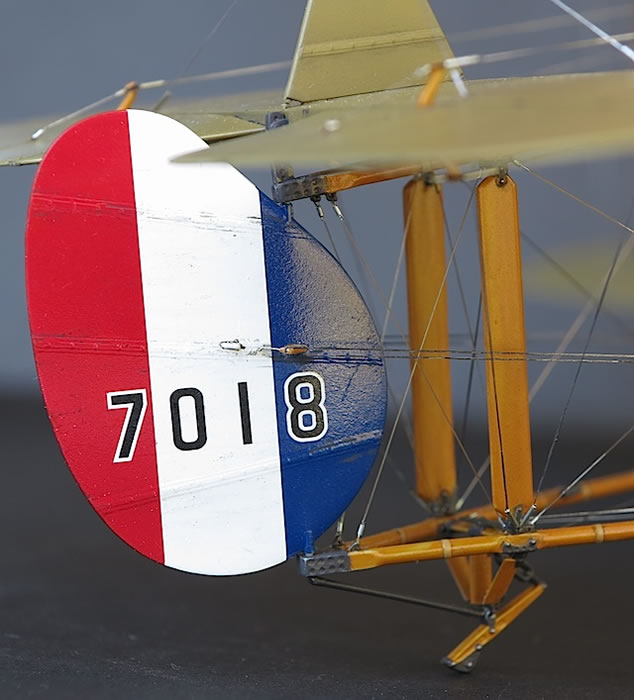
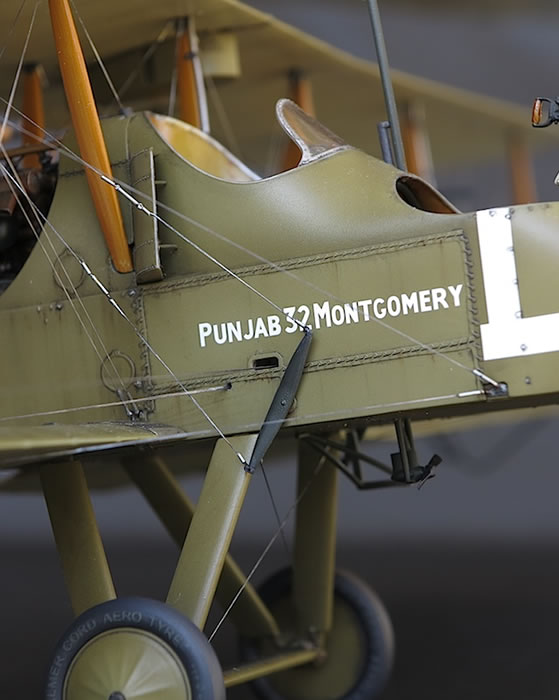
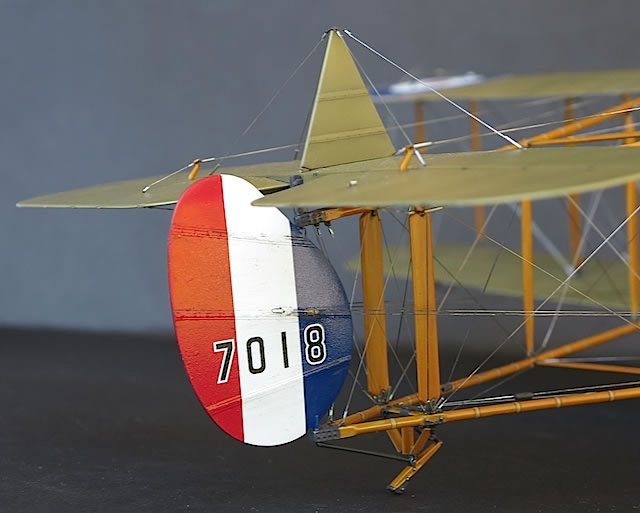
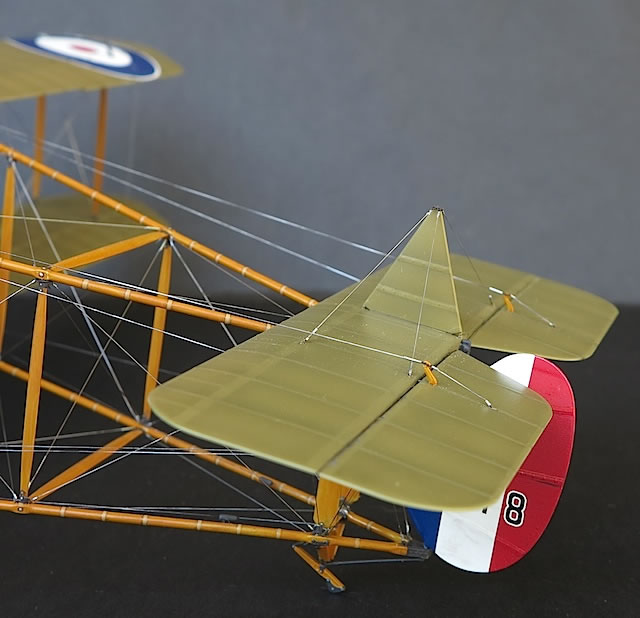
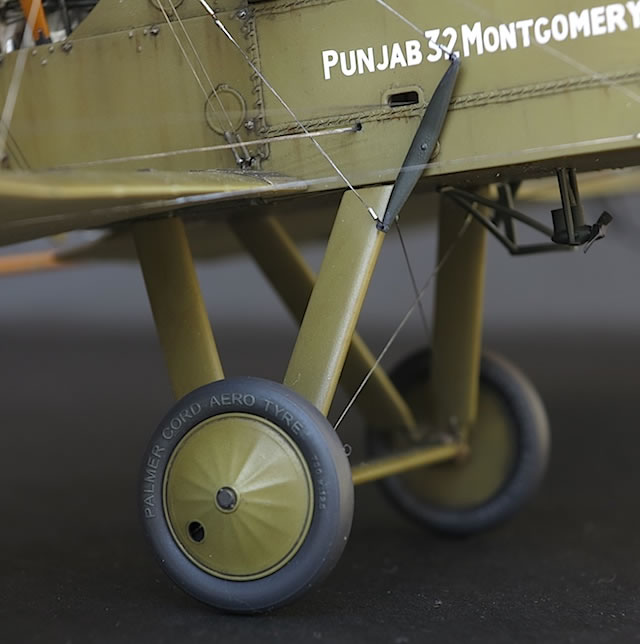
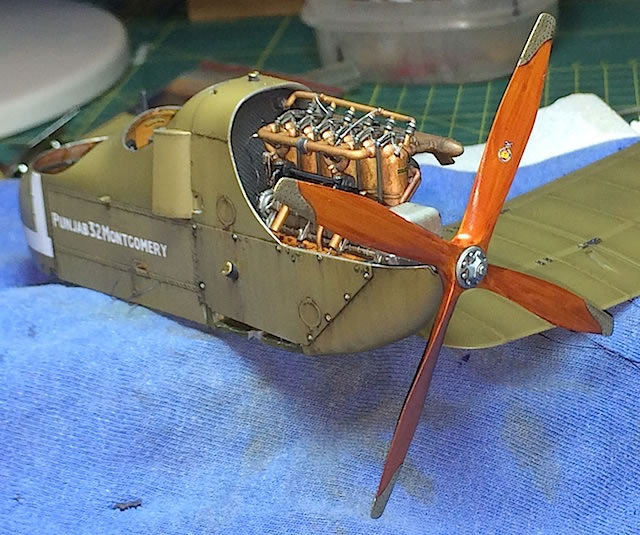
I eventually settled on marking option A – Fe.2b 7018/‘Punjab 32 Montgomery’, crewed by Lt. Lionel Morris (pilot) and Capt. Tom Rees (gunner) of 11 Squadron, Royal Flying Corps. Returning from a mission in northern France on 17 September 1916, Morris and Rees were shot down by Manfred von Richthofen. Both died, although Morris lived long enough to land on a German airstrip at Flesquieres. ‘Punjab 32 Montgomery’ was von Richthofen’s first victory.
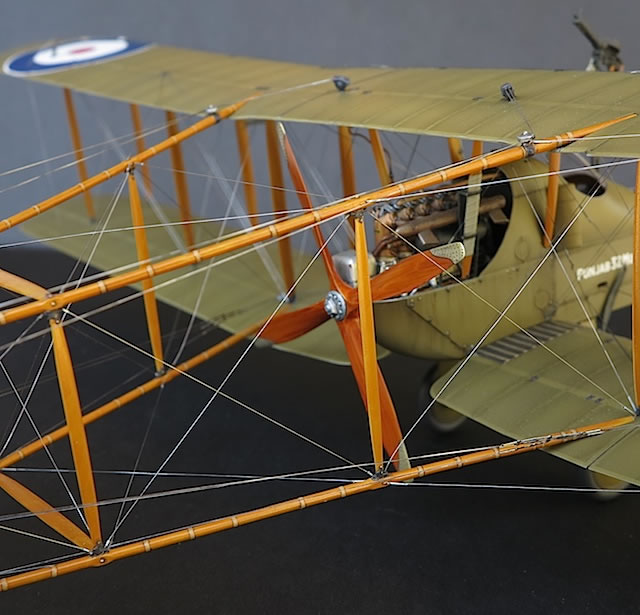
This was my second Wingnut Wings build after the Pfalz D.XII; the only biplane kits I’d touched before this were Airfix 1/72 Dr.1s and Sopwith Pups in the 1970s. Fit and construction were as smooth as you would expect from a Wingnuts kit – easier in some ways than the Pfalz, where I had a few challenges with engine and strut alignment. The main challenge with the Fe.2b is the complexity of the airframe itself, which the Wingnut designers have tackled in as logical and straightforward a fashion as possible. As usual with Wingnut kits, engineering tolerances are fine and I found myself scraping paint off mating surfaces in order to get a good fit.
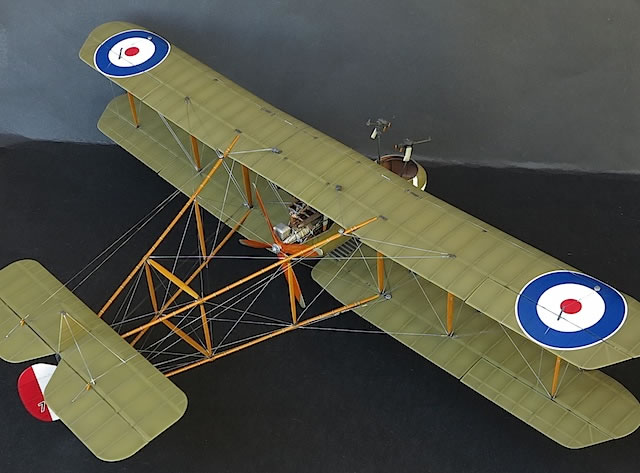
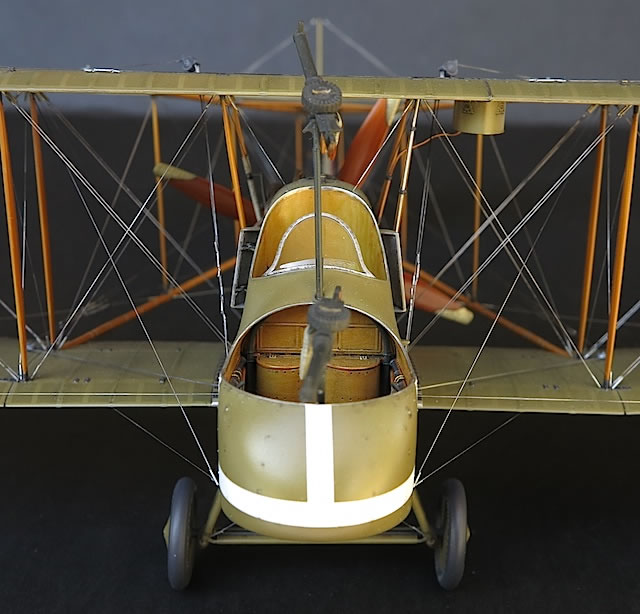
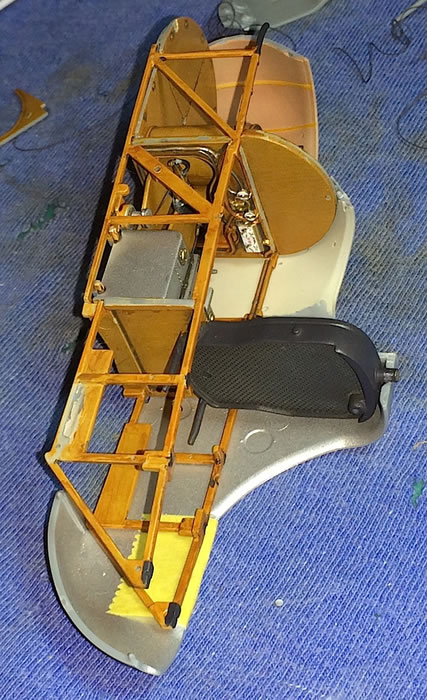
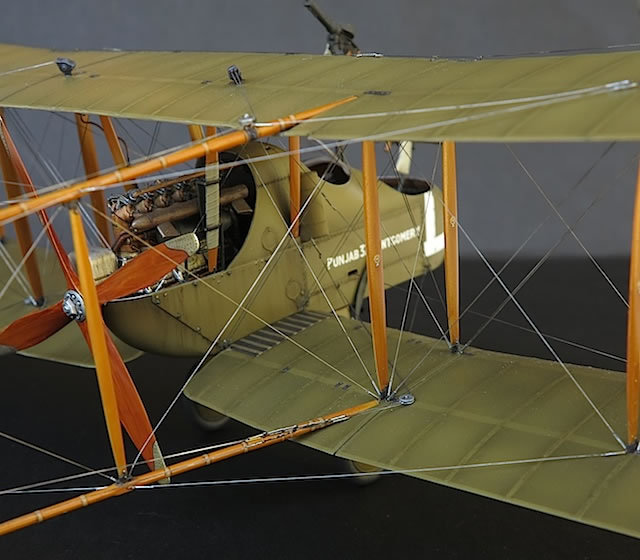
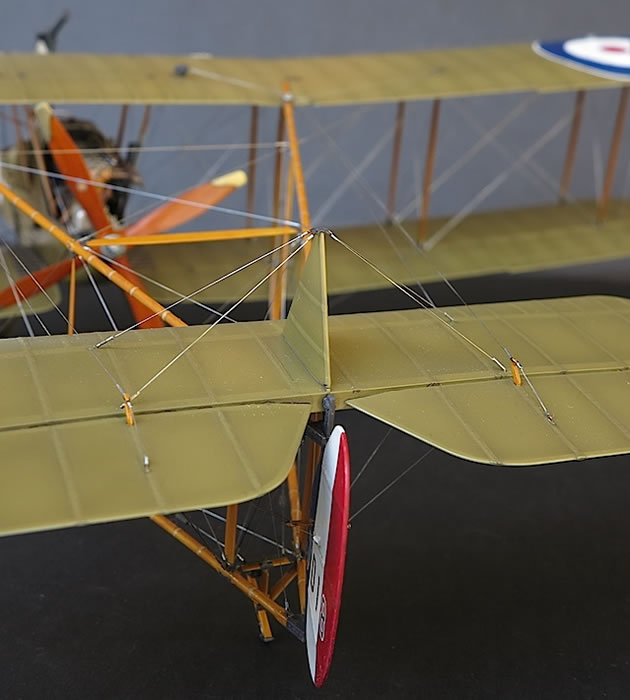
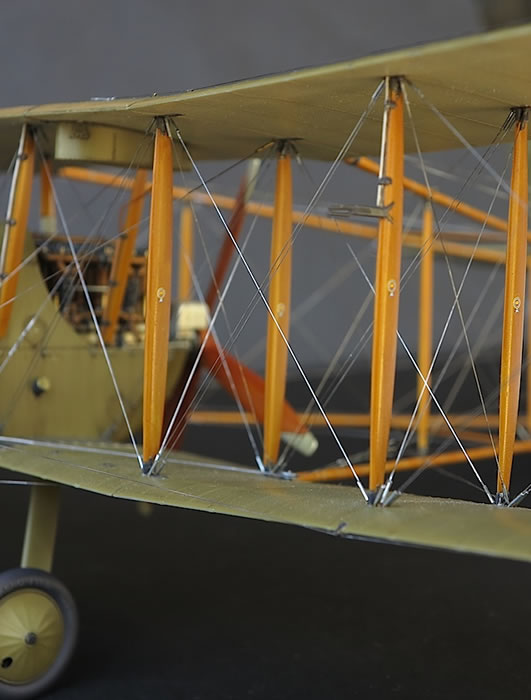
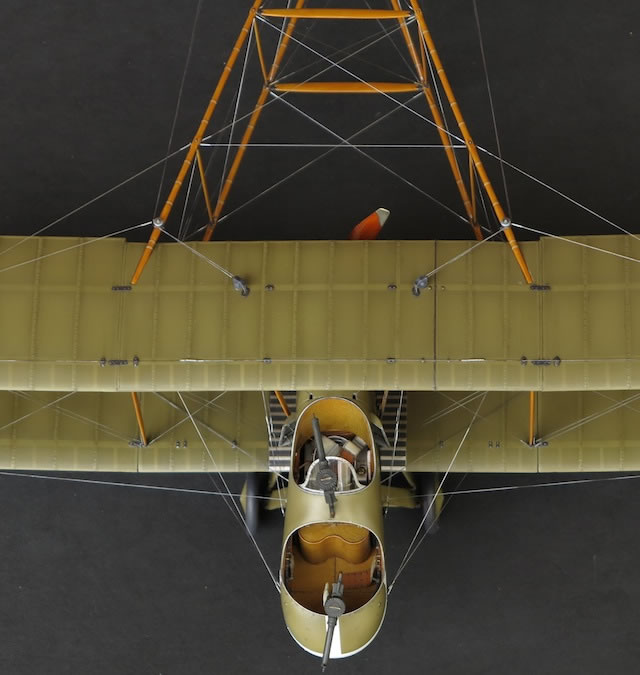
With a few exceptions, I followed the instructions’ modular approach to construction. First, I assembled and painted the wings and stabilisers. Then I built the cockpit and engine bearers and sandwiched them between the nacelle halves. The engine was built and glued to the nacelle, followed by the lower wings and all 16 struts. The number of struts made attaching the upper wing a slow, at times fraught process, but Wingnut’s recommendation of using the box as an alignment jig worked perfectly. I deviated from the instructions and attached the undercarriage after the wings, but wouldn’t recommend doing so as I found it hard to get strong joins and even harder to get everything properly lined up. Finally I attached the assembled and rigged tail boom, which like the upper wing slotted perfectly into place with amazing alignment; I don’t see how Wingnuts could have engineered this make-or-break section of the model any better than they have.
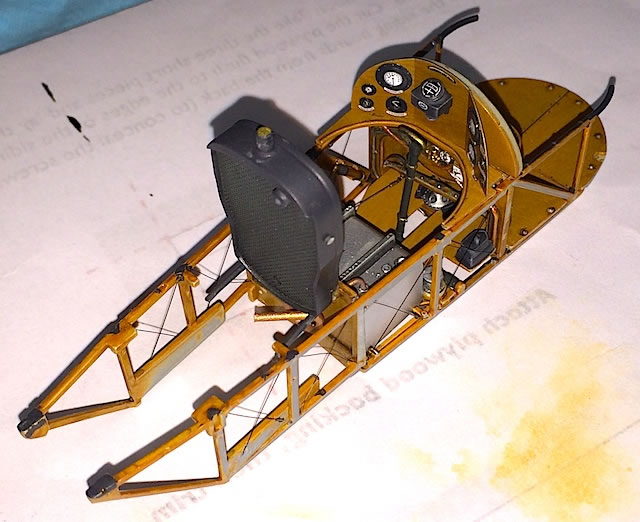
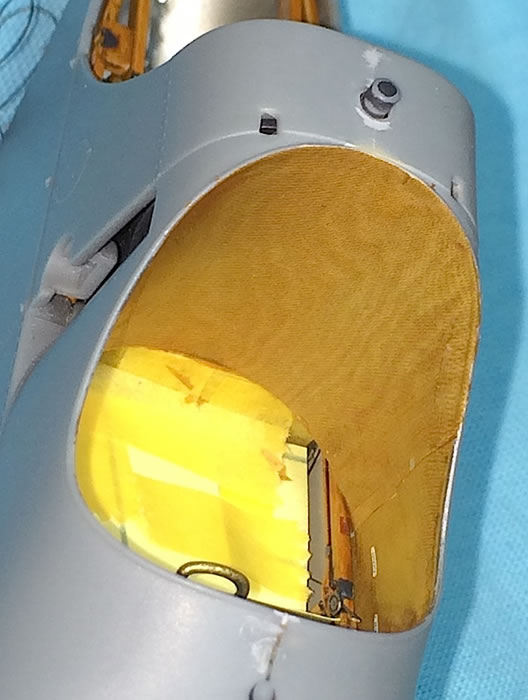
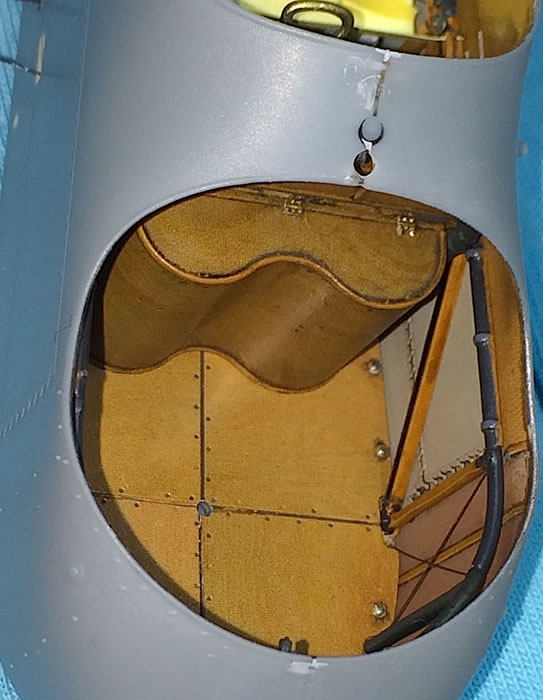
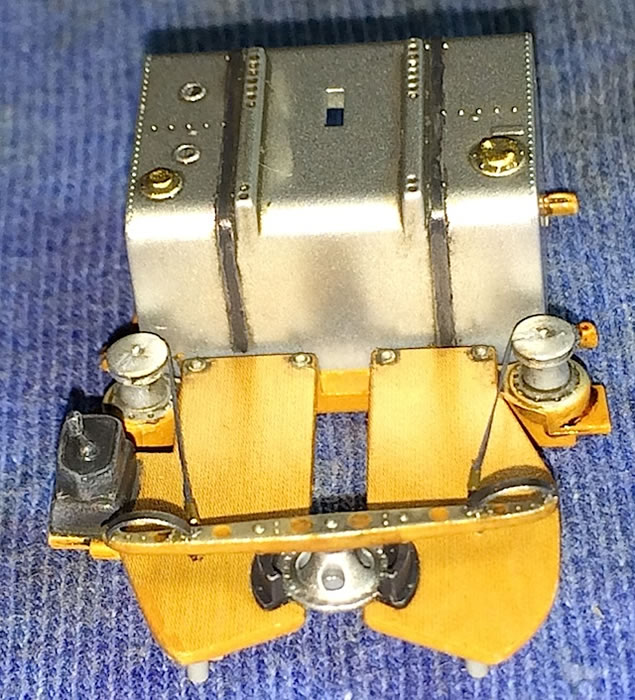
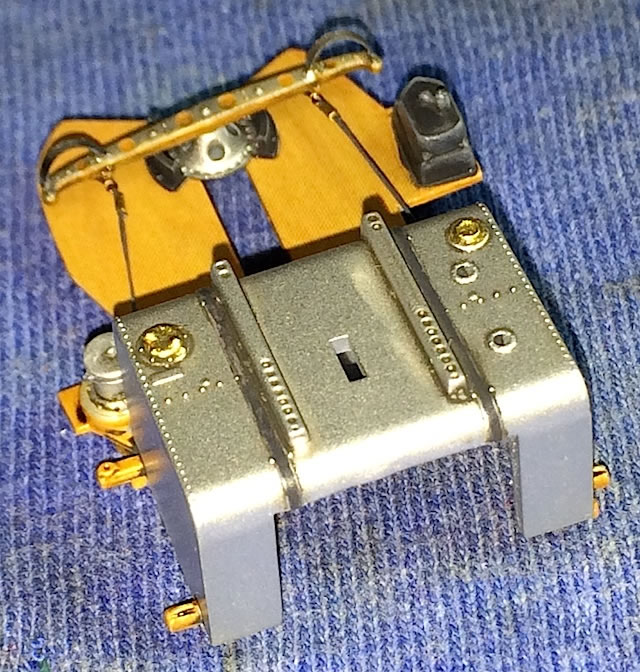
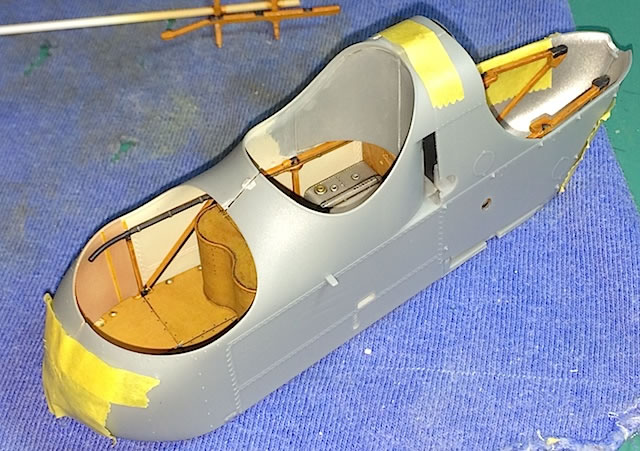
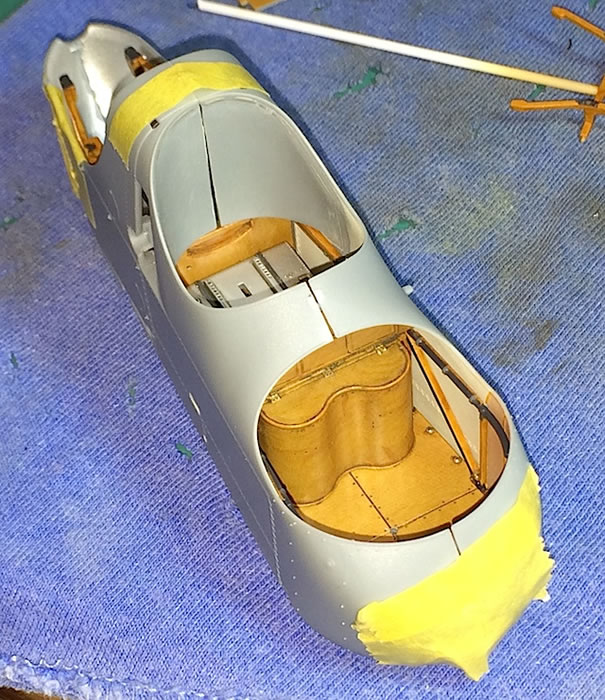
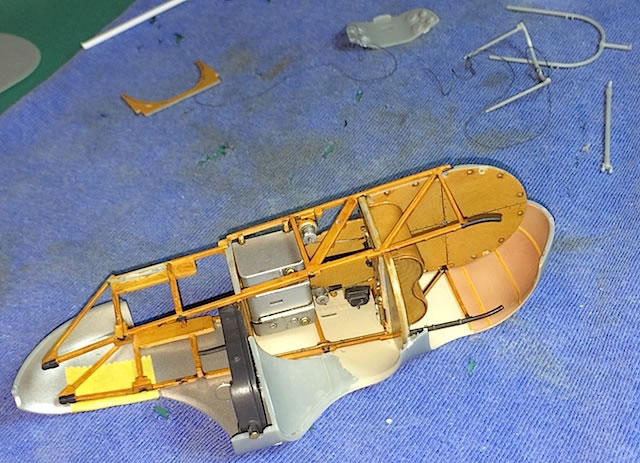
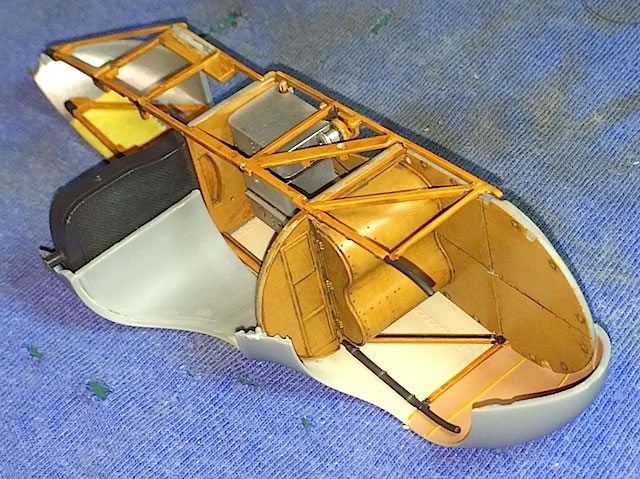
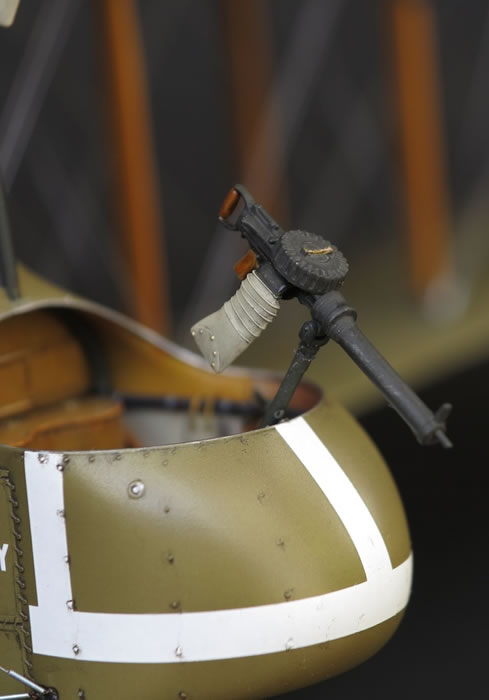
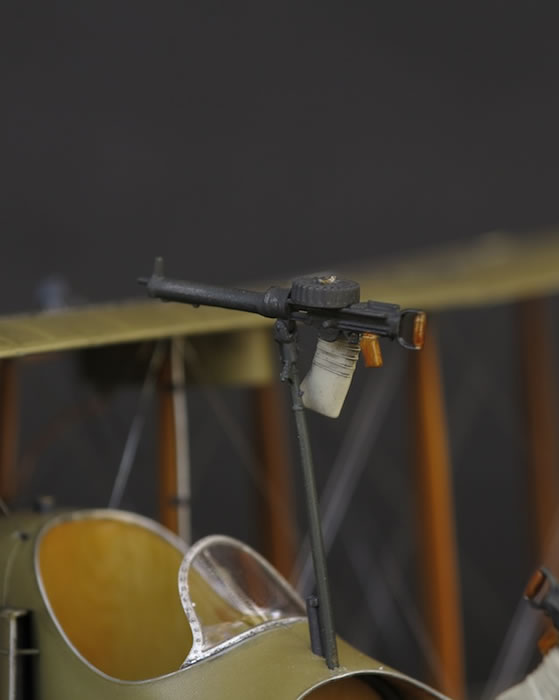
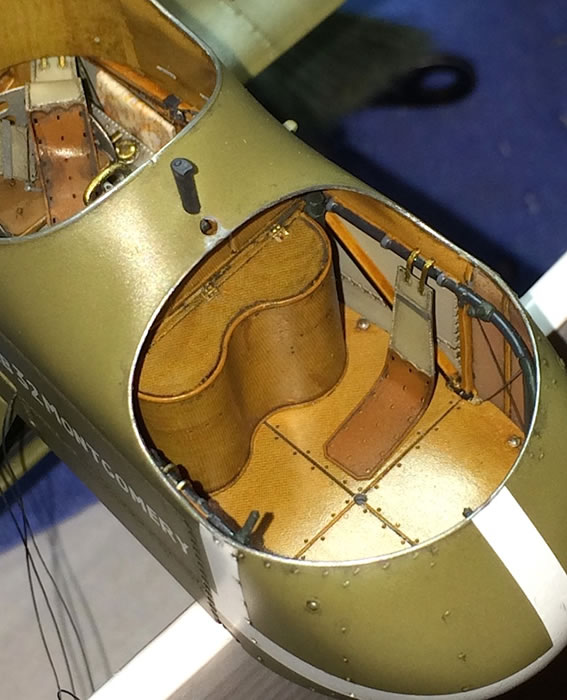
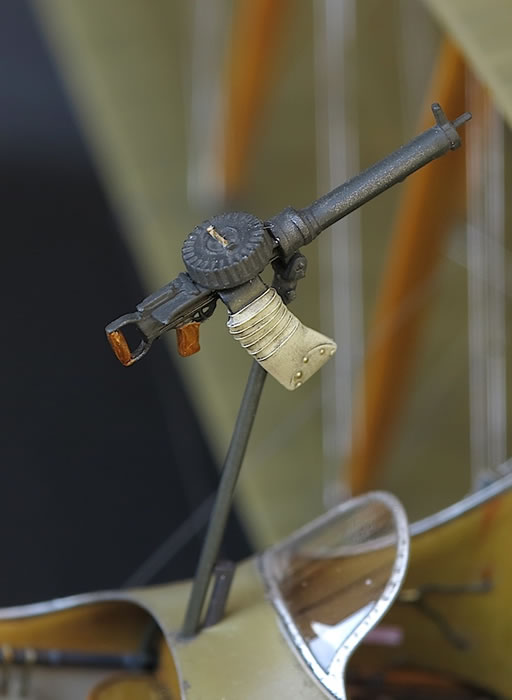
The kit is very well detailed out of the box, but I improved upon this with a number of HGW detail sets – most extensively the interior set that includes both photo-etched details and wood grain decals.
The other main aftermarket items I used were for the rigging: EZ Line, .12mm Platil fishing line, and Bob’s Buckles eyelets and tubing.
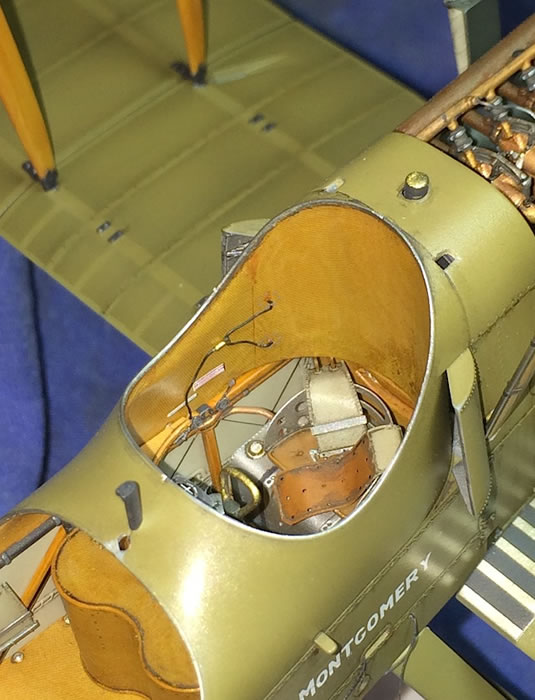
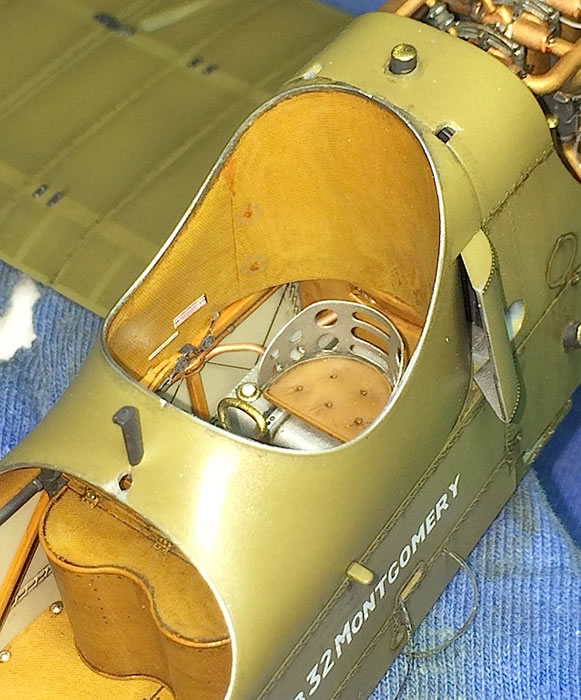
I used HGW's wood grain decals for much of the cockpit wood paneling. The decals are translucent and applied over a CDL-equivalent shade. They settle down well but are quite fragile, so need to be handled with care until they receive a protective coat of varnish.
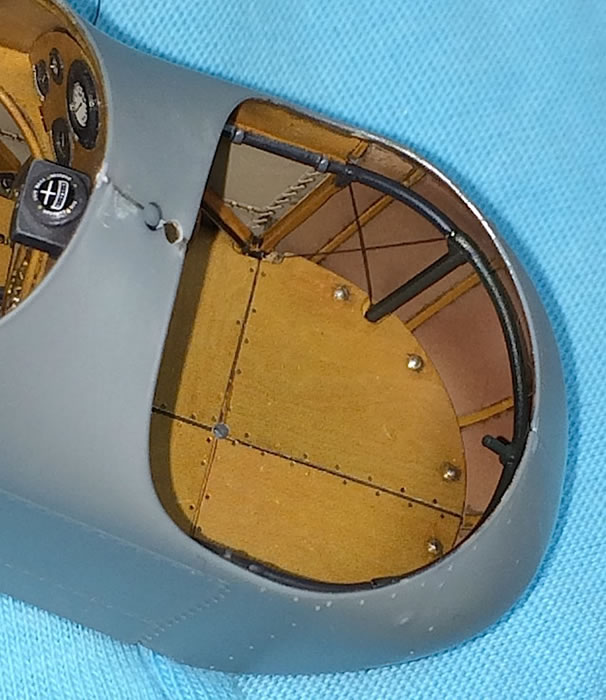
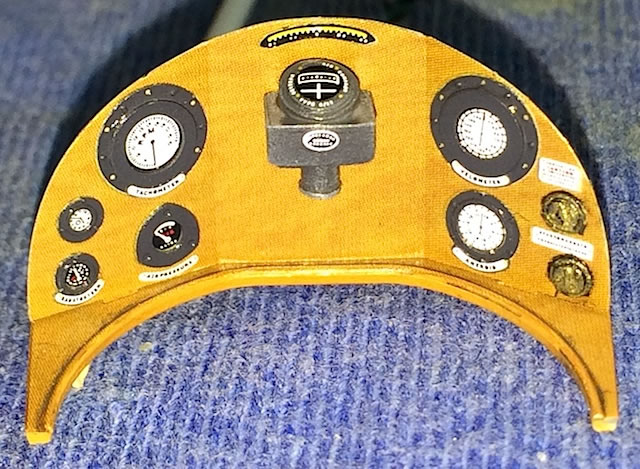
Also in the cockpit, I replaced the kit instrument panel with HGW’s etched set; it looks good and was fun to assemble, but I'm not sure if it's that much of an improvement on the original plastic. I stuck with the moulded kit parts for the piping below the instrument panel, because I thought it looked better than the two-dimensional HGW photo-etch. The back of the pilot’s seat was also a HGW replacement part, while the beautifully quilted seat cushion is from the kit.
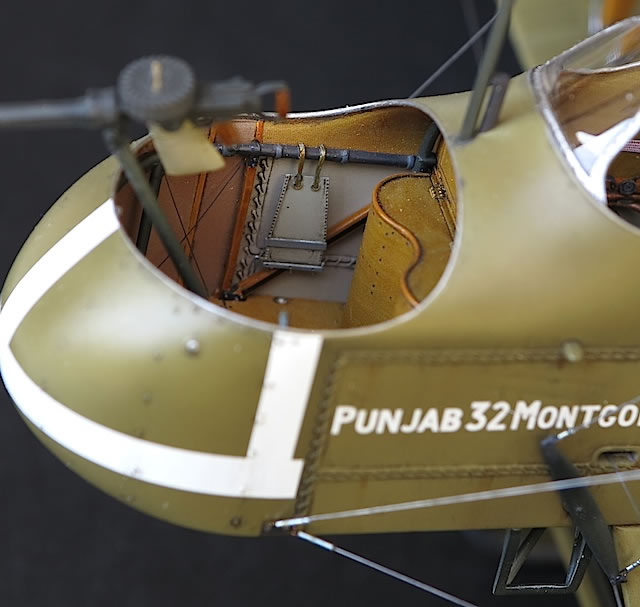
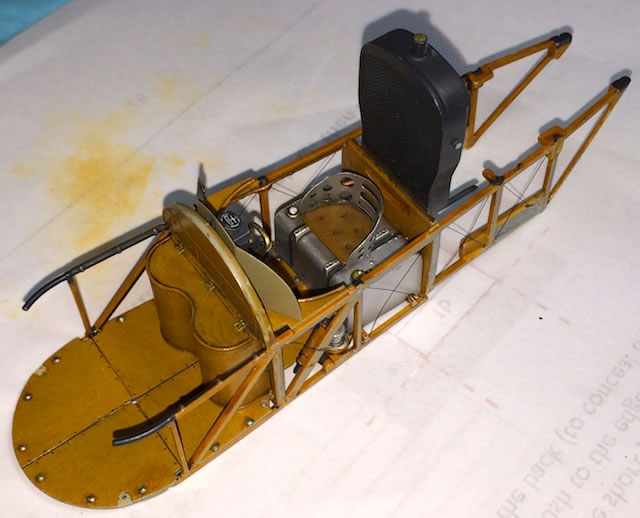
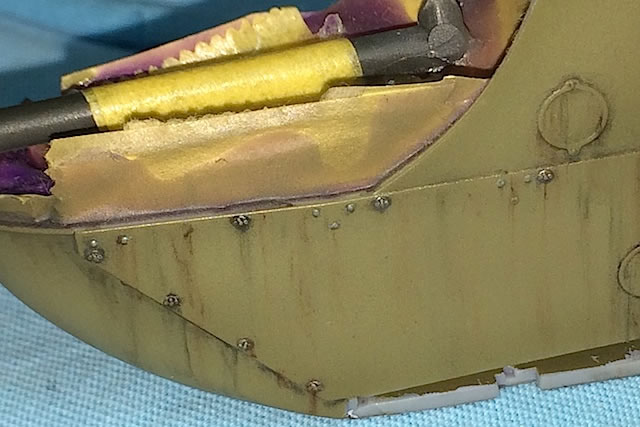
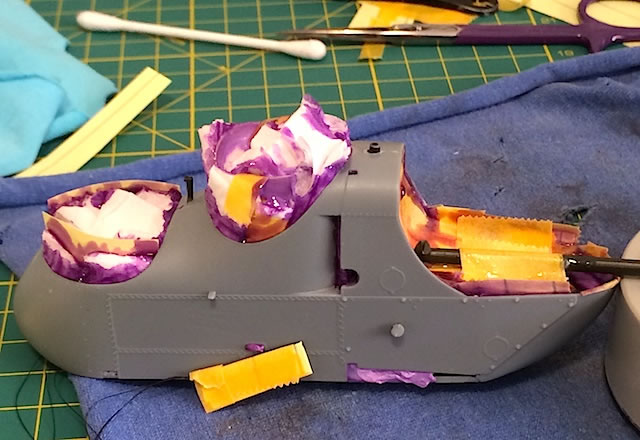
Probably the only frustrating bit of kit engineering – for me at least – is the way the rear wall of the pilot’s cockpit has been designed to slot into the nacelle after assembly. I can see why Wingnuts has done this, but if the part is installed as per instructions there is a gap in the wall that wasn't present on the original aircraft, and (given the wood grain finish) would be difficult to blend in after construction. So early in nacelle construction I cut the rear wall part in two, glued the halves to their respective nacelle halves and blended in the forward joins until these were seamless. The vertical join between the rear wall halves was then easy to smooth over after the nacelle was closed up. The big wood grain decal for this area behaved itself perfectly, and I was very happy with the final look of the cockpit.
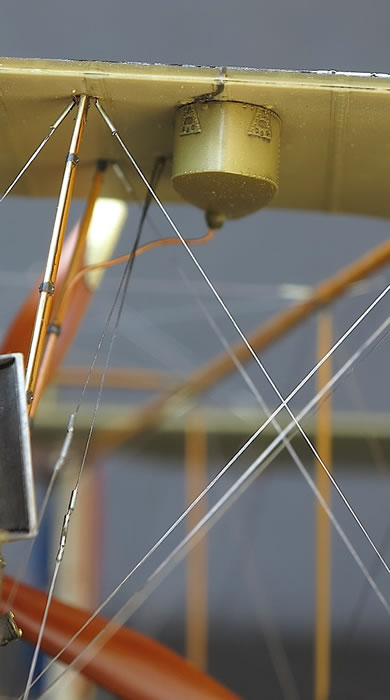
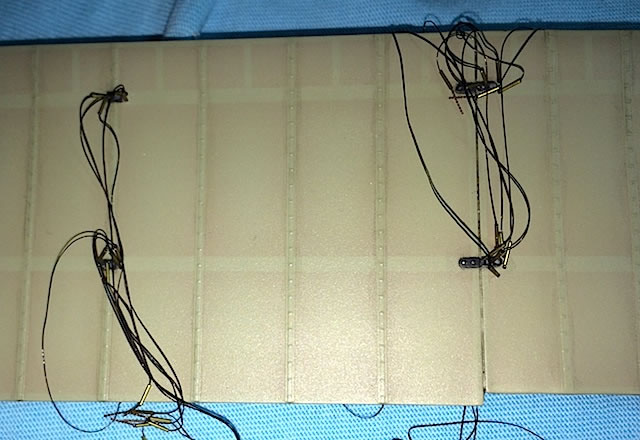
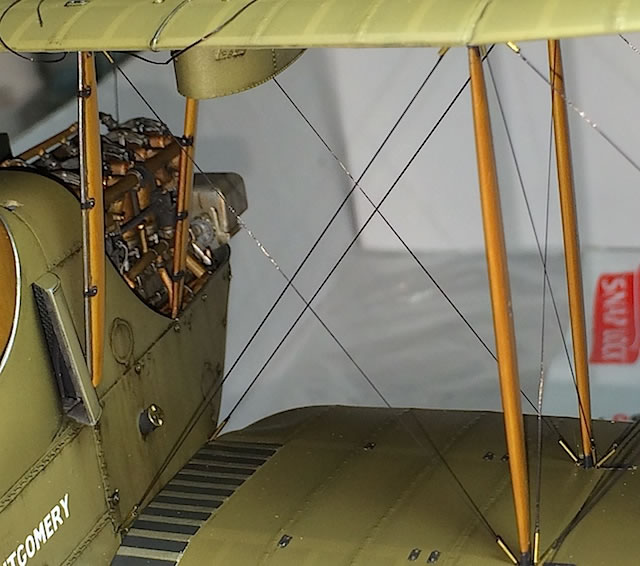
I used lengths of very thin Albion Alloy wire to represent the nacelle’s internal bracing wires. I initially tried EZ Line for this job, but I found it interfered with the fit of the cockpit framework into the nacelle.
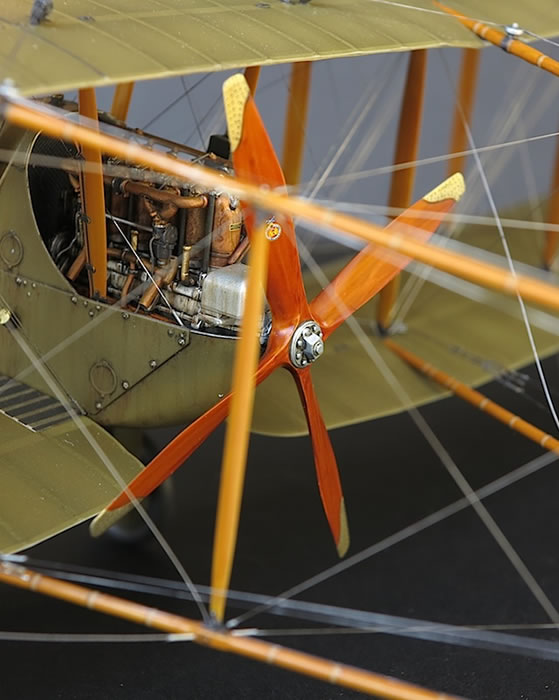
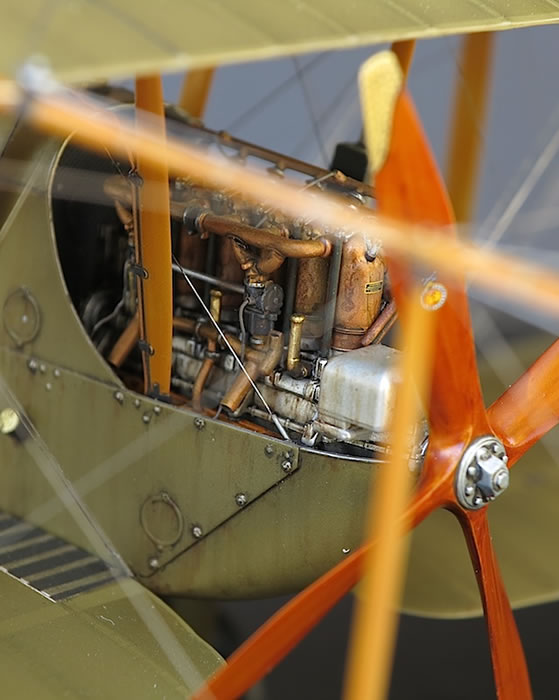
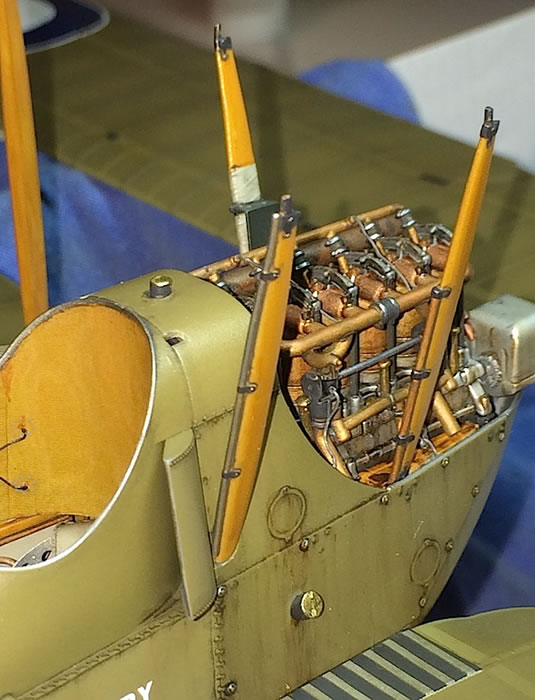
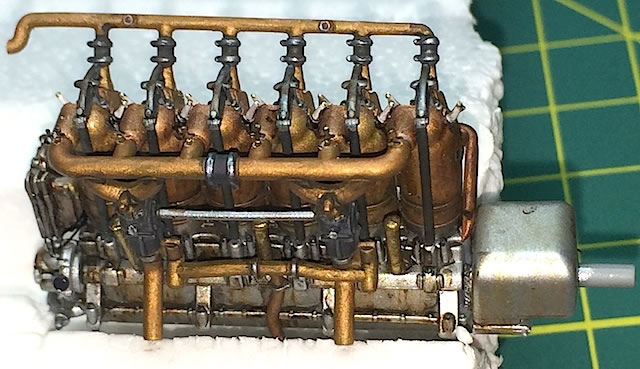
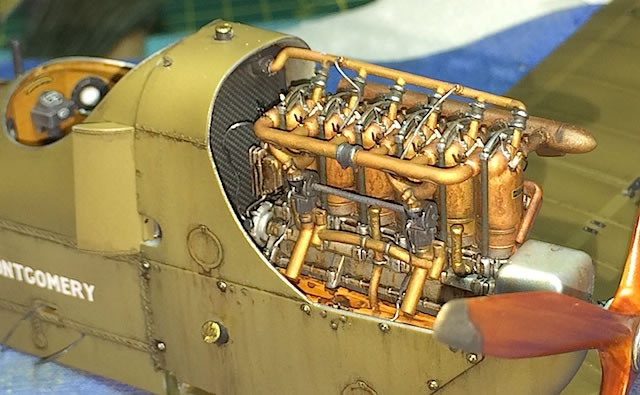
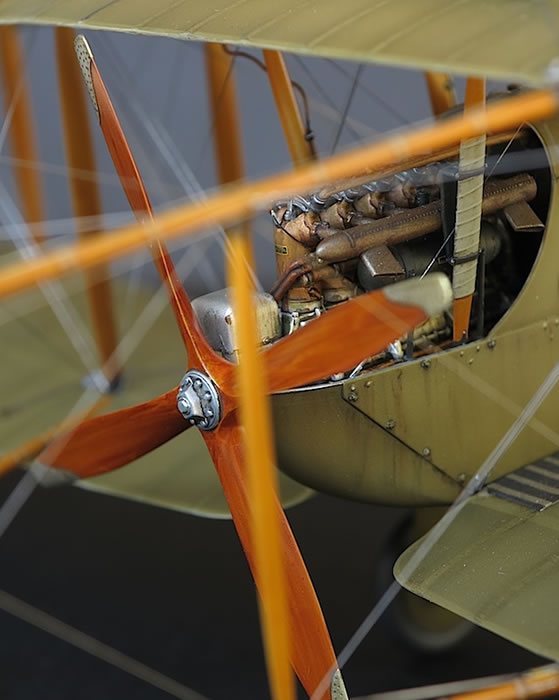
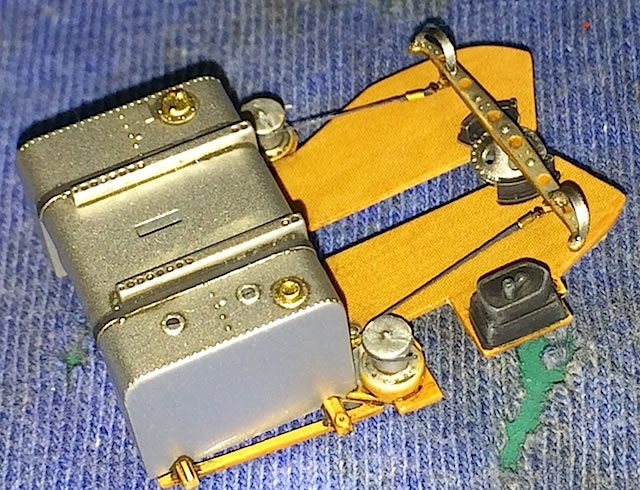
Wingnut's representation of Fe.2b’s 160hp Beardmore engine is very good.
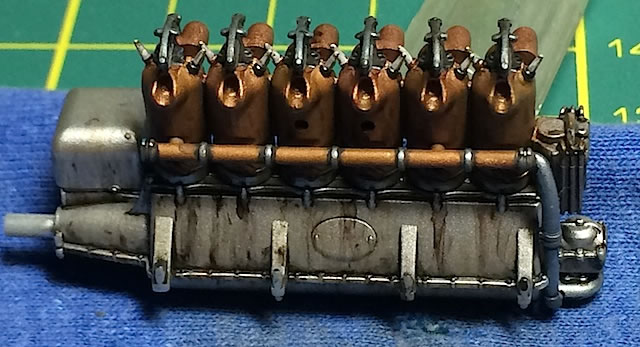
I used HGW's photo-etched set to add a bit more detail, but really the kit parts only need a little weathering to bring them to life. I experimented with oil paints to achieve heat staining effects on the cylinders, and was pleased with the results.
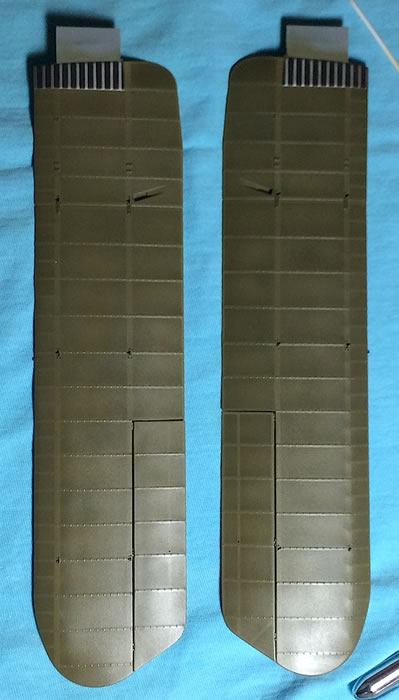
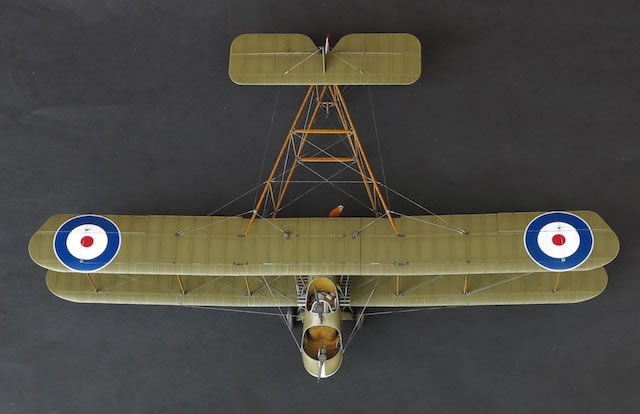
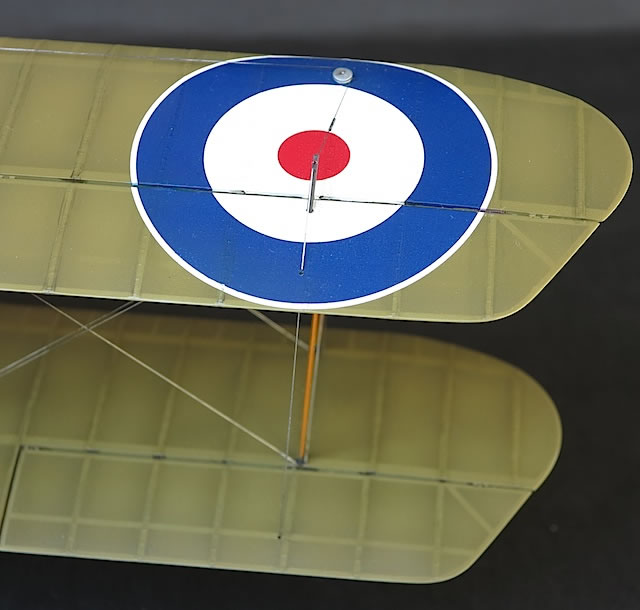
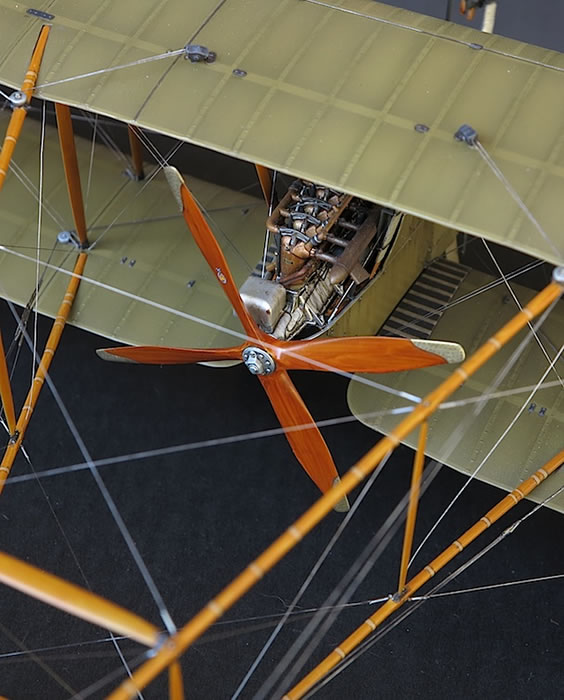
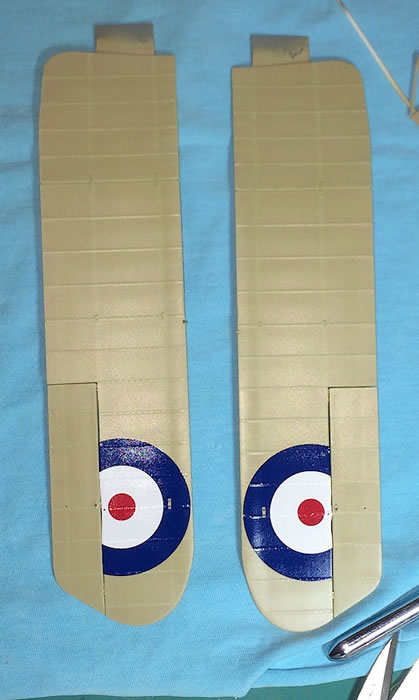
The lower wings are beautiful single part mouldings that only require careful clean up before painting. The upper wing is slightly more complex, being made up of a two-part central panel into which two outer panels are then slotted (automatically setting the correct dihedral in the process). It took more work than I expected to get all this assembled to my satisfaction, though suspect this was due to my techniques rather than anything with the parts themselves.
Painting, Markings and Weathering |
A number of photos were taken of ‘Punjab 32 Montgomery’ shortly after capture, which provide some good insights into its appearance; it appears to have worn standard RFC finish of PC10 upper surfaces and Clear Doped Linen lower surfaces. I represented these colours with custom mixes of Tamiya acrylics thinned with lacquer thinner.
The wings and tail assembly were painted on their top surfaces with an overall light PC 10 shade, then the ribs were masked and a darker shade of PC10 sprayed around the edges of the tape strips before a final blending coat was applied. The same process was applied on the lower surfaces with various CDL shades (which in hindsight I wish I’d made lighter and paler than I did). It was only late in the build – too late to easily fix – that I realised I’d made a mistake in my representation of the front lower wing spar, which I showed as running parallel with the wing leading edge when this was not the case.
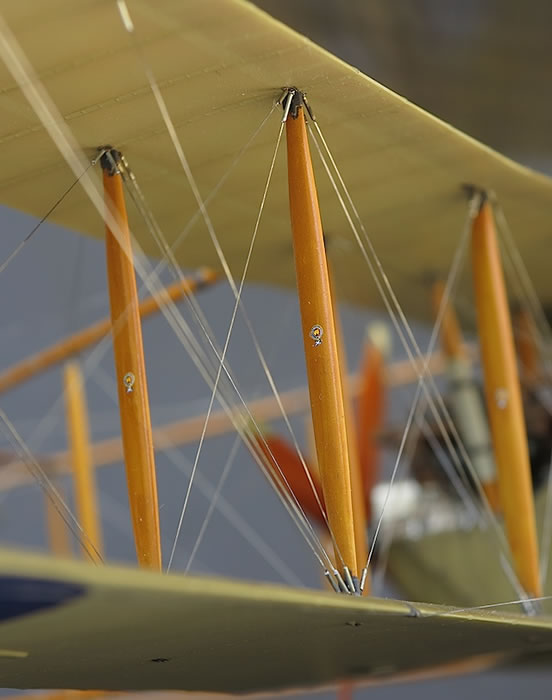
The wood finish on the cockpit framework, struts, tail booms and propeller was achieved with Abteilung oil paints and Tamiya acrylics. I used a base coat of lacquer-thinned XF 55 Deck Tan, which over-coated with Testor’s Glosscote Lacquer gave a good strong base for the subsequent oil work. After trial and error I settled on the following formula for the light wood of the cockpit, struts and booms: an initial coat of Abteilung Abt.092 German Ochre, which I allowed to dry for 24 hours before lightly overbrushing with Abt.093 Basic Earth. I then let this all dry for a week before airbrushing on a thin coat of Tamiya X-26 Clear Orange and then some final protective Glosscote Lacquer.
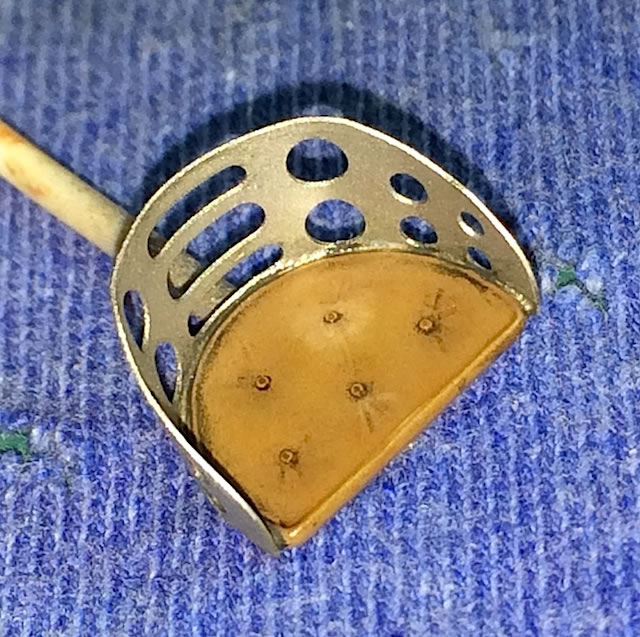
The propeller was slightly more complicated because I wanted to capture the rich and textured look of dark wood. I started with the same XF 55 base, over which I slowly built up layers of various Windsor and Newton Umbers and Siennas. I protected each coat as I went with a thin cover of Glosscote Lacquer, which prevented the new oils from mixing with the layers below. This gave me the result I wanted, but taking into account drying time took about a month to achieve (longer if you take into consideration a couple of false starts.) Painting the protective brass tips was made much easier by a custom masking set from HGW.
With one exception the kit decals went on very well. The only problem I had was with one of the upper wing decals, which bubbled, wouldn't settle properly and required some careful touching up with paint.
Photos show ‘Punjab 32 Montgomery’ as only slightly weathered, which I tried to replicate with restrained use of Flory Models Dark Dirt and AK Interactive’s Winter and Dark Yellow Streaking Grimes.
Rigging and Finishing Touches |
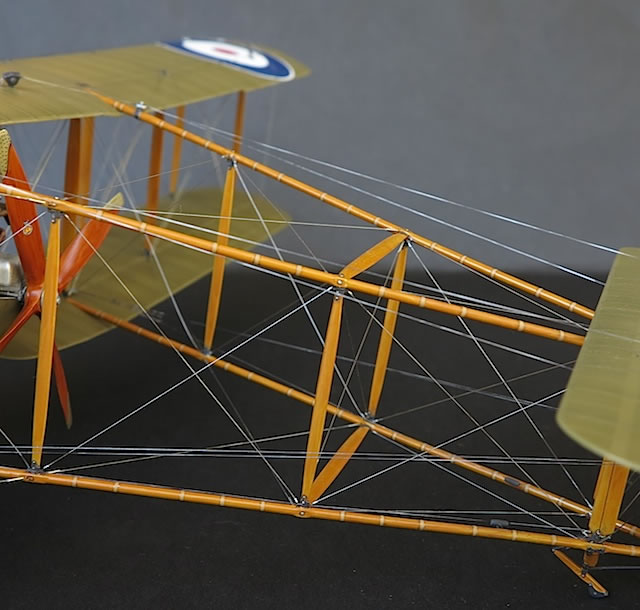
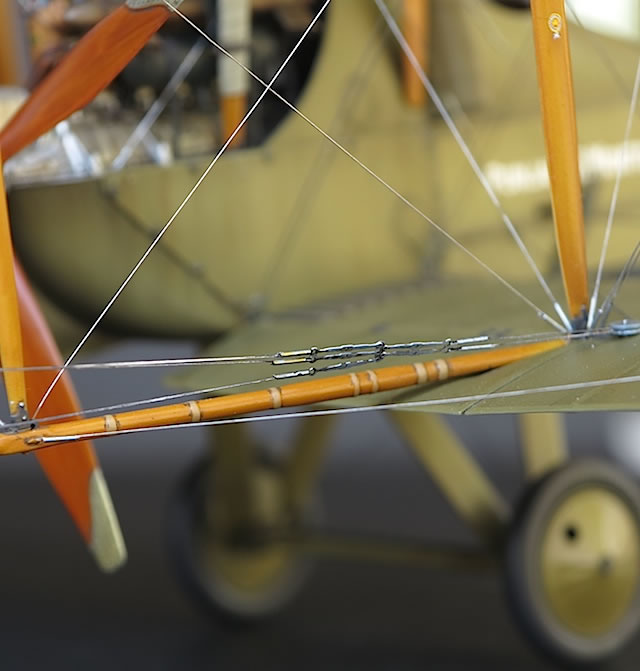
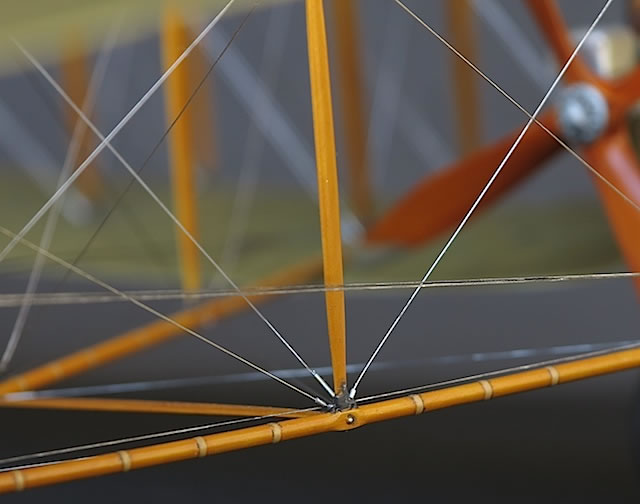
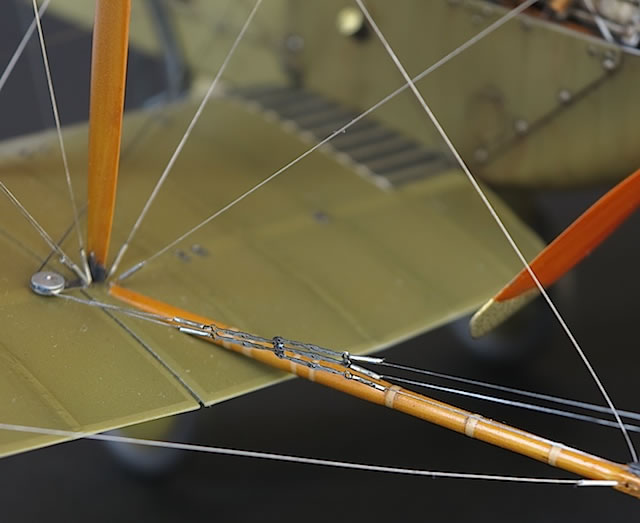
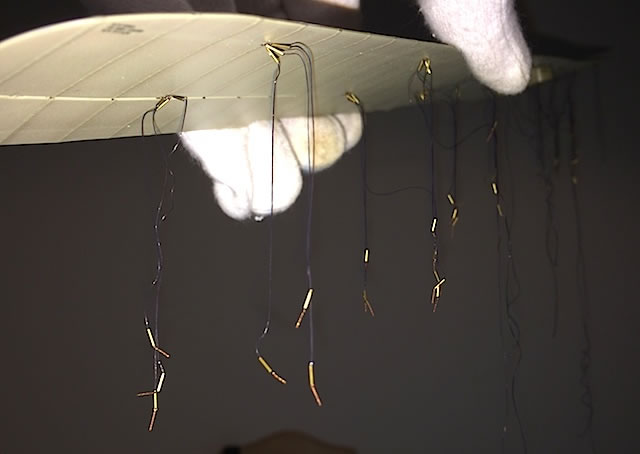
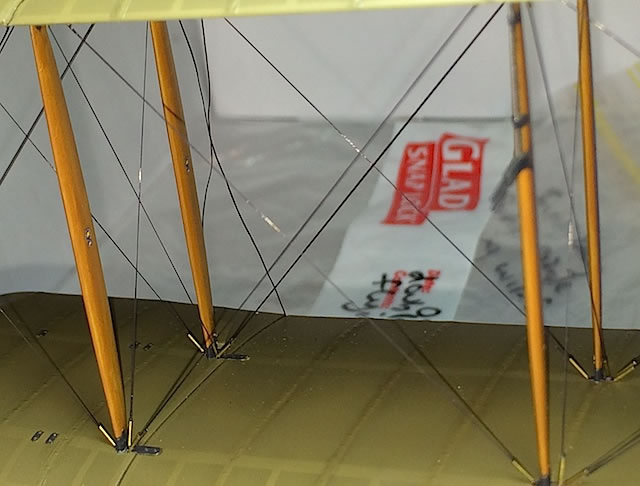
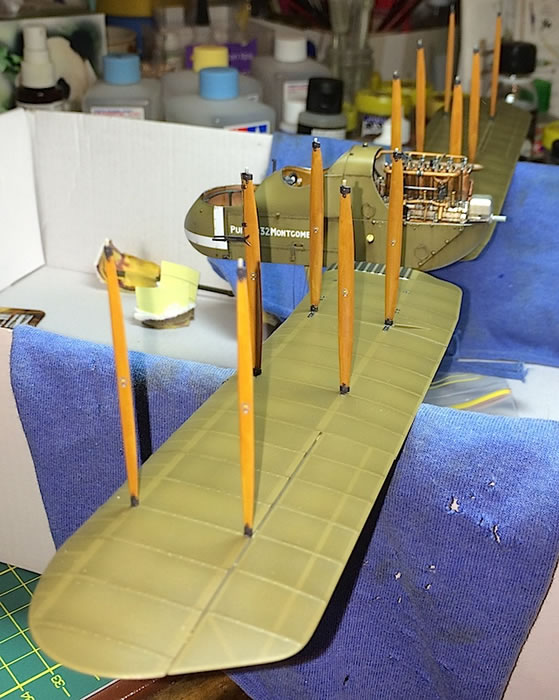
There’s no escaping of the complexity of the Fe.2b’s rigging. For me it’s one of the machine’s most attractive features and while not difficult to replicate, it is time consuming; don’t think you can build the model and then rig it in a few hours, or even days.
I used black EZ Line for most of the rigging, except the tail boom where I needed the strength of fishing line to prevent the booms from sagging under the weight of the airframe. Bob’s Buckles eyelets and pre-cut brass tube (3mm and 1mm) were essential ingredients for success. Some modellers recommend making your own eyelets and cutting your own tube, which I did myself for the Pfalz; but you’ll need hundreds of each for the Fee, and for me at least it was worth using Bob’s excellent products.
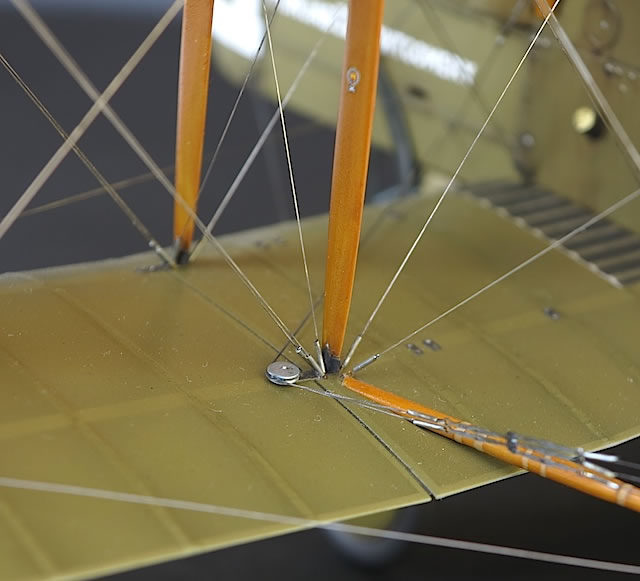
The eyelet/tube/EZ Line combination isn't 100 per cent representative of RFC rigging and attachment points, but once installed and coloured (for which I used a silver Sharpie) it looks pretty good. I love the flexibility of EZ Line – it's very forgiving when you unexpectedly bump or snag it – but I dislike how easy it is to twist, and how obvious the twists are on the finished model. In contrast the fishing line on the tail boom didn’t twist, but I have noticed a bit of sagging that I’ll have to tighten up with a heated screwdriver.
I was able to rig most of the tail boom before attaching it to the wings. After this – which as I said is very straightforward – I needed to add a number of control runs between the wings, booms and tail surfaces, after which I called the model done.
The final point I’d make about the rigging is that Wingnuts tries to make it easy for you, with three separate diagrams in the instruction booklet and all attachment points clearly marked with tiny holes. These need opening up with a drill in order to fit the eyelets, but it’s much better than having to start from scratch.
Wingnut Wings’ 1/32 Fe.2b is a great kit in either its ‘Early’ or ‘Late’ boxings. As I said, it’s only the second biplane I’ve built since I was a kid, and while time consuming it was in no way daunting. I couldn’t be happier with the end result – it’s a big model that invariably attracts attention when displayed, and almost daily has me looking at it and saying ‘did I really build that?’ Thank you Wingnut Wings!
References
-
The Fe.2b flies again!, Albatros Publications Ltd/The Vintage Aviator Ltd, 2009 (photocopy of front cover and p.32 provided).
-
Michael Moore, “A Fine ‘Fee’”, Model Airplane International, Issue 95, June 2013 (provided).
-
James Fahey’s extensive walkaround photos of the TVAL Fe.2b at www.wwimodeller.co.nz
Model, Images and Text
Copyright ©
2015 by Brad Fallen
Page Created 20 August, 2015
Last Updated
20 August, 2015
Back to HyperScale Main Page
|
 Home
| What's New | Features | Gallery | Reviews | Reference | Resource Guides | Forum |
Home
| What's New | Features | Gallery | Reviews | Reference | Resource Guides | Forum |