Airfix and Revell 1/72 scale Shackletons
A Tale of Two Shacks
by Roger Hardy

Revell's 1/72 Shackleton is available online from Squadron for only $35.99!
The Avro Shackleton was the ultimate development of the Lancaster and was essentially a Lincoln fitted with a new, more capacious, fuselage and counter-rotating propellers on its Griffon engines. It entered service with the RAF in 1951 and remained in service until the final version, the AEW2, was retired in 1990. I remember seeing these when I was a teenager in Singapore in the mid-1960s when they were based with 205 squadron at Changi where I went to school. I thought they were a wonderful sight but a complete anachronism, even then. When I was at University, part of my University Air Squadron obligations was to spend a few weeks of the summer break at an RAF station and in I971 I managed to get a detachment to RAF St Mawgan where they had just started flying the new Nimrod.
They still had one or two Shackletons and I got a flight in one. It was rather tedious, I’m afraid, noisy, cold and draughty and lasted for about 8 hours. They didn’t even let me fly it. I spent half of the flight on my tummy in the rear observation position and couldn’t wait to get back on the ground into the luxury of a Nimrod (which I was allowed to fly as the autopilot hadn’t been cleared for service and the crew needed a human autopilot). Who could have imagined that the Shackleton would stay in service for so long; over 40 years!
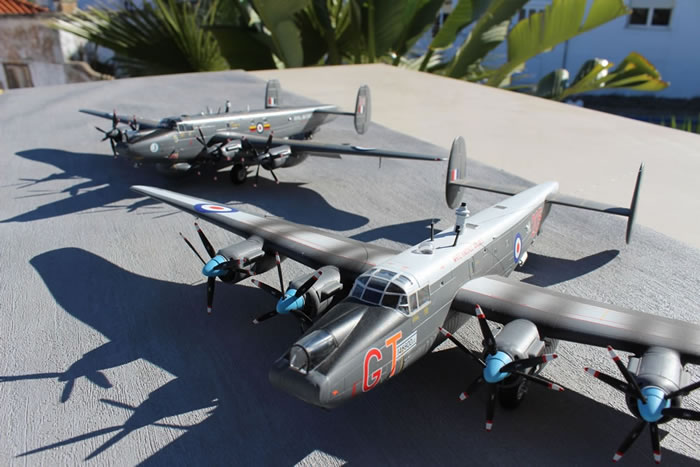
Until now, there was only one kit of the Shackleton in 1/72 scale, an impressive but dated MR3 by Frog/Novo (and I think re-issued by Revell as well) but there was never a tail-dragging MR2, although Aeroclub did a conversion kit. Now, we have two, issued almost simultaneously by both Revell and Airfix, but there are significant differences between the two so I thought it worth recording my experiences of building both. Well, it’s such a cool looking aircraft! Every home should have two.
Airfix
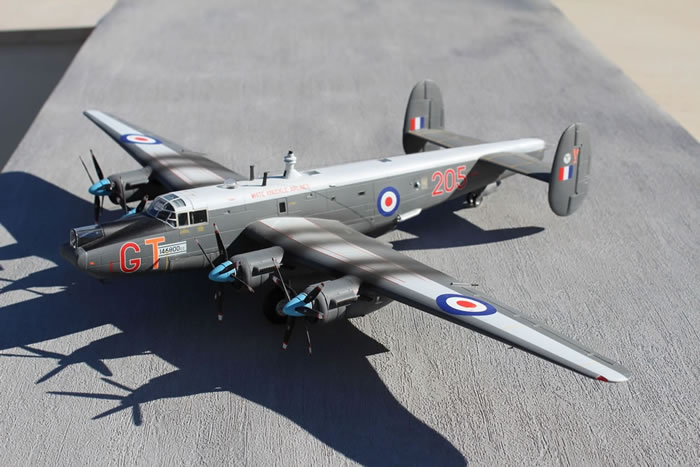
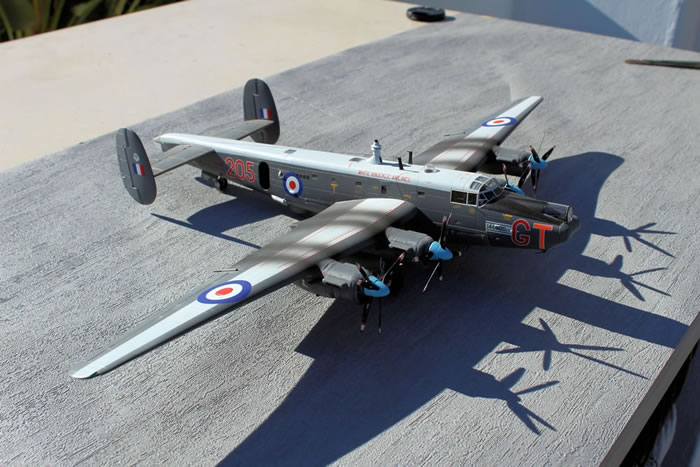
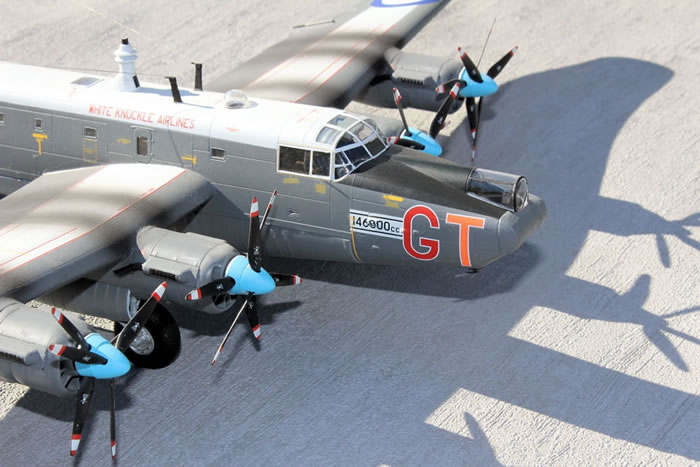
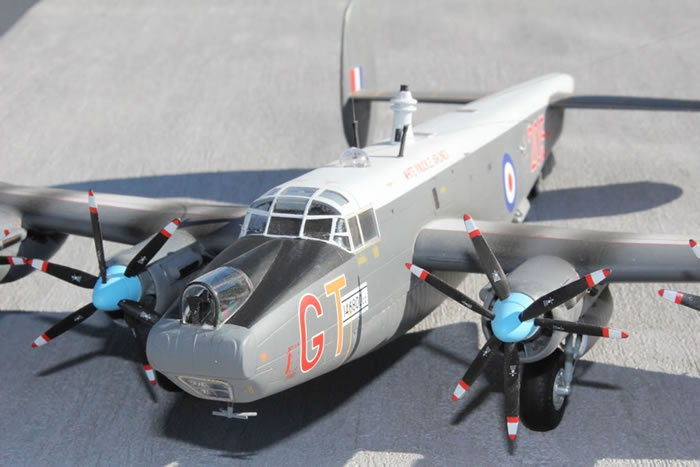
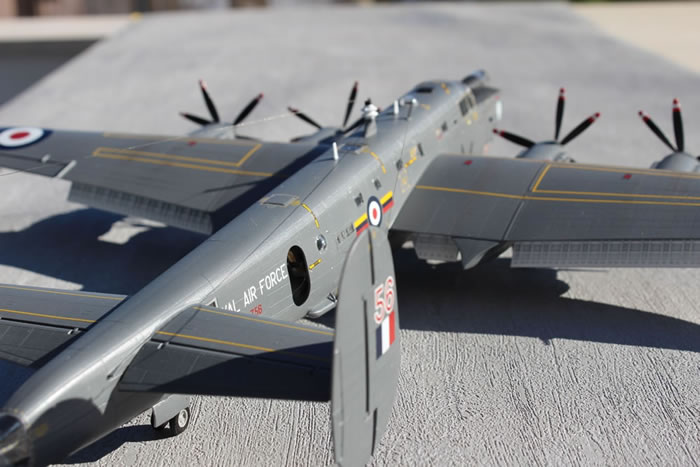
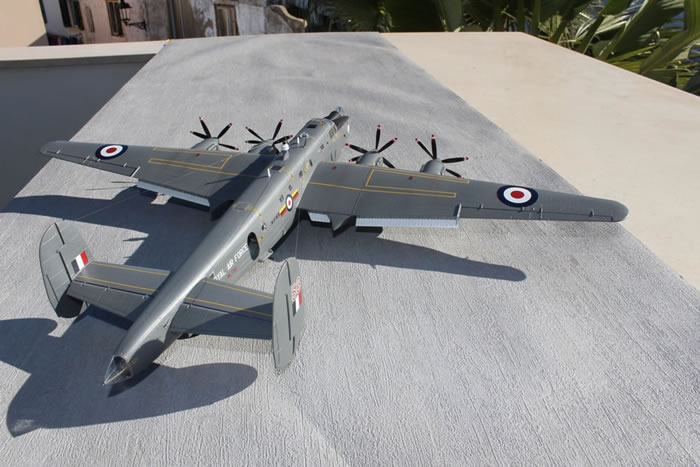
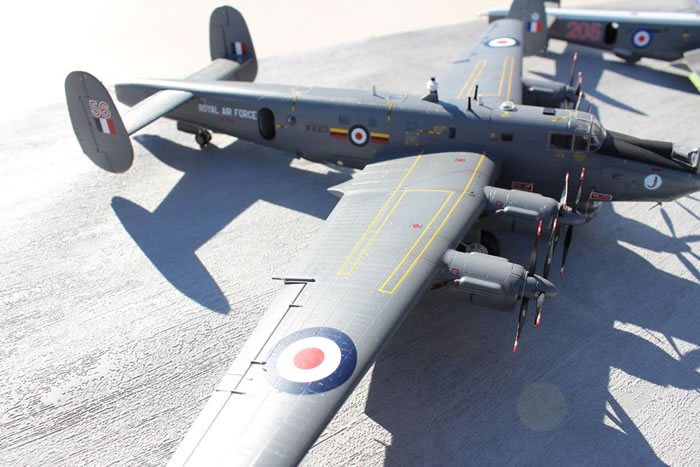
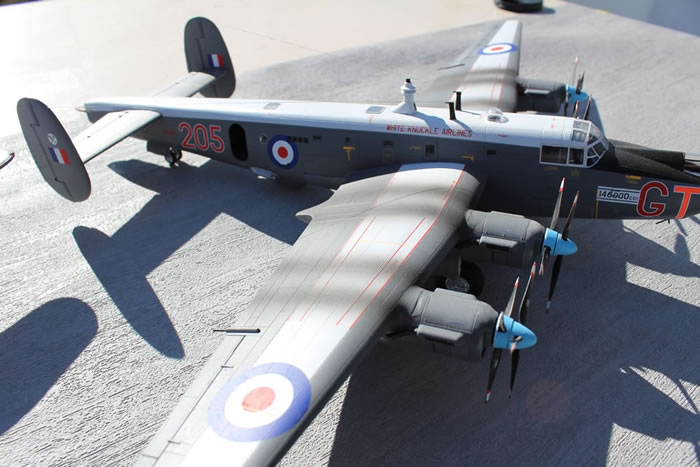
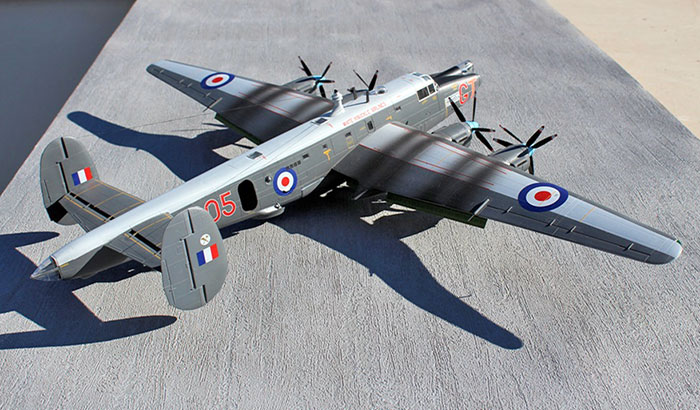
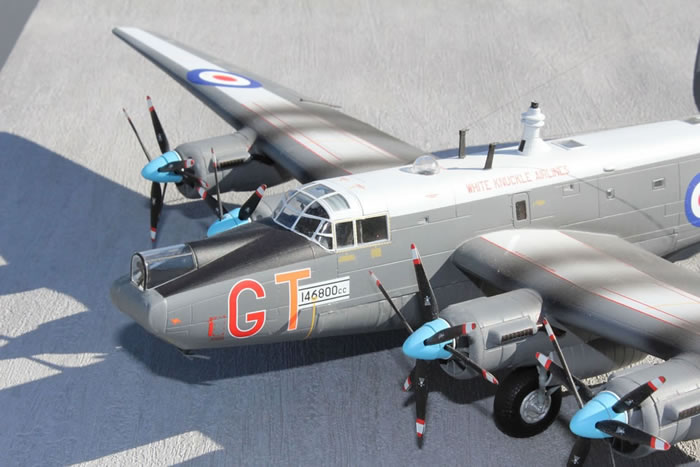
The Airfix model is an MR2 and offers the options of a mid-upper turret fitted initially plus the nose guns and an attractive 1959 grey and white colour scheme which most modellers tend to choose. The second option is of a later MR2 of 205 squadron which are the ones I remember so, naturally, that is the one I chose. The markings clearly reflect the end of their service lives as the aircraft has some jokey markings; ‘White Knuckle Airlines’ and a confirmation that this ‘GT’ version has 146 litres engine capacity! I have some photographs of this same aircraft, WR966 ‘G’, taken at RAF Changi in 1965 when it was fitted with the nose guns as neighbouring Indonesia was being rather unpleasant about the existence of the new Malaysia and the UK was providing the aerial defence of Singapore (then part of Malaysia) whilst the Aussies were up at Butterworth in Malaya.
A word about the instructions for the colour schemes; Airfix insist that this aircraft is of 204 squadron, based in 1973 at RAF Tengah, which is apparently in Indonesia! To set the record straight, there is a clue that this aircraft is 205 squadron, not 204; that is, 2m high red numbers ‘205’ on the fuselage. These aircraft were based at Changi, not Tengah, which, as far as I am aware, has always been in Singapore, not Indonesia, and the date would have been no later than 1971 when 205 squadron was disbanded. Apart from those few details, they got everything else right.
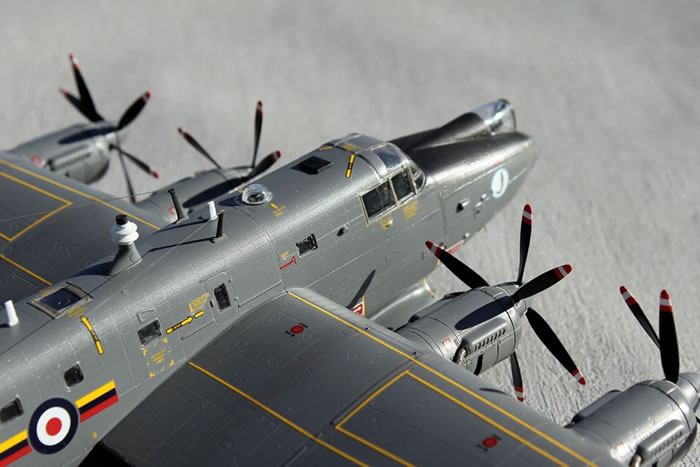
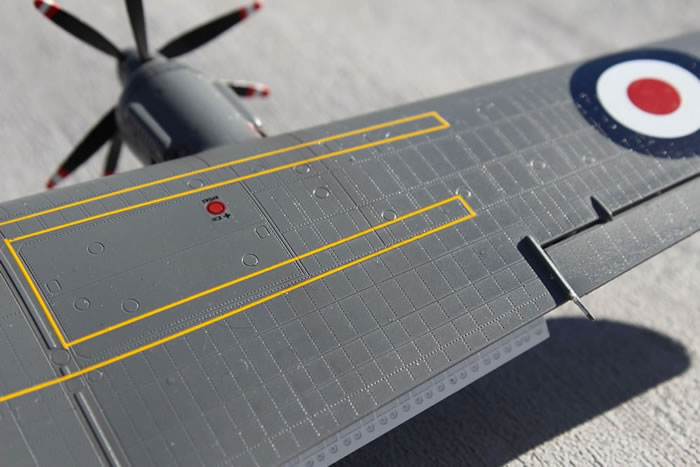
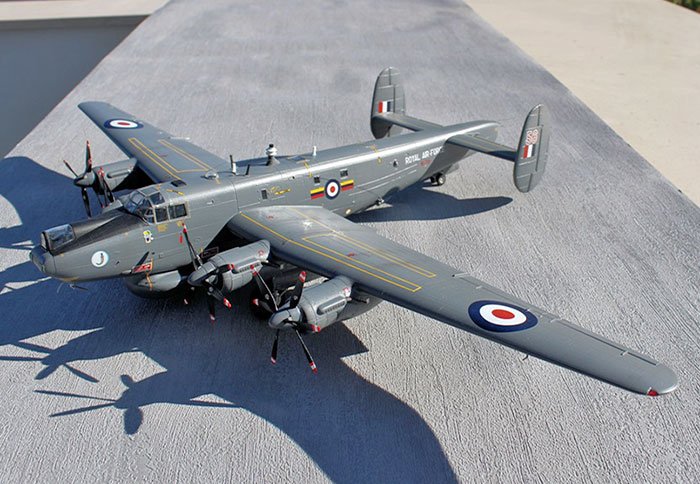
The kit is what we have come to expect from new Airfix but there are one or two areas where they have taken their eyes off the ball. My photo references show a rather prominent fairing and chute/pipe on the left-hand fuselage side aft and below the cockpit; I don’t know what it was but the kit doesn’t have it so maybe it had been removed by 1971 but it was certainly there in 1965. I know that the AEW2 didn’t have it (although, perversely, Revell have it on their model – a clue that they also initially intended their model to be an MR2) but I’ll give Airfix the benefit of the doubt on this one. The elevators and rudders are positionable and the flaps can be up or down. The bomb bay doors are separate but…see later; Government Health Warning. The surfaces are completely clean with engraved detail but there is no indication of the mass of rivets that covered this aircraft. The crews referred to it as ’10,000 rivets flying in close formation’. My example had some sink marks on one fuselage side which need filling but this may vary from model to model. Both Airfix and Revell have moulded the fuel vent pipes with the wings but these are certain to get knocked off so it’s best add some protection by taping some card under them.
There is a wonderfully detailed cabin interior (including a map on one console desk!), none of which can be seen on the finished model, even if you leave the fuselage door open so don’t waste too much time on this area. Incidentally, the door is meant to be hinged inwards but Airfix don’t tell you this and provide no hinges (Revell do). I left mine off but, in reality, when open you can see it very clearly from the outside. Duuhh. The nicely-detailed cockpit is barely visible so my efforts with the Eduard set were all wasted. Still, God and I know it’s all in there. Airfix provide a nice instrument panel decal which is more than adequate but cannot really be seen. For a complex aircraft, the assembly is straight-forward but the fit of the parts is VERY snug so you really need to get things right. In particular, the undercarriage bay inserts must be perfect to allow the inner nacelles to fit properly. Actually, I found that none of the nacelles fitted as well as I had expected and I had to resort to priming filler and a bit of Milliput to get decent seams. The fit of the rest of the parts (bomb bay doors aside) was stellar; you don’t really need to cement the wings as they slide over spars and fit snugly against the fuselage sides.
I had elected to have the bomb bay doors open. This was a big mistake. The weapons bay interior is nice and there are some good torpedoes but the open doors simply don’t fit, no matter how hard you try. Don’t try to force them as you’ll end up knocking all your flaps off. They won’t fit. Period. In the end, I gave up and glued them closed (and the fit is perfect). The flaps are another oddity in that you can pose them open or closed but the tags that are moulded into the flaps for the open position are at the wrong angle so remove them and all will be well. Flaps were usually up on the ground in any case.
Painting the model was straight-forward apart from the fact that white is prominent in both schemes and I find it one of the most difficult colours to use. The problem with white is…how white is white? I’ve done some models in very bright white and they just looked wrong. In this case, I decided to use grey primer then a good coat of Tamiya matt white so that the overall effect is slightly off-white and this looked just fine; the only areas where you notice it is in the contrast between the white of the roundels and the airframe. I used Eduard’s canopy masks which I recommend. After spraying the white, I masked it and sprayed the Dark Sea Grey, using Tamiya XF-54, which is perfect. I sprayed the entire model with Tamiya’s rattle-can gloss before decaling; glossing the surface is essential to avoid silvering with these decals.
The decals are good and go on well, though they need a bit of soaking before they slide off the backing paper. A strange one is four little black squares on the starboard fuselage near the roundel. Revell has these as windows so I guess Airfix forgot. A nice touch is that the red-and-white prop tips (all 48 of them…) are provided as decals and these work well, although initially I suspected they would not. In one or two areas (starboard fuselage roundel and ‘GT’ decal on the nose), you have to apply decals over prominent lumps and bumps and of course, they will never conform, so you need to cut, then touch up with paint when the decals are dry. In these areas I used Micro-Sol which worked well. The yellow dashed lines (‘cut here..’) around the cockpit windows are best cut up before applying as they will not retain their shape and you’ll lose them. This would be a shame as they look good in position. When the decals were dry I sprayed the whole model with a light coat of Tamiya rattle-can matt varnish which left a nice sheen. These aircraft were matt.
When the model looks almost finished, it’s time for the exhaust staining. Yes. Your final chance to ruin the model! Note that whether the aircraft had the exhaust down-pipes or not, the exhaust still flowed over the wing upper surface which was filthy. Not just dirty, but FILTHY! Black. Sooty. Looking at the photos of my model, you might think the effect has been over-done but actually I have under-done it in the interests of an attractive model. I doubt whether these aircraft were ever cleaned. By contrast, the AEW2s were a lot cleaner and photos show hardly any exhaust staining. I have started using a new Chinese airbrush which is a Badger copy and works well and I was able to do the exhaust spraying freehand, something that I normally avoid as I’m not very good at it.
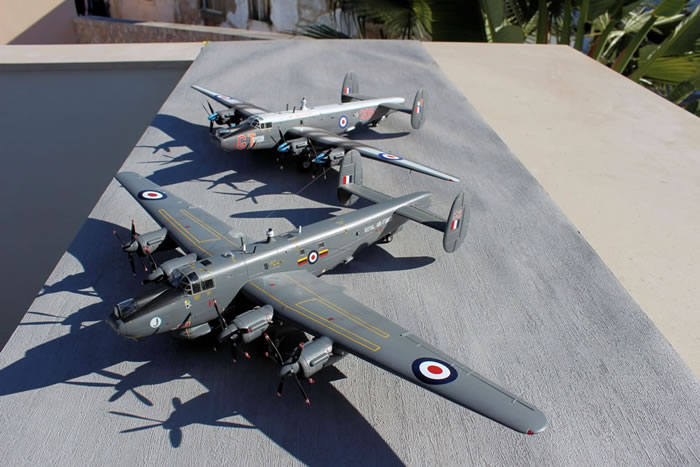
So, overall, a great kit with only a few flaws, none fatal. When finished, it looks superb; exactly right. Of course, it’s big; bigger than a Lancaster, so you’ll need room on your shelf…especially if you build the Revell AEW2 as well…
Revell
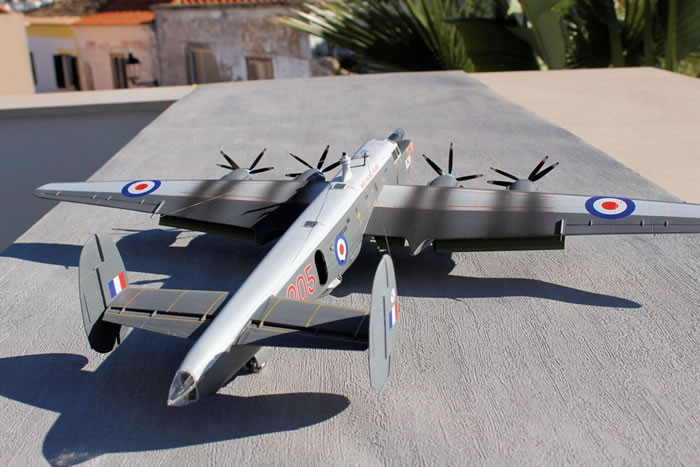
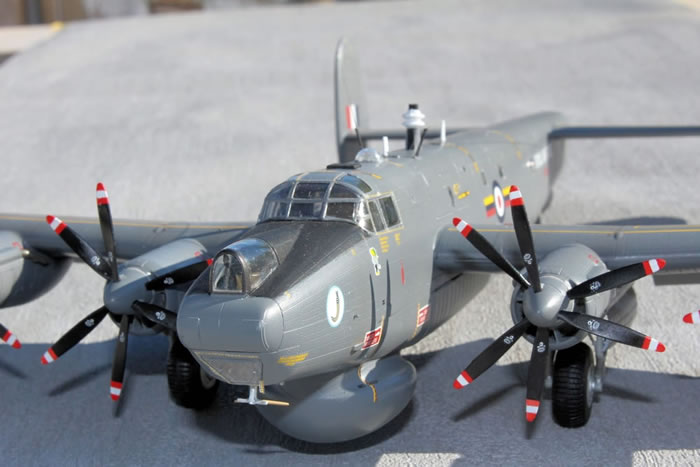
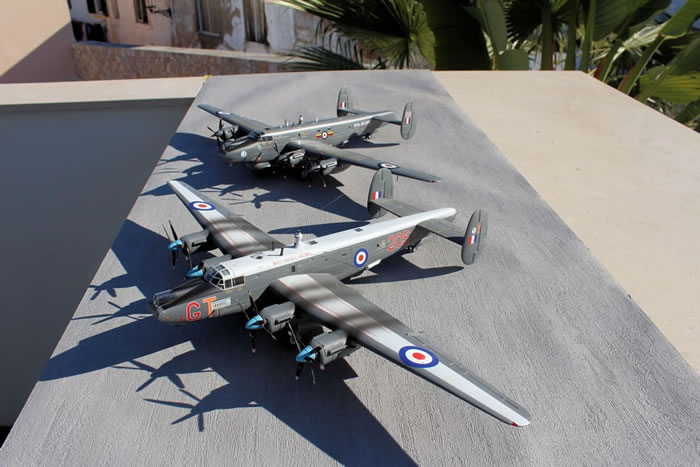
…and on that subject, I’m so glad that Revell decided to make an AEW2 rather than another MR2; maybe they spoke to each other and decided not to duplicate efforts. The kit comes in one of those cheapskate end-opening box that we all know and love so much. However, the instructions (in colour) are massively improved from what we are used to; it looks as if they might actually be useful! The next thing you notice is that Revell have made a good attempt at showing the rivets that covered this aircraft; they’re not over-done but look more realistic than the smooth Airfix surfaces. The next thing is that the fuselage is split between front and rear which might suggest a new MR3 sometime in the future although the wings are definitely MR2 (the MR3 had different outer wing panels and tip tanks). The moulding gates are much larger (long and thin) than I am used to so there is more work required in cleaning up the parts and there is some flash. I was pleased to see that the markings include WL756 which was used by 205 Squadron when I was in Singapore as ‘C’; naturally, I had to make this one.
Revell haven’t bothered to add cabin detail that cannot be seen, so you have a cockpit, nose observer position and rear cabin which can be seen if the fuselage door is open. Seat belts and instrument panel are provided as decals which is fine for this scale, given that little can be seen inside the cockpit anyway. The transparencies are installed from the inside (on the Airfix kit they are all fitted from the outside - preferable) which means danger of getting dust on the insides and the need for careful masking. This kit doesn’t have the shade under the canopy roof as on the Airfix kit but I think this correct for aircraft that were based in UK and flew in the less sunny skies of the North Atlantic. Incidentally, I’ve seen some models made with this central window above the cockpit painted dark sea grey and Revell also do this in their painting instructions. Some photos show that this was glazed, not painted, others show it grey so yer takes yer pick. I guess Revell were able to crawl over the AEW2 in Manchester so I’ll give them the benefit of the doubt. The MR3 was different and it was painted as an emergency exit. I removed the bulged fairing (mentioned in the Airfix review) below the cockpit on the port side as this was not there to the AEW2.
I noticed that Revell have put the rear skylight on the centreline whereas Airfix have offset it to starboard. Photos I’ve seen of the AEW2 show that it is not there at all and the painting instructions indicate that it should be Dark Sea Grey. Whilst looking at the photos, I noticed two new white blade antennae on the top of the fuselage which don’t appear in the Revell kit.
All of the control surfaces are movable (but not the flaps) but I glued them in place as I don’t like gimmicks and they tend to flop around. The assembly is relatively trouble-free and it all goes together well. There are a few slight gaps such as between the tailplanes and fuselage but nothing that a little brushed primer cannot fill. The fit of the wings to the fuselage is very snug once you’ve slightly opened up the slots in the fuselage to accept the tongues in the wing roots. The fit of the nacelles is much easier and better than in the Airfix kit, although as they fit into rebates in the lower wing surface a little primer brush-painted along the joints will be necessary to conceal the slight gap. I use old, partially-evaporated Alclad grey primer for this. Gunze Sangyo make Mr Surfacer which is similar in its thicker version.
The instructions will have you install the undercarriage at this stage but don’t unless you want a difficult masking job; it can be installed during final assembly. In order to get the bomb bay doors to fit closed, you need to cut off the mounting tags as the default pose is with the doors open, though there is nothing to see inside the bomb bay. Maybe you could use the torpedoes from the Airfix Shackleton. Looking at the bomb bay parts, I’m pretty sure that this model started life as an MR2 and was hastily converted to the AEW2 to avoid a market clash with the Airfix kit. An observation for Revell: if the doors are fitted closed, with the tags removed, they need formers inside to hold them at the correct position before assembling to the fuselage; it’s very easy to get this wrong as the only joint is along the seams with no locating pins for guidance. The little sniffer pods (or whatever they are…) on the lower part of the rear fuselage don’t fit the holes provided, so it’s best to fill the holes, trial fit, remove the pins and do it yourself. Incidentally, Airfix has these as different sizes whereas Revell doesn’t. I don’t know which is correct.
The only real buggeration I have so far found on this kit is that you cannot install the propellers at the end as you can with the Airfix kit. The rear propeller has a bush that must be inserted into the nacelle front, so you need to paint the props and nacelle front, assemble them, then install them onto the already painted model (unless you want a really difficult masking job). This is the first example of lack of thought in this kit. Fortunately, these assemblies are a good fit which is just as well as it’s not easy to sort out joints on a model that has already been painted. Come on, Revell! You could have avoided this so easily.
Painting the props is a bit involved as Revell don’t provide the red-and-white tips as decals. I spray these as brush painting them is rarely successful. First spray the props white. Mask off the little white stripes then spray the tips red. For this kind of masking, I use Maketar’s new Canopy Survival Kit (https://www.hannants.co.uk/product/MMS014K) which I recommend as it’s enormous and covers every shape and size imaginable; in this case, nice narrow strips. Then mask off the red-and-white tips and spray the props black. Then spray the spinners and nacelle fronts Dark Sea Grey. Remove the masking and hope there’s no bleed; there always is, of course. Assemble. A word of warning here; the front props and rear props are slightly different although you can’t easily tell which is which when they are off the sprue for painting. If you get the wrong ones in the right place, you’ll find that the assembly won’t fit together properly, although you can make them fit with a little trimming. My recommendation is to keep the front and rear props separate and you won’t have a problem. You’re meant to melt the tip of the prop shaft to retain the props but I simply pushed everything together without glue. Add the prop blade decals and you’re done.
The overall colour scheme couldn’t be simpler as it’s all one colour, Dark Sea Grey (I used Tamiya’s XF-54), with a black anti-dazzle panel. I masked the glazing with Kabuki tape cut with a sharp scalpel as I wasn’t sure whether the Eduard masks, intended for the Airfix kit, would fit this one. Eduard now make a set for the Revell kit but at £10.99 it is quite expensive. Once sprayed, the model must be glossed to take the decals. It’s up to you how glossy you make the aircraft. The example in Manchester’s Air and Space Hall of the Museum of Science and Industry is very shiny, but then I think it had been resprayed for display. Photos of the aircraft in service show them to be less glossy but they all have a good sheen and were definitely not matt, although the anti-dazzle panel is. I did mine with a Tamiya rattle can semi-gloss. A little exhaust staining was provided over the wing by some Humbrol ‘smoke’ weathering powder.
The decals are very nice and were no problem at all but I cut up the long wing-walk markings as it seemed like too much of a risk to try getting them into place all in one go as there’s minimal carrier film. Having said that, the decals are relatively thick so hold their shape well. There was a little silvering so you need to make sure that the aircraft is nice and glossy before applying the decals. You end up with a few spares; I’m not sure where they were meant to go!
The undercarriage is fairly simple and installs well. The main wheels are not weighted (Airfix wheels are) and have a really heavy tread but under a coat of black, they look OK. You need to check your photo references for the aerials because Revell don’t provide the blade aerials for the upper fuselage (though the rebates are there) and the ones fitted under the rear fuselage are too large. It’s possible that aerials changed with role and time in any case. There should also be some yellow aerials above and below the outer wings.
So, which was best? Well, there’s very little to choose between the two, although my preference is for the Revell one as I like the subtle rivet detail which is more realistic for this aircraft and this detail is evident, even from a distance. If you want an early Shackleton with the turret, go for Airfix. If you want an AEW2 then Revell is the only choice.
For the best MR2, you might want to think about a kitbash between the two, getting the rivet detail and the MR2 bomb bay but it would be an expensive exercise. In terms of price, the Airfix offering is £45 from Hannants whereas the Revell model is £37, so both are good value.
In summary, I can strongly recommend both kits; neither is completely perfect but each results in an attractive model that is a real attention grabber.
Model, Images and Text
Copyright ©
2016 by Roger Hardy
Page Created 28 December, 2016
Last Updated
28 December, 2016
Back to HyperScale Main Page
|
 Home
| What's New | Features | Gallery | Reviews | Reference | Resource Guides | Forum |
Home
| What's New | Features | Gallery | Reviews | Reference | Resource Guides | Forum |