Trumpeter's 1/48 scale
Convair F-106B Delta Dart
by David W. Aungst
|
Convair F-106B Delta Dart |

Tamiya's 1/48 scale F-14A Tomcat is available online from Squadron for only $91.99!
For most aircraft, I like the two-seat version better than the single-seat version. This includes the F-106. I think I just like seeing more glass around the cockpit area. Or, maybe it is subliminal in that the only way I would ever get a ride is in the two-seat aircraft. For whatever the reason, two-seat versions of most aircraft is what I like.
The markings for this project come from an ancient MicroScale (before they were SuperScale) decal sheet. Back when Monogram released their 1/48th scale F-106A kit (about 1983), MicroScale released a couple decal sheets. Even though the Monogram kit was only a single-seat F-106A, one of the MicroScale decal sheets had decals for a two-seat F-106B. I really like the markings, and squirreled off a decal sheet in my decal stash for "someday" if I tackled an F-106B conversion.
I had forgotten I even had this decal sheet in the stash. When I picked up the new Trumpeter F-106B kit, I was aiming to build a different set of markings, up until I did a scan of my decal stash and found this ancient decal sheet still waiting for me to build an F-106B. The decal sheet seemed to be in good shape, even with it being over 30 years old. I hoped the decals would not explode when they hit water and started building the model to use them.
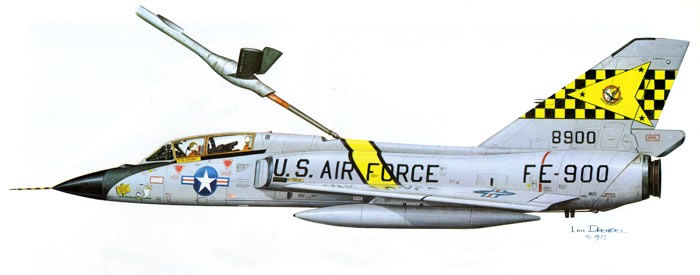
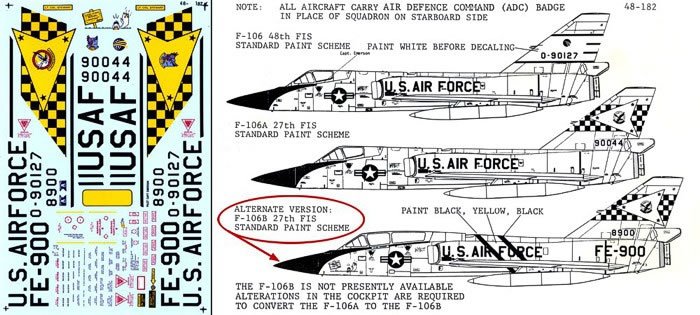
The following image is a scanned artwork from the center spread of the old F-106 Delta Dart in Action book by Don Carson (Squadron Publishing, © 1974, ISBN 0-89747-014-1). The artwork is done by renowned aviation artist Lou Drendel. The MicroScale decal instructions name this art for further information on the markings. Ironically, the artwork caption names the decals for further information, so there is not much more beyond what is seen in this artwork to help with the aircraft or its markings.
The Kit
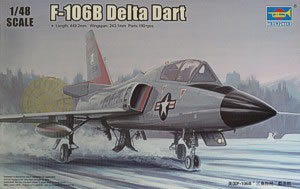 This is the recently released 1/48th scale Trumpeter F-106B Delta Dart kit. This is the recently released 1/48th scale Trumpeter F-106B Delta Dart kit.
The Trumpeter kit has very nicely engraved details. The cockpit is basic, but adequate, right out of the box. The ejection seats seem a bit too "clunky" looking for my taste. I clipped and dry-fitted the major airframe parts on the first night I owned the kit. All the major pieces fit together quite nicely, including the under-wing seam that turns into just a panel line when fitting the wings together.
Monogram has had a 1/48th scale F-106A Delta Dart kit for decades, and it is really not a bad kit. I could not help pulling out the old Monogram F-106A kit I have had in the stash and making some comparisons. What follows is a description of the Trumpeter kit as it compares to the Monogram kit.
Trumpeter and Monogram do not really have big difference (except for the single-seat and two-seat cockpits). Monogram is raised scribing (which bothers some modelers) while Trumpeter is engraved, but both kits have very petite and fine scribing. The two kits are close enough to the same size (and hence the same scale) to not be any worry. The airframe breakdown differs between them. Monogram does a three-way left/right/bottom split on the fuselage. This complicates dry-fitting the Monogram kit. Trumpeter does a left/right only, with only the wings coming up from the bottom. It is easier to dry-fit this and know things are fitting.
Both kits have well detailed wheel wells. Trumpeter improved on the Monogram kit by making the main wheel well door actuators as separate parts. This allows us modelers to build and paint the whole airframe, then add the landing gear. Monogram has these actuators molded as part of the wheel well, so they are hanging out and begging to be broken off while working on the rest of the kit.
Both kits also have well detailed weapons bays. Trumpeter did get the two-seat F-106B features of the weapons bay correct. Both kits provide the same weapons load of Falcon missiles and a Genie nuclear rocket. The Trumpeter kit actually has some extras in the weapons. The Genie rocket is provided on a "common" tree that had two sprues in the kit, so they provide two Genies, but the F-106 only can carry one. Also, the kit provides four IR seeking Falcons and two radar-homing Falcons. The F-106 only carries four Falcons, so you can mix and match them to vary the weapons load.
The parts breakdown of the Falcon missiles is better in the Trumpeter kit. They build up easier into the missiles without having to deal with hard-to-reach seams along some of the missile fins. The Falcons in the Monogram kit are difficult to build without seams running the length of the missile fins. Both kits have different ways to build the Genie rocket, too, but they both capture the rocket's details adequately.
The wing flaps in the Monogram kit are molded in the drooped position with no choice to reposition them without kit surgery. Trumpeter has the wing flaps as separate items with kit options to pose them as either drooped or in the neutral position. On the topic of the wings, both kits provide the longer supersonic wing fuel tanks. While Monogram molds the pylons as part of the tanks, Trumpeter molds the pylons separate. This allows for the inclusion of other ordnance loads. Although, F-106's carried very little other than the fuel tanks.
One construction issue on the Monogram kit is the way they handled the vertical tail. It is hard to build the kit without having to sand off all the detailing on the right side of the tail due to where Monogram chose to place the seam when they broke down the kit parts. Trumpeter is better on this with the seam located in a place that does not damage the scribing to fill it. Now, the Trumpeter kit does have the vertical tail as a separate item, making seams at its base, while Monogram molds the tail as part of the fuselage halves (no seam). But, the Trumpeter tail does fit good on top of the fuselage with only a little care in the construction.
Rounding out the Trumpeter kit, there is a small etched metal fret with harnesses for the ejection seats and a few minor airframe details. One of these etched metal details is the bracket that holds the rear cockpit radar scope into the canopy frame. This piece requires some careful bending to make it cradle the radar scope and fit the space between the canopy rails. Monogram has no etched metal pieces in the basic kit. There is also no comparison on the radar scope bracket because the Monogram kit is a single-seat aircraft, only.
The Trumpeter kit provides two sets of decal markings. While the instructions do not provide any dates for the markings, both are later aircraft from after the F-106 was relegated to the Air National Guard. A fair selection of airframe data is also provided in the decals.
The Cockpit
As with most aircraft kits, the construction starts in the cockpit. Trumpeter provides enough details to make the cockpit look OK. There are molded lines on the inside of the fuselage to provide cockpit sidewall details. It is all just flat, though. Some after-market resin would probably look better and make it more 3D. That can wait for the next build. I just painted up the molded details and moved on.
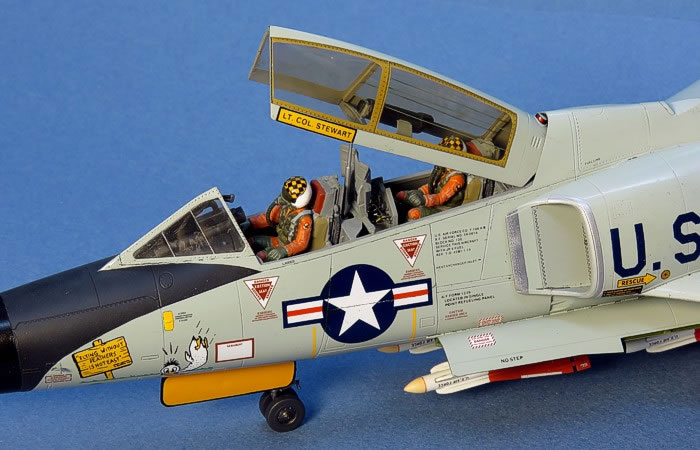
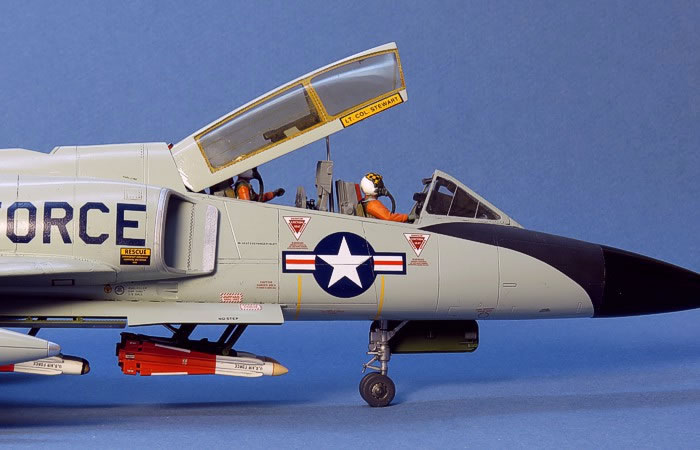
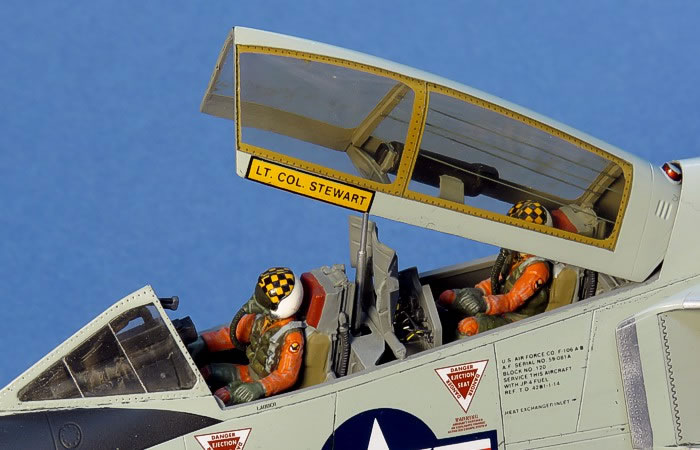
There are some interesting details of the F-106B cockpit that Trumpeter did well on. On the real aircraft, the rear cockpit radar scope mounts into the canopy. There is also a shroud over the rear instrument panel that lifts up when the canopy is open. Trumpeter provides all these details with alternate options for opening or closing the canopy. I wanted the canopy open on my model, so those were the options I chose to build.
One significant thing to note on the cockpits, Trumpeter only provides the "round eye" instruments for the cockpits. All F-106's underwent a change to their main instrument panels that introduced "tape style" instruments in place of the round ones. This improved the pilot's ability to operate at night and in adverse weather. To stay true to the only instrument panels provided in the kit, it is necessary to only build an aircraft from the early 1960s. Of course, most people will not know this difference if a modeler chooses to build a later time period with these instrument panels.
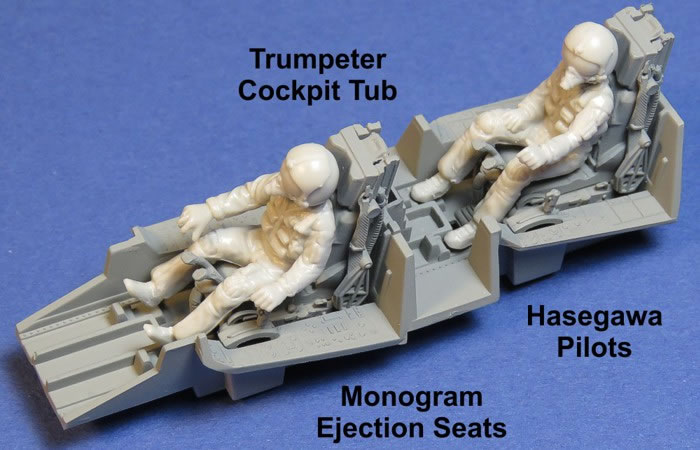
The ejection seats are a bit lacking. They are missing some prominent details and are "clunky" looking. The etched metal seat harnesses dress them up a little, but not enough for my taste. I had a couple extra Monogram F-106 ejection seats in my spare parts bin. I decided to use those in this Trumpeter kit.
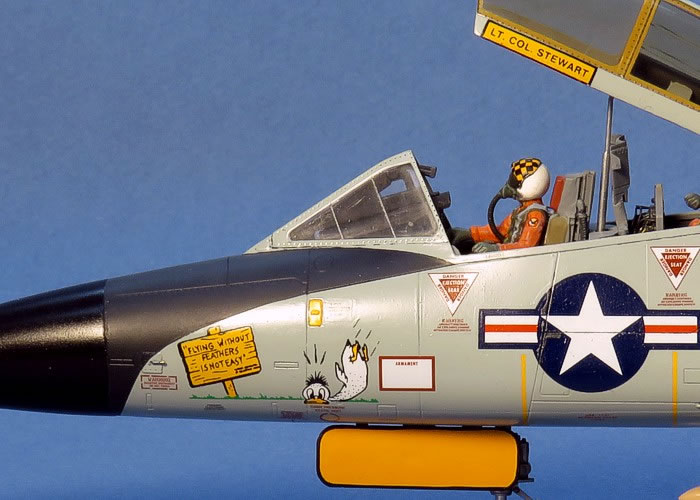
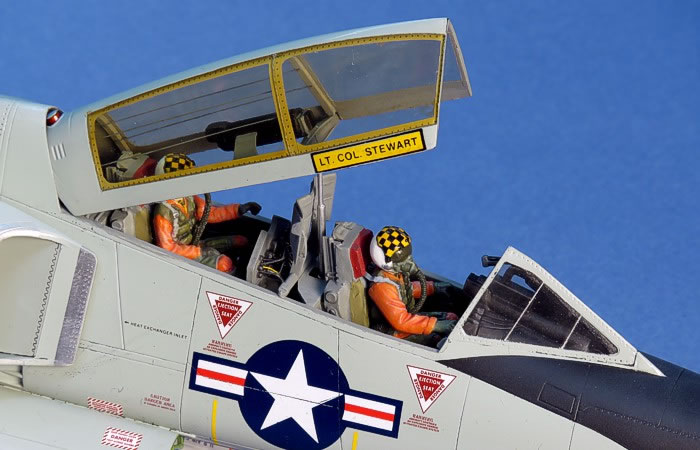
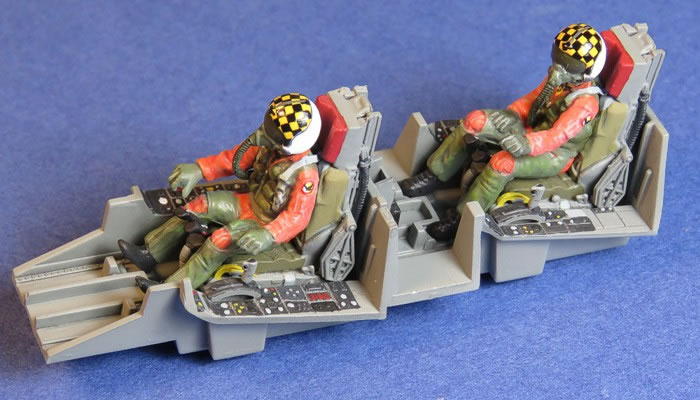
To further fill up the cockpits, I decided to include pilot figures. So, I went out into my spare parts bin and grabbed a couple Hasegawa Phantom pilots and modified them to fit into the cockpits. Their flight gear looks close enough, and Hasegawa is nice in that the two pilots are in different poses. To add more color in the cockpits, I planned to have the pilots in orange flight suits. I added Waldron Oxygen hose to the figures after they were painted.
Cockpit, Ready for Paint
After I took the above picture and started painting the cockpit components, I realized the seat harnesses hanging at the sides of the seats needed to be removed. Since the pilots were "strapped in", the harnesses needed to be attached to the pilots, not just hanging at the sides. Oh well.
Unless you build the Montana ANG, the F-106 cockpit is D.Gull Gray (F.S.36231). The details are like other modern fighter cockpits with black instruments and other details picked off in gray, silver, red, and yellow.
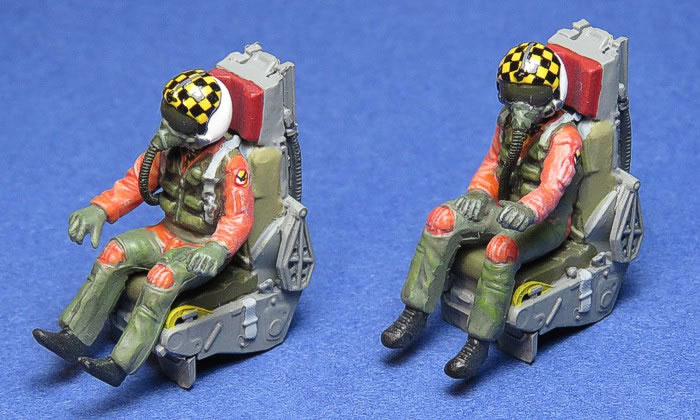
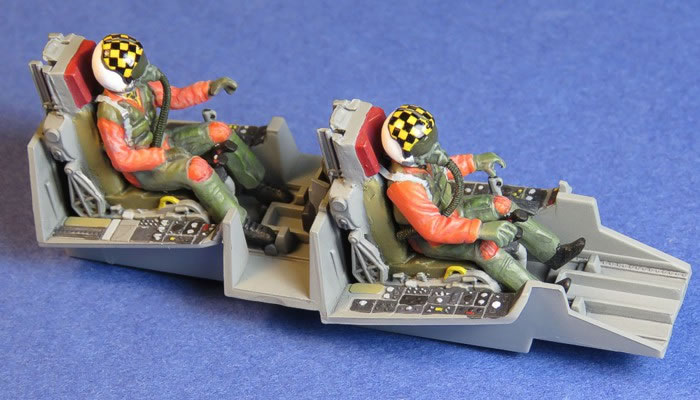
The pilots and seats came together quite nicely.
Some notes on the pilots:
-
They are Hasegawa F-4 Phantom II kit pilots. They conveniently come in two poses so they are not identical.
-
All paints are Model Master enamel paints. All are hand brush painted (no air brushing here).
-
The unit badges on the left shoulders are hand painted.
-
The visor checkers are decals. I used 1/72nd scale F-15 fin flashes for the 57th FWW and pieced the checkers together, a stripe at a time. It took some “play” to get them to all fit the rounded contour of the visor covers.
-
I added lead foil shoulder harnesses to attach the pilots to the seats. I considered the lap belts on the lower seat sides, but decided they would not be visible after the cockpit is wrapped inside the F-106 fuselage.
-
The oxygen hoses are Waldron product. I don’t know if these still are available, but they look the part more than a wrapped wire does (IMHO).
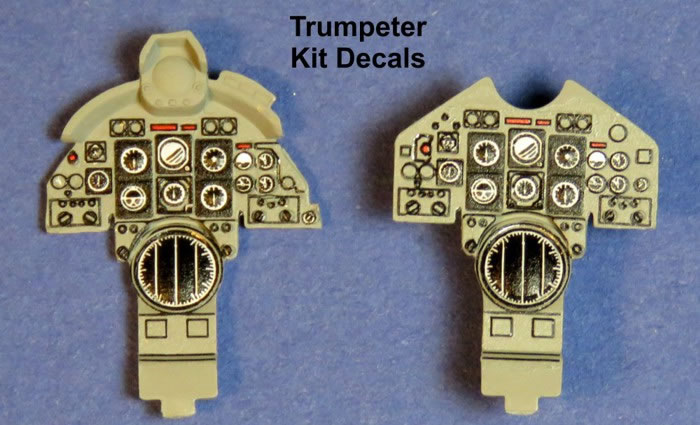
I tried something out of my usual for the main instrument panels – I used the kit decals. Normally I just paint all the instruments. But the main panels are tedious, working with a 10/0 brush with half the bristles removed, trying not to breathe too hard as I paint each instrument. I decided to "cheat".
The panels are pretty accurate for the "round-eye" instruments of the early F-106 cockpits. The decals appeared to be properly sized to fit the molded details, and they did fit, perfectly. I painted the overall panels in D.Gull Gray (F.S.36231), then applied a lot of Solv-a-set with the decals and they snuggled down into all the details. This was a lot easier than the normal detail painting I do on my instrument panels. The picture shows the panels, waiting for me to paint the rest of the details, like the upper radar scope on the forward panel.
Main Instrument Panels with Decals
Now, the kit decals for the side panels were a different story. Trumpeter printed then in "negative" of what they should be - they are black where they should be clear and clear where they should be black. So, I still had to paint the side consoles, but that is not so bad.
Side Instrument Panels, Painted
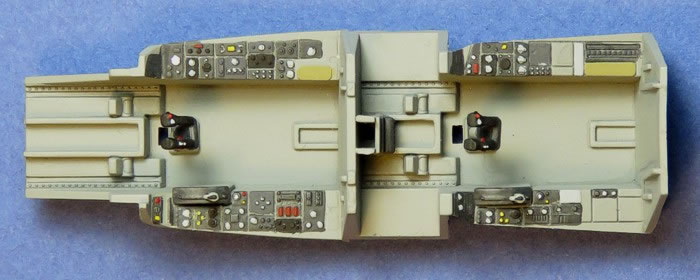
Bringing it all together, this is the look of the completed cockpit before it got locked into the fuselage. There are about eight hours of work for constructing and painting this assembly.
Wheel Wells
Trumpeter provides nicely molded wheel wells. All I needed to do was paint them up. I did acquire the AiRes wheel wells for the kit, but they were not substantially better than the kit parts, so I saved them for a later build and maintained the kit wheel wells on this model.
In the image you can see the RAT door and the lower beacon door are closed. I was not really wanting to open these doors, even though they typically are open on the ground during pre- and post-flight. When I decided to have pilots in the cockpits, that meant the aircraft was already though pre-flight and the engine is running. At that point, these doors are closed. So, I was able to close them ... {smile}.
While Trumpeter did make the nose landing gear strut integral to the nose wheel well, they molded the leg in segments that allow the upper strut to be built into the well, then add the lower strut at the end of the construction. It only requires making sure that strut assembles cleanly before the time it is attached, and making a clean attachment when the time comes. To add strength, I drilled and pinned the nose strut with brass wire to ensure it would not break off while living on my display shelves.
The landing gear strut colors were up for grabs a little. The original color of the struts appears to have been silver. In the middle 1970s, the specs changed and the struts started to be painted white. By the early 1980s, most all the struts were white. With this being the case, and the markings I settled on are for the 1960s, I went with silver struts on my model. In all cases, the wheel wells were interior green throughout the life of the F-106.
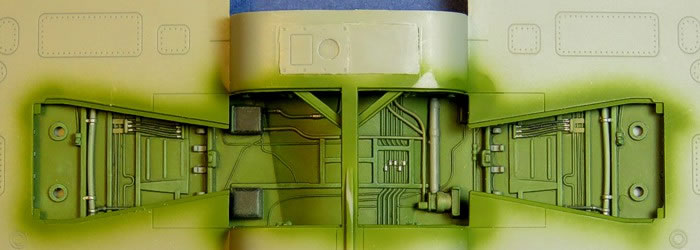
The Weapons Bay
This was the part that made me decide to do a combat aircraft for my markings choice. The B-1 Chase aircraft I had originally been considering would never be armed, and I wanted to open and display the weapons bay full of missiles. The weapons bay is very well molded and looks nice, right out of the box. Trumpeter provides all the proper differences in the bay that come with the two-seat aircraft.
-
To make room in the airframe to fit the second cockpit, they moved some of the electronics into a boxed-off forward section of the weapons bay. The Trumpeter piece for this boxed-off portion of the bay fits really nicely.
-
The electronics box necessitated changing the forward Falcon missile trapeze launchers to individual trapeze units. On the single-seat aircraft, the forward missiles are mounted to a single forward unit where both missiles are dropped and raised together.
-
The electronics box changes the weapons bay doors, making the inner two doors shorter and adding small fairings on the outer doors to close up the gap around the electronics box.
One note about the two-seat F-106B weapons bay - the Genie rocket can still be carried and launched by the two-seat F-106B. Check your references before hanging this rocket in the bay, though. The Air Force stopped carrying the Genie rockets in the early 1970s. Thus, to hang the Genie, the model needs to be finished in markings appropriate for the 1960s and early 1970s.
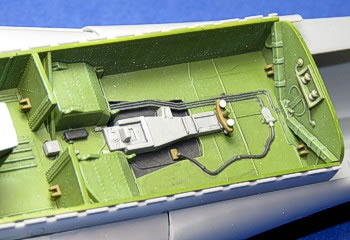
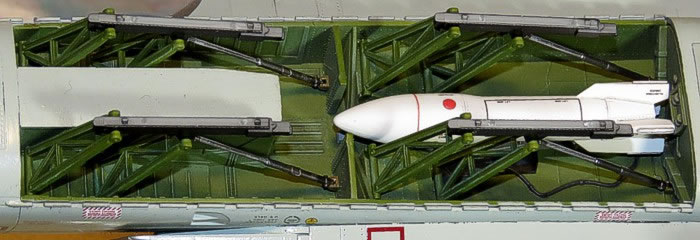
Below is the painted weapons bay. Most of what is seen below is hidden when the Falcon missiles and Genie rocket are added to the bay. What the weapons do not hide will be further hidden when the bay doors are added to either side of the bay. The gray shackle in the rear bay is the mount for the Genie rocket. The trapeses for the Falcon missiles are not yet added. They attach to points at the front and at the middle of the bay.
Empty Weapons Bay
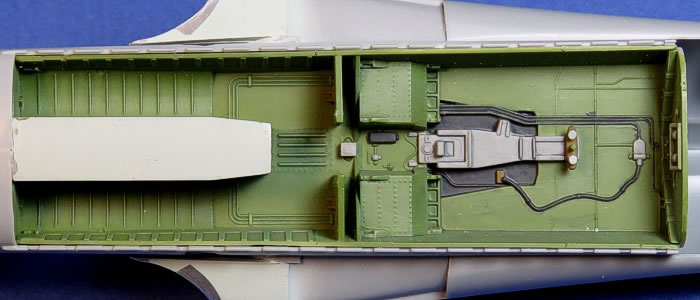
 This is a different angle with a better view of the rear portion of the weapons bay. I did some detail painting in here, but I did not get too crazy with it. This is a different angle with a better view of the rear portion of the weapons bay. I did some detail painting in here, but I did not get too crazy with it.
The view of this area on the completed model will be quite limited.
The nice surface detailing seen here was the reason I chose to do a combat aircraft so I could open the weapons bay and show this off (what parts of it are still visible after I load the weapons into the bay).
Engine Exhaust
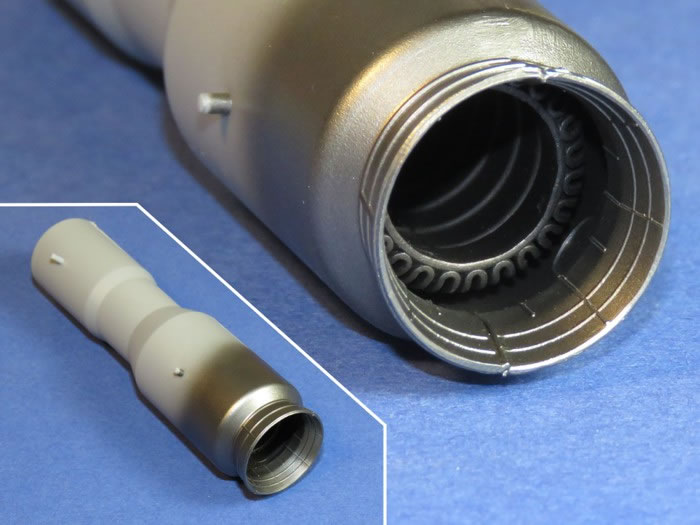
Trumpeter provides a rather elaborate engine exhaust. It builds up easy enough, but it is massively deep. The inside afterburner pipe is 12 scale feet deep. I have no clue if that is accurate, but painted up in burnt iron and dark metalizer paints the whole area is just a "black hole", so I am not going to argue about it. I used 0.005” brass wire to replicate the raised scribing seen elsewhere on the engine exhaust and cover over the seams where the exhaust halves come together. They look a bit thick, but they are better than the depressed seam that was there.
The Airframe
With all the interior items completed (cockpit, wheel wells, weapons bay, and engine exhaust), I could finally start the assembly the airframe. The initial fuselage assembly went easily. With only a little care and trimming before adding glue, I needed no filler on the fuselage.
I chose not to glue any of the interior portions into place. The locations of the cockpit, weapons bay, and engine exhaust are positive enough inside the fuselage to just let them sit in place when closing the fuselage around them. This way, the pieces were "floating" in place and can be pushed around if needed. I have had a number of times in the past where I securely glued something like the cockpit into one half of the fuselage, only to find it is off a tad for aligning to other things.
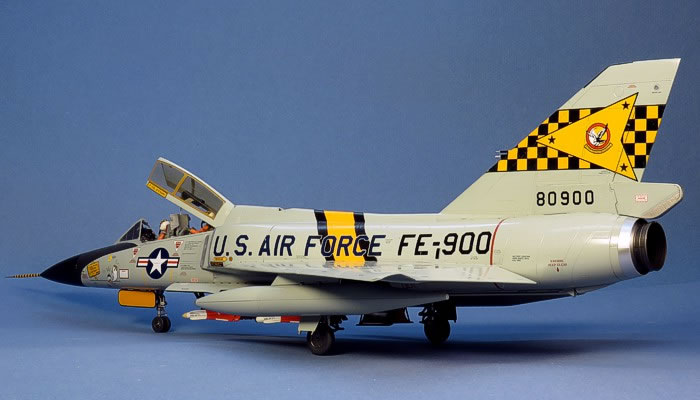
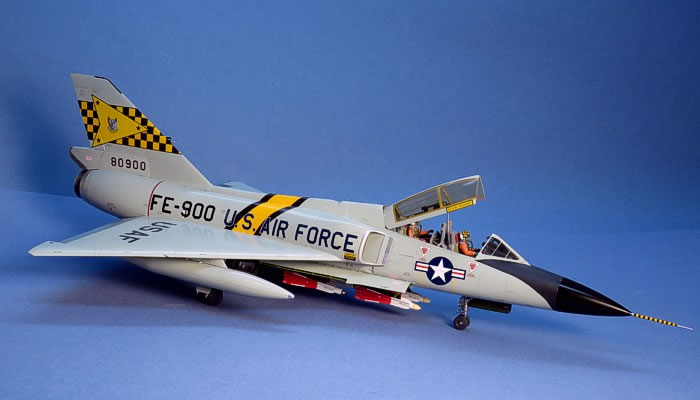
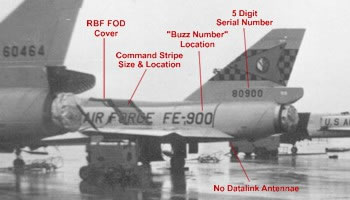
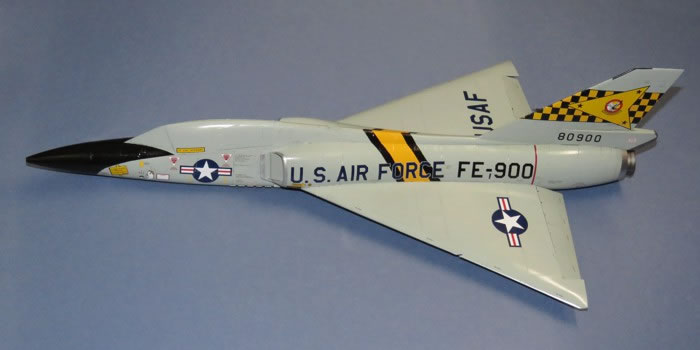
Before I could complete the airframe assembly, there were modifications to be made. The decals I chose for the 27th FIS dictated I needed to backdate the airframe. The specific aircraft (serial number 58-0900) only served with the 27th FIS from 07 April 1960 to 24 August 1962. From what I can tell, these markings are from 1962.
The F-106 was updated with multiple upgrades and changes over the life of the airframe. The Trumpeter kit provides most all of the later updates in the kit. Since I wanted to build an F-106 from 1962, all the later modifications done to the F-106 in the 1960s and 1970s needed to be removed from the model. The artist that drew the artwork had created an F-106 as it would have looked in the early 1970s (when the book was published), not the early 1960s when this airframe wore these markings. So minimally, the following changes needed to be made:
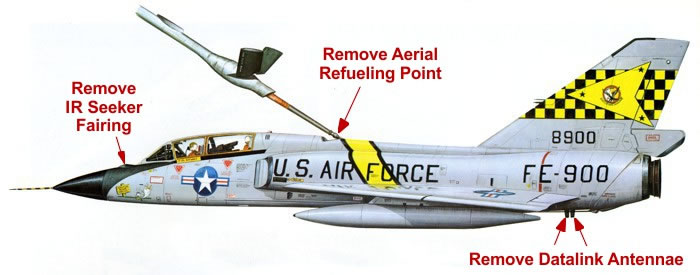
Less obvious, but correctly done in the artwork, there are no blade antennae under the forward fuselage. The last item, also not really exposed in the artwork is that the rotating beacon lights were the retractable type. All this meant to the model is that the lights had a fuselage colored tops, not just an all clear red lens.
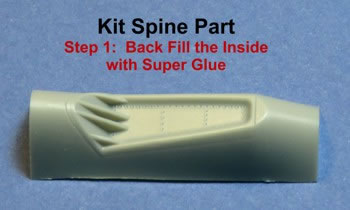
Trumpeter does not provide a spine without the aerial refueling receptacle. However, the refueling receptacle is provided in a separate part of the spine. So I just needed to change this piece to remove the refueling receptacle.
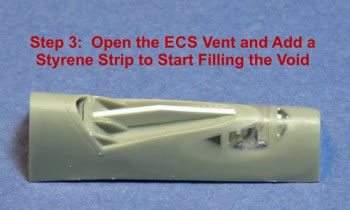
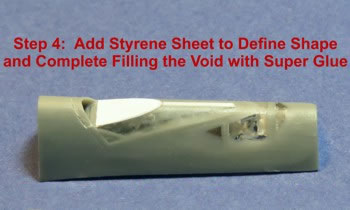
There is still an ECS vent present on the spine. So, it is not just a smooth spine. I originally considered making a scratch-built spine replacement, but the shape of the spine piece is subtle and complex. I decided to just go for it and update the kit's spine piece rather than trying to duplicate the subtle shape variations of the kit's piece.
 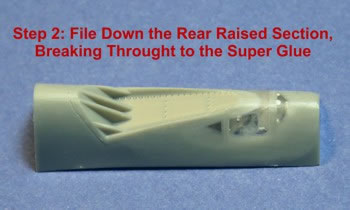
The removal of the IR sensor fairing on top of the nose was simple. I waited for the fuselage to be glued together, then filed the fairing off. It broke through to the interior in doing this, so I added a backing piece from the inside (while the nose cone was still not attached) and filled the hole with super glue. After it set up, I filed it all smooth.
The blade antennae were also not difficult to handle. Trumpeter has each blade antenna molded to a base. The base fits into a depression molded where the blade antenna goes. To fill those depressions, I attached the blade antennae, then clipped them off the actual blades. A little filing and sanding smoothed out the areas - no depressions.
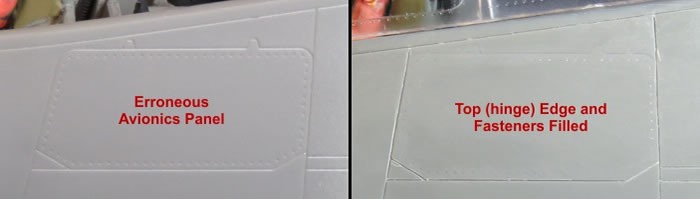
Because they were doing the same molds to make both an F-106A and F-106B kit, Trumpeter molded some erroneous panel lines on the nose. The first is the avionics panel on the sides of the fuselage, below the cockpit. This is the proper location on a single-seat F-106A. But, for the two-seat F-106B, this area is the rear cockpit. So, the avionics were moved elsewhere in the airframe, much of it relocated to the boxed-in portion at the front of the weapons bay. I used super glue and filled the upper panel line (hinge line) and all the fasteners that line the edges of the panel.
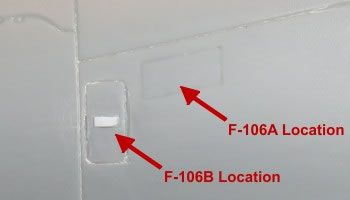 As long as I was correcting panel lines on the forward fuselage, I also changed the canopy control panel. As long as I was correcting panel lines on the forward fuselage, I also changed the canopy control panel.
The F-106A and F-106B do not have the same canopy control panel location or shape.
The Trumpeter kit molds the F-106A control panel on the F-106B fuselage. It was an easy fix.
As a slightly raised detail, I also added the lever that opens the panel using from 0.005" styrene strip. See the image to the right.
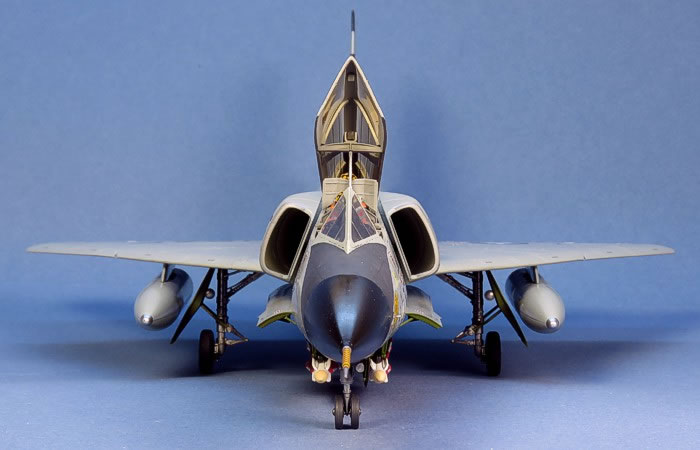
I pre-painted the engine intakes before assembling them. It took some searching to find the interior color of the intakes. I don’t know if they changed colors over time, but the pictures in my personal photo vault showed white intake interiors, starting just behind the "vents" on the inner side. The exterior color wraps into the forward sections of the intakes. The intake outer lip is polished metal, inside and out.
The Trumpeter kit does not provide full intake trunks, so I had to do some simulation. The black shading on the back "wall" of the intake is done by air brush. It gives a rather convincing impression of depth when viewed from looking in the front of the intakes.
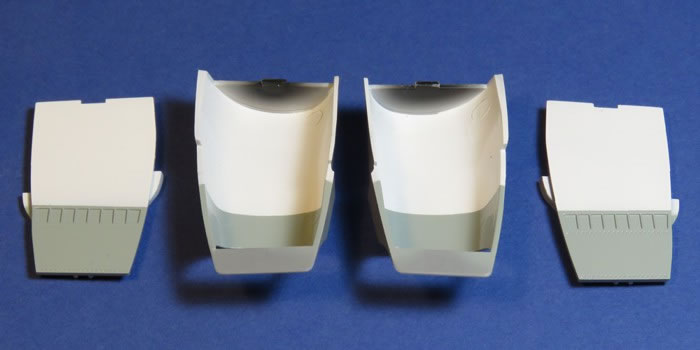
Painted Intake Interiors
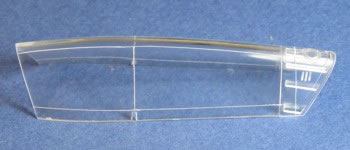
The Canopy
Something did not look right to me when looking at the kit-molded canopy. After studying pictures of real F-106B canopies and comparing them to the kit canopy, I figured out the problem. The frames were not molded correctly. There should have been gray painted frames at the top peak and bottom edges. The areas molded as frames (with lots of rivet details) are actually inner frames, not outer frames on the real F-106B canopy. Specifically, the "frame" in the middle of each side of the canopy window is just a break in the two transparencies that are attached to an inner frame.
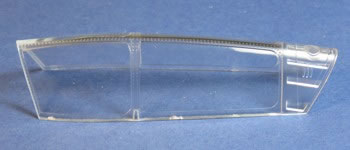 Kit Canopy Kit Canopy
 Frames Filed Off Frames Filed Off
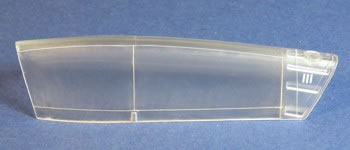 Canopy Sanded with 1000 Grit Paper Canopy Sanded with 1000 Grit Paper
 Canopy Polished back to Clear Canopy Polished back to Clear
|
There was no fix to this other then sanding off the kit molded canopy frames and re-scribing new frames. The overall shape of the canopy was fine. It was just the frames that needed to be changed. The images to the left show the progression.
I used the existing kit frames to help determine the proper placement of the panel lines for the canopy. I scribed these in pretty deep since I knew I was going to be filing and sanding the whole canopy.
With the panel lines scribed, I used an X-acto file to file away all the kit-molded frames. Since Trumpeter molded the frame edges higher than the canopy surfaces, it was easy to remove them without changing the surface contours.
After I filed off the kit-molded frames, I next sanded the whole canopy to even off the surfaces. I started with 240 grit and worked my way up to 1500 grit.
I completed the process by using plastic polish to bring the canopy back to being clear. This was an iterative process. I would get it back to clear, then find blemishes and re-sand the canopy to fix them, followed by more polishing. This took about four iterations to get it the way I wanted it.
Everything else that needed to be done on the canopy was inside the canopy. So, being impatient to get colors on the model, I masked the clear areas and moved on to the exterior painting. See the end of the posting where I am finishing the model to see all the details I added inside the canopy. |
I like way too many F-106 markings. It was a chore to settle on a single set of markings for this project. I was originally thinking of the B-1 Chase aircraft with the all red/orange tail. Then, I saw how nice the weapons bay looked in the kit and decided I wanted to do an armed combat aircraft. That opened the flood gates to every other unit out there. And, each unit had at least one two-seat F-106B aircraft assigned to them.
What finally settled it was details of the Trumpeter kit. The cockpit having round instruments instead of the tape instruments, along with my desire to hang a Genie rocket in the weapons bay required that I pick markings from the 1960s. Then, I found an old MicroScale sheet that I had squirreled away in my decal stash a few decades ago that included early markings for the 27 FIS from the 1960s. I liked them back when I bought them, and they were the right time period for the model I wanted to build, so that made the decision for me.
Painting
I used mainly Testors Model Master enamel paints to build this model. Any paints I discuss here that do not specifically mention their manufacture are Model Master enamels.
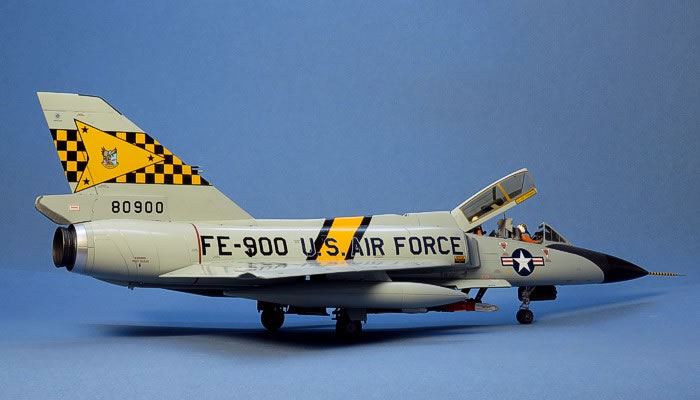
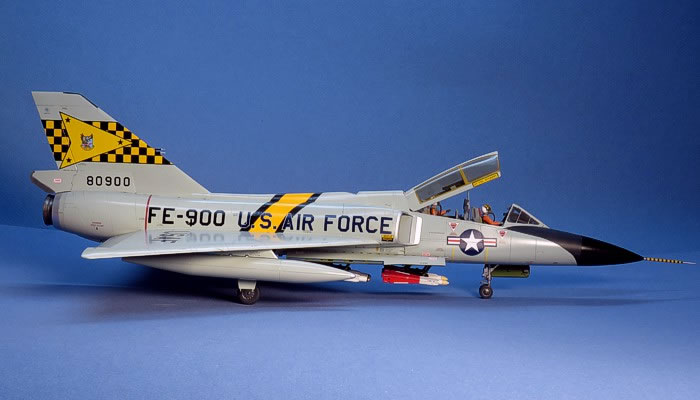
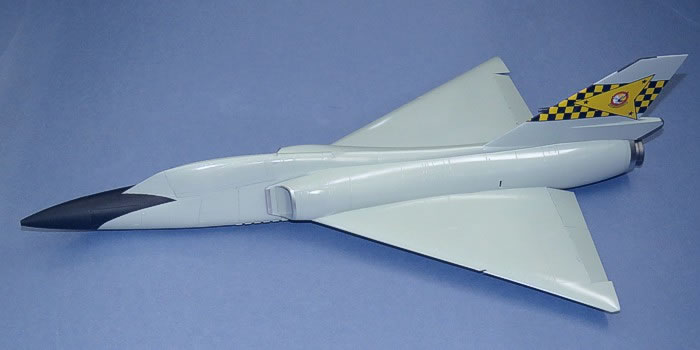
With only a few rare exceptions, all F-106s for all time periods were Aircraft Gray (F.S.16473), also known as "Air Defense Command Gray (ADC Gray)" or in some references as "Coin Gray". There are technical specifications for S.E.Asian camouflage on the F-106, but no aircraft ever got that applied. Or if one did get S.E.Asian camouflage applied, no images of it in camouflage have ever surfaced (just like the mythical camouflage B-58).
The aircraft I wanted to build was ADC Gray. This is a gloss color, so I had to take care painting the model. Gloss colors have longer drying than flat colors. I started by painting the top areas of the model. Then, I set the model aside for a few days to let the topside paint dry. When I could handle the model, again (in about three days), I painted the bottom of the model. It took another three days for the bottom to dry enough that I could handle the model.
I had already painted and needed to take care not to get paint into the wheel wells, weapons bay, and engine exhaust. I piece of paper rolled and inserted in the tail protected the engine exhaust. I used the kit's own pieces of the wheel well doors to cover the wheel wells. The doors fit well enough and had the benefit of getting the wheel well doors painted on the outside as I painted the bottom of the model. I used the "closed weapons bay doors" piece to mask over the weapons bay.
I paint with a Badger 150-IL air brush. I paint with fairly thin paints and keep the pressure down to about 12 or 13 PSI. That pretty well controls most of the paint overspray. However, I still needed to take care as I painted to direct overspray away from already painted areas so they did not "grow fur" from the overspray. I needed a smooth and clean gloss finish. For some reason, the paint took longer than usual to dry. Typically, gloss colors take 18 to 24 hours to dry for me. This took three days and still had some tack to it. I don't know why.
After the gray paint dried, I masked and painted the larger details:
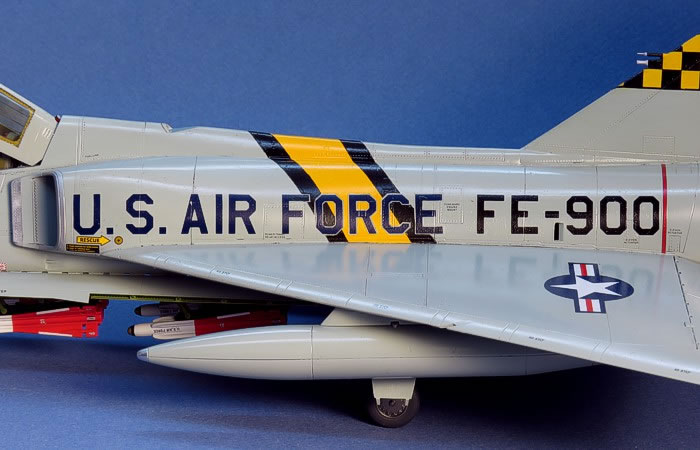
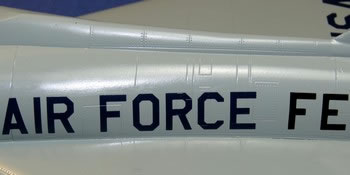
The black and yellow command stripes on the center fuselage would need to wait until I had the U.S. AIR FORCE decal in place. I needed the decal lettering to help define the correct location for the stripe.
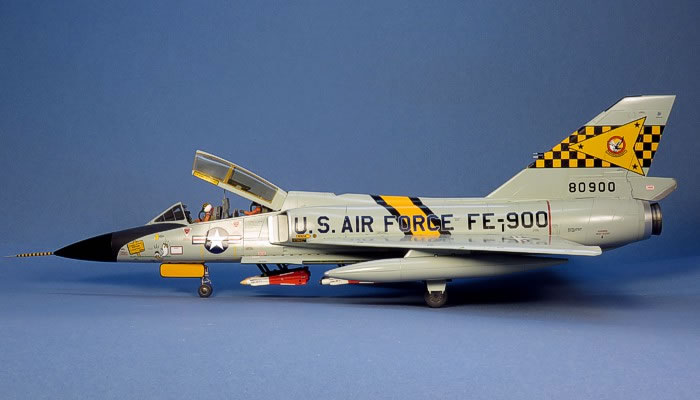
Since the paint was already a gloss finish, I was ready for decals without applying a clear gloss finish to ready the model for decals. Note, the above image already has the large tail marking in place. I had gotten impatient and painted the vertical tail earlier than the rest of the model and applied the decal so I could see what the decal looked like. I was not disappointed with this markings choice. It looked great.
Decals
Like I wrote at the previously, I had forgotten I even had this ancient MicroScale decal sheet in the stash. I was aiming to build a different set of markings, up until I decided I wanted a combat aircraft. A scan of my decal stash uncovered this decal sheet still waiting for me to build an F-106B. The decal sheet seemed to be in good shape, even with it being over 30 years old. I hoped the decals would not explode when they hit water.
Actually, I was not going to even tempt fate on the decals exploding in water. The tail flash, the art on the left side of the nose, and the pilot's name blocks were the only critical decals from the old MicroScale decal sheet that I would not be able to replace. I coated them with SuperFilm to guarantee they held together while applying them to the model. They all worked well. I used Solv-a-set as a setting solution.
I did need to make some adjustments to some of the decal locations. A couple images of the actual aircraft in the 27th FIS markings are found on the F-106 Delta Dart web site (http://www.f-106deltadart.com/). The images are only black and white. And, the images are grainy (more so after I enlarged them a bit). But, the images give good detail to the actual markings on the aircraft.
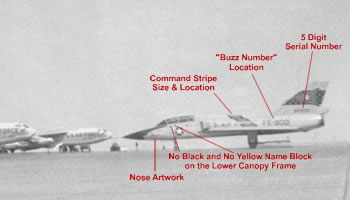 
Interpreting the images, they show the following:
-
The command stripe proportions on the decal instructions seem about right. But, the stripe crosses through the U.S. AIR FORCE titles at a different place than shown in the decal instructions. When masking the stripes for painting, I adjusted the location as needed.
-
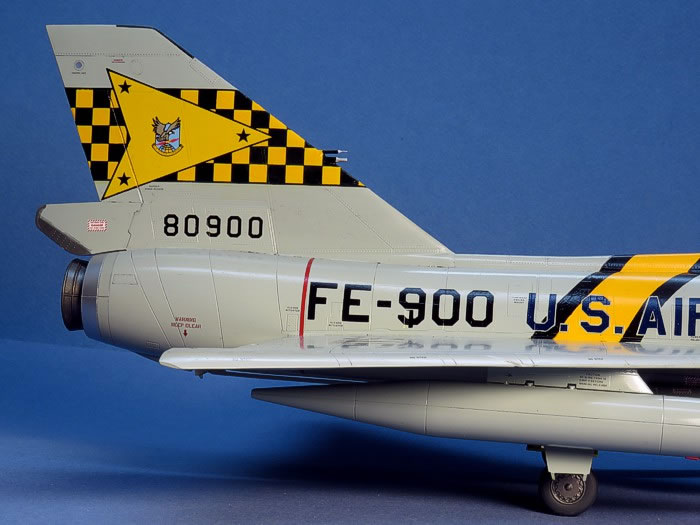
The FE-900 "buzz numbers" needed to be completely forward of the turbine warning stripe instead of having the turbine stripe cutting through the letters. I just applied the provided decal at the appropriate place, and I applied a full turbine stripe at its appropriate place.
-
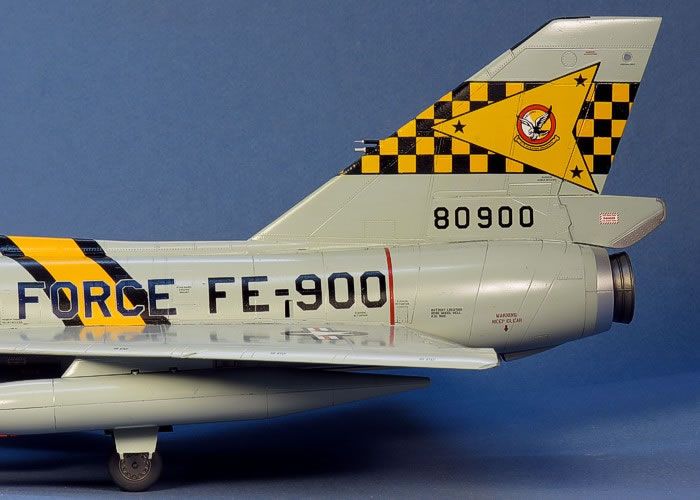
The serial numbers on the tail needed to be the "standard" five digits, 80900. MicroScale only provided four digits, 8900. There were extra numbers from alternate aircraft I did not intend to build on the MicroScale decal sheet, so I used them to insert the extra "0" into the serial numbers.
The adjustments were simple and accomplished as noted above. Other notes on the decals and markings are as follows:
-
The U.S. AIR FORCE and USAF were both black on the MicroScale decal sheet. The original specification of these markings was to be Insignia Blue, the same color found in the "star and bars" national insignia. Units re-painted the titles in black as time wore on and the airframes were maintained and re-painted. I felt that in 1962, the airframe was still pretty new and would still have the factory applied titles in the proper Insignia Blue as listed in the specifications. So, I secured different decals of the proper color from a Bare Metal / Experts Choice F-106 decal sheet. With the U.S. AIR FORCE crossing over the true black portions of the command stipes, this is a difference that would actually be visible on this model.
-
F-106s are peppered with a fair amount of airframe data. MicroScale provides some of these, but better versions of all the data are available on a Fox One F-106 decal sheet. I used the Fox One decals for most all the airframe data markings. One notable exception, the ejection seat triangles come from a Caracal Models decal sheet.
-
Since I love airframe data on my models, I took a quick scan through all my F-106 decal sheets. I wanted to make sure I had any and all data markings that were available applied to the model. I am sitting on 17 total decal sheets for F-106s in my decal stash, so I had lots to choose from for all the common markings.
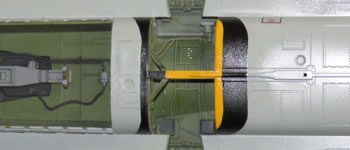
The Command Stripe
It may be an anomaly of the reference picture (like someone sharpening the picture in PhotoShop), but there appears to be a thin light colored border on the U.S. AIR FORCE titles where they cross the command stripe. Since I needed the U.S. AIR FORCE to be applied before the stripes with masked over letters to protect them from paint, it gave me the opportunity to incorporate the edging. I used Parafilm-M to cover the letters. I cut the masks just slightly larger than the actual letters so that a thin edging of the gray fuselage was preserved.
The following images outline the process. One of my friends declared I had "big brass ones" for sanding and re-scribing the canopy piece. When he heard my plans here, he declared I had actually grown a second pair ... [smile]
1: Starting Point
2: Initial Masking
3: White Primer Painted
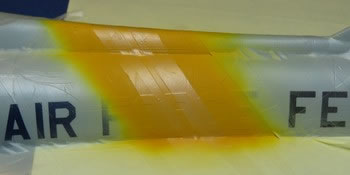
4: Yellow Painted, Mask for Black
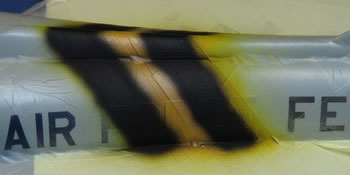
5: Black Painted
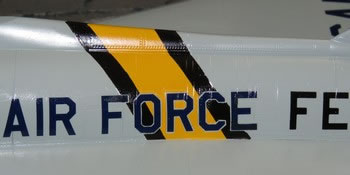
6: Final Markings
It worked like a champ and provided a really nice detail to the markings.
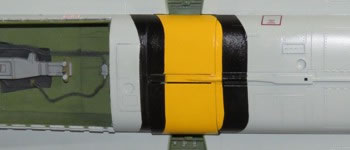
The decal instructions allude to the command stripe wrapping under the fuselage. It is difficult to verify on the reference pictures, but the angle of the stripe (if it does wrap under) would go across and just behind the main wheel well. I decided I wanted the stripe on the bottom. Masking the bottom was easy compared to the top.
I "loose mounted" the wheel well doors into place using some blue tack, then I eyeballed the angle to get the stripe in about the right position. I masked and painted the stripe using the same steps I used on the top (except I did not have the complicated masking over any letters).
Not All Yellows Are Created Equally
When initially evaluating the SuperScale decals before starting the project, the yellow looked really close to Insignia Yellow (F.S.13538). So, I counted myself lucky the SuperScale made this easy and used the Model Master bottle paint for Insignia Yellow (F.S.13538) when painting the command stripe. After the command stripe was applied, I noted that the yellows were not quite the same ... [frown]
My first thought was to let well enough alone. In the lighting in my work room, they were not too much different. When I took the model to a friend to get his opinion, the lighting in the room was very different, and the tail yellow markings looked very pale when compared to the more orange command stripe. I decided this needed to be fixed.
Lightening the command stripe was not really an option. I did not have a yellow paint of the needed shade. The more direct approach was to change the tail yellow to match the command stripe. Yes, I painted over the yellow in the tail markings to make them match the command stripe.
The checkers were easy. I cut a square in a Post-It note the size of one square to make a mask. Then, I just moved the mask around and re-painted each yellow square. The large chevron was going to be more complicated. I was already tempting fate a lot with what I already had been doing. I decided not to tempt fate any further. You will note the chevron in my images is lighter than the checkers around it.
It was still a lot of work to make the yellows match ...
I always finish the decal stage with a gloss coating of Floquil Crystal Coat. This seals the decals and prepares the surfaces to receive some washes for weathering. Since the model was already gloss paint, I only applied the clear gloss in the places where decals had been applied.
Weathering
For weathering, I used my typical style of thinned down enamel paint washes and air brush shading. I finished the weathering with some dry brushing of specific areas to pop out the surface details. For a more complete discussion of what I do to weather my models, see my posting on "Weathering Aircraft".
I kept the weathering to a minimum. F-106's, throughout their careers, tended to be some of the cleanest and best kept fighters I have ever seen. This is likely due in part to their gloss paint finishes and the pure air defense role they flew. But, I know the troops that supported them kept them very well maintained, too. I am sure there were some "dirty" F-106's, but that is not what I see in most of the pictures I look at, and I wanted my model to be "clean".
Excitement mounts when I go into the "home stretch" with any project. I am working on all the various detail parts at the same time as the main airframe, so by this time, the project is mostly an excursion in attaching the detail parts.

Airframe, Ready for Final Assembly
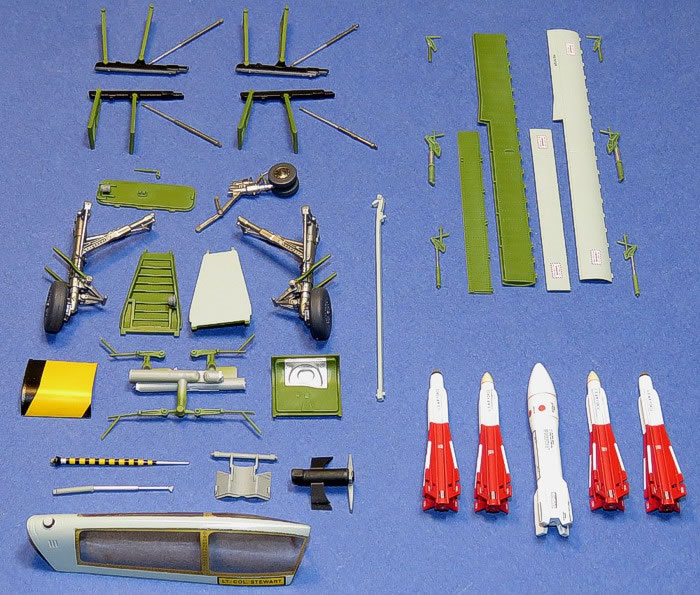
All the Pieces, Ready for Final Assembly
I generally start with the landing gear, first. By this point, I have a sizable investment in the painting on the main airframe, so I want to get the model up off its belly and sitting on the landing gear. That protects the painting on the bottom of the model from damage.
The landing gear on this model is very complete and includes the actuators that attach the wheel well doors to the landing gear and to the wheel wells. Being that complete, it is a bit fiddly. Also, my super glue was expired, so it was taking a long time for it to set up as I worked.
With the model finally resting on its landing gear, I could turn my attention to the weapons bay and the weapons.
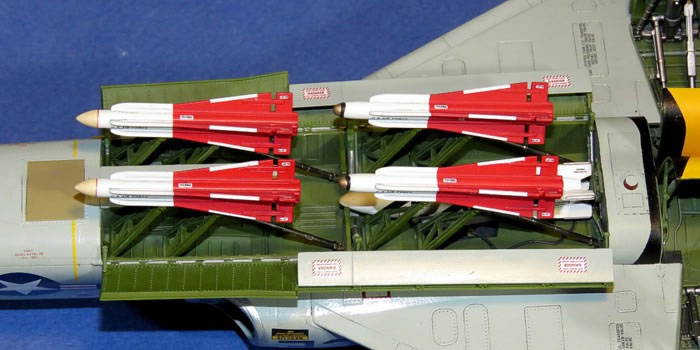
Weapons
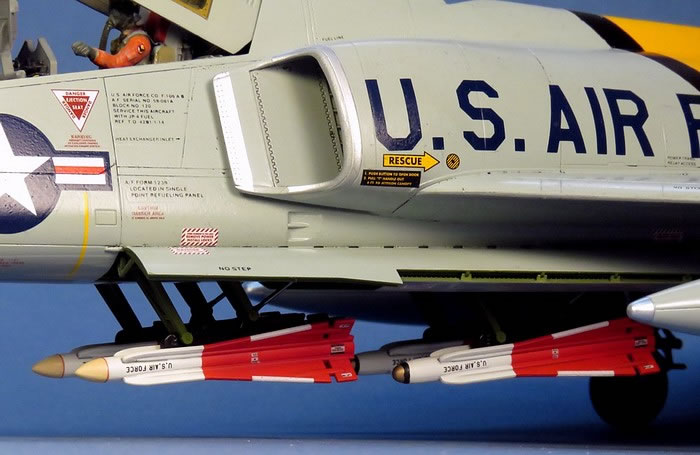
I had been building and painting the weapons as I worked on the rest of the model. In fact, I actually started on the weapons, first, and had them mostly completed before starting the rest of the model. F-106s from the time period where I was building this model carried five weapons - four AIM-4 Falcon missiles and one GAR-2 Genie nuclear capable rocket.
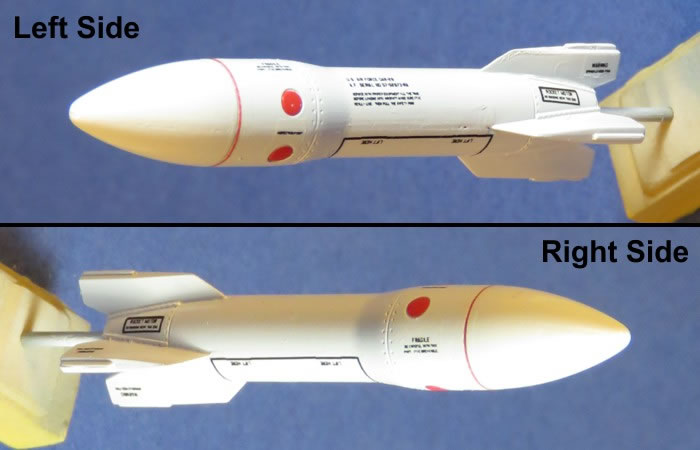
Being red and white, the missiles are very colorful, but I also wanted them detailed. So, I set off to add as many data markings as I could find on the missiles with decals. I ended up with 24 to 25 decals on each Falcon missile and 17 more decals on the Genie. There are 115 decals in just this one picture:

Some of these decals are in the Trumpeter kit, but most are not. I scavenged decals from the Hasegawa weapons sets as well as making my own custom decals. I also used some generic white striping decals from ScaleMaster. The following picture provides some indication as to all the decals on one Falcon and where I got them.
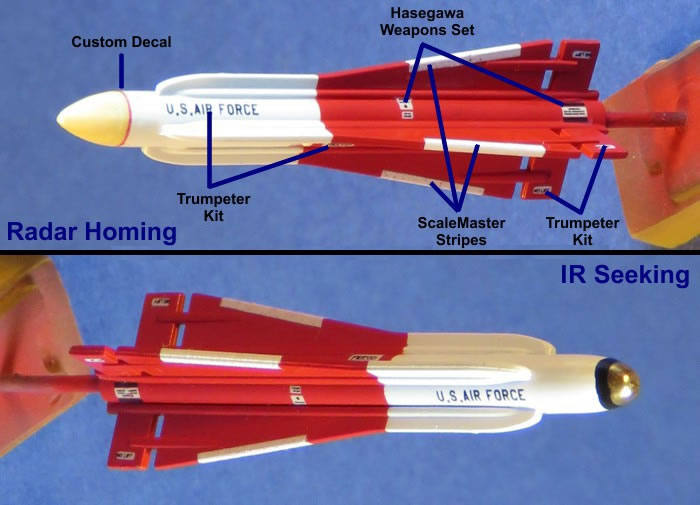
The red dots on the Genie are from Trumpeter. All the rest were custom printed by me after doing some research on the Genie. I am not sure I got all of the markings on the Genie right, but it looked satisfyingly busy after I was done.
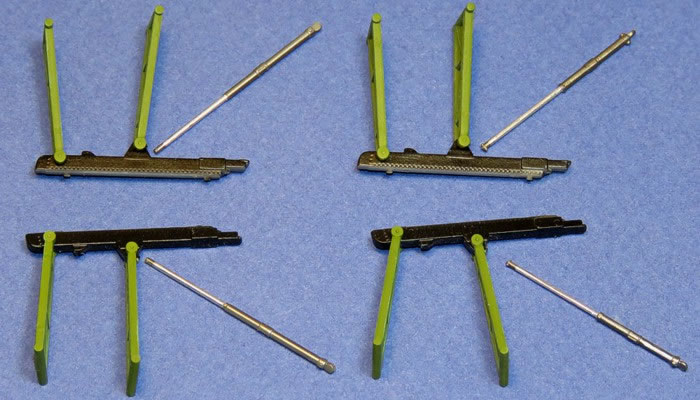
With the missiles done, I also needing to be complete the missile trapezes. Each Falcon hangs from a trapeze that lowers it out of the aircraft prior to being launched. The kit provides these with the option to be extended or retracted. I wanted the missiles all hanging out so they could be seen. The exception is the Genie rocket, which stays all the way in the bay until it gets kick-launched.
I started the weapons installation by attaching the Genie rocket into place. I decided that getting the Genie into place after the trapezes was just asking for trouble. I was pretty confident that it would not be as difficult to work around the Genie while doing the trapezes as it would be the other way around.
Attaching the trapezes was tedious. The front trapeze arms are difficult to get into the locator holes. I had to pry a bit to get them to pop into the holes. Once in, they were tight, so that helped them keep their position as I got the actuator oleos into place. The rear trapezes are a little like herding house cats. There is nothing solid about them. I had to get them hanging at the correct angle for the oleos to fit into place. I ended up drilling and pinning the forward arms to get some stability.
The following picture shows the installed trapezes. Note the trapeze arms are "handed". The cross members inside each arm form an arrow. The arrow on each arm "points" toward the aircraft centerline. You can also see the actuator oleo struts that push the launch rails forward and out of the bay. The rear of each of these oleo struts has a good, positive alignment point to which the strut attaches. The forward ends that attach to the rails, though, have no positive alignment. The tip of the strut just butt-joints onto a small dimple on the rail. These are very fragile joints. Since these attachments will be hidden behind the missiles, I flooded them with gap-filling super glue in hopes that it would harden and strengthen the joints.
With the trapezes in place, I decided to tackle the weapons bay doors, next, before the Falcon missiles. The Falcons would block my view into the weapons bay for getting the bay door actuators into place. The actuators are relatively positive in their locations. After the glue set up on the actuators, I added the doors. The hinges on the big doors are good at providing good interlocking position on the doors. The two smaller doors were more challenging. After my third attempt, I finally got the smaller doors to stay in place. The issues getting these doors attach got me really close to ripping all this out and closing the weapons bay.
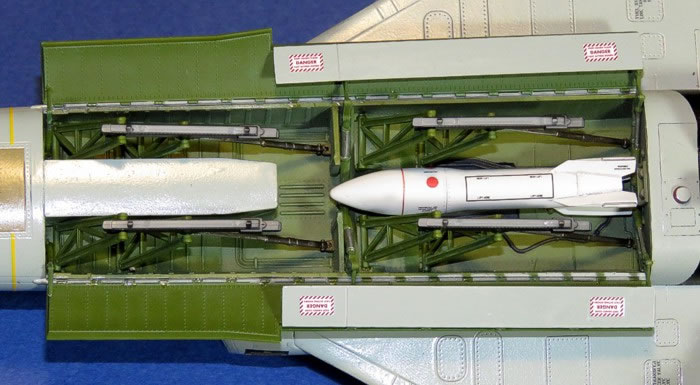
The next challenge was attaching the Falcon missiles without breaking off the trapezes. The trapezes are fiddly and their attachments are delicate. I hoped that I could just add a spot of glue and lay the missiles in place. To my good fortune, that is how it worked and I did not break free or have to re-work any of the trapezes. Note, when carrying a mixed load of missiles, the infrared Falcons are loaded in the rear locations and the radar homing Falcons in the forward locations.
The Canopy
The last big place to give attention to was the cockpit and canopy. I popped off the canopy, which I had "loose mounted" using the same technique I discuss in this posting. I touched up the paint as needed on the cockpit sills using D.Gull Gray (F.S.36231). I then unmasked all the clear sections of the cockpit glass, which I had masked using Parafilm-M in a technique I discuss in this posting.
As I had determined earlier in the project, the Trumpeter canopy has the frames molded wrong. I decided the only real fix was to sand them off and re-scribe the canopy. That fixed the outside of the canopy. The F-106B has most of its canopy frames on the inside. I used decals to create the inner framing.
The first step was applying strips of "dots" to represent the fasteners. I created these on my computer and printed them on my laser printer.
The second step was to apply decals to represent the frames. I did this by painting clear decal film, then cutting the decals to the shapes of the frames. The buff color represents the fiberglass reinforcing in the edges of the transparencies. I also painted over the buff color with D.Gull Gray (F.S.36231). This was the inner part of the frame would be D.Gull, not buff.
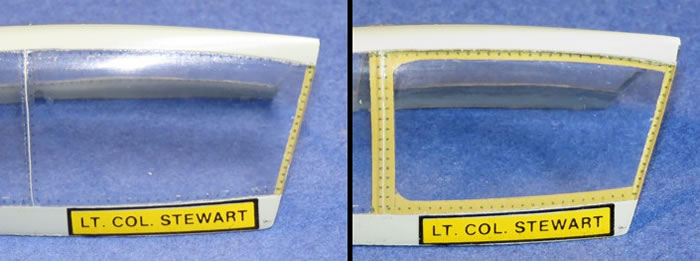
This looked really nice, to me. One issue that can't be fixed is the thickness of the plastic is noticeable when viewing the frames from an angle. But I wanted the frames to be on the inside, like the real F-106B canopy.
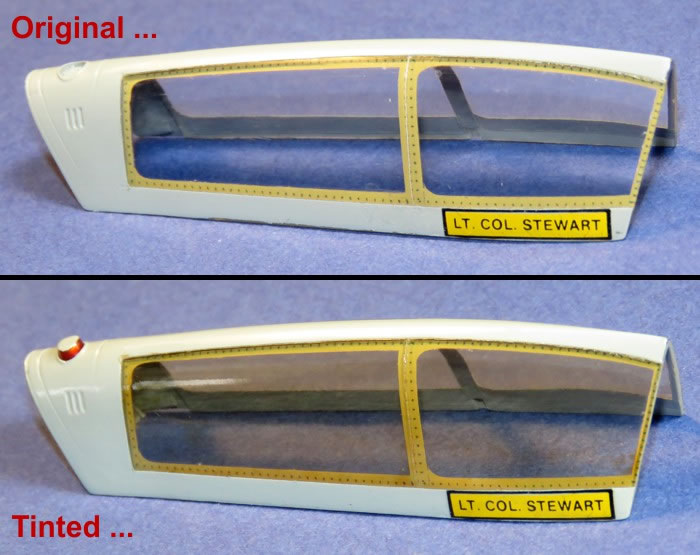
Feedback I got online indicated that the F-106B canopy was tinted with a goldish color. I decided to include this detail, also. I re-masked the canopy to cover the frames using Parafilm-M, then painted the clear area using clear Tamiya colors. I created an unmeasured mixture of Smoke and Clear Orange, thinned with Windex. The light coating caused the glass to be "not shiny" and affected the clarity when looking through the glass. I sprayed a heavy coating of Future to put shine back on the glass and fix the clarity.
With the transparencies and frames done, I wanted to add some details on the inside of the canopy. See the following reference picture of a F-106B cockpit canopy and windscreen, highlighting the details I wanted to add to the canopy.
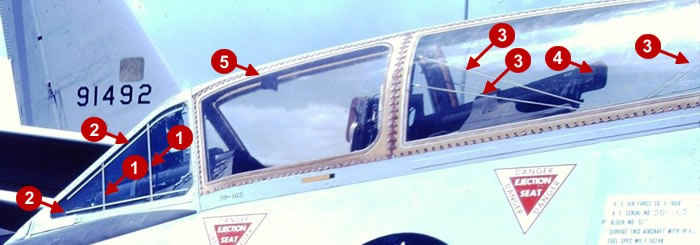
-
The items labeled #1 are reinforcing strips imbedded in the windscreen glass. The strips are trapped between sandwiched glass panes for the windscreen. I simulated these with some thin scribed lines in the windscreen that I then highlighted with some light tan paint.
-
The items labeled #3 are bungie cords for holding the "boot" used for instrument training on the rear seat. They normally go straight across the window, but in this case, the back-seater has pulled and looped them over a hook on the lower canopy frame to provide less obstructions to his view. I chose to keep it simple and did them straight across the window using some fine brass wire, painted a light gray color. I chose not to include the "boot", itself, inside the canopy.
-
The Trumpeter kit provides the rear cockpit radar scope. The F-106B has the rear cockpit radar scope mounted actually to the canopy, not the instrument panel (item labeled #4). I added this (after building and painting it) into the canopy.
-
Also, above the front cockpit, the back-up magnetic compass is mounted to the top canopy frame (item labeled #5). I added this from scratch with some strip styrene and added an instrument face to it.
After painting and adding the above details, I installed the canopy actuator between the cockpits and attached the canopy in the open position. Since I have the pilots in the cockpits, I did not need to add the canopy props at the sides of the canopy.
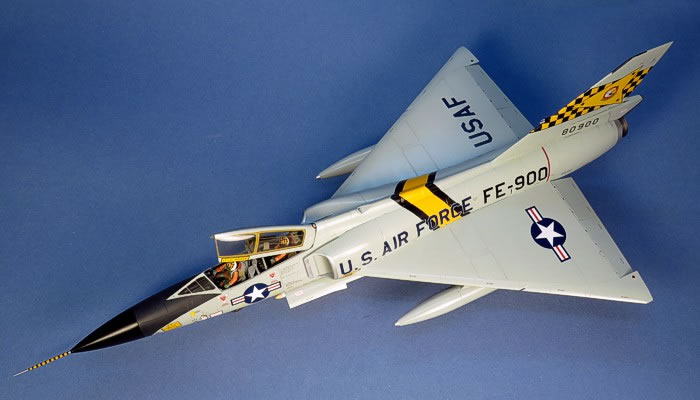
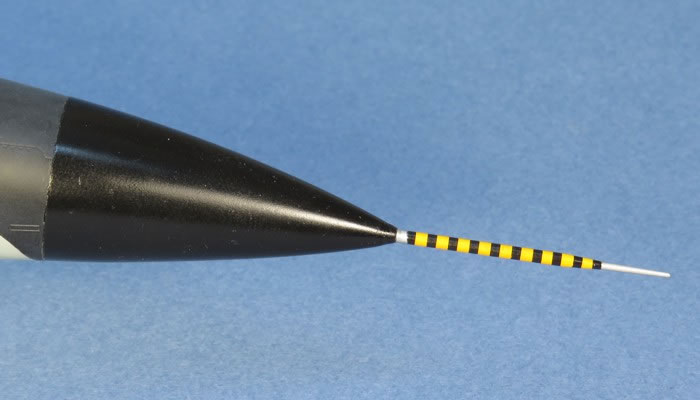
The nose pitot probe came last. I had waited on this until the end to prevent myself from repeatedly breaking it off as I worked on the model. I found little to no help on the nose probe colors. The images of the real 58-0900 were to small and grainy to tell anything on the nose probe detail. Scanning through general pictures of F-106s from the 27th FIS showed they were split pretty even on either being all-black, all polished metal, or being candy-striped. The candy-striped ones were split even on some being red and white while others were the contrasting squadron colors of black and yellow.
I decided I wanted the contrasting squadron colors and painted the probe yellow. I was not up to working out the "barber pole" spiral stripe, so I did the alternating stripe pattern for the candy-stripes. To add the stripe, I used some arresting hook decals from a 1/72nd scale Tomcat data decal sheet. They seemed about the right size.
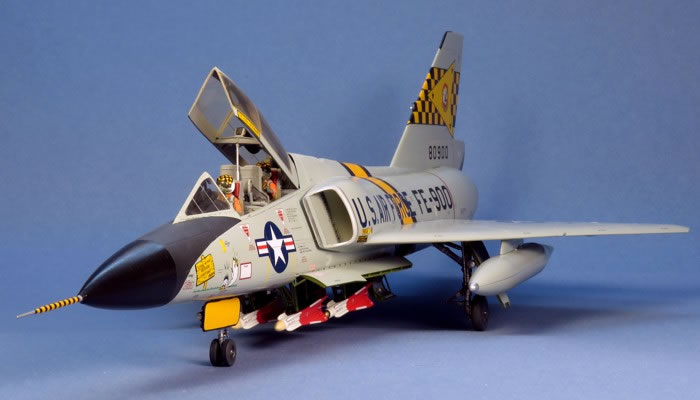
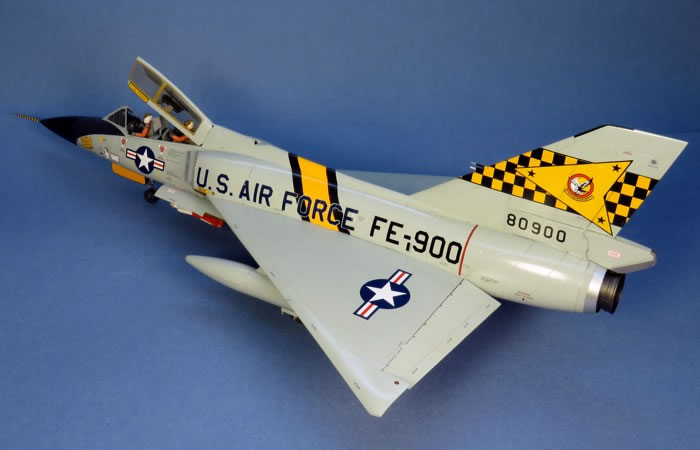
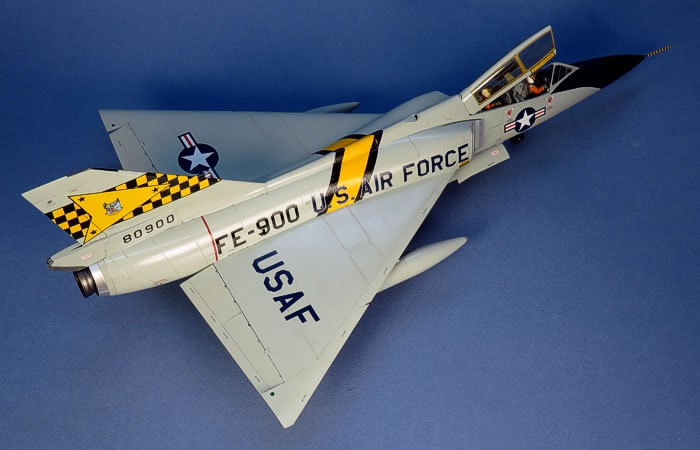
As I mentioned at the beginning of the article, I always seem to like the two-seat version of most aircraft types better than the single-seat version. It is great to have a two-seat "Six" on my display shelves. I like the orange flight suits on the pilots with the checkered visors on their helmets. It all adds details to draw you in to look in the cockpit.
I have half a mind to make a diorama out of this model. I was told the set-up of the aircraft is incorrect - the missiles would never be hanging out of an aircraft after the pilots are onboard. But what modeler would ever let that stop them. I could still do a diorama with the plane captain and maybe another ground crewman going through the start-up of the aircraft.
Completion Date: 14 January 2017
Total Building Time: 98.1 Hrs
Research: 11.9 Hrs
Construction: 23.8 Hrs
Painting: 30.2 Hrs
Decals / Markings: 20.0 Hrs Includes Creating and Printing Custom Decals
Extra Detailing / Conversion: 12.2 Hrs
Model, Images and Text
Copyright ©
2017 by David W. Aungst
Page Created 18 April, 2017
Last Updated
18 April, 2017
Back to HyperScale Main Page |
 Home
| What's New | Features | Gallery | Reviews | Reference | Resource Guides | Forum |
Home
| What's New | Features | Gallery | Reviews | Reference | Resource Guides | Forum |