Hasegawa's 1/48 scale
Vought F4U-7 Corsair
by Jon Bryon
|
Vought F4U-7 Corsair|
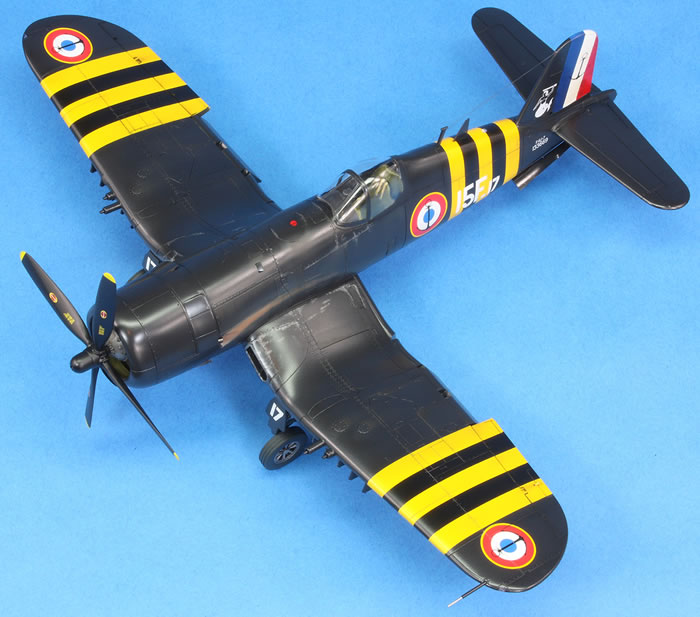
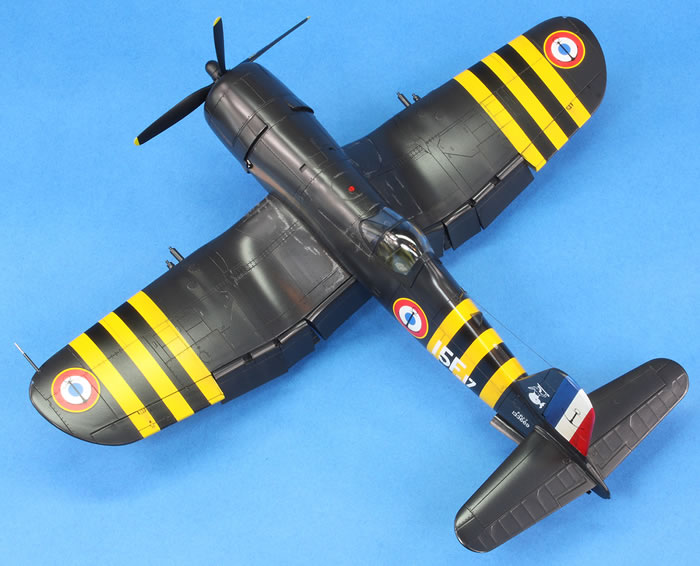
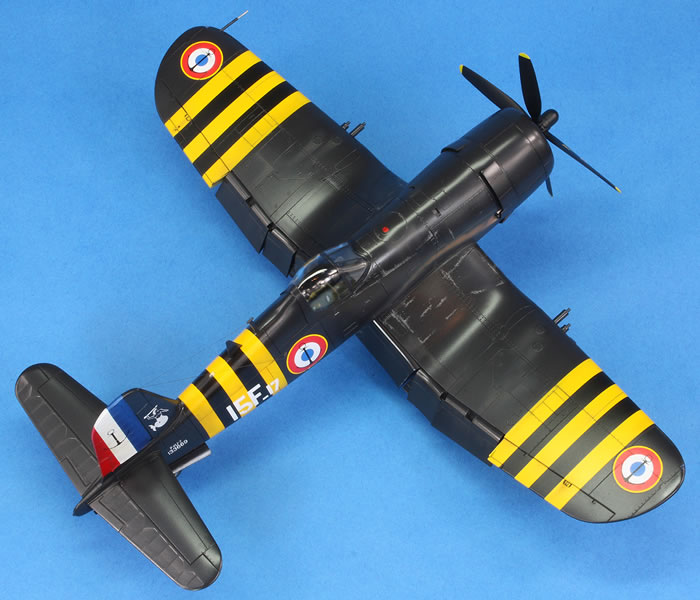
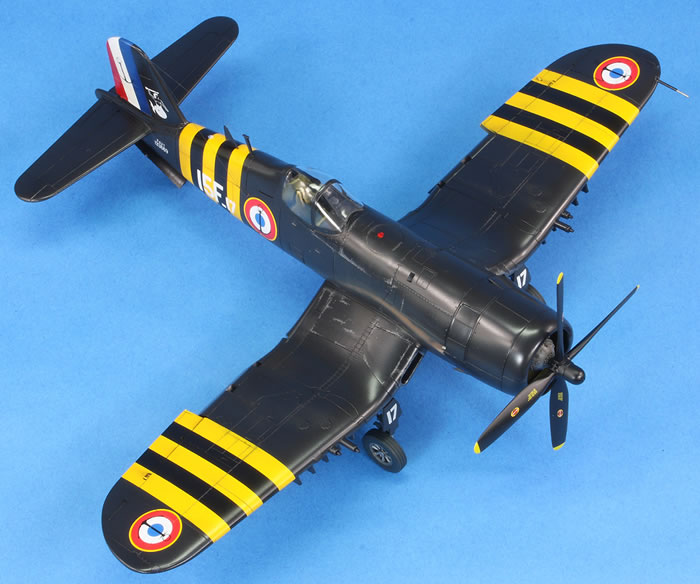
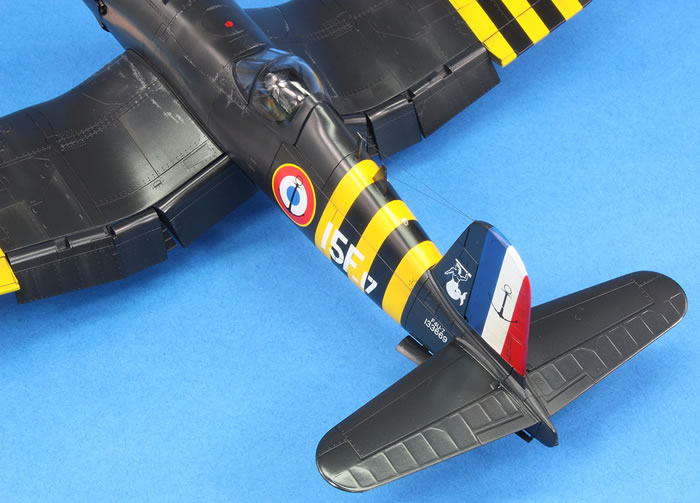
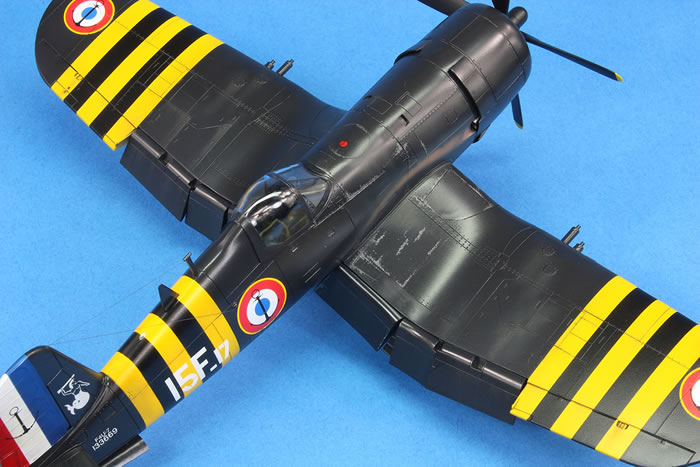
Aéronavale, Flotille 15F, Arromanches 2007
|

Hobby Boss's 1/48 F4U-7 Corsair is available online from Squadron.com
Summary
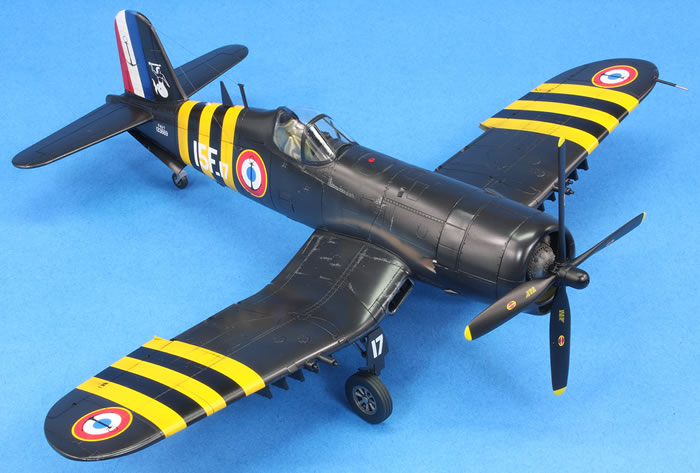
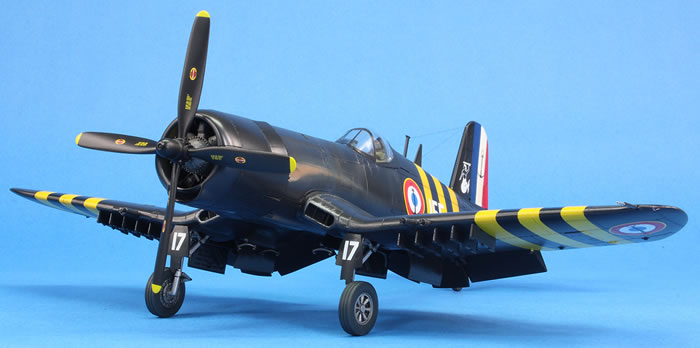
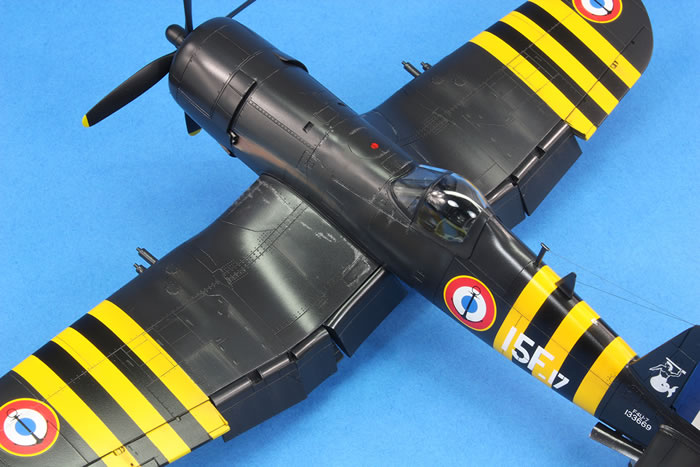
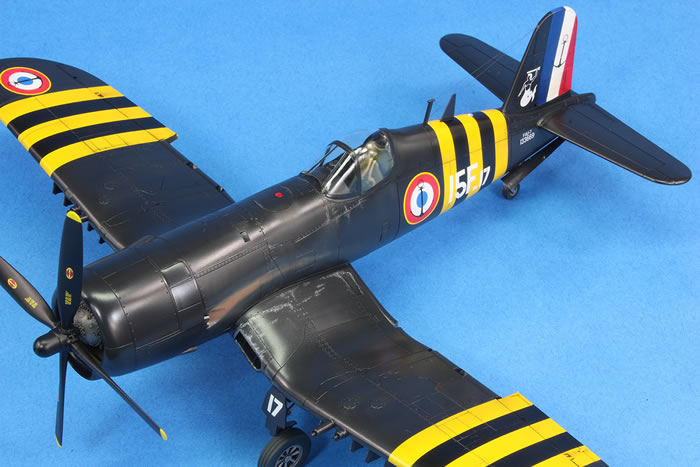
Hasegawa 1/48 Vought F4U-7 Corsair
with CMK resin wheels and Sky Models decals
Aéronavale, Flotille 15F, Arromanches 2007
Background
One of the happy benefits of being a student in Cambridge was the cheap tickets to get into the Duxford airshows. It was at one such show in 2003, where most of the grad students in geophysics department had decided to go, that I found this kit at the Hannants stand. For £13.99 it was a bargain.
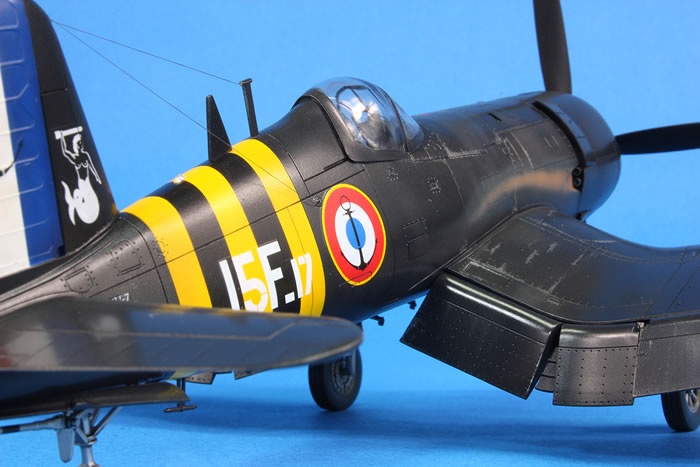
I’ve already built the Hasegawa F4U-5N and AU-1 (as well as the much older tooling of the F4U-4) and this kit was built alongside the F4U-5. They are nice kits, but not without their problems. The quality of moulding is exceptional, but as with many other Hasegawa kits, the inserts (like the oil radiators in the wing roots) do not fit well. Furthermore, these kits suffer from a well-known mould mismatch in the nose area where Hasegawa used mould inserts to cater for the different late Corsair variants. The fit of the cowling to the main fuselage is pretty horrible and requires a lot of brute force, clamps, glue and patience to get anything approaching a reasonable fit. Considerable filler (I used superglue), sanding and rescribing will then be necessary to get a tidy finish around the nose area.
In short, the kit is a surprising amount of work for a single-engined prop.
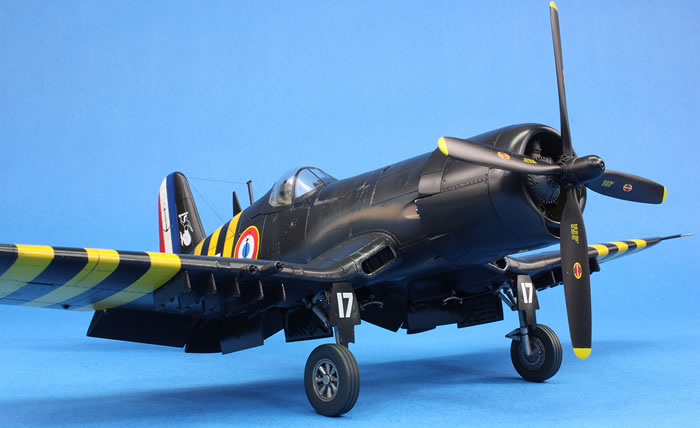
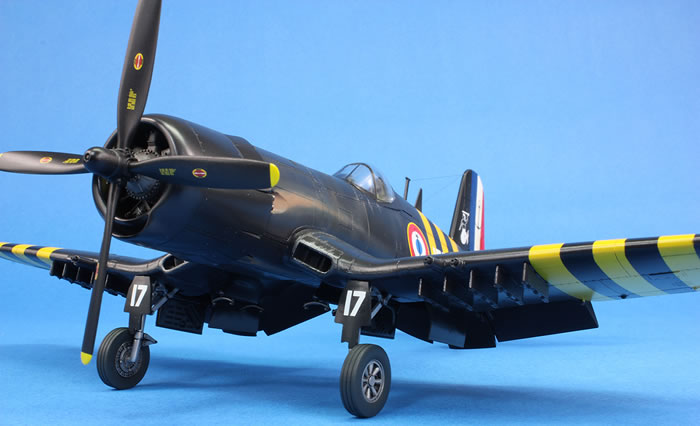
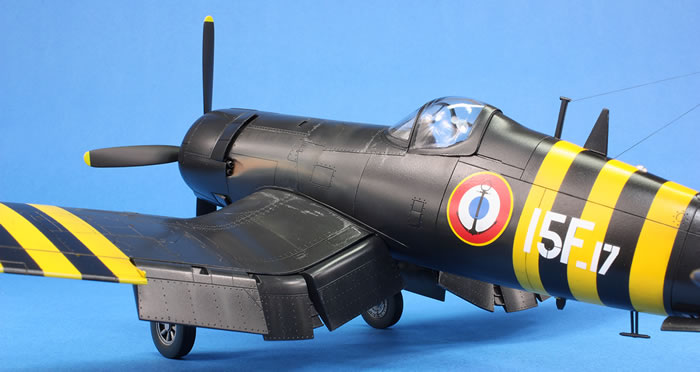
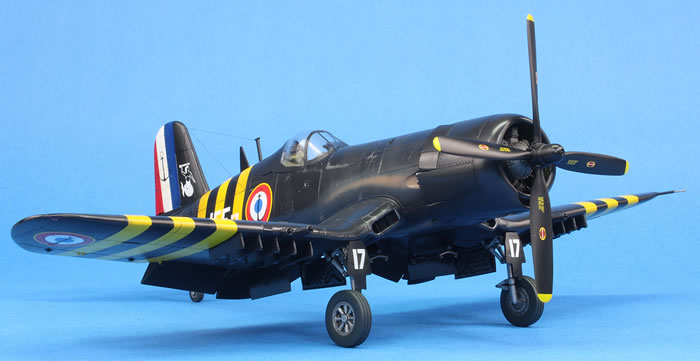
There are also several accuracy issues that vary with the variant. As soon as the kit was released there were comments that the wheels were too narrow. I had intended to replace them with some resin True Details wheels, and indeed found a good number of photos showing French Aéronavale Corsairs with the early style spoked wheels. However, right near the end of the build I stumbled upon a photo of a 15F Corsair in Suez stripes that had the later style wheels. I duly purchased a resin set from CMK to replace the kit wheels. These were nice, but it appears the masters were 3D printed and the wheels spokes are not perfectly smooth.
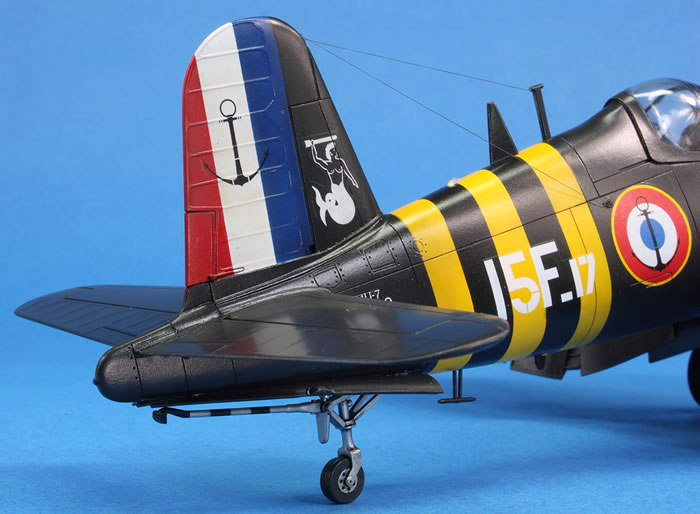
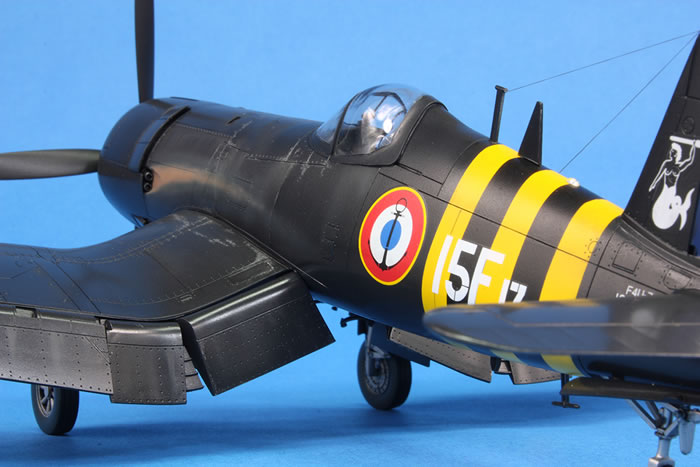
Further accuracy issues include incorrect aerials. The large spine-mounted aerial (part N3) is far, far too small. I made a replacement from plastic card. Even then, it’s still a little on the small side! None of the Hasegawa Corsairs include the T-shaped aerial under the fuselage. I’ve no idea why Hasegawa neglected this, since most late model Corsairs seem to have had it. Fortunately, Quickboost make a nice little resin set that includes two of these, and I used one here. I used a little transparent light from the spares box for the spine mounted light.
The instrument panel is, I believe, wrong as it includes the radar screen for the 5N variant I think. Since so little of this is visible, I ignored this error. I also cannot vouch for the accuracy of the gunsight. Hasegawa would have you paint the interior green. I know this is wrong, and did most of the area above the sidewalls in black, but completely forgot that the rear bulkhead should be black! I did not notice this until it was too late and the canopy was glued in place. A really silly error, as I got it right with my 5N and AU-1 back in 2005.
I drilled the exhausts out. Note that this exhaust fit is not catered for by part N14. I slipped the exhausts in at the end of the build…well, in reality, I forced the dual pipes in place and hoped they would not pop the cowl seam open! A further modification was to cut the wingtip lights out and replace them with transparent plastic.
Decisions Decisions
I settled on building 15F.17 from the kit options, simply because the Suez stripes were in a more convenient position for masking. However, it became very clear that the kit decals were thick, translucent and that the anchors were not centred on the roundels. Furthermore, the rudder anchor marking was printed on decal stripes, and I wanted to paint the stripes to get a better finish. I therefore purchased a set of aftermarket decals from Sky Models. Unfortunately, they only included one Suez option and that was also for 15F.17. My heart was set on Suez stripes (I’ve never modelled them before and the colours look amazing against the Gloss Sea Blue) and so this was the option I was forced to take.

I could find no photos of 15F.17, so had no photographic evidence to go on. Both Hasegawa and Sky Models indicate the propeller hub was white, but I could not find any photos of 15F Corsairs during Suez with a white hub and so left it black. The most useful photos I found were from these websites:
The asisbiz.com website is a particularly useful resource for WWII fighters.
Painting Underway
The first things to paint were white for the rudder stripe and as a base for the yellow stripes. The yellow was Mr Color 329 and gave a good, vivid deep yellow. The tail stripes were painted red (Mr Color 3) and blue (Mr Color 322). The blue that Sky Models have used does not seem quite right to me. Photos I’ve looked at seem to show that French Corsairs either had a very dark blue for the national markings, or a very light blue. Sky Models have gone for something in the middle. All these were sprayed with my H&S Evolution, an airbrush I’ve had for over 6 years but have really come to dislike. I intend to replace it with an Iwata HP-C soon.
The stripes were all masked, and I used the white Tamiya vinyl tape for the first time to mask the yellow. This is an excellent product that I will be using again. I had worried that it would not be sticky enough, but the adhesive qualities are very good.
I primed the entire aircraft in Mr Black Finishing Surfacer 1500 using an Iwata RG-3. This left an extremely smooth surface. I masked the black stripes and then contemplated the overall finish.
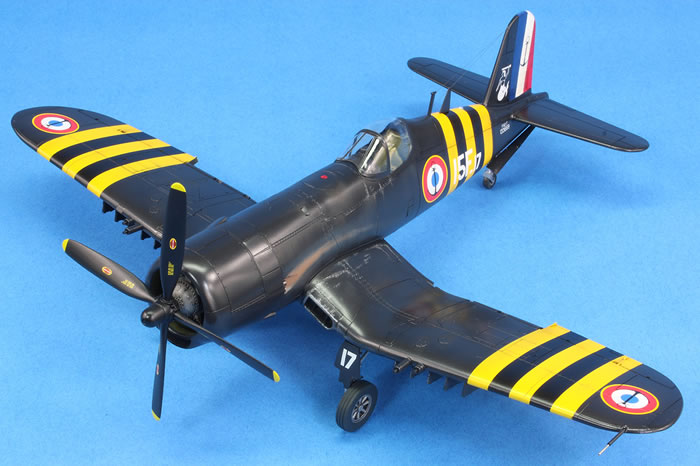
I say ‘contemplated’ because pinning down Gloss Sea Blue proved extremely difficult. Hasegawa would have you use Mr Color 365, a shade only available in a boxed set and that I did not have. Some have mentioned they do not like this shade and darken it with black. Gunze themselves recommend 365 for WWII US Navy aircraft, and my understanding is that the post-war GSB was different. On the instructions for the F6F-5 that I was building at the same time, Hasegawa recommend Mr Color 14. This did not seem right to me either. The Gunze Sangyo recommendation is Mr Color 71, which is what I ended up using, but it does seem very dark and not very blue. In the end, it is what it is, but I think in future I might actually use the 365 for GSB. I sprayed the 71 with the RG-3.
The masking came off and I was delighted. Even my wife was impressed. The rudder and Suez stripes really set off the finish and it’s a very striking scheme. A generous coat of Mr Color GX100 was applied with the RG-3 to protect the finish for weathering and the decals.
Decals
Sky Models’ decals are extremely nice. The carrier film is minimal and thin and the colour density is good, although the yellow and black did still show through the white lettering. My only complaint is that the images are tightly packed on the sheet and cutting them out was not easy!
Weathering and Finishing Touches
I used a black oil wash for the panel lines of the Gloss Sea Blue, and brown shades over the markings. The final finish is Tamiya Semi-Gloss, which seemed about right, but the photos make it look a bit rougher than it does in real life.
Over the semi-gloss some streaking was applied using AK Interactive Streaking Grime and the exhaust stains were sprayed with an Iwata Custom Micron using Mr Color 43 and 137. I wanted to add a little bit of silver chipping, but struggled to think of the best way to replicate this. Silver paint never looks good, and I didn’t think the hairspray chipping or the maskol methods would give me the control or the scale I was looking for. In the end I went with a silver pencil, which I’m also not a fan of, but at least it looks quite subdued.
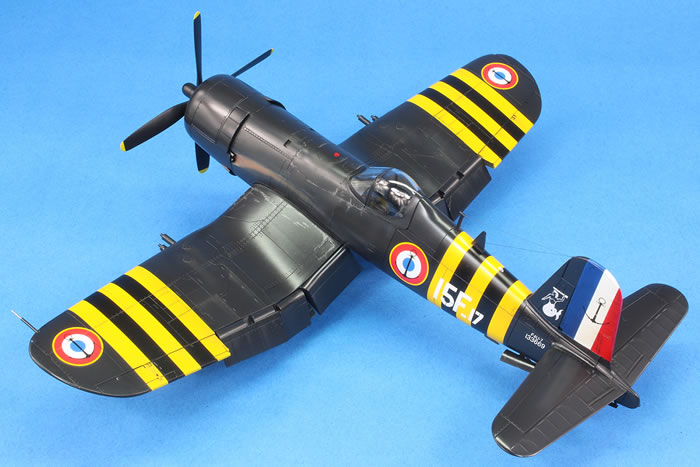
After adding all the bits and pieces, the final task was adding the aerial wires. I had drilled tiny holes for these, but as I’m currently getting used to wearing hard contact lenses that I’m not convinced improve my vision, getting the aerials sorted was a bit of a trial. I used Uschi van der Rosten fine rigging wire for the first time, which I think is fantastic and is much more reliable and fine than hair or stretched sprue.
I love this scheme, and I love the look of the US Naval Reserve F4U-5 and F6F-5 that I made at the same time. I’m still not that happy with the Gloss Sea Blue, but this is a striking addition to the display cabinet. I’ve no intention of building any more Corsairs and I’m very happy to have built the Hasegawa quartet, warts and all.
For more articles like this, please visit my website www.jonbryon.com
Text and Images Copyright ©
2018 by Jon Bryon
Page Created 12 March, 2018
Last Updated
12 March, 2018
Back to
HyperScale Main Page

|
 Home
| What's New |
Features |
Gallery |
Reviews |
Reference |
Forum |
Search
Home
| What's New |
Features |
Gallery |
Reviews |
Reference |
Forum |
Search