Hobby Boss' 1/48 scale
Wildcat Mk.V (FM-1)
by Fernando Rolandelli
|
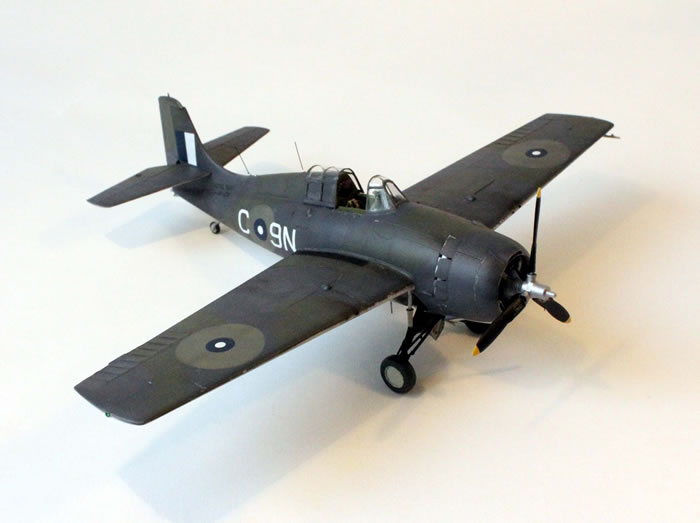
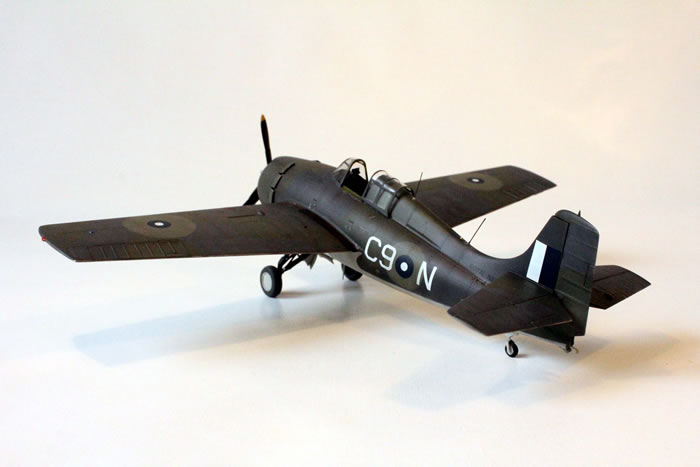
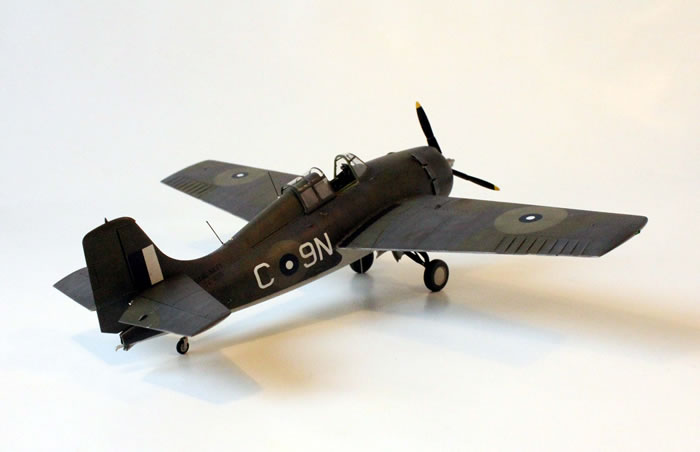
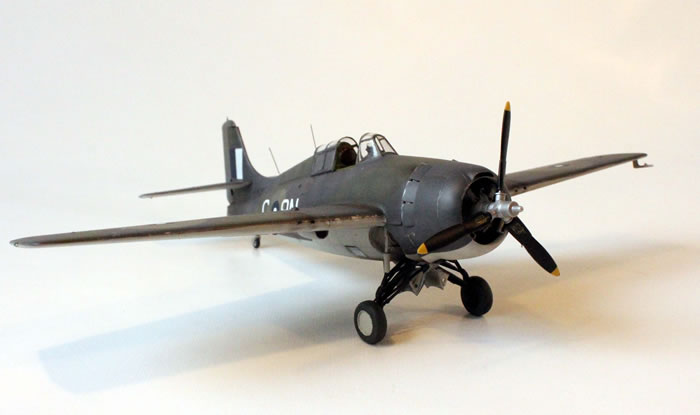
General Motors (Eastern Division) FM-1 Wildcat V, JV439 “C9N”, 733rd Sqn FAA, East India Fleet, Royal Navy, Trincomalee, Ceylon, 1945 |

Hobby Boss' 1/48 FM-1 Wildcat is available online from Squadron for only $27.99!
Background
The Wildcat V was the first RN version to share the US Navy name for this fighter, as well as being the first to be truly and thoroughly standard with a model in US Navy service.
Production of F4F-4 was passed on to GM to free Grumman’s production capacity to the better performer Hellcat. The FM-1 was virtually identical to the -4, with the exception of the armament, which reverted to four 0.5 MGs, these being more than enough to deal with Japanese aircraft anyway. They were intended for service from the smaller CVE, mostly in mixed squadrons together to Avengers in the antisub role.
The Royal Navy received 312 aircrafts, which were used in general fighter duties, taking part in several major operations such as Operation “Tungsten”, the attacks on Tirpitz. Accoding to the RN practice at the time, they shared decks with Corsairs, Hellcats and Seafires.
On its part, 733rd Sqn, FAA, was a training squadron based at Trincomalee; also, a mixed formation which gathered many types of aircraft. JV439 (delivered at RNARY Coimbatore on 1.44)had served in 890th Sqn previously. There is a picture of this machine in Sturtivant’s “Squadrons of the FAA” book (which I have not seen!).
The Kit
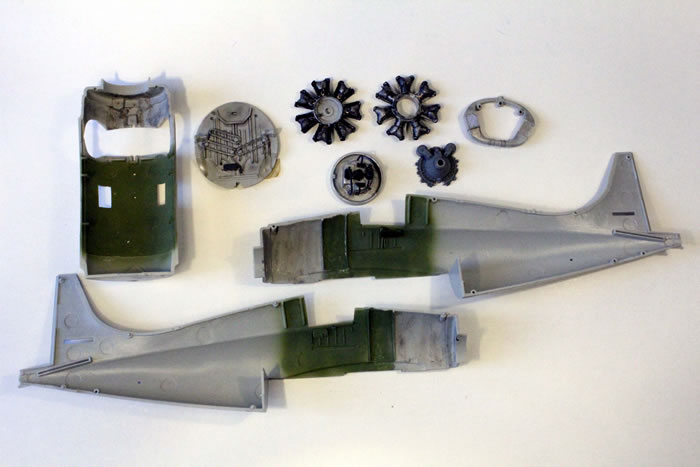
Hobbyboss family of Wildcats are overlooked jewels, having little to envy to the much earlier Tamiya kit (that is, except being Tamiya!) The Japanese kit displays a solid engineering and is one of that fantastic generation of self-assembling kits from Tamiya.
It has however a couple of missing or oversimplified details (the most glaring –as well as the easiest to correct- is the “solid floor”) Hobbyboss’ kit is not so tidily or precision injected, but has some good detail, such as a good engine rear (also present in Tamiya’s) with complete engine bearers, and a more detailed firewall (inspired in the KMC resin set, for sure) .
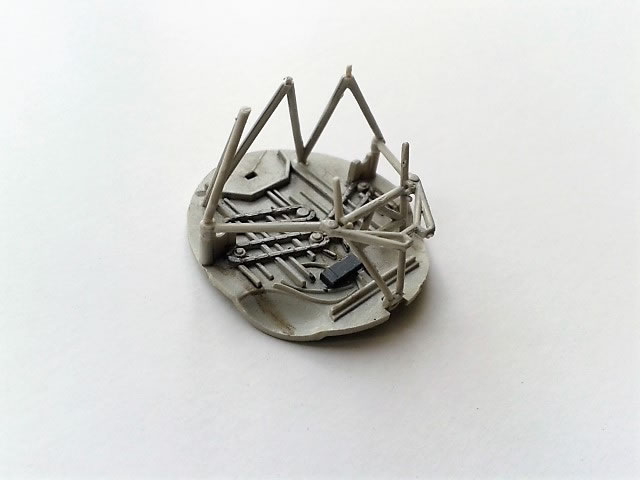
The big problem in those tubby, mid wing fighters from the 30s (F3Fs and F2As) is the wheel well, a large, empty space which in the real plane was a maze of tubes and wires.
Accuracy wise, the kit looks spot on, and the differences between the several versions of the family are well taken, exception made of the FM-2, which should be avoided as is and can only provide a good representation of the real aircraft adding a Vector resin set.
Of course, no attempt to issue the early Cyclone-powered versions was made, leaving the FAA builder with the same painful gap in his collection. Nor a wide-spaced four gun unfolding wing was ever made.
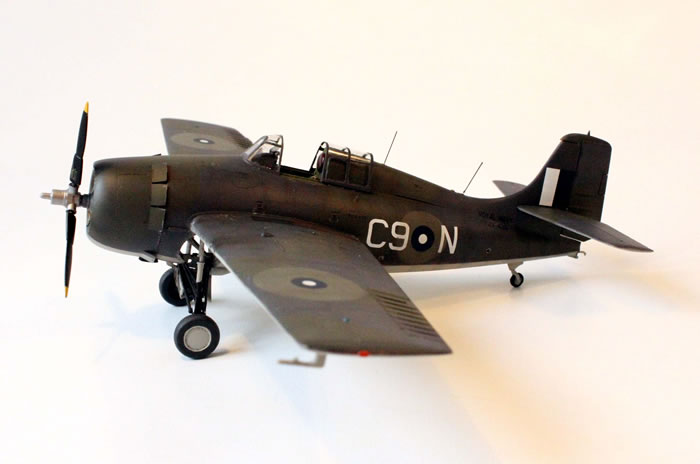
The main departure between the Tamiya and the Hobbyboss kits, engineering-wise, is the one-piece lower wing in the former. The latter has adopted a “boat-type” central section, to allow for the different wings in the family (two-gun unfolding, two-gun folding, three-gun) There is nothing wrong with this exception made that Tamiya’s way ensures the perfect dihedral.
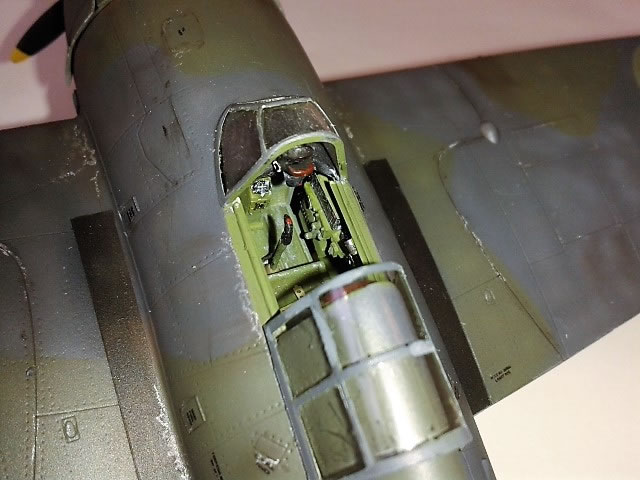
Cockpit is built up on this “boat”, with bulkheads for the instrument panel, the seat support and the rear compartment.
The side consoles should be presented just a bit higher than shown. Some boxes were added to the sidewalls proper, and an Eduard Zoom set was used mainly for the instrument and electric panels.
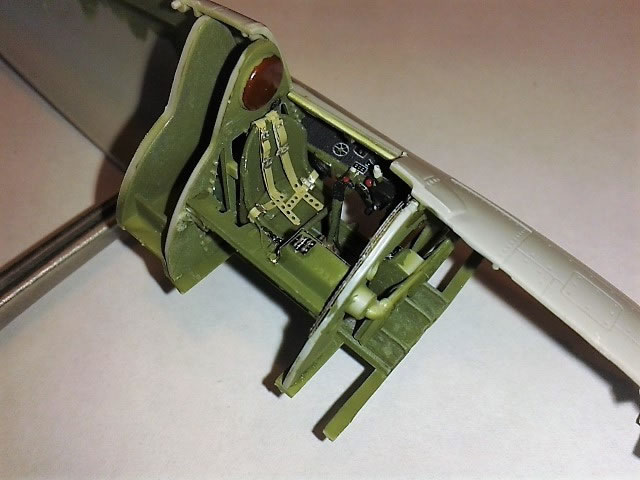
Harness was taken from a Reheat RAF set. The seat is rather poor (a replacement included in the set would have been great) but was improved with a scratch built lumbar plate. The under seat fuel tank was mimicked with some cardboard plates blocking the view from the ventral windows, which otherwise would have a see-through effect. The instructions have you place the gunsight (a fairly good representation of the later model; I wonder what is included in the -3 kits. Well, no, I do not) in the middle of the coaming when it should be on the rear lip. Therefore I scratch built a mounting, detailed the sight a bit and placed it where it should. Everything was painted Interior Green.
Wheel well received some attention.
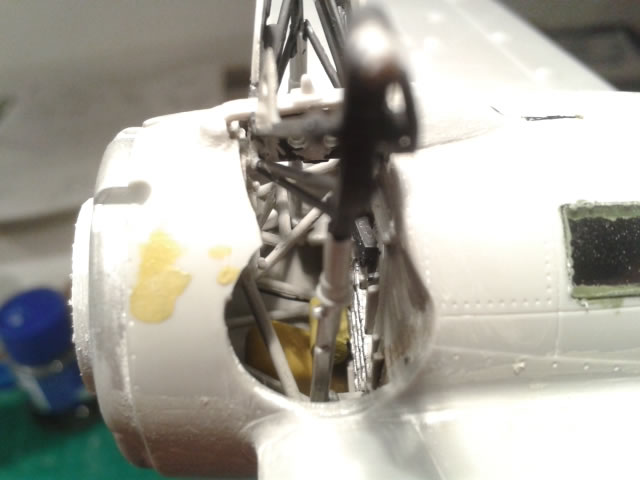
The engine rear accessories received some wiring, “inspired” in some illustrations on the D&S, but just representative. It must be said that it is less visible than it looks. The firewall received also some detail, and some wiring run along the engine bearers (hardly visible)
The intercoolers are well shaped; only the front face is visible. The whole is rather tricky to assemble, but can be done with some ingenuity. This was painted Aluminum (firewall) and Grumman Grey (the rest –though an GM build, every piece of evidence points at these Grey still being used) I weathered them with oils and pastels.
The fuselage was closed without incident, then the “boat” added. Then you have to add the engine, which does not sit back enough and had to be trimmed at the join ring area (all the operation well clear of the engine or accessory back, though inevitably some wiring detached itself) The assembly of the engine itself is not very clear; I detailed the stars with ignition wires, but then their fit to each other and to the crankcase is far from positive. An upward stance also gave me some trouble. Then I added the wings. For all the worrisome look of the very short “fixing tabs” in the wings, fit is exemplary, and a perfect dihedral can be obtained without difficulty; just do not forget to paint the inner faces of the tabs Interior Green, should they be visible from the cockpit. Some putty was necessary on the join lines along the fuselage and the fearsome looking rear join between the “boat” and the fuselage. Cowling posed no trouble, though the fixed sections at the 12 and 6 o’clock positions were puttied.
Undercarriage looks troublesome and it lives to expectations. I chose to fit is at this point to avoid nasty surprises later. The long legs are fiddly and their fit is anything but positive, though there is a substantial socket in the bay. They tend to float over it and also a bit asymmetrically forward, but after some care and super glue they stayed in an acceptable stance. The rear wheel has to be fixed before closing fuselage halves; it is very flimsy and inevitably broke off later. I check the dihedral and found it acceptable.
Windscreen fit was exemplary, but the hood was replaced by a Rob Taurus vac.
Paint
AI started by the regulation priming (Alclad Grey) and then a heavy preshading. Then the fun began.
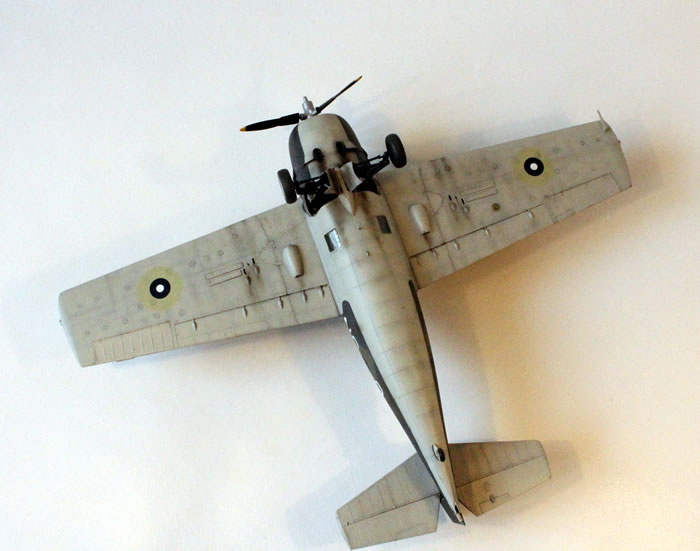
Though Grumman built machines were painted in fairly accurate (“equivalent”) versions of the MAP paints (to the point of being undistinguishable for modeling purposes), GM built ones were reputedly painted in ANA “substitute”, these being ANA 603 Sea Grey and ANA 613 Olive Drab. Undersurfaces should have been ANA 610 Sky, but some good reputed sources claim ANA 601 Light Grey was used. At least, GM used a standardized camouflage scheme fairly consistent through the FM-1 and -2 production run. To complicate things further, a EIF machine would have the big “European” roundels overpainted; usually in MAP Dark Slate Grey.
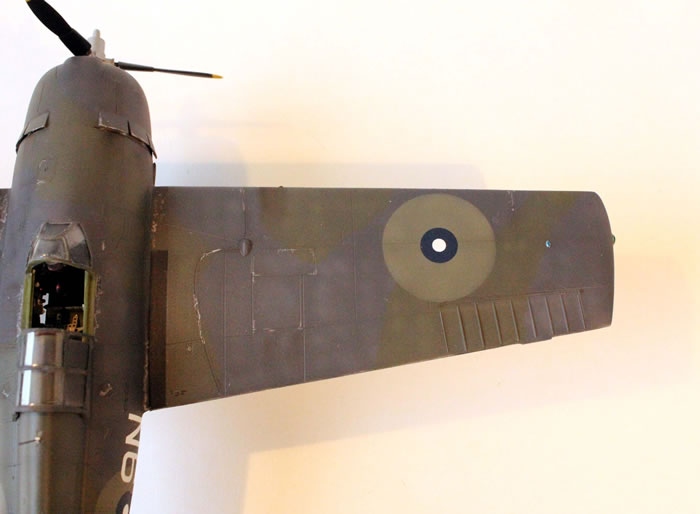
I used two very old Humbrol paints for the upper scheme, Authentic Colour Sea Grey and (regular) RFC Green 108 for the OD. The DSL is Xtracolour, while the Light Grey was no other than BS Light Aircraft Grey. Sea Grey darkened a bit with the Gloss coat (brush painted Xtracrylix), and the DSL was left a bit light, but generally speaking all performed acceptably.
I tend to go lightly with postshading and general weathering of naval planes, but this was shore-based, so I indulged in a bit of dot-painting in lighter shades. The reticular rivet plan certainly helps, though the general effect might be a bit rigid as a result.
Decals
They were Xtradecals, and they were well proportioned as well as performing admirably.
Not having access to the picture of this machine, I am in doubt regarding the overpainting of the upper roundel and replacement by the small one. The absolute lack of stenciling both in the Xtradecals as well in the kit’s sheet led me to scavenge some from an Eduard Hellcat (USN).
The stencils are absolutely spurious with only a passing resemblance to those shown in the Techmod Wildcat VI sheet.
Final Assembly
Having the undercarriage affixed long ago, the final assembly involved the wheels, including restoring the tailwheel (it must be said that it is not accurate. Many Mk Vs had the small solid rubber tyre –but this one is shore based, so it could have the pneumatic “balloon” one. However, it is not large enough to properly depict this. Moreover, the fork could have been single-armed-, pitot, canopy hood and antennae. Regarding the latter, configuration varies. I would very much like to see a research on the diverse types of antennae configuration on FAA planes of US origin (much as there is one on the Spitfires’).
I have seen Mk Vs with masts, both straight and canted, and without. The closest in serial number range I could find was “6-Q” from 882nd Sqn., showing no mast and a whip antenna (as the contemporary Hellcat Mk Is from 800th), so I went for this configuration.
An underrated, under noticed and probably underrepresented kit, which delivers a nice model at a very reasonable price. It was an enjoyable and satisfactory build, one of those that leaves you wanting to build half a dozen. Certainly, those big (no, it is certainly not “a little tubby fighter”) American radial engine naval planes look very good in FAA camouflage.
References
- “The F4F Wildcat in Detail and Scale”, Bert Kinzey, Squadron Signaal Publications
- “F4F Wildcat Walkaround”, Bert Kinzey, Squadron Signaal Publications;
- “Aircraft of the Fleet Air Arm, 1939-1945”, Sturtivant, Air Britain Publications;
- “The British Fleet Air Arm in World War Two”, Ron McKay, Schiffer Publications;
- “F4F Wildcat – Monografie Lotnicze n° 20”, Adam Jarski, AJ Press Publications;
- “Grumman F4F Wildcat”, Andre R. Zbiegniewski, Kagero Publication.
Text and Images Copyright ©
2017 by Fernado Rolandelli
Page Created 20 June, 2017
Last Updated
15 January, 2018
Back to HyperScale Main Page
|
 Home
| What's New | Features | Gallery | Reviews | Reference | Resource Guides | Forum |
Home
| What's New | Features | Gallery | Reviews | Reference | Resource Guides | Forum |