Hasegawa 1/32 scale
Ki-61 Hien (Tony)
by Bruce Salmon
|
|
Ki-61 Hien (Tony) |

Tamiya's 1/32 scale Tamiya P-51D Mustang is available online from Squadron.com
Hasegawa Ki-61 Hien (Tony)
1/32 scale
Kit No. 8078
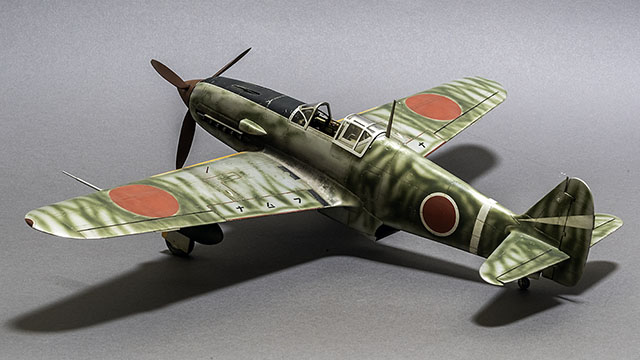
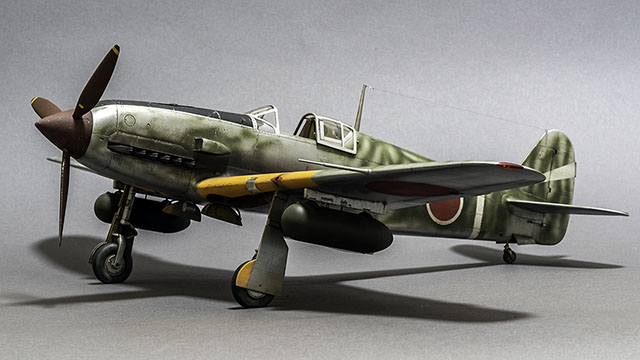
My model represents Ki-61-1 Otsu, 68th Sentai (Manufacture number 640) operating from Boram airfield near Wewak, Papua New Guinea. The Otsu armament was 2 Ho-103 12.7mm MG in the nose and the same in wings.
The pilot force landed his aircraft on an open area of Kunai grass near Yilipe to the south of Aitape around late Dec 1943. The aircraft was recovered to Port Moresby in the 1970’s and the empennage was later acquired by Kermit Weeks (Fantasy of Flight, Florida). At a much later date the remainder of the aircraft was shipped to Australia for restoration expecting an eventual return to the PNG Museum.
Ref. Pacific Aircraft Wrecks and Where to Find Them by Charles Darby. Kookaburra Technical Publications Pty Ltd 1979. Pg 3, 68 middle and bottom.
Originally I wanted to get the 68th Flight Regiment Ki-61 (Kit 8190) as it sports a retractable tail wheel and correct wing gun blisters. Unfortunately it seems to have been a limited run edition so I had to make these parts from scratch.
Aftermarket Products Used:
- Aires (2107) Kawasaki Ki-61-1 Cockpit Set 1/32
- Quickboost (QB 32 075) Kawasaki Ki-61 Hien Undercarriage Covers 1/32
- Quickboost (QB 32 037) Kawasaki Ki-61 Exhaust 1/32
- Master (AM-32-022) Ho-103 12.7mm Japanese Aircraft Machine Gun Barrels
- Montex Maxi Mask (MM 32071) Ki-61-1 Hien Hasegawa
Cockpit
Construction began with the Aires resin cockpit. This is one of their newer designs so it’s basically a drop-fit replacement of the kit parts meaning you won’t have to spend ages thinning down the fuselage side walls. The set is only let down by their instructions which are vague in places. The upper kit sidewalls will need to be ground down where PE parts (PP21-PP22) are supposed to be affixed otherwise the top edge would be far too thick. I should also bring to your attention that some of the kit parts are needed in the construction and that the instructions don’t mention this.
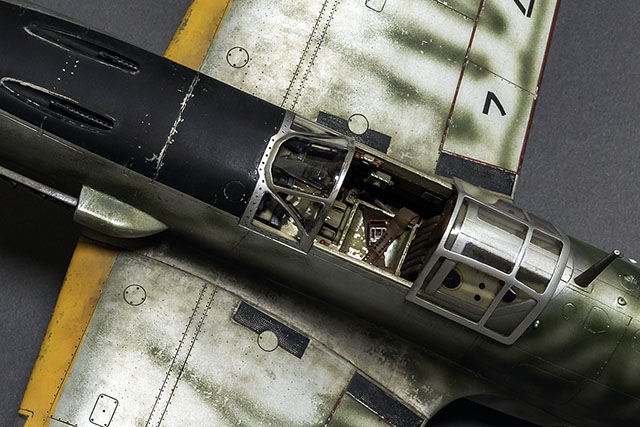
The emergency canopy jettison handles are oversized and should have been cast in resin not PE. You will also have to grind down much of the MG breeches to be able to fit the upper cowl over them. I made sure to offset the rudder pedals so that they would match the position of the rudder that I would later cut off and repose. In the rear decking behind the headrest, I scratchbuilt the fuel pressure regulator and its relevant pipework.
The cockpit was painted with 1 – Tamiya XF-49 Khaki / 1 – XF-59 Desert Sand followed by a wash with AK (066) Enamel wash for DAK vehicles. A drybrushing and chipping procedure helped to pop out the details.
Fuselage
Next the cockpit was glued into the fuselage with epoxy and the two halves cemented together; it was a tight fit. I forgot to glue in part A13 (the support for the tail planes) so instead I glued it into both planes and later cut it in half so that each plane would have a tab to ensure a strong connection when glued into the fuselage.
Also at this time I cut out the new tailwheel well and added some internal fittings to accept the tailwheel leg which I remade from brass tube for extra strength. I then scratch built some hinged doors to fit. The radiator assembly went together easily and was inserted without too much fuss. I thinned the rear end of the shutter flap to a more reasonable scale thickness.
Some attention was also needed in the nose area. The exhaust gas deflection fairings G5 were far too thick and had to be thinned. I also glued some plastic card ribs to the underside of the upper cowl and drilled them out to accept the exquisite Master MG barrels which would be added later in the build process.
Quickboost’s exhaust pipes were then dry fitted and I found some sanding, shimming and packing was necessary; consult your references here. I painted them first with Alclad ALC 123 Exhaust Manifold then weathered with AK 013 Rust Streaks and AK 046 Light Rust.
The kit aerial mast is poorly fitting as the hole for it is far too large. I shimmed the hole and also made a brass rod insert for the mast to ensure a more secure attachment. The rudder and elevators were then cut out and repositioned for a more dynamic pose which I think adds a bit more life to the finished model.
Wings
Next the two wing halves were joined. The trim tabs were ridiculously thick so I cut off the ones on the top wing surfaces and thinned those on the bottom. I then dealt to the gun tube openings as they are far too wide and had to be remade. I cut the holes even larger and inserted plastic tube of the appropriate internal diameter. Once the glue had dried I sanded them to match the leading edge profile. I also made some machine gun barrels from plastic rods which were painted black and glued at a suitable depth inside the tube openings.
The same method was used for the pitot tube opening but using brass tube instead. Whilst the glue was drying I aligned it precisely so that when I inserted my newly scratch built brass pitot tube it would fit easily and at the correct angle. New gun blisters had to be fashioned by first sanding off the moulded ones and gluing on replacements using 40 thou plastic card pre-sanded to shape.
Construction Continues
The wings and tail planes were then dry fitted before being permanently attached. There is a sizeable gap in the top of the port wing root which was partially alleviated by sanding the bottom joint. The remaining gap was then shimmed with 10 thou plastic card. A possible cause may have been the tightly fitting resin cockpit as I have seen the same problem in another online build using this cockpit; I have not heard of any problems arising from using only the kit parts. Next the model was primed with Alclad ALC 302 Gray Primer and Microfiller and then sanded with wet 4000 grit sandpaper.
The whole airframe was then riveted using the RB Productions (RB-T010) Rivet-R Mini riveting tool. This an excellent tool although the size of the holes it produces are better suited to 1/72 and 1/48 scale. For 1/32 scale you need to widen and deepen the holes with a pointy scriber; I didn’t bother and consequently the holes are quite hard to see especially once you have painted over them. If you want to save time I would suggest only enlarging the rivet holes where they are most noticeable such as the around the nose, cockpit sides and inner half of the upper wings. After riveting, the model was lightly sanded again.
Undercarriage
The main landing gear legs need some attention as they are rather basic. My method was to first glue the hubs (C19,C20) to the appropriate legs. I then added brake lines using fine brass wire. They were painted Alclad ALC 106 White Aluminum and weathered with Tamiya Panel Line Accent Colour Dark Brown.
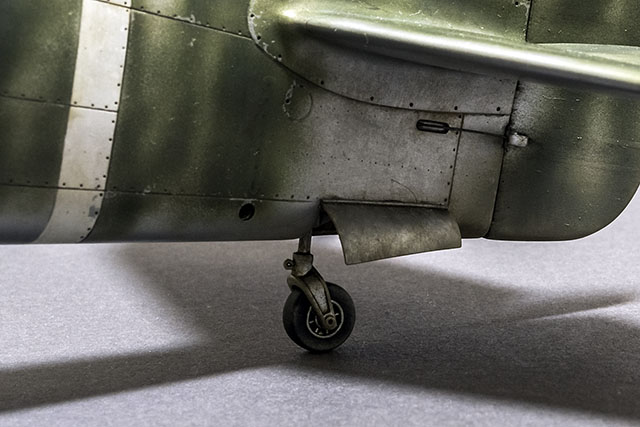
Next the wheels were painted dark grey and mud colours were applied to the sidewalls using Tamiya Weathering Master A set (Item 87079). I then painted the Quickboost undercarriage gear doors. The only difference between these doors and the kit parts are that the inner surface ejection pin marks have been removed and the outer surfaces are riveted so it’s up to you if you think they’re worth the money or not. The parts were then set aside until after the airframe was painted.
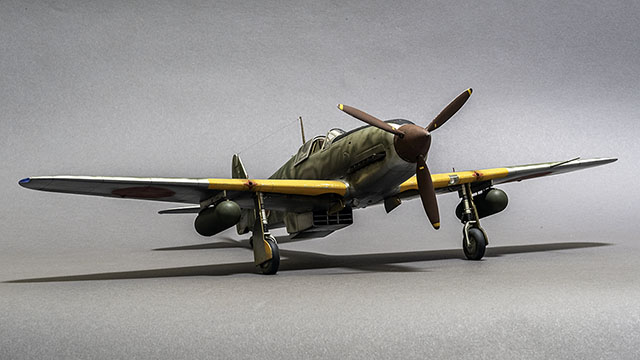
Propeller
The base of the prop blades needed some sanding and the spinner required dry fitting as the fit around the blade holes is a bit tight. I first sprayed a coat of grey primer then painted the yellow tips of the blades. Then a mix of Tamiya XF-9 Hull Red and Mr Hobby H-47 Red Brown was applied using a slightly darker mix for the propeller blades. Next I masked off the blades and used the salt weathering technique on the spinner.
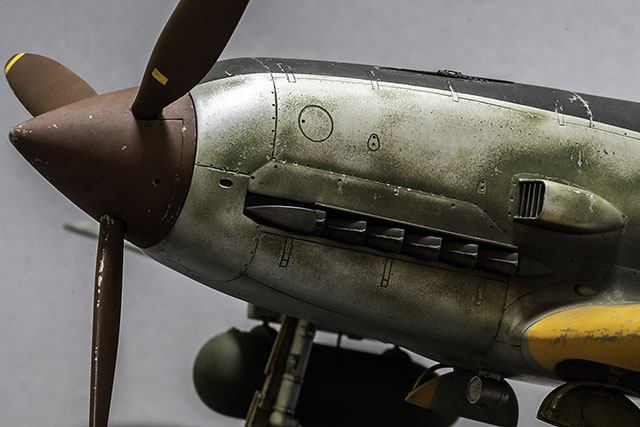
I painted two colour layers both highly thinned (15/1). Firstly salt was applied then I sprayed with light red brown. The initial salt was washed off and another lot applied before spraying with black. Lastly the whole unit was washed and then further weathered with an oil wash and some chipping and drybrushing.
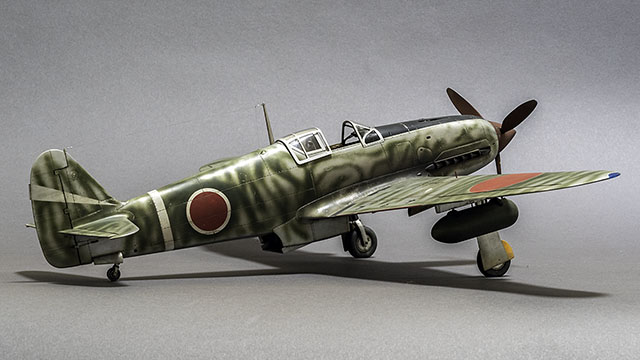
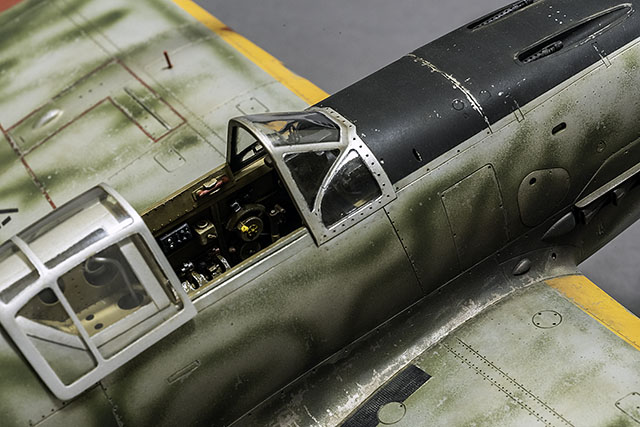
Canopy
To be honest the open canopy is probably the worst part of the kit. It is extremely thick for this scale and the sliding section sits far too high at the rear when fully open. I plunge-moulded a new sliding section using the closed canopy part Q4 as a mould. It turns out a little wide at the lower front edges and a little narrow at the back. As I didn’t have the right thickness of plastic to mould with I gave up and resorted to using the kit part instead. The edges of this were bevelled and the inside was sanded out and then polished for a better fit. I really wish there was an aftermarket replacement part for this.
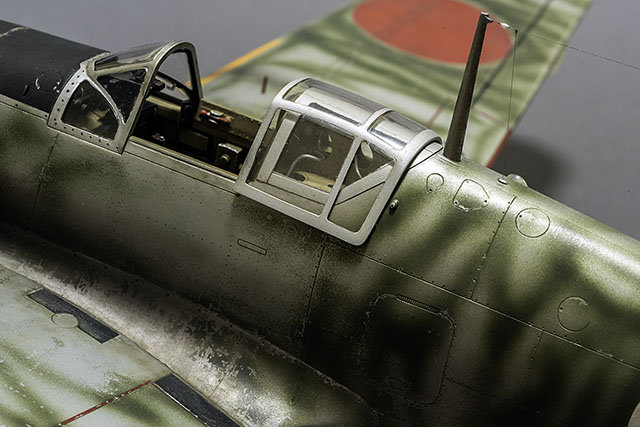
I then masked the outside of the canopy parts only using the Montex masks. These were a pain as they are ill-fitting and had to be cut up for a better result. The interior colour was painted first; black for the windscreen and the cockpit colour for the sliding and rear sections. Once dry this was followed by a top coat of enamel X-11 Silver then a satin varnish to finish.
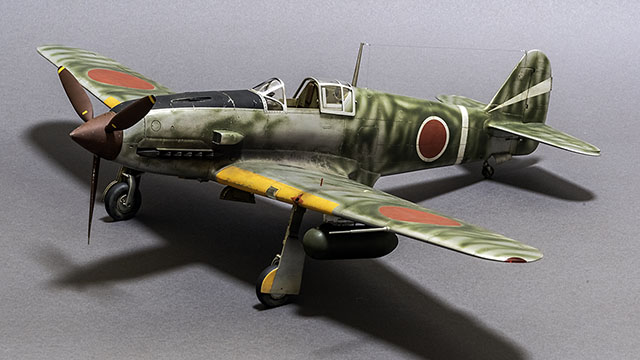
Drop Tanks
The drop tanks needed some filling and sanding to achieve the correct profile. I decided to paint them XF-13 J.A. Green lightened with some XF-4 yellow green. I then used the salt method of weathering beginning with some highly thinned yellow green.
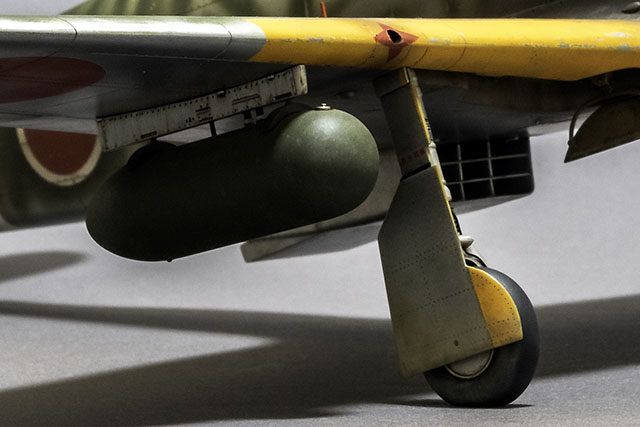
The initial salt was then washed off and a second application applied and painted this time using thinned black. The pylon was painted ALC 103 Dark Aluminum and once dry the tank was attached.
Painting
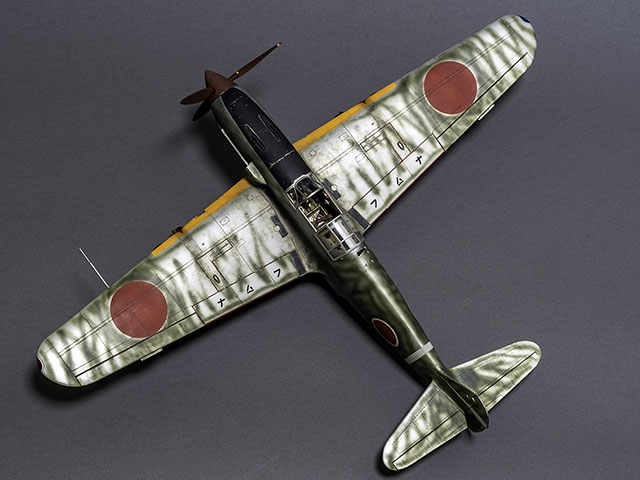
This began with masking and then painting the wheel wells, the leading edge stripes, anti-glare panel, Hinomarus and other theatre and unit stripes. The Hinomarus were painted 5 parts Mr Color lacquer 327 FS1136 Red / 1 part 29 Hull Red / 1 part White and the leading edge stripes 4 parts XF-3 Flat Yellow / 1 part Mr Hobby H24 Orange Yellow. Once dry these were masked over and the airframe sprayed with Alclad Aluminum ALC 101 with a few panels in ALC 103 Dark Aluminum. The salt weathering technique was used again to age the aluminium finish. First I used heavily thinned white and secondly black.
nterestingly the white made the most visible effect. The model was then washed several times as the salt tends to get into everything. Next I masked and painted other smaller details and applied a few decals. Another thing that’s sorely lacking in this kit are stencil decals for things such as the under wing pylons, landing gear leg placards and various other hatches. Following this a coat of acrylic satin clear was applied using a mix of Tamiya Acrylic X-22 Clear and XF-86 Flat Clear. The wavy pattern was then sprayed freehand using XF-13 J.A. Green and finally the masking was removed.
Now I went to work wet sanding the paintwork with 8000 grit sandpaper to give it that worn-off look. The satin clear forms a slight barrier so that you can sand off the green without sanding through to the Alclad or the underlying plastic. Unfortunately the satin finish traps the green paint unevenly so that I ended up with a spotty effect. Further sanding eliminated most of this problem. You also need to be careful sanding near decals as it will show up their edges easily. Lastly I painted the exhaust stains and gun smoke residue. Once the painting was complete I gave the model a protective satin clear coat.

It was at this time that I discovered the landing light cover had cracked. This was replaced with one that I plunge-moulded from a mould that I made from plastic card and Milliput. I had to half guess at its shape as I couldn’t touch the wing due to it already being painted. Next the main landing gear legs were attached to the wings with epoxy glue to give a drying time long enough to be able to move them into their correct positions while aligning the wheels as well. Lastly the gear doors were attached.
Weathering
The model was given an overall filter wash by painting along every panel and rivet line with Tamiya Panel Line Accent Colour Dark Brown. The excess was then half wiped off but also blended in using a wide flat brush slightly dampened with white spirits.
Some panel lines were darkened with further darker washes. Oil streaks on the belly were made with AK Interactive AK 025 Fuel Stains and some restrained chipping was applied with a fine brush and X-11 Silver enamel paint. Another light satin clear coat was then applied.
Next the exhaust pipes were attached and further weathered using the rust and soot colours from the Tamiya Weathering Master B set (Item 87080). Lastly another filter wash was applied to the upper surfaces using AK 022 Africa Dust Effects / AK 080 Summer Kursk Earth 50/50 thinned 50% with turps.
Final Assembly
The drop tanks on their pylons were attached without any fuss followed by the other breakables: Master MG barrels, sliding canopy, radio mast, pitot tube and main landing gear retract indicators on top of the wings. Finally some dust pigment was lightly brushed onto the wings and drop tanks and also some general grime around where the pilot and ground crew would walk. I noticed that the canopy silver didn’t quite match the Alclad on the airframe so I painted it with some highly thinned raw umber oil paint which helped to a lesser degree.
Overall, this is a reasonably good kit, however for a modern piece Hasegawa could have made a better effort especially concerning the scale thickness of some parts. The decals are in need of further embellishment and it would be nice to have a decent canopy for this bird because it sorely deserves one.
Model and Text Copyright ©
2018 by Bruce Salmon
Page Created 10 July, 2018
Last Updated
10 July, 2018
Back to
HyperScale Main Page

|
 Home
| What's New |
Features |
Gallery |
Reviews |
Reference |
Forum |
Search
Home
| What's New |
Features |
Gallery |
Reviews |
Reference |
Forum |
Search