Revell 1/48 scale
Consolidated SA-10A Catalina
by Jon Bryon
|
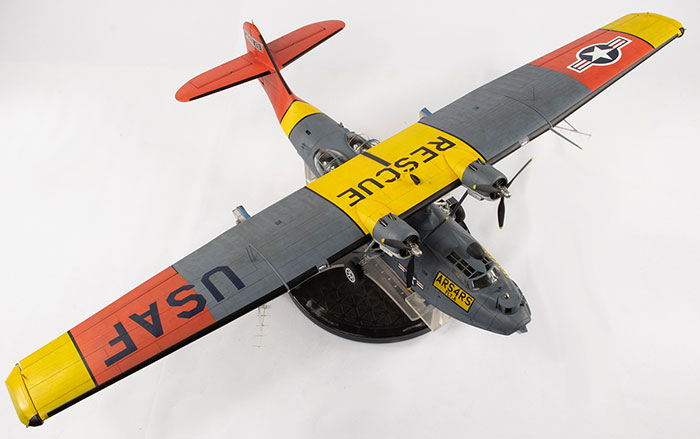
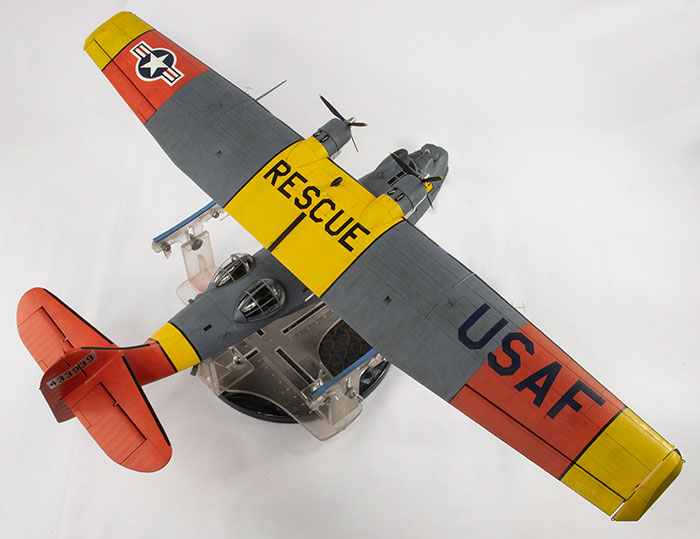
Consolidated SA-10A Catalina
US Air Force, 4th RS, USA 1949
|

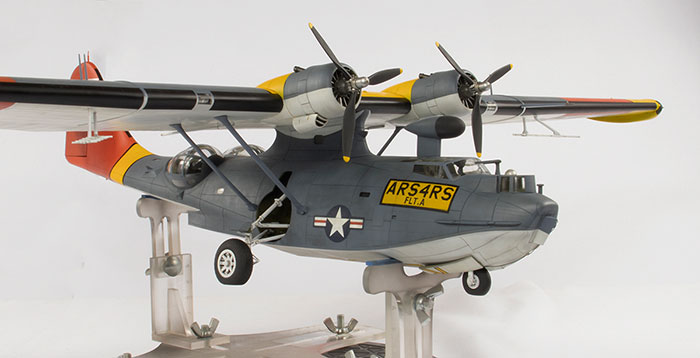
Revell 1/48 Consolidated SA-10A Catalina
with Eduard Brassin wheels, Eduard photo-etched undercarriage set, Belcher Bits resin tail correction and Quickboost resin engines
US Air Force, 4th RS, USA 1949
My main recollection of getting this kit was picking it up from my post in the Porters’ Lodge at Queens’ College in Cambridge in 2002, and then immediately going punting up the river Cam with friends and awkwardly trying to fit it in the punt. It comes in a Big Box because, of course, it is a Big Kit.
So big that I doubted I’d ever build it and it’s followed me around for the past 18 years in an increasingly battered box. Ever since I built an Italeri 1/48 AC-130, big kits have lost their appeal as they are hard to manoeuvre on the work bench, hard to display, and tend to fall apart. When it comes to the Catalina, it’s not so much the length (which is less than a MiG-31), but the wingspan.
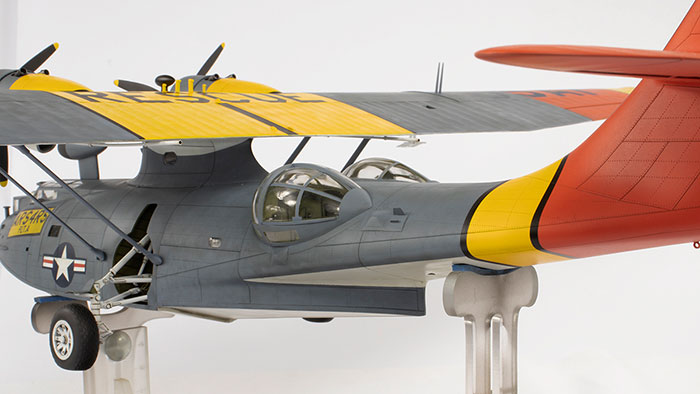
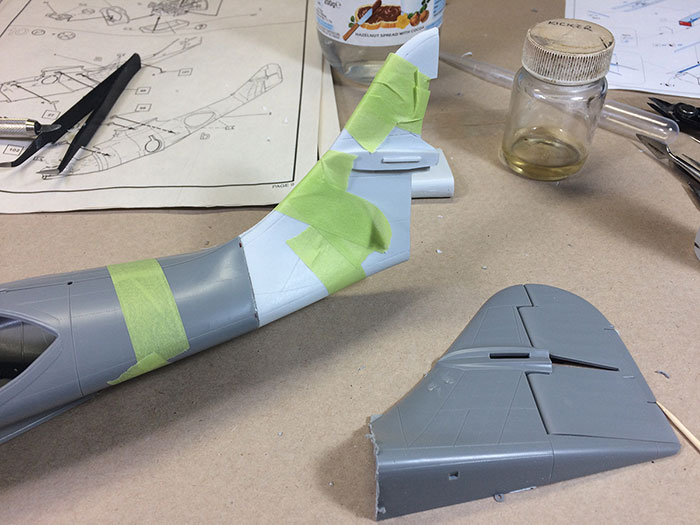
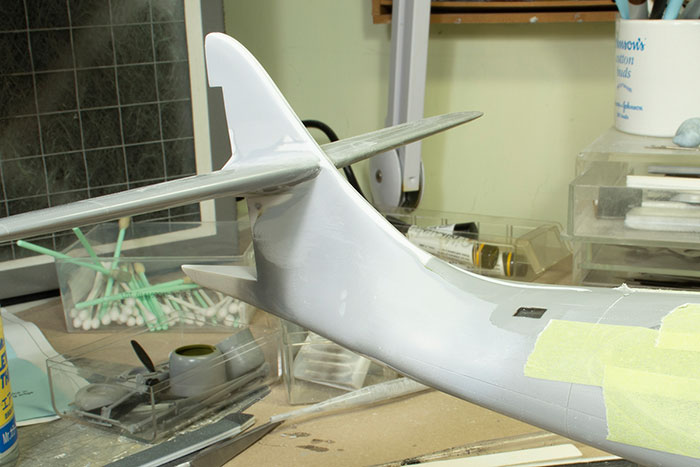
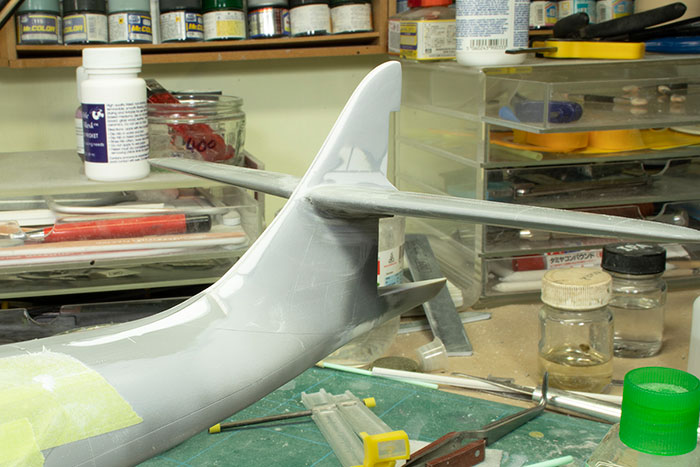
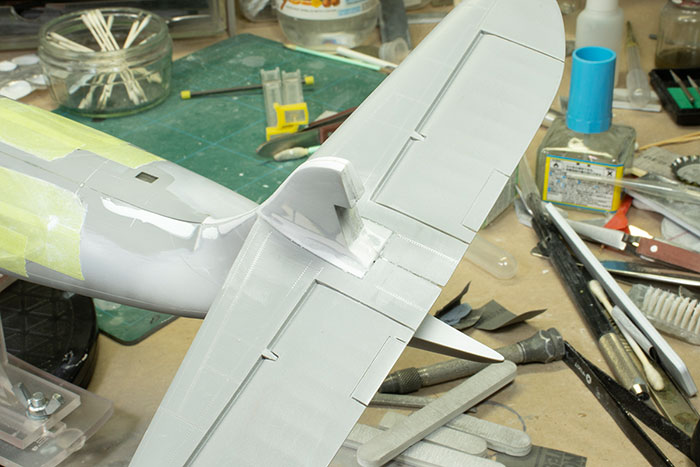
The other big issue was the tail. I became aware after purchasing the kit that the tail was considered too fat. I looked at photos and I agreed. Belcher Bits in Canada make a resin replacement, but it was expensive to source in the UK and threatened to increase the already considerable amount of nose weight the model would require. This made me nervous because the main landing gear looks fragile.
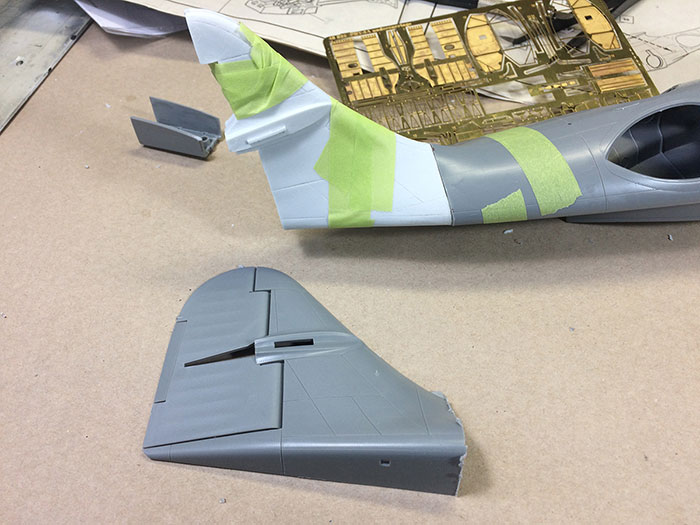
In 2018 I came into a little money and (amongst other things) I decided to splurge on getting the corrected tail direct from Belcher Bits. It is a big chunk of resin. The shape is, in my opinion, infinitely better than what comes in the kit, but this is a correction set that takes some work to use. I wanted to completely redo all the surface detail to better match the injection moulded plastic, and there would inevitably be a lot of body work to blend the tail into the fuselage. The resin is quite hard, which helps. If you intend to use this set, be prepared to put quite a lot of effort in.
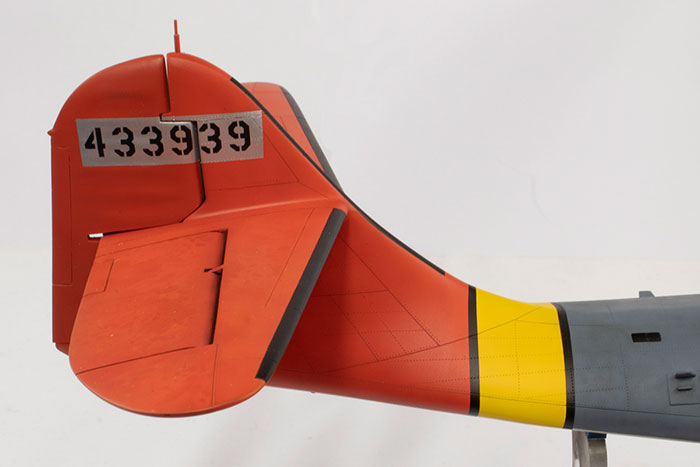
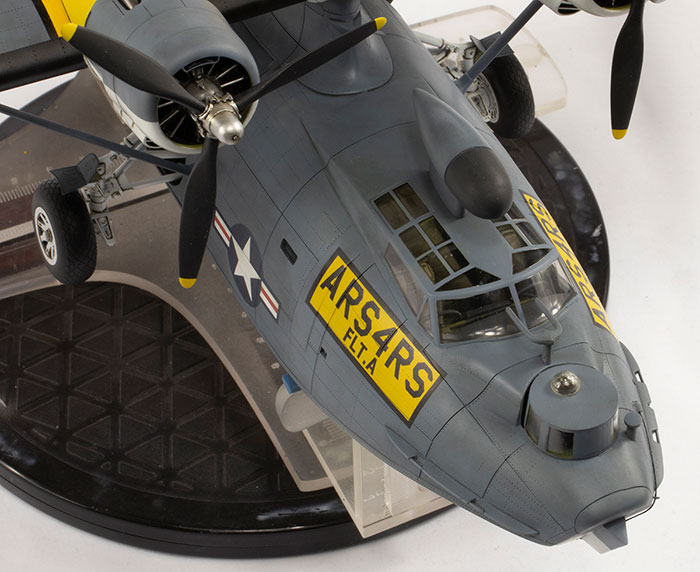
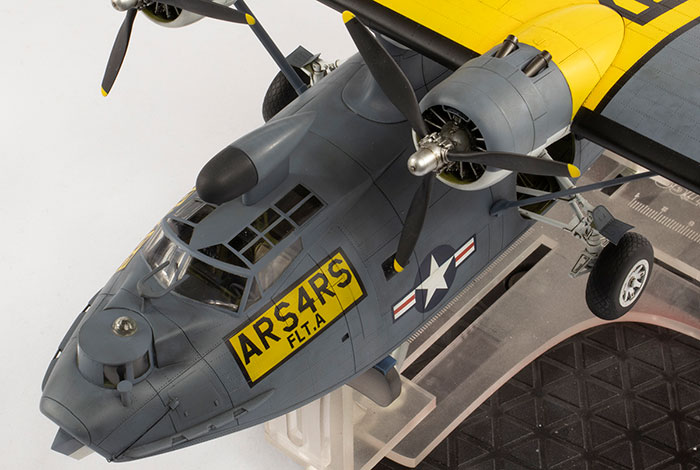
I wanted to make the brightly-coloured example that was provided by Revell and is illustrated on the box art: a blue and white USAF SA-10A with a red tail and wing tips and lots of yellow bands and panels. I don’t know if this scheme was unique to 4433939; I couldn’t find any other similarly marked Catalinas on the internet as most seem to not have had the red markings. 4433939 is not that well documented in terms of images I could find via Google, and in the end I only managed to track down lots of different versions of two photographs, both clearly taken at the same time and of the port side, one from the front and one from the rear. The best one is on Wikipedia.
Looking closely at the photographs revealed quite a lot of small modifications that would be required to the kit:
-
There are (at least) three antennae masts on the wings not provided in the kit. I added these from left over Hasegawa F4U parts.
-
The kit-moulded aerial mast behind the observation blisters should be removed.
-
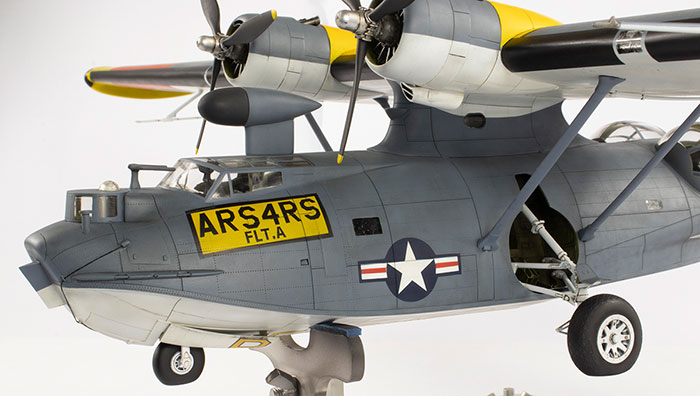
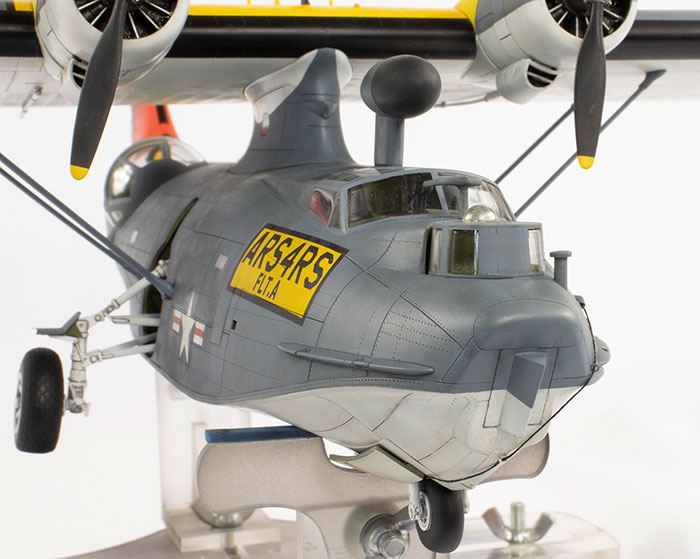
There is a U-shaped aerial in between the nose turret and the main canopy. I could only find an image of this fitted to one other Catalina (4433912). I used a spare part from a Revell C-47 for this, which is rather too chunky but will do.
-
The intake at the base of the tail should be removed. This is not moulded into the Belcher Bits tail (they provide it as a separate part if required).
-
An astrodome needs to be added to the nose turret. The closest I could get was something from my spares box, but if I could have found a part just a millimetre wider, I would have been happier.
-
There is some sort of ‘post’ (for mooring?) by the port side of the nose turret. I added this from a spare prop shaft; it’s slightly too big.
-
There’s a wedge-shaped protrusion on the nose. I’ve only seen this on 4433924 and 4433939, so pinning down the exact shape was impossible. It looks like it might be there to deal with ice on the water. I shaped something similar from a bit of a P-47 dorsal spine and Milliput.
-
There should be a smaller football antenna on the upper wing between the engines. Again, I sourced this from my spares box.
-
This Catalina was rigged for JATO and has two mounts either side near the observation blisters. I found a couple of good photos and put something together from some MiG-21 airbrake bays and ordnance that came in an Academy F-4 kit. The finished items are rather overscale and rather oversimplified.
In addition to these matters of accuracy, I made the following detail changes:
-
The moulded holes for the bombs under the wings were filled.
-
I decided it was unlikely the gun mounts were fitted to a rescue aircraft in 1949, so I removed them. I was looking for excuses to remove any weight from behind the main wheels.
-
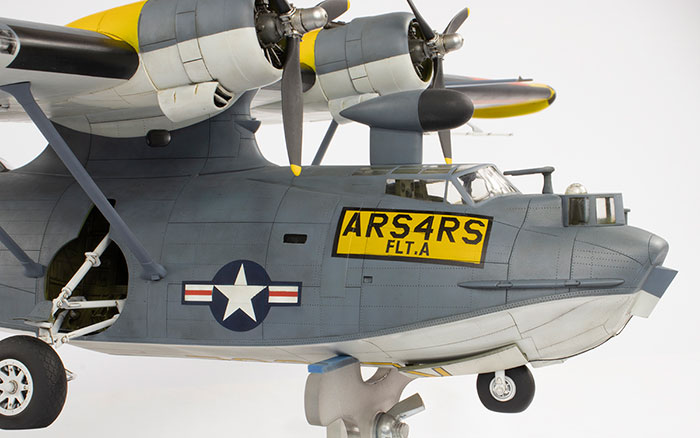
Quickboost engines, which have finer detail than the kit engines, but they are not super-detailed. I added push rods from brass wire; a lot more detail could be added if desired.
-
I cut away the moulded on mooring rope and replaced it with cotton thread coated in PVA to remove fuzziness from the fibres.
-
The solid hand holds around the nose were removed and replaced with plastic rod.
-
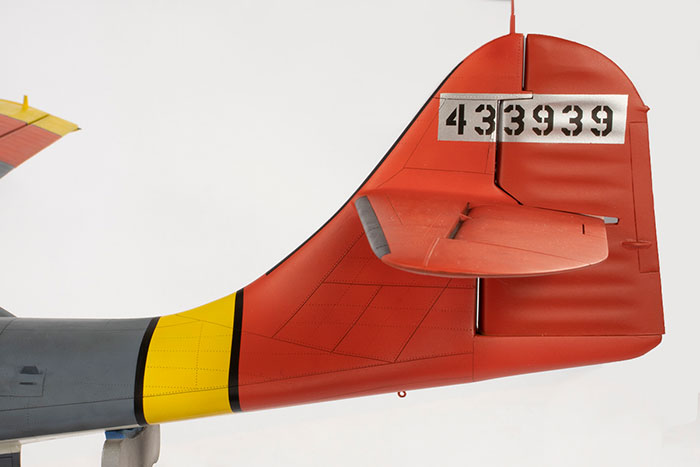
What I take to be a tie-down loop was fabricated from wire and added under the tail.
-
The ends of the fuel dump pipes were replaced with brass tubing from Albion Alloys.
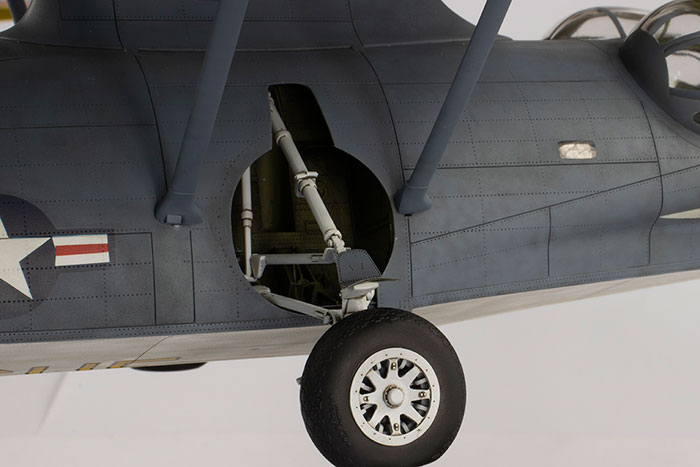
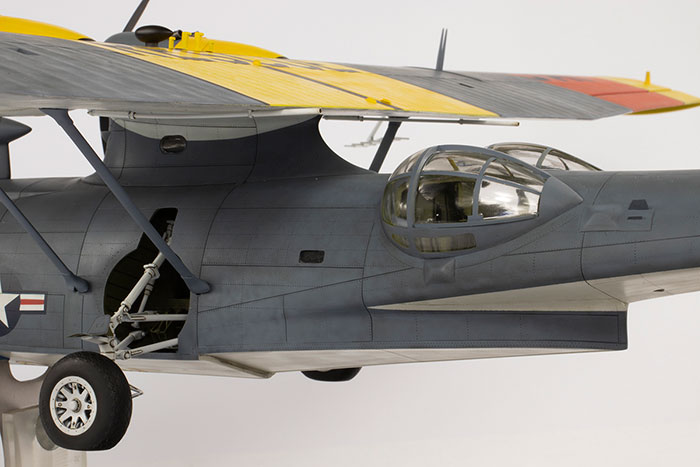
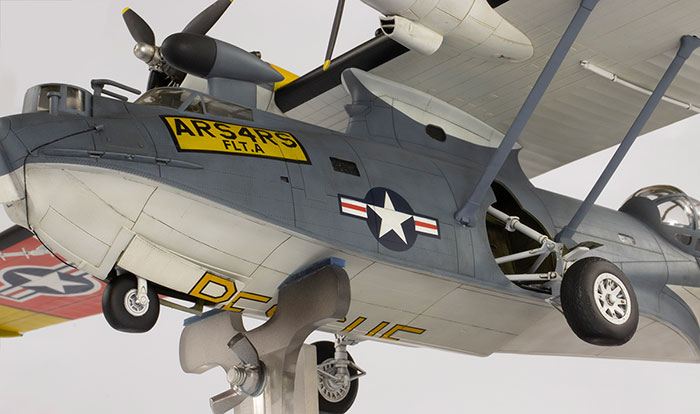
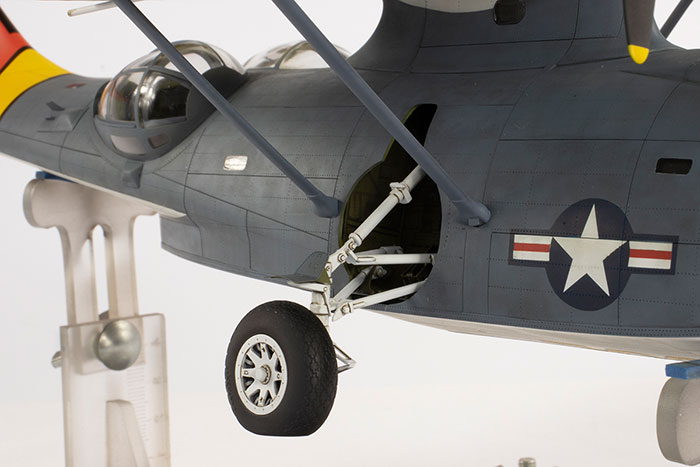
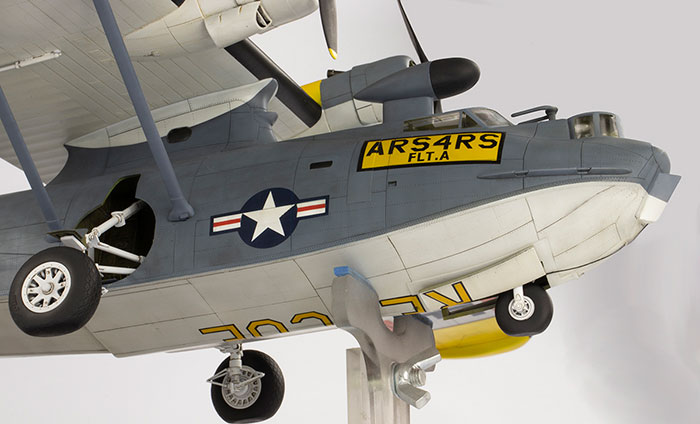
In addition to the resin tail, I decided to obtain Eduard’s resin wheels. The set arrived with the nose wheel missing but double the number of hubs for the main wheels. It was a couple of months before I realised this and Creative Models were super-quick in rectifying the problem.
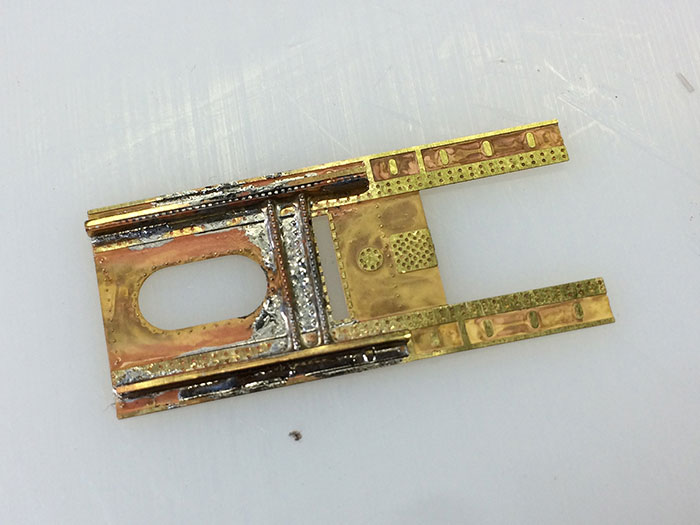
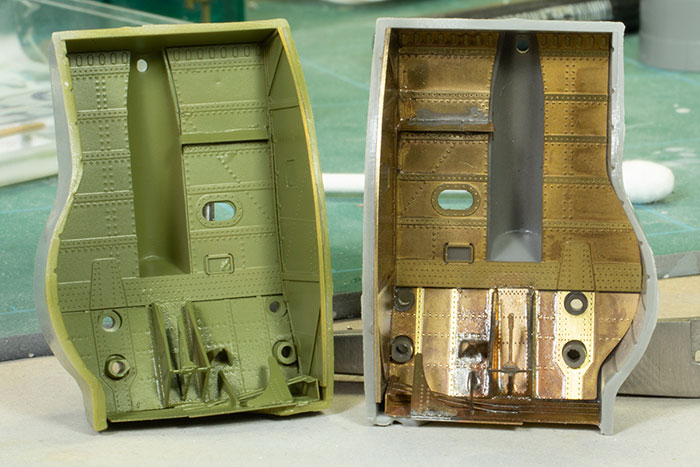
I discovered that Eduard made a photo-etched set for the main undercarriage bays. This really appealed to me as this area is highly visible and somewhat simplified. The only problem was it was out of production. I found one second hand on the Hannants website and ordered it for far too much money…
The set looked nice but fiddly. Eduard made a rather big cock-up in neglecting to realise that an oblique section through a cylinder is an ellipse, not a circle. This means the large PE overlays in the main bays do not fit over the cylindrical undercarriage mounts and the PE needs to be reworked. This seems a rather elementary error for the most prolific of PE manufacturers.
I dislike gluing PE parts at the best of times; the bond never seems as strong as I want it to be. Some groggy YouTube viewing in the early hours after a late shift reminded me that Paul Budzik had done something on soldering, and I became convinced that might be a better way forward.
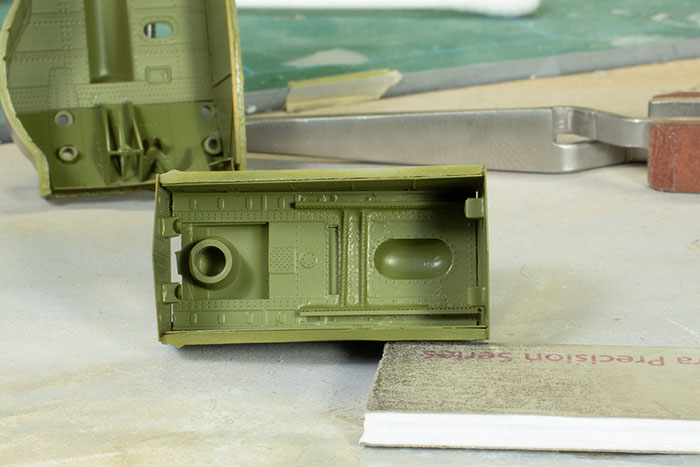
I’ve not done any soldering since I was at school, and that was for printed circuit boards, not construction. Nevertheless, I bought the recommended stuff, and pressed on. Colour me impressed; it’s not super-pretty but the bond it forms is amazing, and after a bit of clean up and some paint, was much better than anything I could have managed with glue. I started with the nose bay as it’s invisible on the finished model (which is why the wonky parts in the photos below were not fixed).
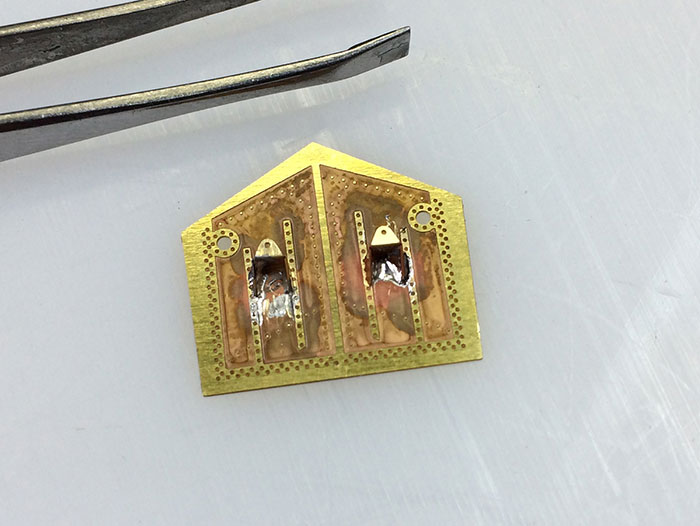
Sweat soldering also worked for the tail aerial mast I made from brass tube, and is much easier for bonding telescoping tubing than superglue or epoxy.
The Revell Catalina has a reputation for needing a lot of nose weight, and that’s before you decide to stick a resin tail on the rear. The Belcher Bits tail I had was hollow, but the walls were still pretty thick. I spent a long time thinning them down with a Proxxon power tool, and also hollowed out as much of the separate rudder and the fixed part under the rudder as I could.

By taping everything together, I then attempted to estimate how much weight I required in the front. The first attempt used this amount of steel ball bearings and lead ballast balls looked like this:
[insert images Weight.jpg and weight 2.jpg]
This wasn’t enough, so about another 50% more was added on the rear of the cockpit bulkhead as were some bearings under the seat in the nose turret.
As construction continued, I was continuously checking the weight issue. It turned out what I’d already added was insufficient, and so I filled the front large football antenna over the cockpit with lead ballast. Still not enough.
In the end, the nose turret area got filled with more steel and lead, painted black, and I am relying on the very limited visibility through the turret windows to not worry about it. Behind the rear cockpit bulkhead I added a fake shelf to prevent the weights there being seen through the rear windows.
The kit is essentially quite simple and goes together quite well. Adding the resin tail really complicated matters for me around the rear end and a lot of Silver-Grey Milliput and superglue were used to blend everything together. The plastic tail planes in particular took vast quantities of CA to fair into the resin tail.
It’s easy to install the cockpit a bit wonky (I did) as the moulded locating tabs are very loose; this is an area to pay careful attention to.
The clear fuselage windows are a loose fit into their moulded holes. I wanted to try a UV-curing glue to fill the gaps, and managed to get hold of something called Blufixx, which I believe is a German product. Unfortunately, mine was sold with a non-proprietary UV light and the stuff didn’t really cure. Blufixx say a 405nm UV light is required, and in the UK I could only find a light source at 395nm. I have no idea how much difference that 10nm makes, but even under such a light for 60 minutes, the glue never really cured and remained soft. This was definitely a disappointment and I remain on the lookout for a UV glue that actually works.
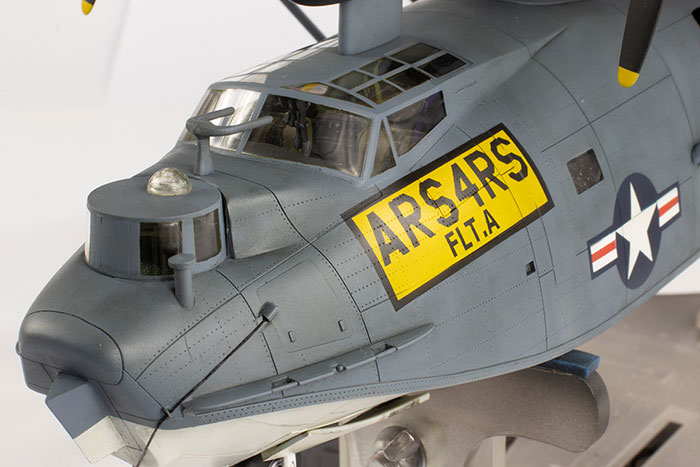
The main canopy was way narrower than the fuselage, which posed a big problem. I even considered cutting it down the centre. In the end, I didn’t follow through with that mad plan and resorted to good old Milliput, Mr Surfacer 500 and CA to blend the sides of the canopy in. I did, however, butcher the fuselage where canopy joins at the rear three-quarter area to make the joints easier to address.
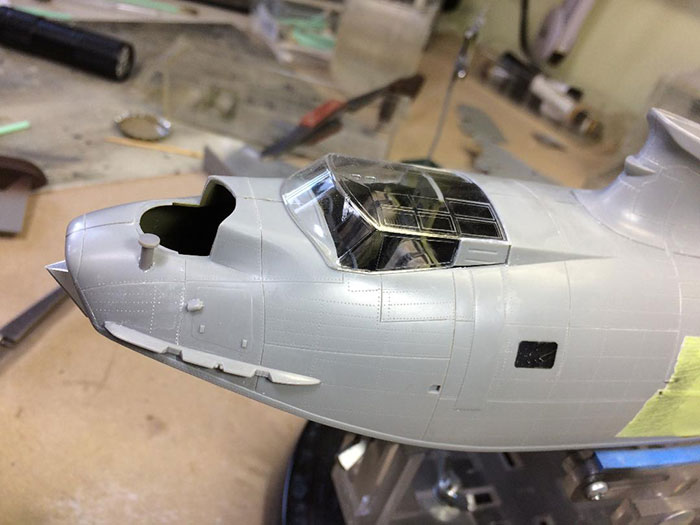
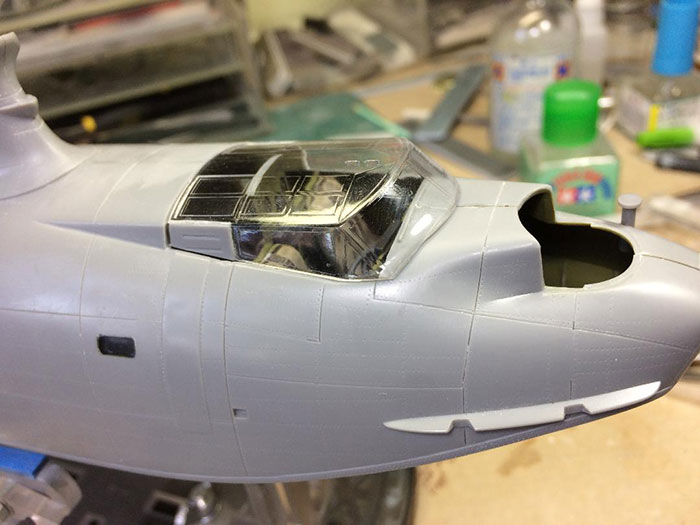
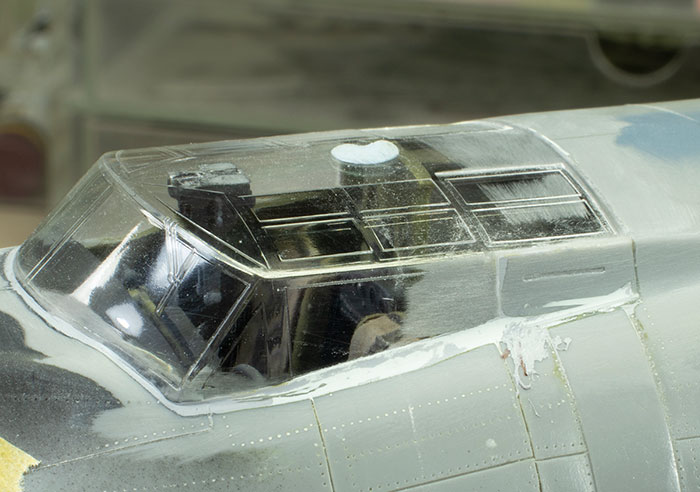
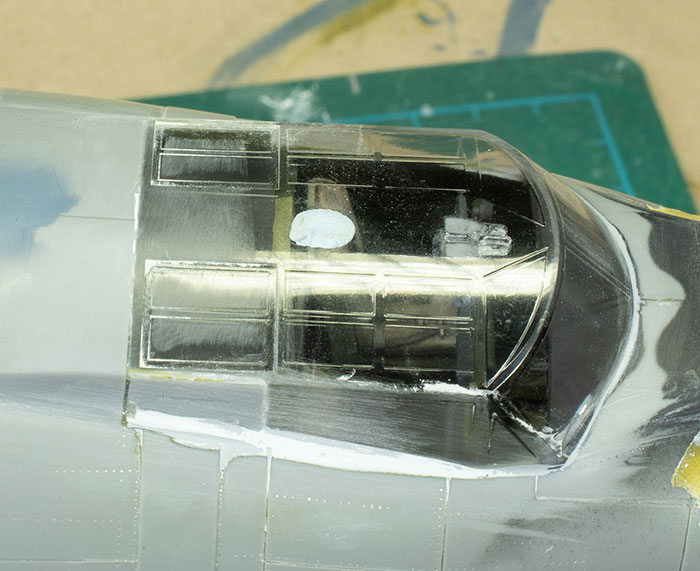
After masking and spraying the canopy with Interior Green, I realised Revell had moulded the canopy framing far too wide. I stripped some of the paint and remasked, but the geometry does not allow for scale-thickness frames, and so those on the model are still too wide down the side of the canopy round to the windscreen.
The wing is absolutely enormous. The engine nacelles are a pretty poor fit (and to be honest, just look wrong somehow…) and the cowls needed quite a lot of carving to get them to positively attach. It’s not a particularly pretty area of the model and I hoped the sheer size of it would distract from some of the sloppiness around the engines. Again, quite a lot of CA was used to get rid of gaps and to fair the base of the four aerial mounts into the centre of the wing. Revell provide no leading edge lights and the transparencies fit very, very poorly into the leading edge. Mine got fogged up during filling and it all looks rather a mess in that area. The mounts for the large underwing radar aerials have big gaps around them and took a lot of effort to install cleanly. They did not survive construction unharmed…
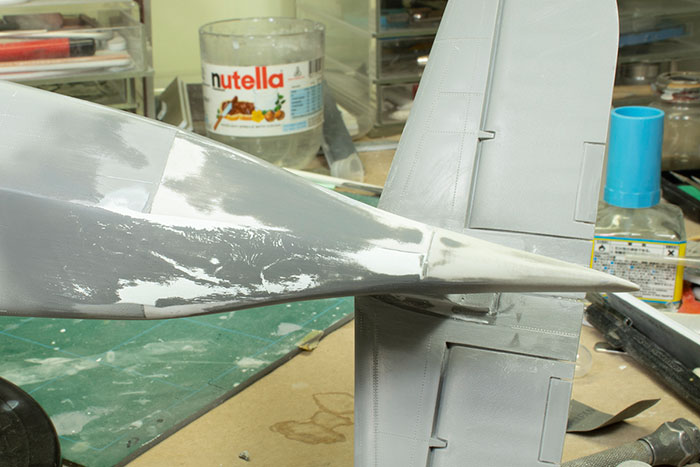
The surface detail on the resin tail does not really match the quite fine and riveted detail on the kit. I eliminated it all and then pondered how to make it match, since rescribing into hard resin and CA was not going to be fun. In the end I plumped for what I call the intermediate Paul Budzik method, which is to scribe into primer, and not the underlying material. (The advanced method is to scribe into the finished paint!) I therefore sprayed the rear of the model with generous amounts of Mr Primer Surfacer 1000, followed by Mr Mahogany Surfacer 1000 and then Mr Finishing Surfacer 1500 White, all through an Iwata RG-3. That meant there was a lot of primer. With a needle, I scribed through the white primer revealing the brown primer underneath using Tamiya white flexible masking tape as a guide. This was not ideal, as the tape deforms easily under pressure. The resulting detail is a bit wobbly and rough when viewed close up, but I was happy enough. I then attempted some riveting using a wheel from RB Productions and learned my hand is not as steady as I thought it was. I should have used a guide and marked it all out properly in pencil first; the rivet lines are all over the place.
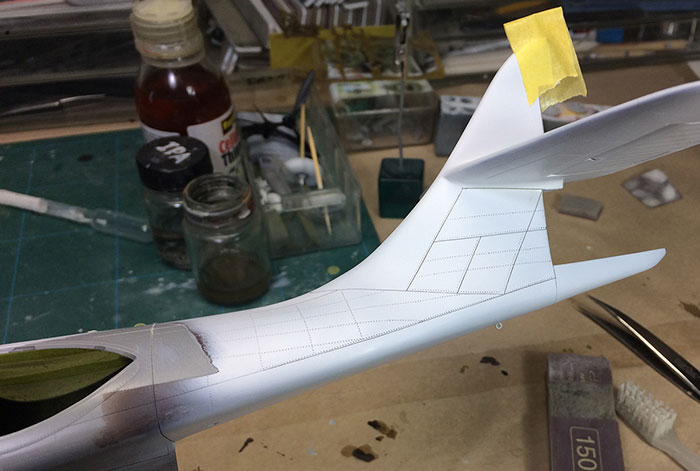
Part way through scribing.
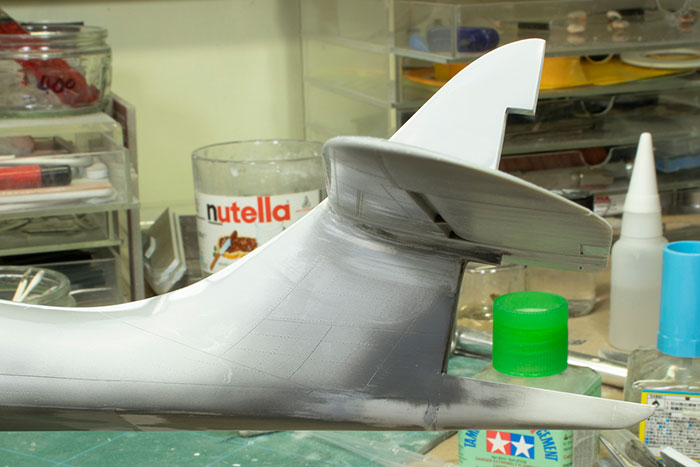
I was bored with filling, masking and rescribing, so left it at that.
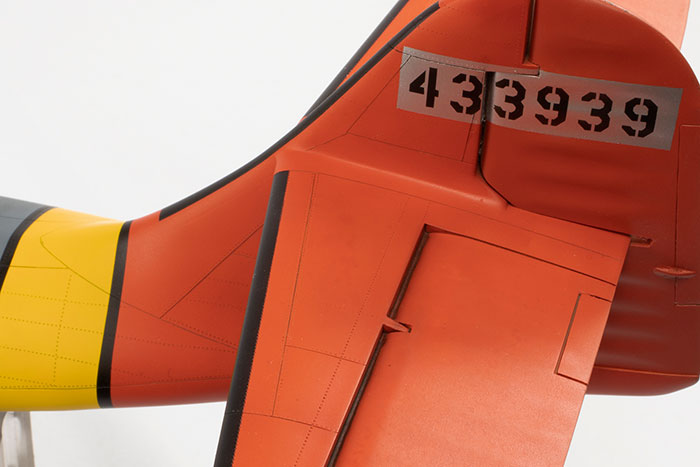
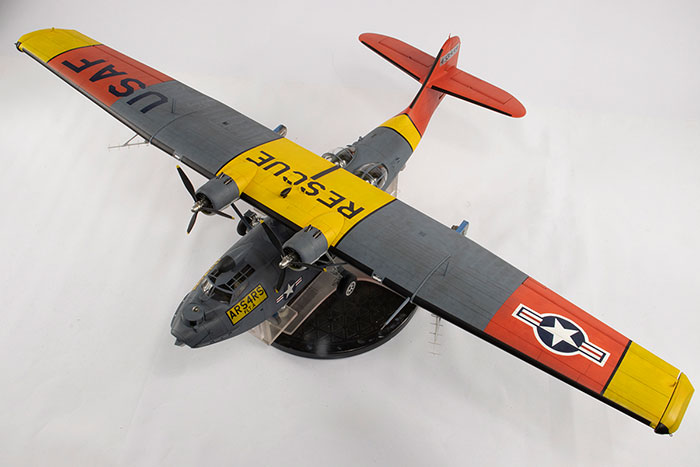
Revell’s marking option claims to be for 4433939 in 1948 in Canada. The photos I had were from 1949 Hamilton AFB in the USA (at least according to the captions), but these same images are also variously captioned 1947 and 1952 depending on the website. I am more inclined towards the 1949 date for three reasons: 1) The 4th RS was redesignated the 4th ARS in August 1950, and the photos clearly show it marked up as the former; 2) the paint on the aircraft looks very fresh; and 3) the 4th RS relocated to Hamilton AFB in September 1949 from Guam.
This meant the kit-supplied markings needed the following changes:
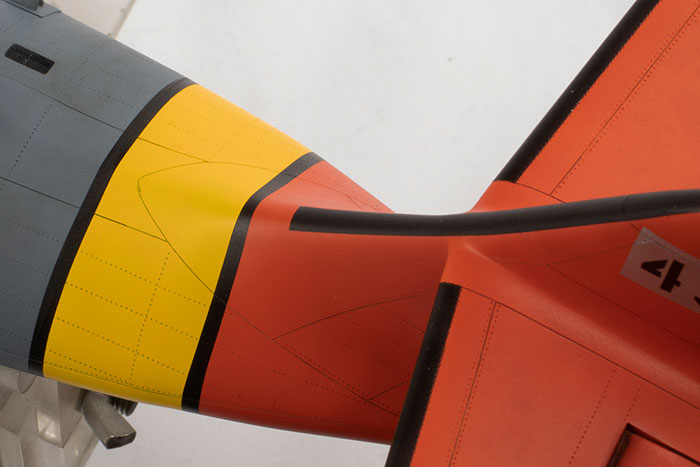
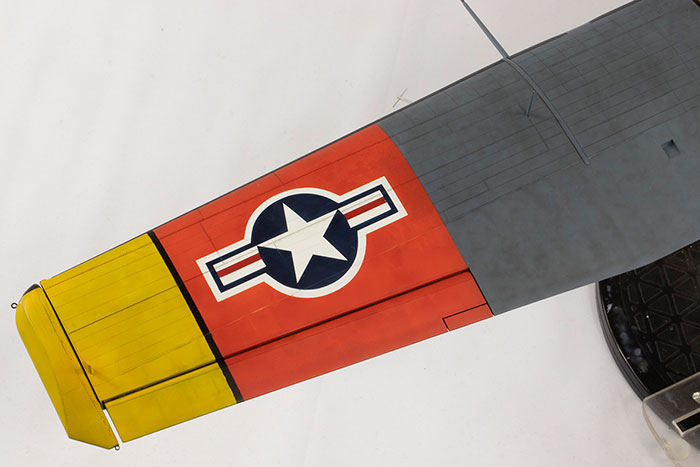
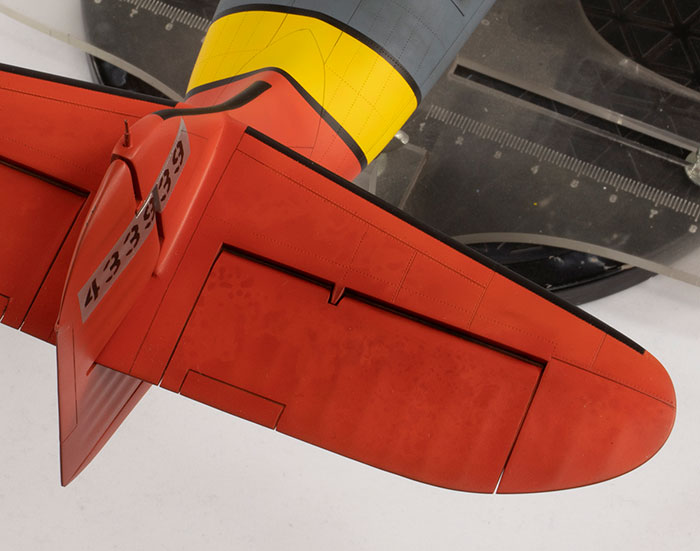
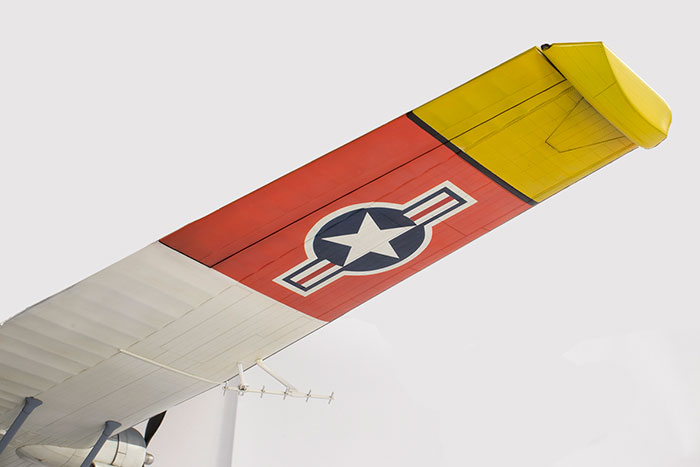
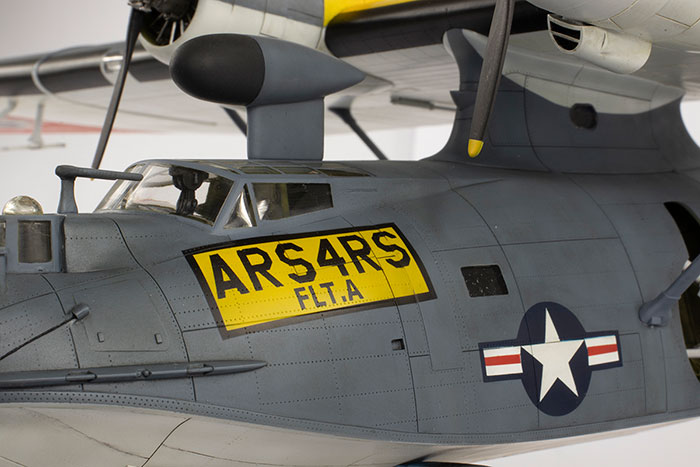
*The tail code should be black, on an aluminium rectangular background on the red tail, and read ‘433939’. Revell supply the tail code in yellow and as ‘4433939’. I think it should also be the ‘stencil’ style.
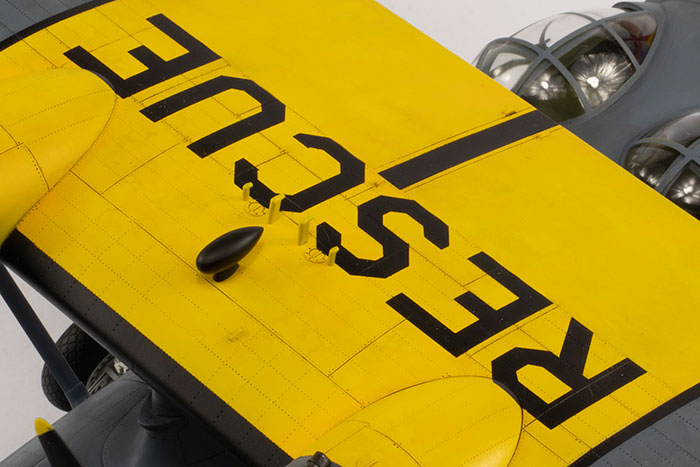
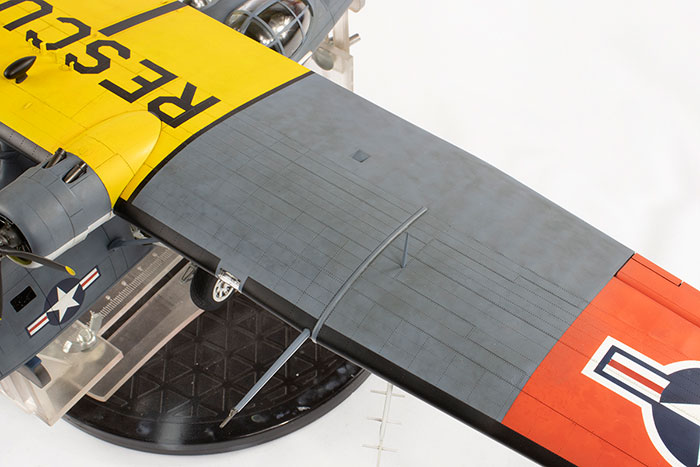
*The large yellow panel on the upper wing does not have the ‘4th ARS’ marking. It may or may not have the ‘RESCUE’ lettering; I decided to add it.
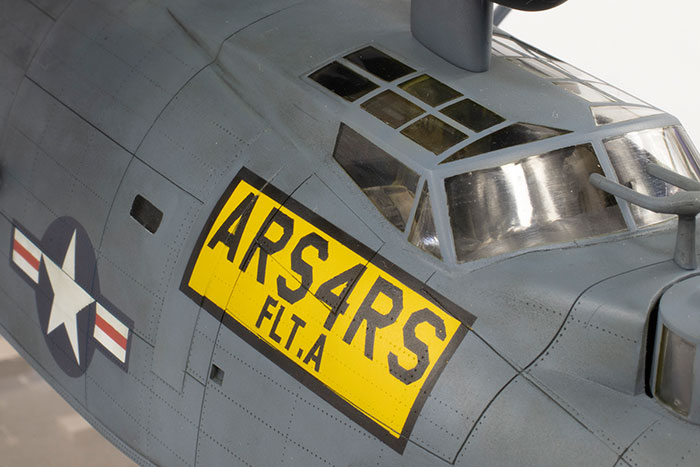
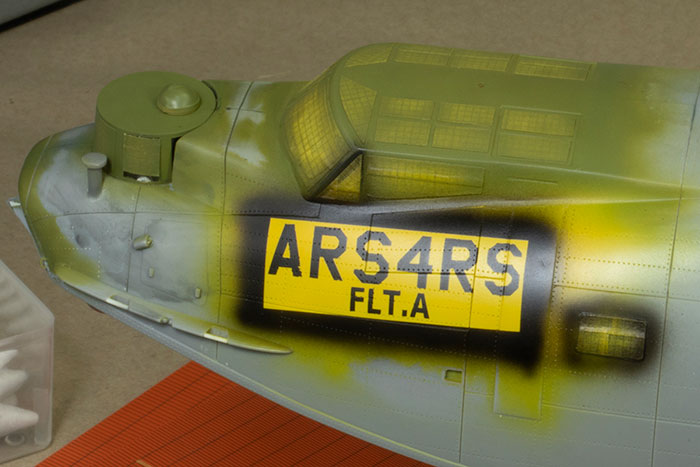
*The large yellow panel under the canopy on the kit decals sheet just reads ‘ARS4RS’. However, the photos show the box should be deeper and there is further smaller text under this lettering. I could not read it on the photos I had, but a similar aircraft was marked ‘FLT.B’ in that area. ‘Aircraft of the United States’ Military Air Transport Service’ lists 4th RS aircraft based at Hamilton AFB as belonging to Flight A. (Flights B, C and D were based elsewhere), so I went with ‘FLT. A’.
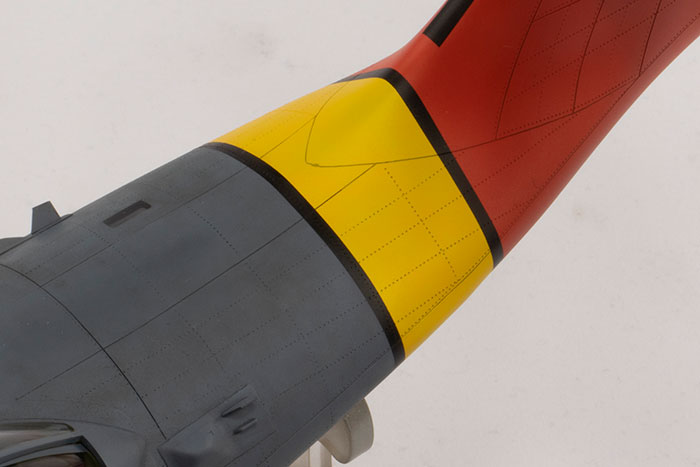
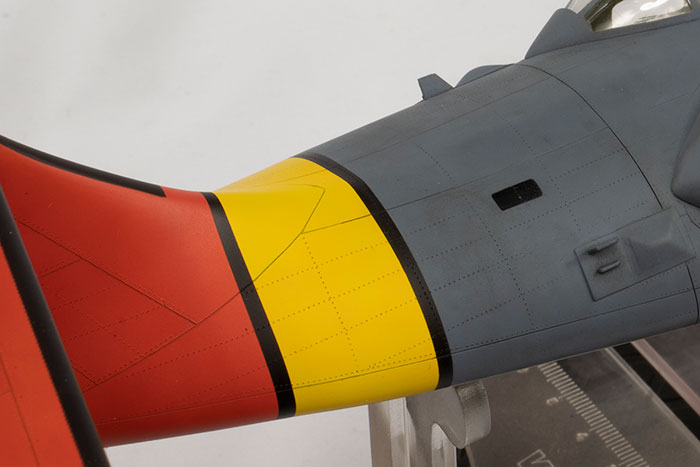
*I don’t think there is a black band between the red and blue sections on the wings.
*I don’t know how the USAF marking was outlined on the red panel on the upper wing, so that’s a guess. The photos are pretty clear that on the underside of the wing that it’s against a silver background.
It’s worth noting that in a later boxing, Revell repeated the option for 4433939 with markings closer to what I have modelled here.
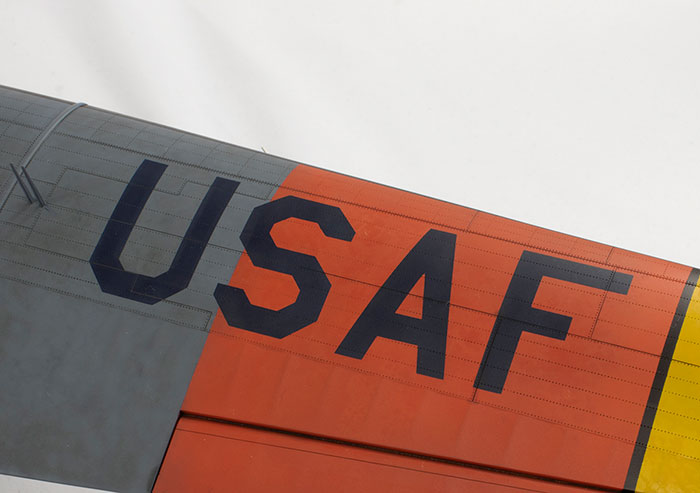
The errors in the decals were enough that I decided to mask and spray all of them. I scanned in the decal sheet and used Inkscape (a free vector graphics program) to trace and create the artwork. This can then be saved as a .dxf file and opened in Silhouette’s software for use with their cutter. You just have to be careful there are no glitches that get introduced in the file conversion and check the design before you cut.
I experimented with Tamiya’s yellow masking sheet and Artool Ultramask vinyl masking material. Both have their strengths and weaknesses. The Tamiya material is very thin, and so you avoid ridges building up at the mask edges more easily, but it’s more flexible and easier to distort. The vinyl is stiffer and thicker and I could cut finer details into it. Here’s what the large RESCUE marking on the wing looked like. It’s almost 6 inches long:
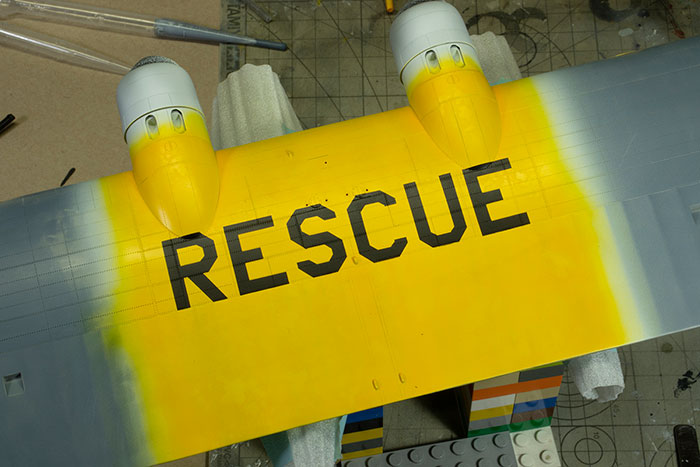
The yellow is a layered application of Mr Color 329 Yellow, 4 Yellow and MRP RAF Marker Yellow. The red is a 1:2 mix of Hataka lacquer Insignia Red and International Orange, which is ever so slightly too pink, but matches close enough what I can see in the photo I think is best exposed. The main blue/grey is Mr Color 366 Intermediate Blue. It is far from clear that this is the correct shade and I could not find definitive proof of which paint was used by the USAF on their Catalinas. The photos I had varied in colour quite wildly depending on how the same image was processed, so I just went with what seemed close enough and pleasing to my eye. In the end I think my model is too light and would have benefited from a slightly darker shade of blue. The white undersides are various applications of Mr Color 69 Off White and 316 Insignia White all over a base of Mr Finishing Surfacer 1500 White.
I had no clear view of the upper wing, but convinced myself the edging to the national insignia should be white. Again, I used masks and this is what they looked like immediately after they were removed. There was some touch-up required, but it wasn’t too bad.
The large panel under the canopy was made with a vinyl mask and I was quite pleased that the ‘.’ (which is 0.85mm x 0.65mm) came out pretty well. The flaking was caused by paint that stuck to the edge of the mask and was corrected later. I think this is where paint is applied too heavily.
There are no decals on this model and all the markings were sprayed with masks I made on a Silhouette cutter. There should be a lot of stencils, but Revell don’t provide any.
The weathering posed a conundrum for the me. The photos I have show a very clean aircraft that I suspect was recently painted, but I needed to do something to avoid the recessed detail just looking odd if left simply painted, especially on the white surfaces. In the end I elected to use an oil filter over the whole airframe (bluish on top; brownish below), although it has come out darker than I would have liked over the white. I’ve used no clear coats and really the blue should be a bit shinier. Mr Color 366 is extremely matt.
A lot of canopy masking was required for this model. I made my own, but not too well, and so quite a few of the canopy frames are a bit wonky. This would have been a good kit to actually invest in an Eduard masking set!
Aside from the aerials, the last parts to be added were the main undercarriage legs. I dreaded this, and for good reason it turned out. If ever there were a kit in need of a decent brass landing gear set, it’s this one. There’s a lot of weight for the main gear to bear and the force lines are scary for such spindly legs. The model weighs 500g, which doesn’t sound a lot, but try weighing some of your models! I used epoxy to glue the legs into the bays. The end result is a bit of a disaster. The starboard leg bends under the weight of the model (weirdly, the port side does not) resulting in that wheel splaying outwards. And worst of all, when the supports were removed, the whole thing went *clonk* and fell on its tail. I’ve built my first tail sitter since 1994. Oh, and I’m not sure the main undercarriage should be white…
I could not figure out the aerial wire arrangements for this airframe. I think there should be three wires from the tail, one to the centre of the wing at the trailing edge, and two from the horizontal stabilisers to somewhere between the nacelles. Truth be told, I’m sure I’ve got the area between the engines a bit wrong: I suspect there should be one (if not two) further antenna masts between the nacelles on the upper wing surfaces. In the absence of clarity from the photos I had, I elected to miss the wires off altogether.

In some ways it feels appropriate that this kit was purchased during my PhD. One of my supervisors always said a PhD is never finished; it’s abandoned. I feel a bit like that with this project: in the end I just wanted to move on to something else. It was abandoned rather than finished. There are all kinds of things wrong with it – the misalignment in the national insignia, the ragged masking on the black wing bands, the tie down loops lost from one of the wingtips, the wonky starboard undercarriage, the damn noseweight…
…and then there are the wing struts. Oh, the wing struts! They are too short! And the attachment points are flush neither with the wing nor the fuselage. I only have myself to blame, as I knew this would be a problem early on in the build and chose to bury my head in the sand and hope for the best. Never works. When it came to the final stages and I attached them, everything was painted and the gaps at each end are huge and horrific, especially on the fuselage. Were I a more committed modeller, I’d do something about it (some water soluble putty and followed by paint touch up maybe?), but I’m not, so I didn’t. It’s the worst feature of the finished article, by far. I think the problem originates from the wing not seating down as fully as it should on the fuselage mast, and so it sits a little too high.
The above was all written prior to the photography. By the time I got to the photography (the day after completion) the main undercarriage had failed. Despite the Gorilla 5-minute two-part epoxy, the lower horizontal gear struts had come loose from their mounting points in the gear bay. With everything finished, there’s no access to fix them. Hence the photos are all on a modelling stand.
This project represents my greatest modelling failure. It got crushed under its own weight. I could have installed the gear earlier and really beefed up the attachment points, but in reality they would never have survived construction or painting. I know other people can get these kits to work, but my belief is confirmed: big kits are more trouble than they’re worth.
I feel utterly ambivalent about the finished article. On the one hand, I’m glad I sort of finished this project and it gave me a chance to explore and refine new and newish techniques to me: soldering, masking instead of decals and scribing in primer. But I confess it wasn’t much fun getting there, and the end result is pretty useless. Its sheer size made manoeuvring the model around my workbench stressful and it was always knocking into something. The Belcher Bits tail is an essential addition in my view, but takes a lot of work. The basic kit is adequate and I suppose pretty typical for a mid-90s product, but could be so much better in detail in places like the canopy. The weight issue is a nightmare and the undercarriage has already broken. The kit needed what felt like endless additions and modifications to reflect the real thing, and the markings were complex, large and took a very long time to complete, especially as they all needed to be drawn from scratch. Lastly, I’ve nowhere to put it, even if it could stand on its own three legs.
So now for something much, much smaller…
For more articles like this, please visit my website at www.jonbryon.com
Text and Images Copyright ©
2020 by Jon Bryon
Page Created 27 October, 2020
Last Updated
27 October, 2020
Back to
HyperScale Main Page
|
 Home
| What's New |
Features |
Gallery |
Reviews |
Reference |
Forum |
Search
Home
| What's New |
Features |
Gallery |
Reviews |
Reference |
Forum |
Search