The Judas Goats in Color
Two B-17 Assembly Ships
by Tim Nelson
S
u m m a r y : |
Description and Item No.: |
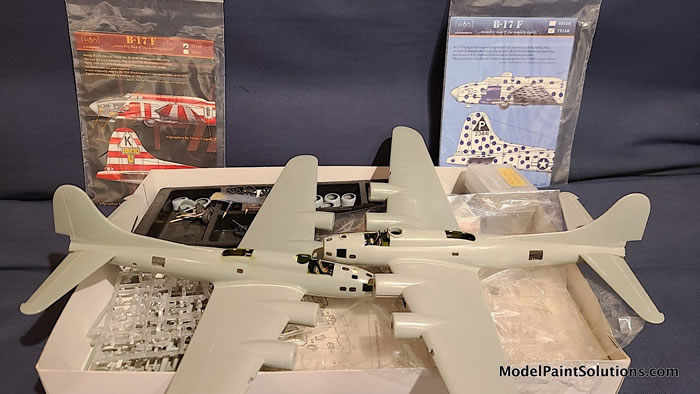
Academy Kit No. 188 “Memphis Belle” and Kit No. 2142 “Fort Alamo” |
Scale: |
1/72 |
Review Type: |
Full Build |

Do not adjust your monitor…
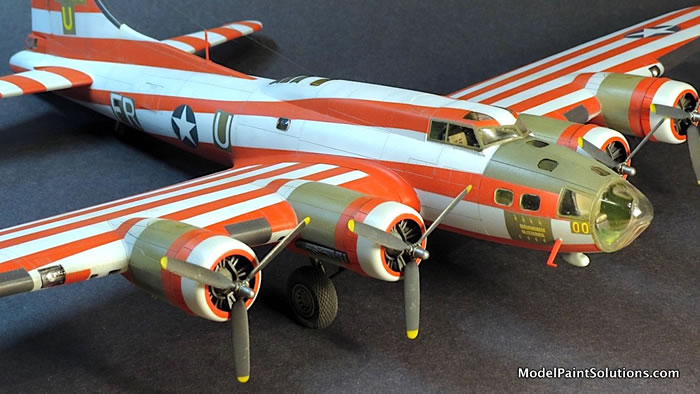
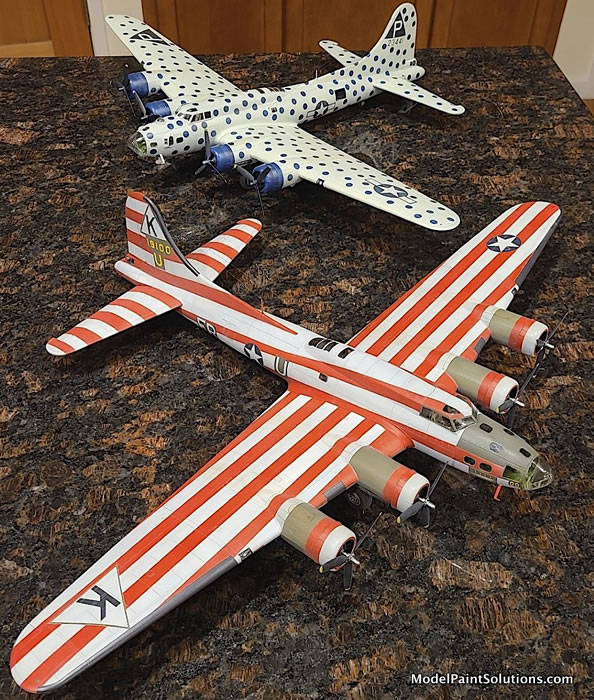
In a modeling world full of grays and olive drabs, when you have the chance to dazzle with bold color, you seize it. As our local modeling club embarks on a museum display of the colorful “Assembly Ships” of the U.S. 8th Air Force in World War II, we undertake two Boeing B-17 projects in which the painting fun far exceeds the rest of it.
History
I’m assuming readers here need no introduction to the classic Boeing B-17 Flying Fortress, however, the first Reference provides an overview. The Pete Bowers tome (see References) is an excellent short history of this legendary subject, including an invaluable “spotter’s guide” appendix to sift through the myriad of B-17 variants and configurations.
As the 8th Air Force armada grew during 1944, it became increasingly challenging to assemble the massive formations. From 3- or 4-ship elements, to 4-element squadrons, to 3-squadron bomb groups, to multiple bomb group wings, to potentially larger all air division formations, all the participating aircraft had to coalesce before heading east. The forming up process required dispersal all over English airspace, and even over the North Sea, all under radio silence, consuming up to three hours of mission time. In the inherent chaos and confusion of this process, aggravated by “green” pilots in marginal weather and visibility, some shepherds were needed.
Although best known for daylight bombing raids, certain “war weary” B-17s and Consolidated B-24 Liberators were repurposed to non-combatant roles. Among these was the job of helping to form up the large combat formations over friendly territory before heading to the continent. These aircraft, generally called “Assembly Ships,” were given gawdy, high visibility liveries. Some were also enhanced with exterior lights. All generally used Bomb Group color-coded airborne flares to aid in recognition – a high risk proposition and one which resulted in casualties. Other names for these birds included Forming Ships, Circus Leaders, or (my favorite) Judas Goats. In Freeman’s classic “The Mighty Eighth,” Chapter 16 (see References), he describes the nature of their job:
“It was the procedure, prior to a mission, for the Assembly Ship to be first off the airfield, to fly to the assembly area and commence orbiting with its signs illuminated, while the crew fired a continual succession of flares from the large supply carried. When the formation was complete the Assembly Ship would break away and return to base. Several of these machines expired in flames; there being a high fire risk with the vast number of pyrotechnics carried.”
Freeman’s book includes a 2-page spread of B-24 profiles in the back, but oddly ignores all B-17s used in this role, some of which were spectacular.
The Jackiewicz / Bock book (see References) is by far the most in-depth guide to individual assembly ship aircraft, with a plethora of photographs and art which depicts the subjects in (very) living color. There are occasional discrepancies in the artwork but it is nevertheless the undisputed “bible” of these unique birds.
Our local club, NorthWest Scale Modelers (www.nwsm.club), is privileged to meet at The Museum of Flight in Seattle. We collaborate with the Museum on rotating lobby displays, and stage model shows. One upcoming display (June 2023) features these outrageous but overlooked assembly ships. We anticipate 10 1/72 B-17s and B-24s inside the display cases, with about 4 more 1/48 models hanging in the area above. As the curator of said display, I had to set some kind of example…
The subjects of the builds at hand are the following:
-
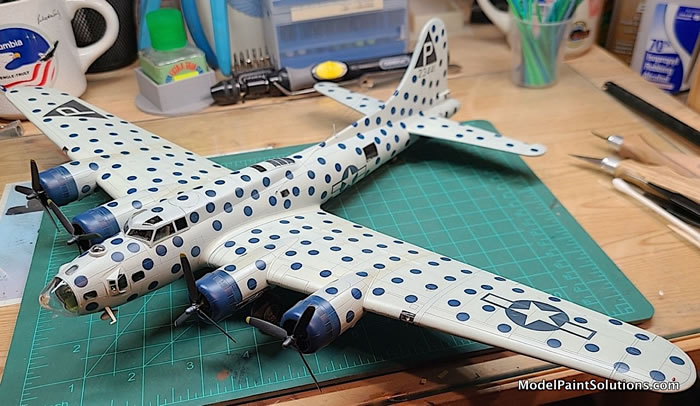
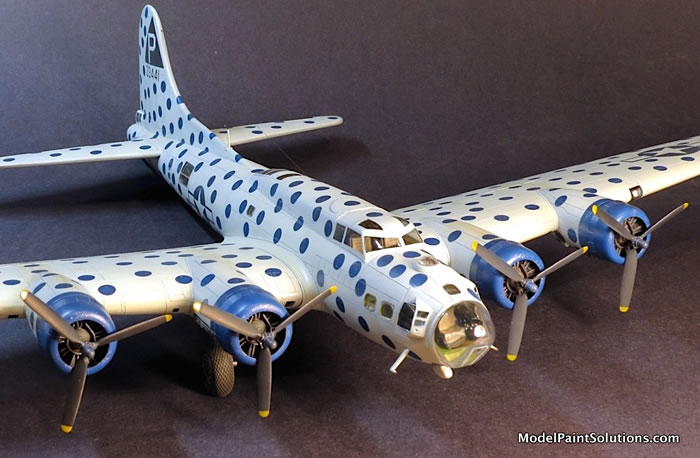
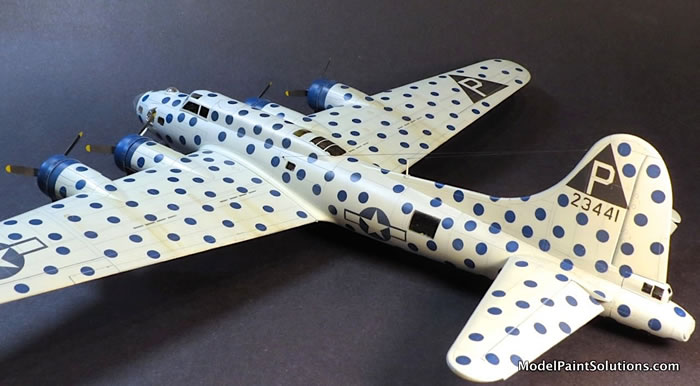
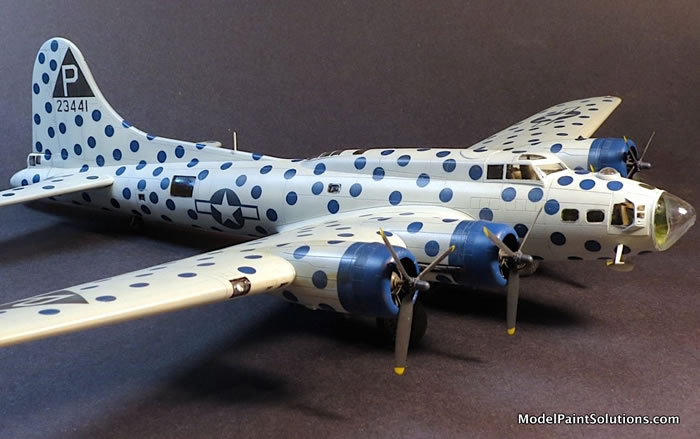
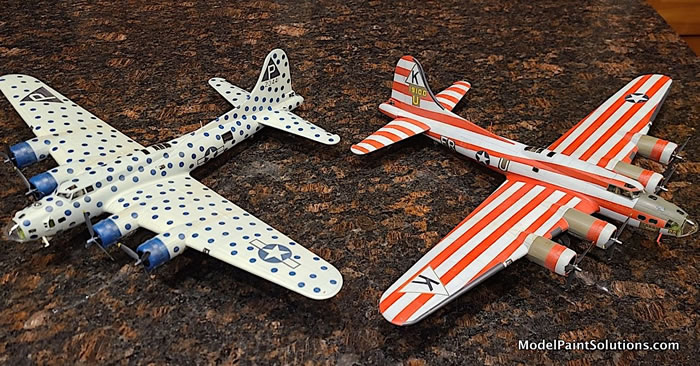
Boeing B-17F-60-DL "Spotted Cow" of the 384th Bomb Group, Grafton Underwood, England, Summer 1944. Previously known as "Patches II" during its combat career.
-
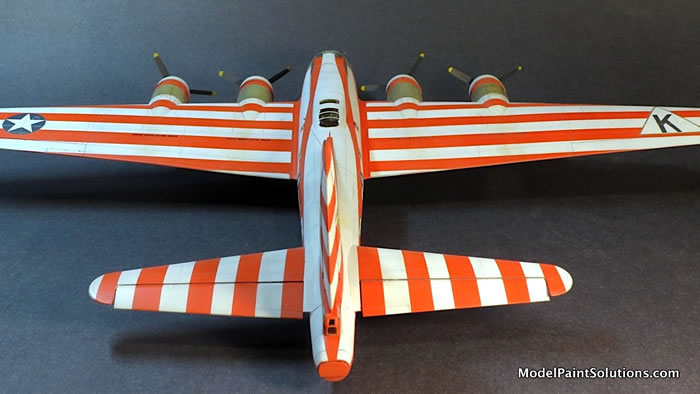
Boeing B-17E "Birmingham Blitzkrieg" of the 379th Bomb Group, Kimbolton, England, Autumn 1944. It was previously one of twelve B-17s that conducted the first 8th AF bombing mission over occupied Europe on 17 August, 1942.
The Kits
Many years ago, I acquired a couple of 90s vintage 1/72 Academy B-17F kits (in this case, Kit 2188 “Memphis Belle” and Kit 2142 “Fort Alamo”). As the Assembly Ships project began to gel around 2016, and I selected the two subjects to build, I thought, “Hey, I’ll just build ‘em right out of my stash!” Boy, was that a poor decision.
I thought starting with an “F” model would save some surgery on the nose (it sort-of did), but the kits have a multitude of problems despite their modern-looking fine recessed panel lines.
Among the grievances:
-
Grossly exaggerated wing dihedral
-
Extremely thick clear parts
-
Empty radio compartment (highly visible, although less so through the thick kit glazing)
-
No wing leading edge inlets for turbochargers, intercoolers, or oil coolers (some of these are suggested by panel lines, some ignored)
-
Crude cockpit
-
Misshapen engine cowlings which are also too long
In addition, the nose window and gun configuration of F models varied greatly, and if your kit doesn’t have the configuration of your subject, you’ll be headed for major surgery (you may anticipate where this is headed…)
I began these builds in 2016 and corrected the first four issues above before bogging down in resentment. I’ve built many crude, limited run kits and take some pride in creating what I call “Hey Jude” models, with apologies to Paul McCartney: take a sad song and make it better. It was the expectation of more of a fall-together experience with these Academy kits that led to so much disillusionment, and the 2 B-17s were relegated to the Shelf of Doom for several years. (I’m actually a serial modeler, and tend to finish each project before starting another – these kits //WERE// my Shelf of Doom.) The smart thing would have been to chuck these kits and restart using the new tool Airfix or Revell of Germany B-17 kits, or Hasegawa. But I’m too cheap.
In late 2021, as the calendar crept ever closer to our museum display, I began to feel the need to get these projects moving again. Looking the models over, I decided to adopt a Cable Guy “Get ‘er done!” attitude, live with some of the problems, and quickly shove the builds forward into what I really looked forward to: the painting. I also resolved to use the kits as a platform to try some new (to me) paint techniques and products.
After the usual cleaning in a warm soapy bath of Dawn, I commenced back in 2016 with what I wanted to be bare-bones, out of the box builds. As alluded earlier, this was not to be. I dealt with the dihedral issue back then, and the radio compartment, and the wing åleading edge inlets. However in the Resurrection Phase of the project in late 2021, I intentionally ignored many fundamental issues that I usually couldn’t accept. Here is a summary of modifications (common to both B-17s except as noted):
-
Major correction to wing dihedral, using styrene shims, lots of putty, and strip styrene
-
Scratchbuilt radio compartment
-
Cut out turbocharger & intercooler inlets in wing leading edge
-
Replaced radio aerial post with brass
-
Replaced top turret and ball turret with blanking plates. (The Academy SB-17 Coast Guard version kit includes these parts, and I fabricated another set from 0.020” sheet styrene cut and bent to shape. Note: photos show “Spotted Cow” with turrets (presumed early) and without turrets (presumed late) – I elected to make life easy and go “sans turrets.”
-
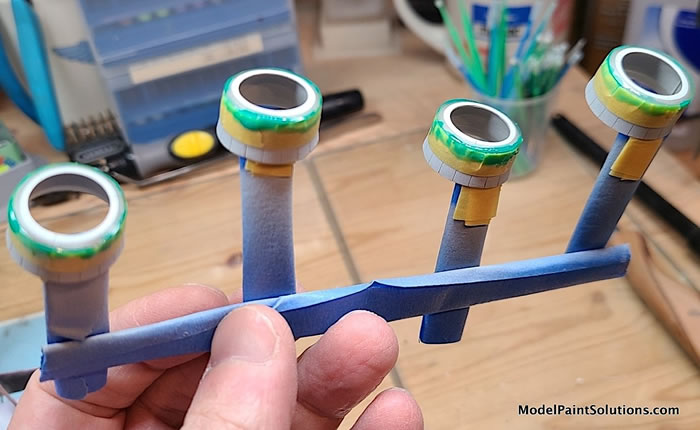
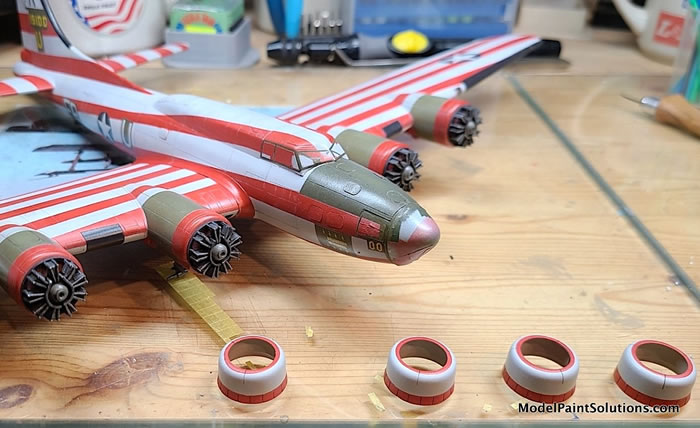
Replaced prop shafts with brass tube and rod to adjust length for proper clearance with the cowlings
-
Added Ngineering landing lights
-
Used True Details main landing gear wheels
-
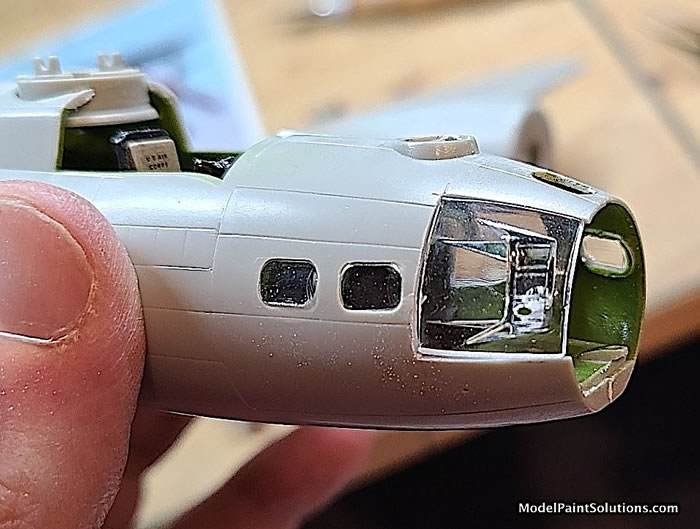
Used Falcon flight deck and tail gunner windows, lived with thick kit clear parts everywhere else
-
All markings painted using custom paint masks, except small nose decals on Birmingham Blitzkrieg (from HADmodels set 72158)
-
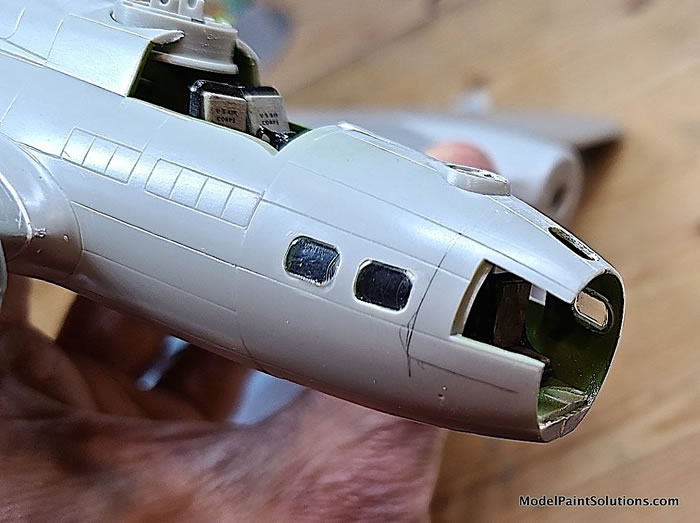
B-17F “Spotted Cow:” grafted on nose cheek windows from Academy SB-17 version. (I should have started with this kit! It was exceptionally dumb on my part not to notice the prominent “cheek” windows on Spotted Cow from the start. By the time I noticed, I was deep into the build and decided on robbing the cheek window parts from the SB-17, requiring significant surgery to install. I’m not real proud of the graft job, but it’s part of the “get ‘er done” approach here. Another thing: Spotted Cow had the late “F” center-mounted nose gun which I quickly decided to ignore.)
- B-17E “Birmingham Blitzkrieg:” added appropriate "E" model windows to nose compartment “roof”, manually cutting holes and fitting Compact Disc holder clear material to fit. (Again, exceptionally dumb – an “E” model would have been a better starting point, but that said, my own “E” windows look better than most of the kit glass.) This B-17E incorporated a later “F” style plexiglass nose, and the wide chord “paddle” blade props, so those kit parts were used.
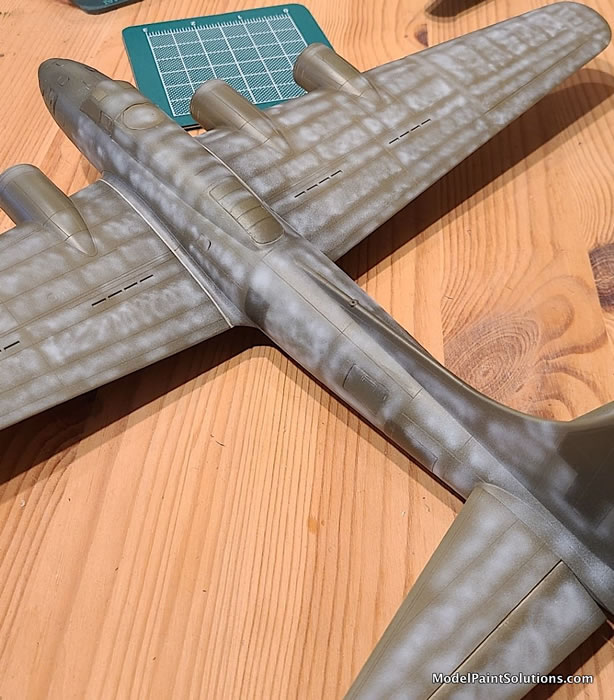
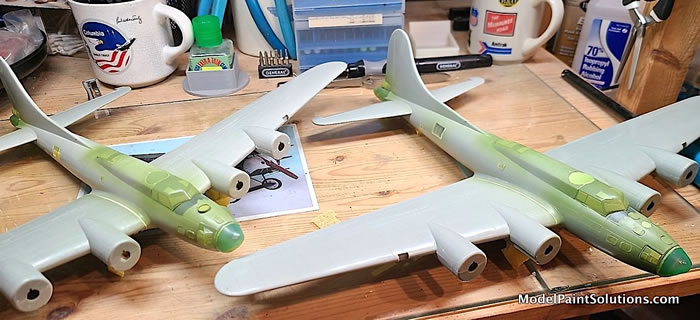
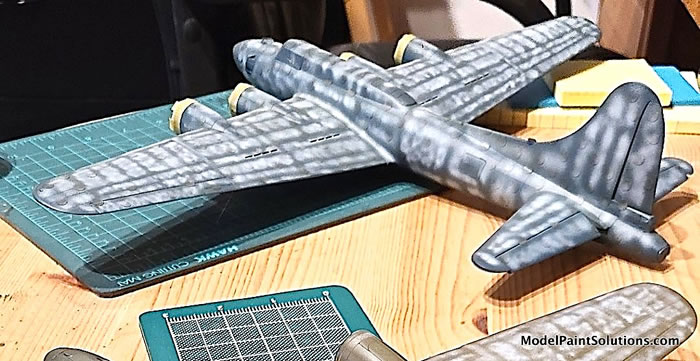
Let’s not spend any further time on shortcomings, because we want to get to the painting, here using both Mission Models and AK Interactive Real Color acrylics. The last couple of years, I’ve been experimenting with the “black basing” technique, where the model is primed black and then mottling/marbling is applied to various panels. I find this method easier, and yielding more natural looking results, than pre-shading panel lines. (I’m also not very good at pre-shading panel lines, and find the mottling much simpler.) These two B-17s, despite their problems, were nice platforms to further practice this technique. Further, in cahoots with Dr. Strangebrush, I’ve been going straight to a dark base coat thinned with the 30% Mission Clear Primer (MMS-007) with 70% Mission Thinner “CP30” elixir. (That elixir is further cut 5-10% each with Liquitex Flow Aid and Tamiya Retarder.) Overall, weathering will be restrained, based on photos of the prototypes.
We’ll take each B-17 in turn, beginning once each model is masked and rubbed down with denatured alcohol and buffed with a Kim-Wipe…
NOTE: All Mission paints thinned about 50/50 with the CP30 elixir unless noted. All AK Interactive paints thinned about 40/60 with various AK thinners noted. Harder & Steenbeck Infinity used throughout, with tip sizes noted.)
B-17F SPOTTED COW PAINT SEQUENCE
-
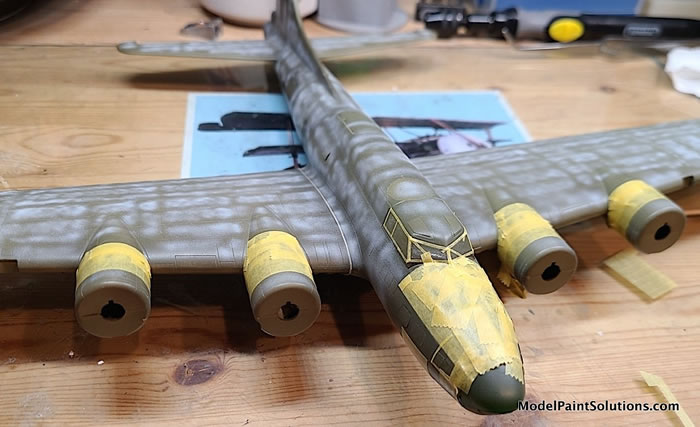
Spot treatment of clear window framing with Mission Zinc Chromate (MMP-068)
-
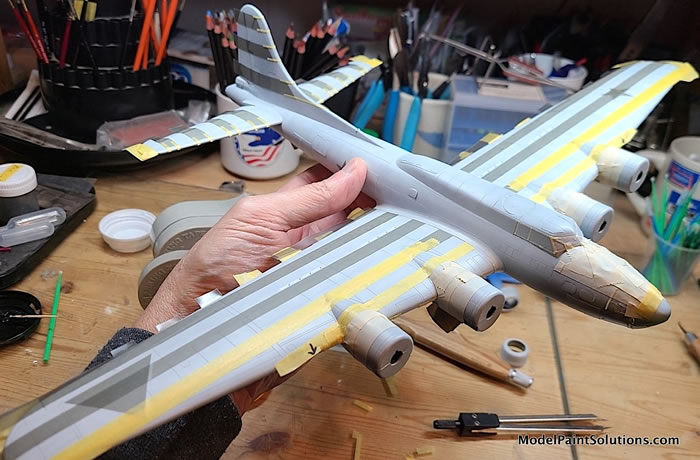
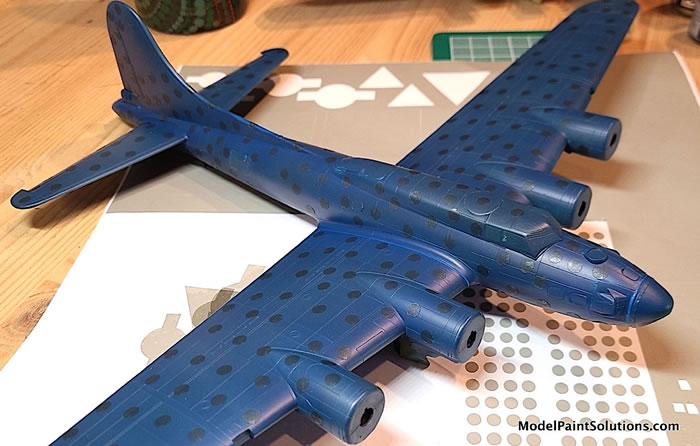
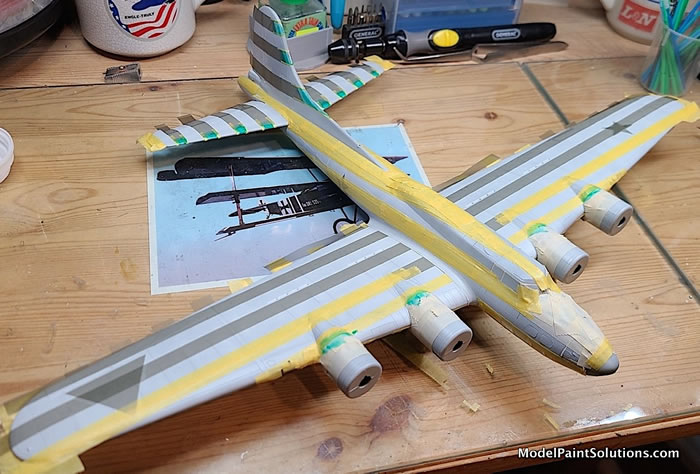
Entire model primed (“dark based”, 0.4 mm tip) with a mix of one third each of Mission USN Sea Blue (MMP-062), Mission Blue (MMP-048), and Mission Light Grey (MMP-116); this was cooked up to emulate the blue hue of the airplane shown in the Jackiewicz & Bock book. Some artistic license here.
-
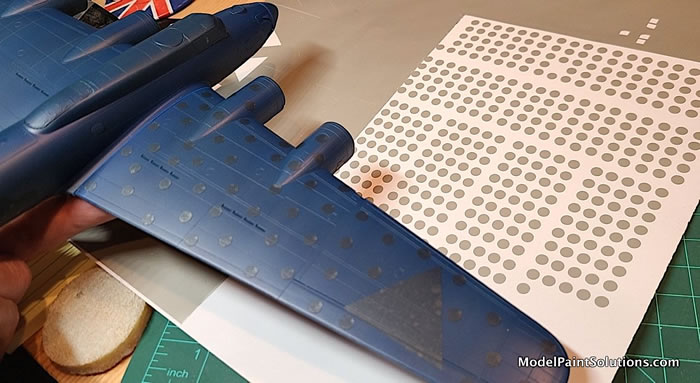
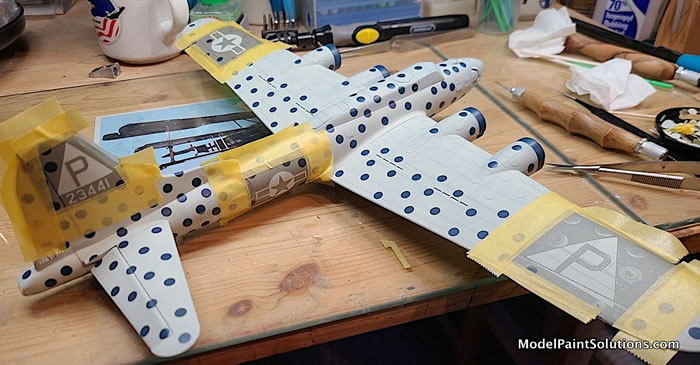
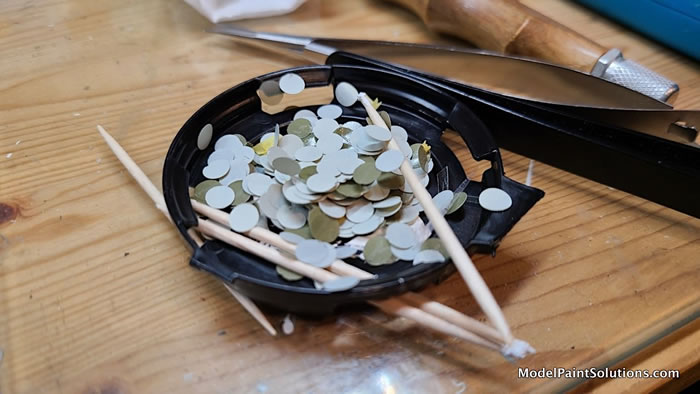
All areas to remain blue masked with many, many Oramask dots created using the Silhouette Cameo.
-
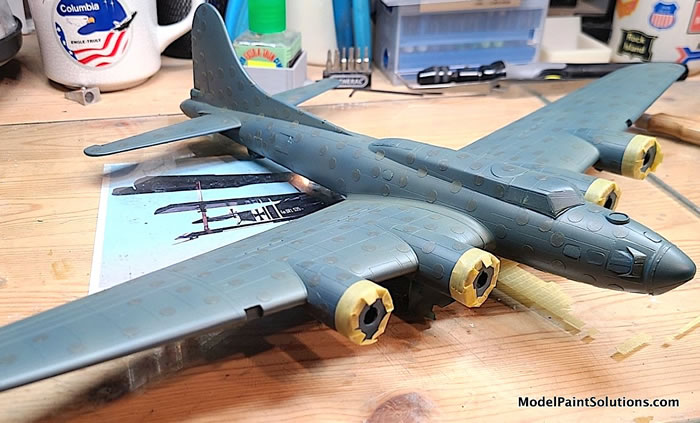
Concerned that the final tint of the model might be too blue, I threw some shade at it in the form of Mission US Army Olive Drab Faded 2 (MMP-021). I was concerned about further diminution of panel lines so didn’t go very heavy with the OD. This effect was thus pretty subtle and probably a waste of time.
-
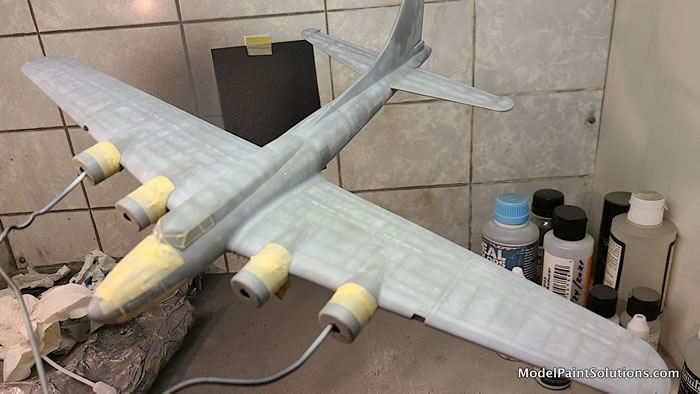
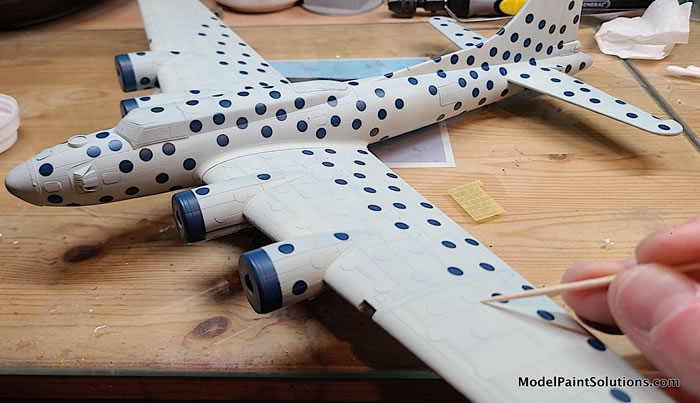
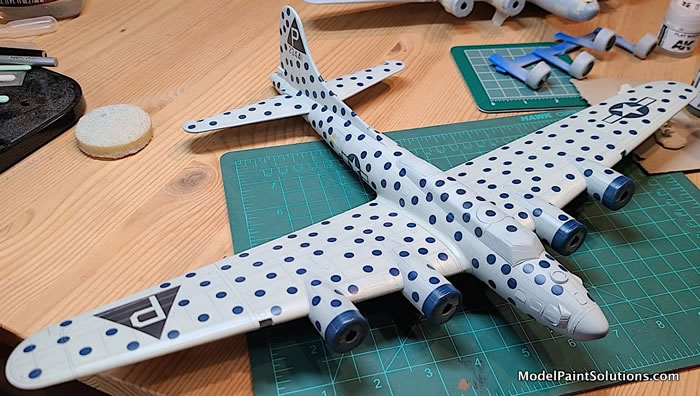
Now the final white was built up, with many thin coats of Mission Insignia White (MMP-104), Mottling / marbling was applied with AK Flat White (RC-004) mixed about 40/60 with AK Nitro Thinner (0.2 mm tip)
-
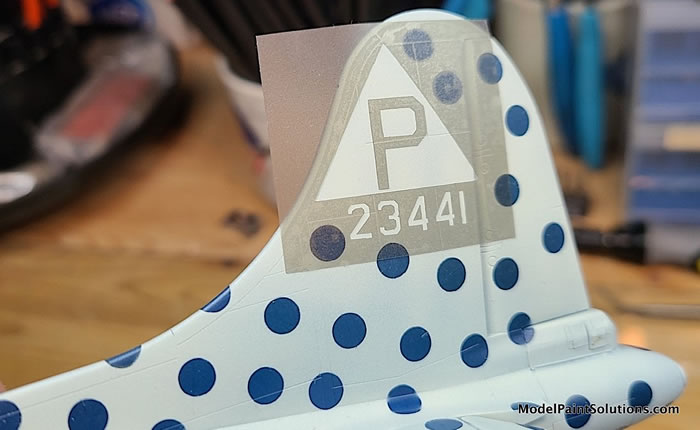
At this point most of the multitude of small dots were carefully removed with a toothpick sanded to a chisel shape
-
All panel lines treated with Tamiya Gray Panel Liner
-
Final sheen was applied using Testors Metallizer Sealer (out of production), straight out of the bottle (this was actually applied with my trusty Paasche H, with medium “3” tip)
-
Still missing the small wing leading edge oil cooler inlets, I used Oramask stencils to stipple on some Tamiya X-1 Black
-
Exhaust stains (all via the turbocharger exhausts on the wing underside) were airbrushed with combinations and iterations of Mission Worn Black (MMP-105), Mission Brown (MMP-002), and Mission Light Grey (MMP-116). This was a more thinned mix, about 20% paint to 80% CP30.
-
Some top wing oil streaking was applied with AK Streaking Grime
-
No deicer boots were implemented, since they are not visible in photos and likely removed in the field (as often was the case)
-
All markings applied using the Jackiewicz & Bock profiles and photos as a guide, however I realized at the end that photos show full blue dotting on both wing undersides. I decided to leave the model as is.
B-17E BIRMINGHAM BLITZKRIEG SEQUENCE
-
Spot treatment of clear window framing with Mission Zinc Chromate (MMP-068)
-
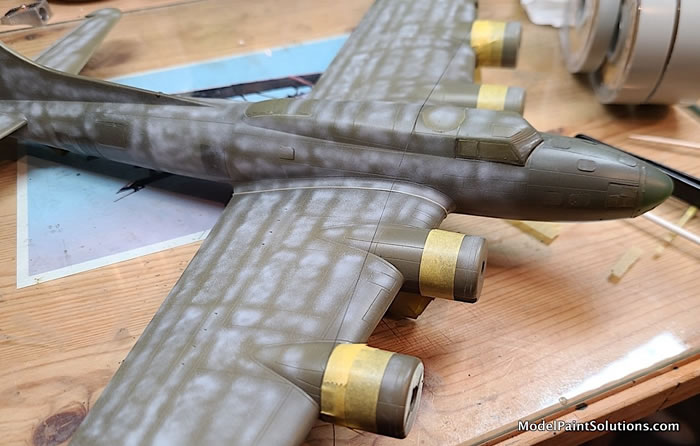
Entire model primed (“dark based”, 0.4 mm tip) with Mission USAAF Olive Drab (MMP-091).
-
Some post-shading applied (0.2 mm tip) to top of nose and engine nacelles, which would remain OD, Mission US Army Olive Drab Faded 2 (MMP-021).
-
After masking, the lower engine nacelles were treated to AK RAF Medium Grey (RC 289) (closest match to Neutral Grey I had on hand)
-
Mottling / marbling was applied with AK Flat White (RC-004) mixed about 40/60 with AK Nitro Thinner (0.2 mm tip), leaving some of the mottling visible
-
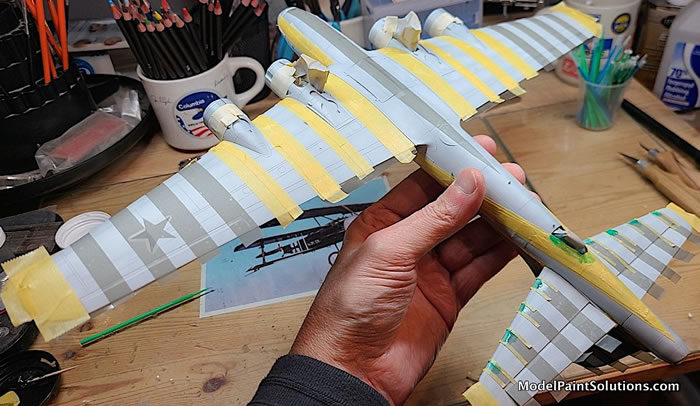
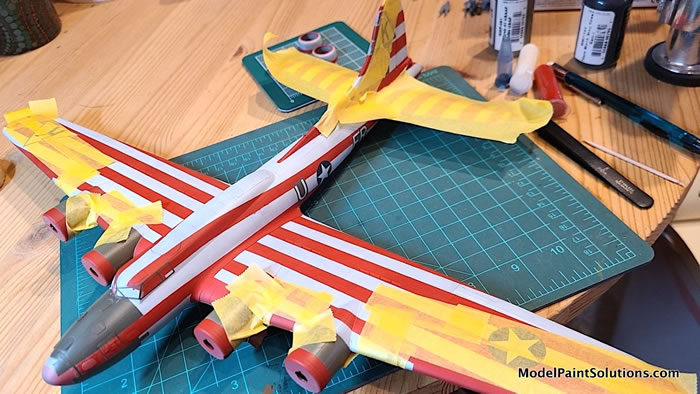
All areas to remain OD and grey were now masked off with Tamiya and Aizu tape [Images 30-31]
-
The final white was built up, with many thin coats of AK Insignia White (RC 222) (0.4 mm tip), leaving some of the mottling visible
-
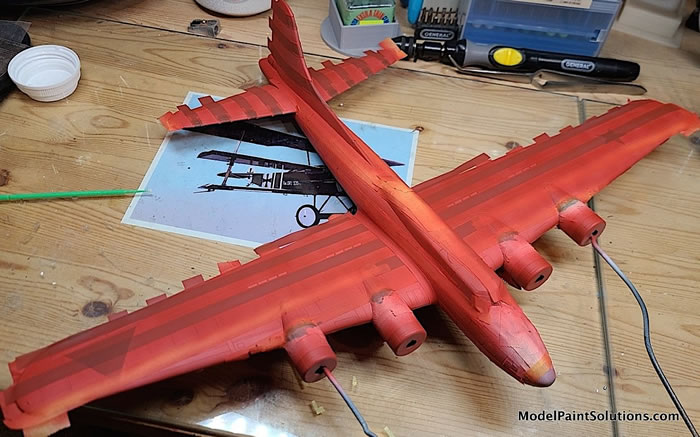
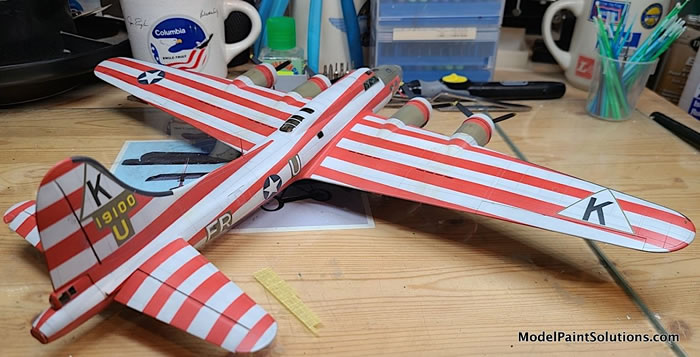
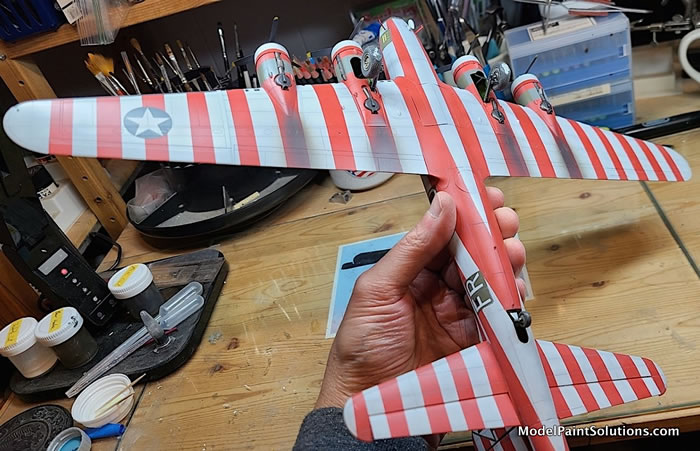
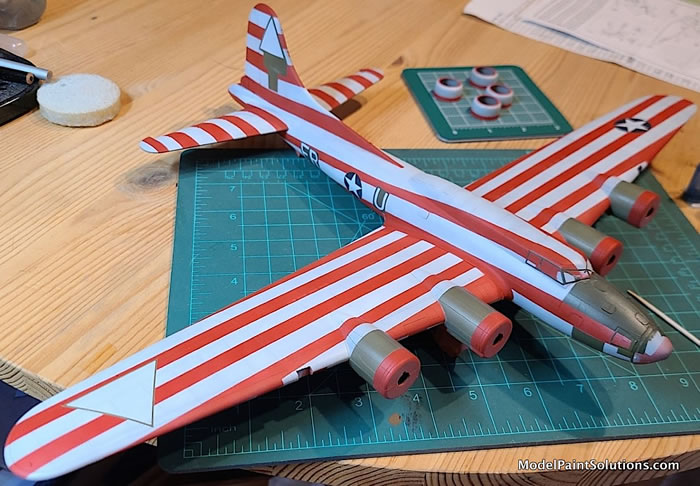
"Now the fun really began with masking off white in preparation for the red; I created some strip masks on the Cameo using the Jackiewicz & Bock profiles, the rest was applied manually using Tamiya and Aizu tape, and the ammonia-free Mr. Hobby Mr. Masking Sol R liquid mask.
- Red was built up with thin coats of AK Red (RC 006). (Note: The airplane is typically depicted with lurid red and white stripes, but there is some contention over whether the airplane carried red, or the white stripes were simply added over basic OD. When you have a coin toss between OD and red, you go RED 100%.)
-
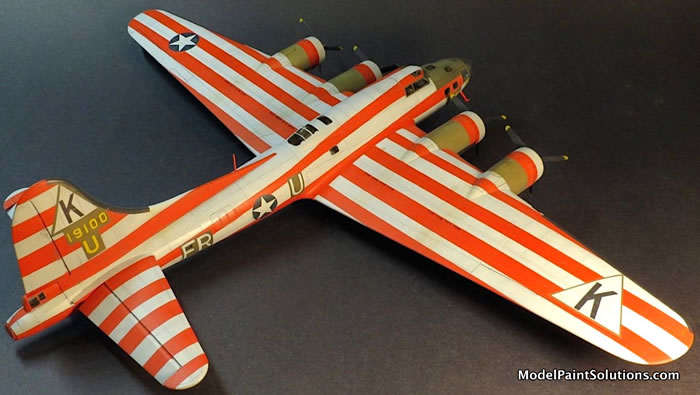
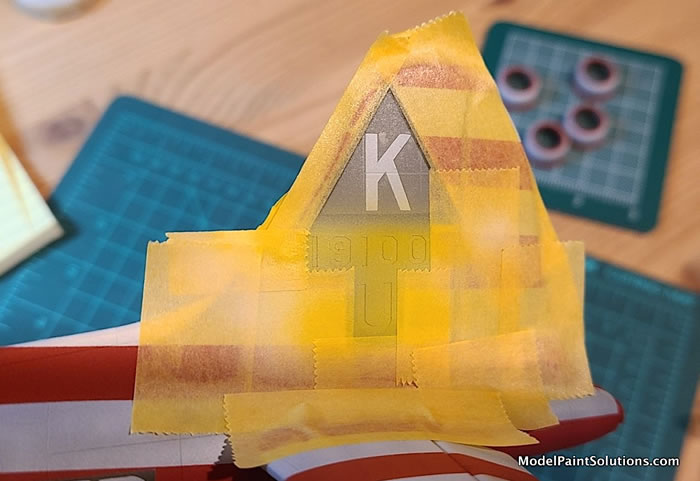
Unit and national insignia were applied using my own Oramask designs, using Mission USN Sea Blue (MMP-062) and Mission Worn Black (MMP-105), respectively. Tail number was laid down with Mission Insignia White (MMP-104) followed by Mission Yellow (MMP-007)
-
Nose areas for HADmodel decals were spot treated with Pledge Floor Gloss (a.k.a. Future), which were applied and sealed with more PFG after a suitable waiting period
-
All panel lines treated with Tamiya Gray Panel Liner
-
Final sheen was applied using Vallejo Matt Varnish, mixed 50/50 with Vallejo Thinner
-
Still missing the small wing leading edge oil cooler inlets, I used Oramask stencils to stipple on some Tamiya X-1 Black
-
Exhaust stains (all via the turbocharger exhausts on the wing underside) were airbrushed with combinations and iterations of Mission Worn Black (MMP-105), Mission Brown (MMP-002), and Mission Light Grey (MMP-116). This was a more thinned mix, about 20% paint to 80% CP30.
-
Some top wing oil streaking was applied with AK Streaking Grime
-
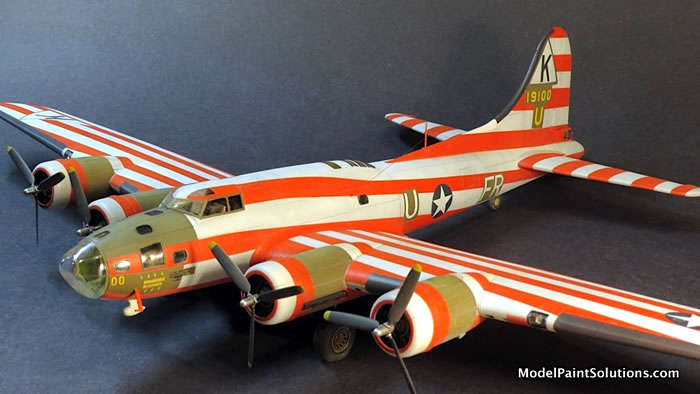
All markings applied using the Jackiewicz & Bock profiles and photos as a guide
After final assembly of engines, cowlings, props, aerial rigging, etc., these long languishing Forts were declared done!
It’s great to get these monkeys off my back, and clear the Shelf of Doom. I’m not proud of some of the basic kit workmanship – probably my worst efforts in 25 years. But I got ‘em DONE! The painting was fun and another learning experience. Having done circles and bands, I’ll be taking on the B-24 “Wham Bam,” later this year – squares!
Look for more Assembly Ships at The Museum of Flight in Summer 2023!
Cheers,
Tim
For more on this review visit Modelpaintsolutions.com.
Text and images copyright ©2022 by Tim Nelson.
References
-
Boeing B-17 Flying Fortress, Wikipedia
-
50th Anniversary Boeing B-17 Flying Fortress, Peter M. Bowers, Museum of Flight 1985
-
The Mighty Eighth, Roger A. Freeman, Doubleday (4th ed.), 1973
-
Assembly Ships of the Mighty Eighth, Jacek Jackiewicz and Robert Bock, Atelier Kecay 2007
Resources
Silhouette Cameo 3 electronic cutting tool:
Available from the manufacturer, Micro-Mark, and other outlets.
Mission Models Paint
Text and Images Copyright © 2022 by Tim Nelson
Page Created 17 February, 2022
Last updated
19 February, 2022
Back to HyperScale Main Page
Back to Reviews Page

|
 Home
| What's New |
Features |
Gallery |
Reviews |
Reference |
Forum |
Search
Home
| What's New |
Features |
Gallery |
Reviews |
Reference |
Forum |
Search