Arma Hobby's 1/72 scale
Nakajima Ki-84 Hayate
by John Miller
S
u m m a r y : |
Description and Item No.: |
Arma Kit No. 70051 - Nakajima Ki-84 Hayate |
Scale: |
1/72 |
Review Type: |
Full Build |

Disclaimer:
Let me say upfront, I’m a huge fan of ARMA kits. So much so, some of their more recent kits are available on MPS. This new ARMA Ki-84 fits like Legos and builds up beautifully with little-to-no effort. I thoroughly enjoyed building this model but as with most (all?) kits, there are a few issues which the potential builder should be aware, especially if a natural metal finish is the goal. That said, what follows is as unbiased a review as this builder could write that serves to highlight both the strengths and weaknesses of the ARMA Ki-84. Thanks, in advance for reading along.
—J. Miller
The Wind Up
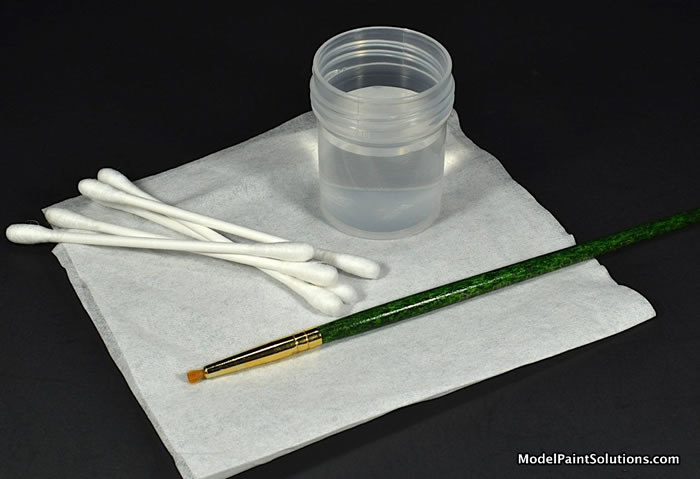
As I always do before getting started, the sprues were soaked in a 1:1 solution of Denatured Alcohol (DA) and old-style Windex (with ammonia) for a few hours then rinsed well with warm water and allowed to dry. Note: the DA says “For Cleaning Glass” on the tin, not “For Fuel.”
For the entire build, parts were removed from the sprues with GodHand parts nippers (how did we ever get along without these?) and a photo-etch micro saw where appropriate. Clean-up was done with a new X-Acto blade, micro files, soft files, and folded sheets of Alpha Abrasives synthetic sandpaper (grits #400, 600, and 1,000). I really like the 600- and 1,000-grits for blending seems).
Except where noted, conventional building techniques were used throughout. Large parts were joined using Tamiya Thin Cement. Where possible, all joins were strengthened with Thick CA Glue (Bob Smith Industries), applied to the inner (unseen) faces of joined parts. Smaller parts were affixed with the same Thick CA Glue except clear parts, which were affixed with White glue or Gold Odorless CA Glue (Bob Smith Industries).
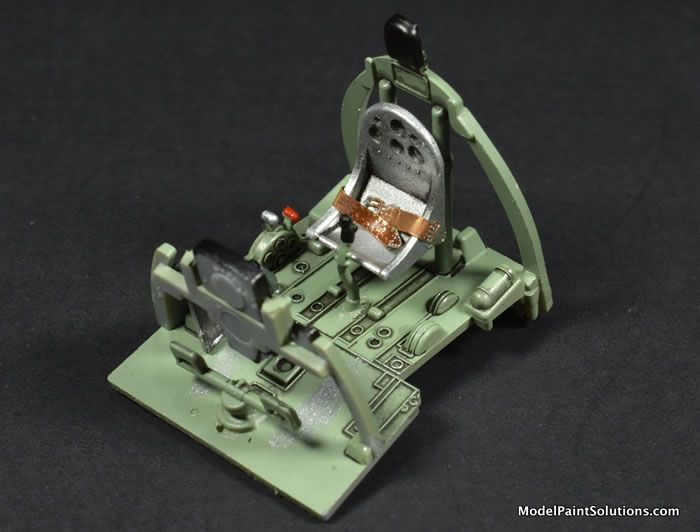
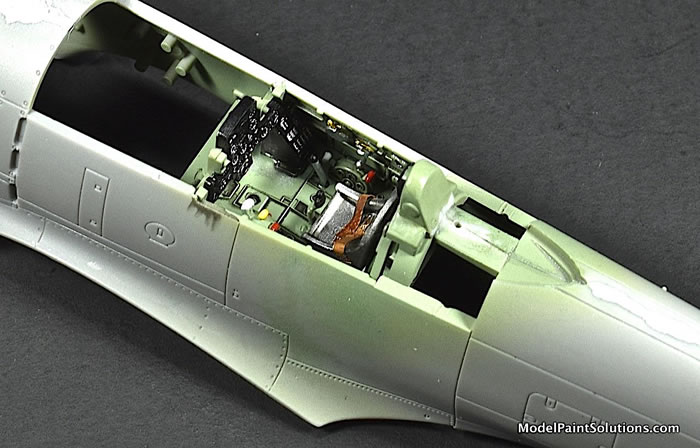
Per the norm, assembly began with the cockpit. The level of detailed incorporated into their cockpit assemblies is one of the reasons I like ARMA kits; simply amazing right out of the box.
Note: AK Real Colors and Metallics were used throughout the build. The AK number for each paint is provided in brackets.
The inner fuselage halves and cockpit pieces were painted RAF Cockpit Green (RC-293) darkened with a few drops of Pure Green (RC-012). This mix was diluted to ~30% paint with AK High Compatibility Thinner (AK-HCT) and applied as a dry followed by a wet coat at ~12psi with an H-S Evolution fitted with a 0.20mm tip.
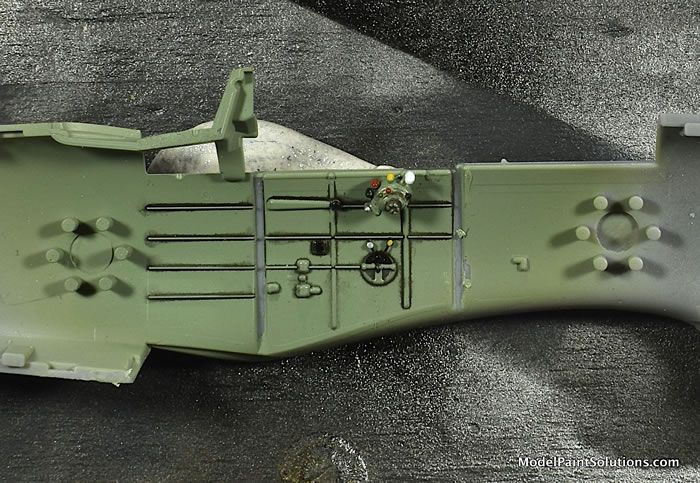
The cockpit as seen in the build-pics, is right out of the box except for Eduard colored PE seat harnesses. This is due, in large part, to my shaky abilities with conventional paint brushes. For brush-painting cockpit and other small details, Mission Models and LifeColor acrylics were used. Detail was enhanced with a pin-wash of Tamiya Black Panel Liner and wear on the floorboards was replicated using silver ink applied with a micro brush.
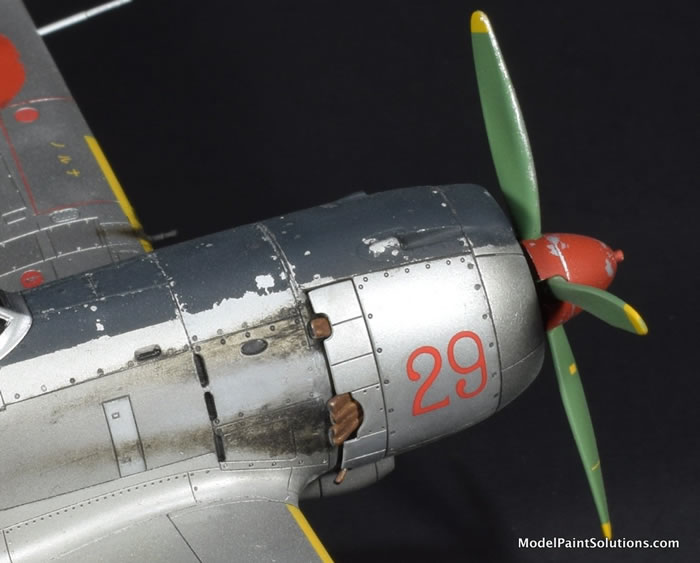
The beautifully cast radial engine was first sprayed AK Dark Aluminum (AK-480) diluted to ~70% paint with AK Nitro Thinner. When dry, the cooling fins on each cylinder were highlighted with silver ink applied with a micro-brush. The crank case was sprayed Light Gull Grey (RC-220) that was lightened with a few drops of Insignia White (RC-222). This was diluted to 30% paint in AK-HCT and applied at ~12psi with a 0.20mm tip/Evolution.
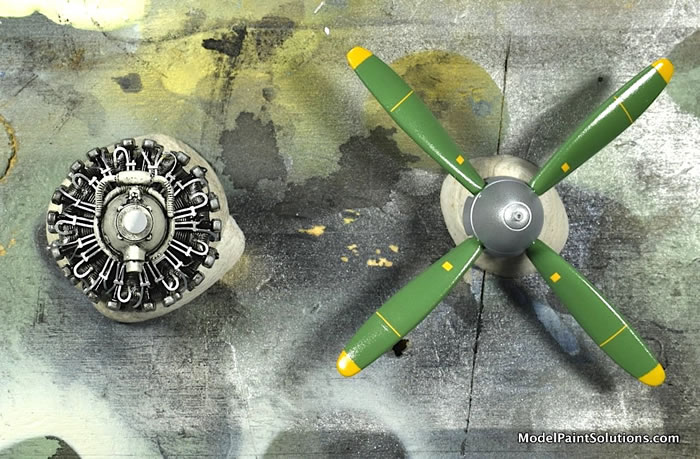
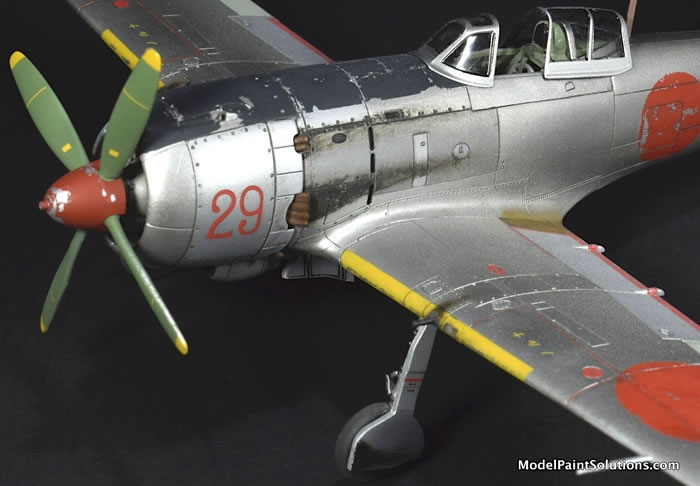
I spent a few hours trying different mixes of Real Colors to get what appeared close to correct color for the propellor blades. I have to say, this color proved to be a challenge. The final mix was 40% Pale Green (RC-232), 40% Pure Green (RC-012), 15% Off White (RC-013), and 5% 6RP Black (RC-071). This was diluted to 30% paint in AK-High Compatibility Thinner (AK-HCT) and applied with an Evolution as described above. Prior to this, the tips were painted Maize Yellow (RC-008) diluted to 30% in AK-HCT. After being allowed to dry overnight, the tips were masked off with AK 2mm tape that was burnished with an embosser in preparation for paint——a few extra minutes with an embosser greatly decreases the chances of paint wicking under and ruing that pretty yellow yip ;)
With the cockpit tub and engine trapped between the fuselage halves, I turned to assembling the wing from the full-span lower piece and left and right upper halves; all fit together beautifully. A few seams needed dressing and this was done with Alpha #600- followed by #1,000-grit synthetic sand papers followed by a final buffing with Micromesh 6,000 thence a dry Kimwipe.
The fit of the assembled wing to the fuselage was spot-on requiring no filler. Next up was the dorsal fuselage where the builder must decide on an opened or closed cockpit. Both options use the same canopy parts but different dorsal fuselage assemblies.
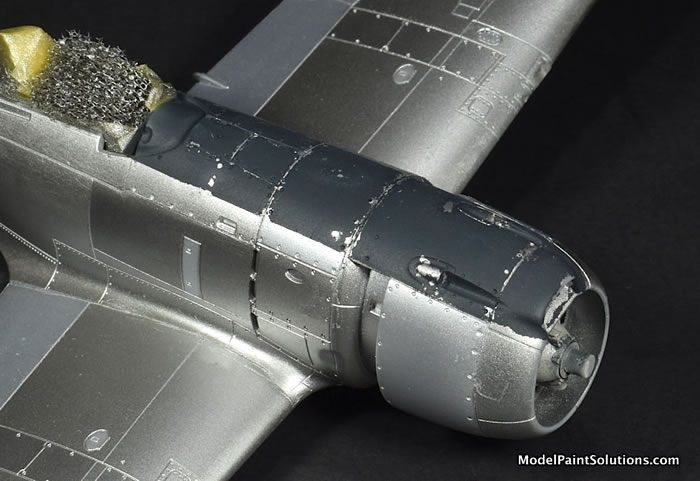
Next up was the multi-part cowl assembly; a point in the build that caused a bit of concern when I first reviewed the instructions. Fortunately and not surprising for an ARMA kit, the fit of the upper, lower, and front cowl parts was as good as the rest of the model; spot-on and painless.
The single piece horizontal stabilizer/elevators were left off until after painting. Similarly, the cowl flaps (parts 26 and 27) that cover the exhaust stacks were left off to facilitate painting of both the flaps and the exhausts. The folks at ARMA deserve a hand on the ingenuity and fit of the cowl flap/exhaust assemblies. The design allows the exhausts to be painted and detailed before being covered with the cowl flaps. This makes for an easier assembly and one that facilitates the application exhaust stains later in the finishing process.
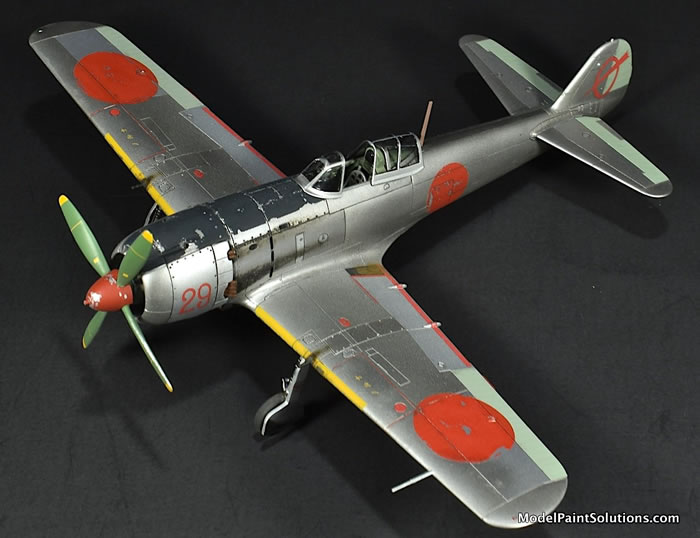
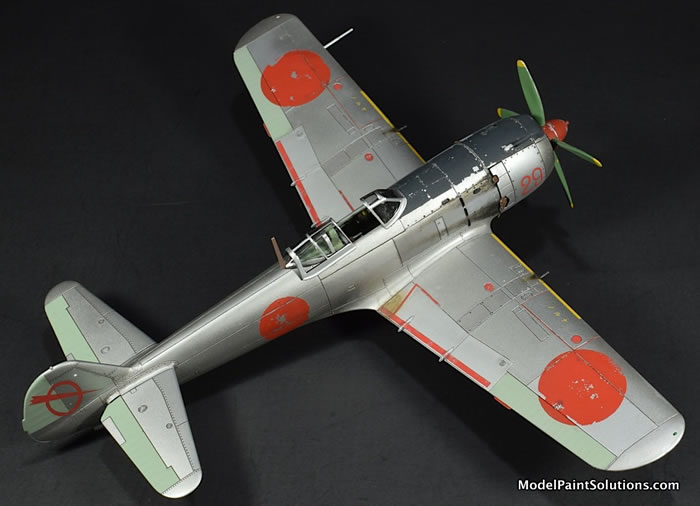
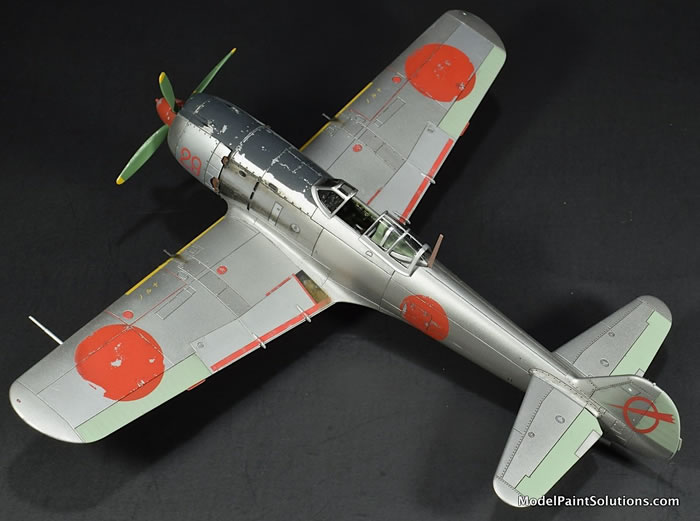
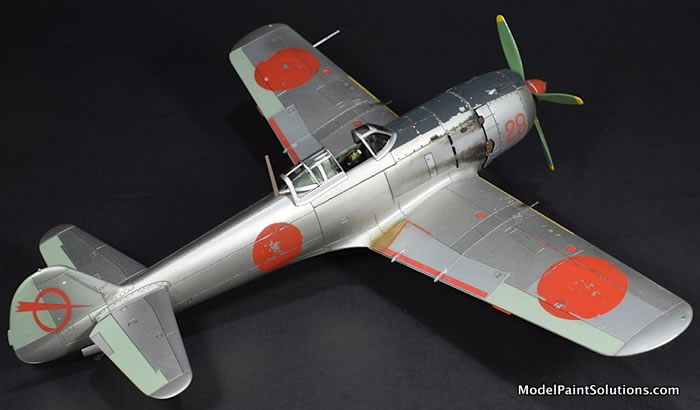
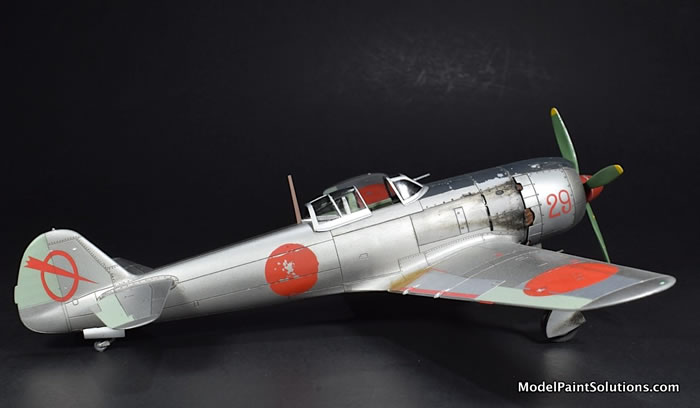
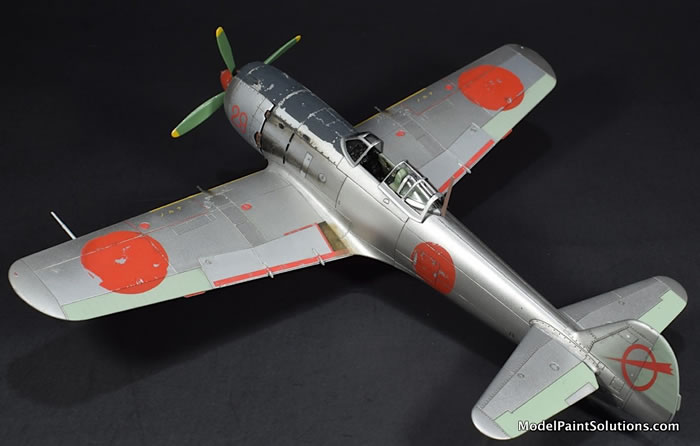
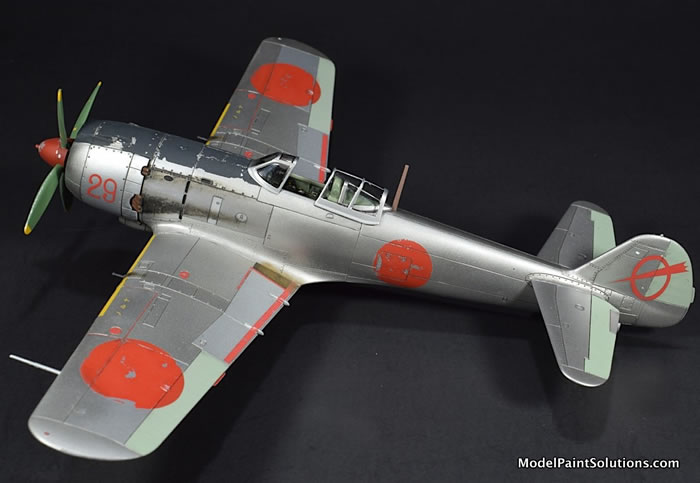
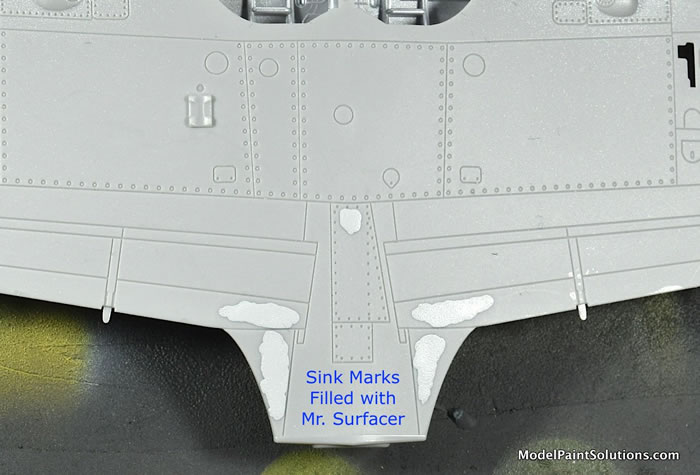
And with that, the airframe was largely assembled; sweet! And, so began the process of readying the model for primer and paint. Since I wanted to do the third scheme offered on the decal sheet, Lt. Takata, 10 Rensei Hikotai, Spring 1945, I needed to apply the mark-one eyeball to the surface in search of imperfections that would mar the required natural metal finish. As many of you know, a natural metal finish (NMF) requires a near-perfect surface as even the smallest of imperfections seem to be magnified once under a coat of metallic paint (see “Gear Legs” below). Unfortunately, there are multiple, small sink marks that should be filled and blended if your desire is to replicate an all-aluminum airplane.
All of the sink marks on my example were on the wing parts. I could find no similar marks anywhere on the fuselage. The most noticeable are on upper, inboard, wing trailing edges; both left and right. Additional sink marks were found in comparable areas on the belly (inboard trailing edge).
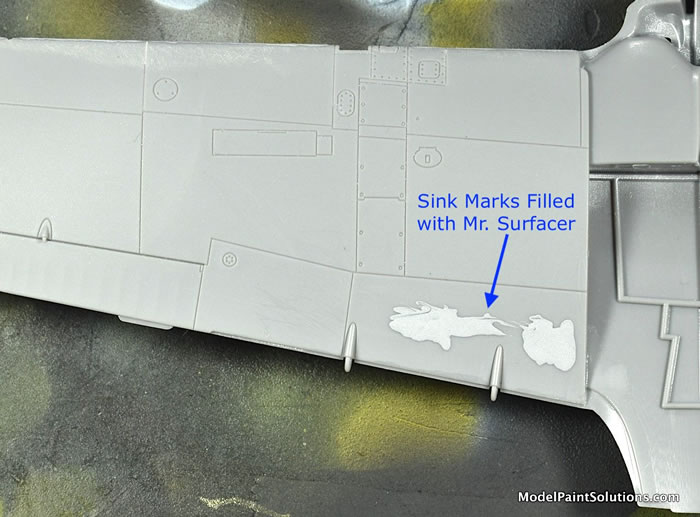
For filling these areas, I used Mr. Surfacer 1,000, carefully applied with a small micro brush. When dry, I started the blending with Alpha Abrasives #600- followed by #1,000-grit sand papers (used with soapy water). This was followed by additional blending with Micromesh 3,600 thence 6,000 Pads.

I finished the process with a firm buffing of the filled areas thence the whole model using a dry Kimwipe in preparation for painting.
The model was painted entirely with custom mixes of AK Xtreme Metallics sprayed directly onto the plastic without an underlying primer coat——I know, I know; it’ll be okay :) I began using AK Xtreme Metallics as a primer coat while building the Eduard Me-109 G-6 night fighter. When used as primer, Xtreme metallics can be diluted with AK Xtreme Thinner (pretty hot stuff). Xtreme Thinner will aid in cutting through residual mold release and accumulated finger oil thereby providing a very sturdy finish when dry. If you’re less concerned with residual mold release and more focussed on the smoothness of the finish, I suggest diluting Xtreme Metallics with AK Nitro Thinner, which provides more leveling, less tip dry, and a smoother finish—good stuff. Similar results can be obtained using Mr. Color Leveling Thinner (a.k.a. “unicorn tears” to those who listen to the Plastic Model Mojo podcast). All of the metallics used in finishing the Ki-84 were diluted to ~70 Paint (~30% thinner) with AK Nitro.
As a guide for the painting/finishing process I was fortunate to have a copy of Aero Detail No. 24 “The Nakajima Ki-84 Frank” (ISBN4-499-22684-8). This is an excellent reference for building, detailing, and weathering a Ki-84.
To replicate the multiple shades of bare metal required for the airframe panels, blends of AK Xtreme Aluminum, White Aluminum, Dark Aluminum, and Duraluminum were used. To facilitate the preparation of custom mixes, large volumes of each aforementioned metallic were diluted to ~70% paint with AK Nitro Thinner and stored 20ml bottles until use. Custom blends of these pre-diluted paints (measured by percent volume) were easily prepared by using the gradations on either 2 or 5ml Spin Tubes.
As an example, the most commonly used metallic blend or Primary Blend for the wings and fuselage panels was a mix of 75% Aluminum, 20% Dark Aluminum, and 5% Duraluminum. This was easily prepared and stored in a 5ml spin tube. The metallic blends for other panels on the model were prepared so as to be either lighter or darker than this first, Primary Blend.
Note that all of the metallic blends were shot at ~12psi with an H-S Infinity fitted with either a 0.15mm tip for small areas (ex, access panels) or an H-S Evolution fitted with a 0.20mm tip for larger areas.
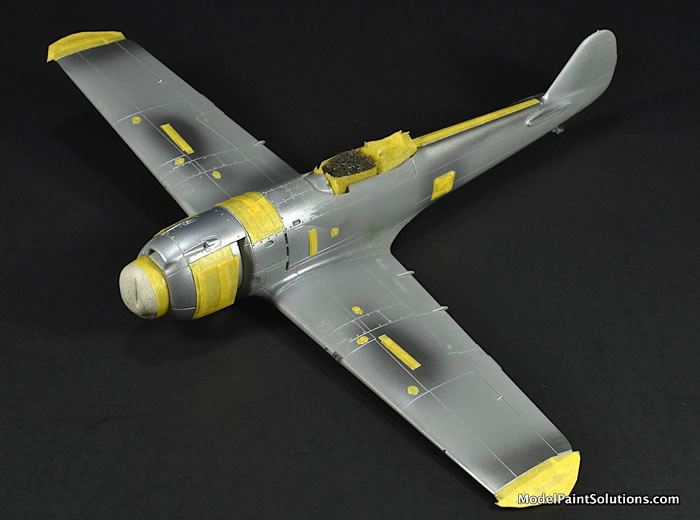
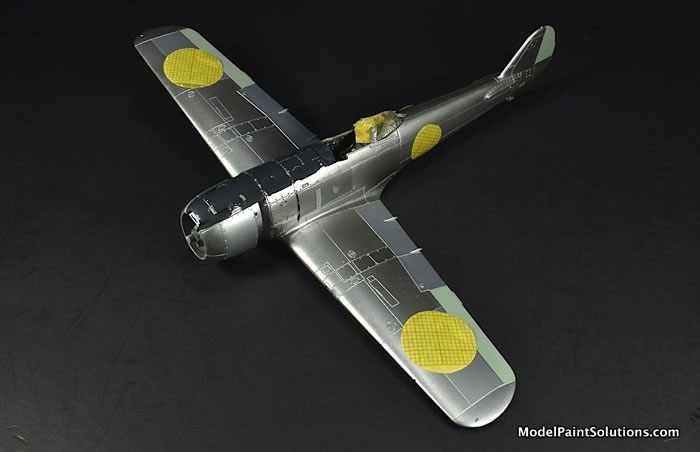
The painting process began with the horizontal stabilizers, which had multiple small access panels that were painted with a mix of 60% Aluminum (AK-479) and 40% Dark Aluminum (AK-480). After a few hours of drying time, the painted panels were easily masked by finding a Masking Circle of the appropriate diameter. To mask such details, masking circles were used from the Large, Medium, and Small Circle Mask Sheets.
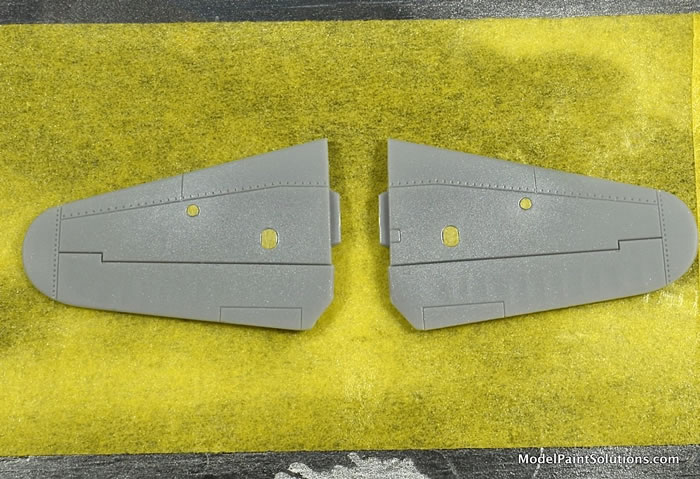
The remaining panels on the stabilizers were then painted the Primary Blend (see above) as well as a mix of White Aluminum (AK-478).
After masking the elevator trim tab, the fabric-covered elevators (and all the fabric-covered control surfaces) were sprayed Hairyokushoku (RC-328) nudged a bit with ~15% Insignia White (RC-15) and ~15% Pure Green (RC-12).
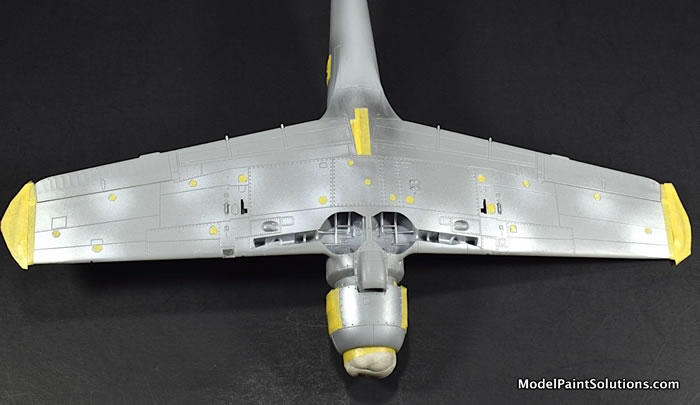
The same process was then begun on the airframe with various access panels, the wing tips, and multiple cowl panels shot with mixes of AK Aluminum (AK-479) combined with AK White (AK-478) or Dark Aluminum (AK-480). After drying over night, the panels were easily masked using a combination of Circle Masks and Aizu Masking Tape; all burnished in place with a small embosser.
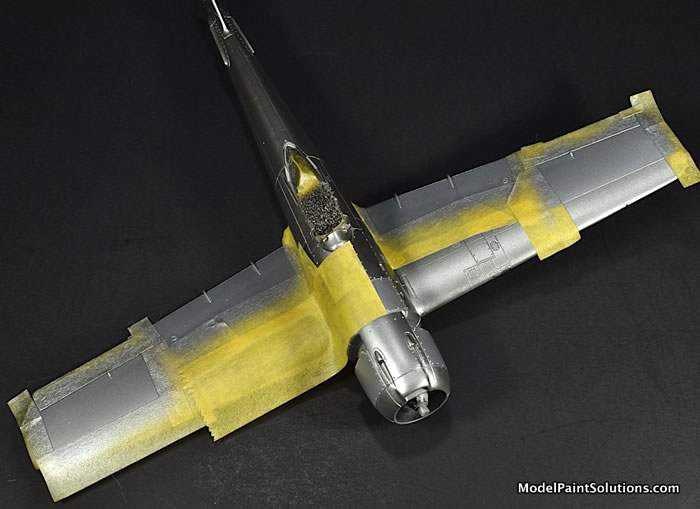
After an over all coat of the Primary Metallic Blend (75% Aluminum, 20% Dark Aluminum, and 5% Duraluminum; see above) was applied and allowed to dry over night, various wing and fuselage panels were masked off and over-shot with a blend of AK White Aluminum (AK-478) with ~30% Aluminum (AK-478; the lighter panels in the accompanying pics).
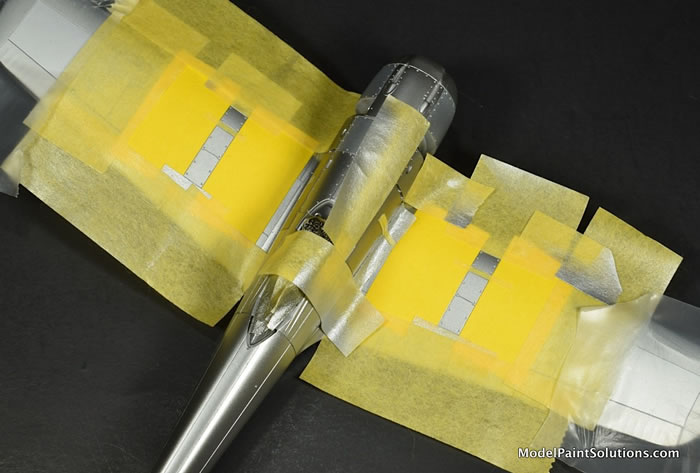
One last detail was to mask the access panels for the wing guns with a combination of Aizu, AK Tapes, and Parafilm.
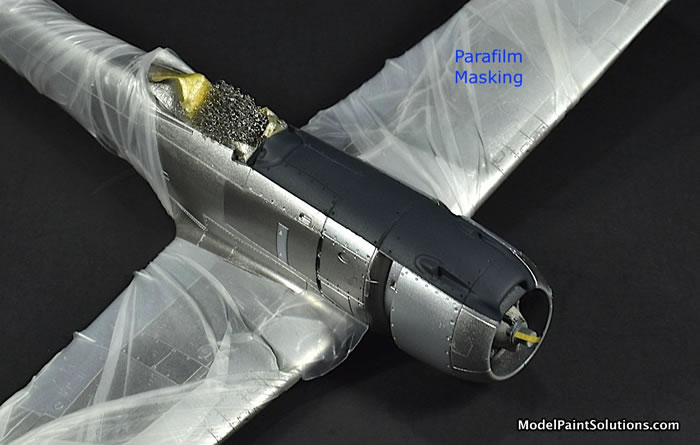
This may seem extreme but I’ve learned from painful experience that there’s no better way to ruin that natural metal look than with a fine patina of another metallic clumsily applied; been there, done that—too many times. A moment for extra masking is a moment well spent. Once masked the access panels were shot with a 1:1 of AK Aluminum (AK-478) and Dark Aluminum (AK-480).
Wheel Well Doors: An Example of Mistake Magnification:
As an example of how an otherwise insignificant mistake can be magnified into an unacceptable result when covered with a coat of metallic paint, I give you the main wheel well doors as I first prepped them for paint. You’ll note the small gouge at the bottom of each that escaped my inspection—until after painting, of course and then, Zang; there’s no missing either one. The only option was to fill, blend, and re-shoot both parts; no big deal but a fine example of the mistake magnification that occurs anytime a natural metal finish is the goal.
With the airframe in it’s natural metal finish, I set about spraying and chipping the anti-glare panel. I’ve done a little chipping but I’m not that experienced with chipping using the classic hair spray technique, which works very well when chipping AK Real Colors. Fortunately, I have access to Eric “Tank Man” Christianson who is a strong proponent of using Tresemme’ Hair spray; the Dude swears by it. Based on some awesome armor “chip jobs” I’ve seen from Eric’s bench—Tresemme’ it would be.
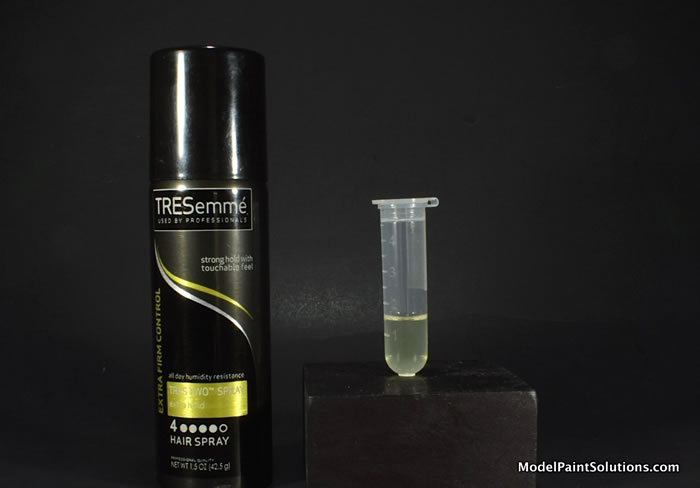
Even the small can of Tresemme’ provides a lot of hair spray when sprayed straight from the can. To provide more control, some of the hair spray was decanted through a drinking straw into a 2ml Spin Tube, which also served to store the hair spray until use.
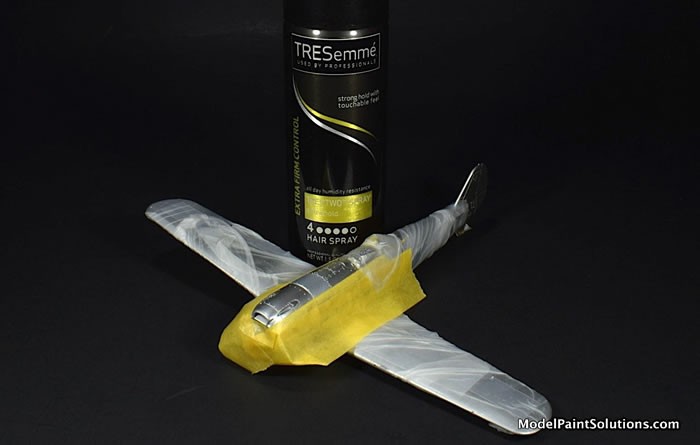
In preparation for chipping, the hairspray was applied to the area previously masked off for the anti-glare panel. This was done at ~10psi with an H-S Infinity fitted with a 0.15mm tip. The hair spray was removed from the brush with a few rinses of 70% Isopropyl alcohol. When the hair spray was dry, a custom mix composed of 90% 6RP Black (RC-071) plus 10% Pure Blue (RC-010) was diluted to ~30% paint in AK-HCT and applied at 10psi with a 0.15mm tip/Infinity.
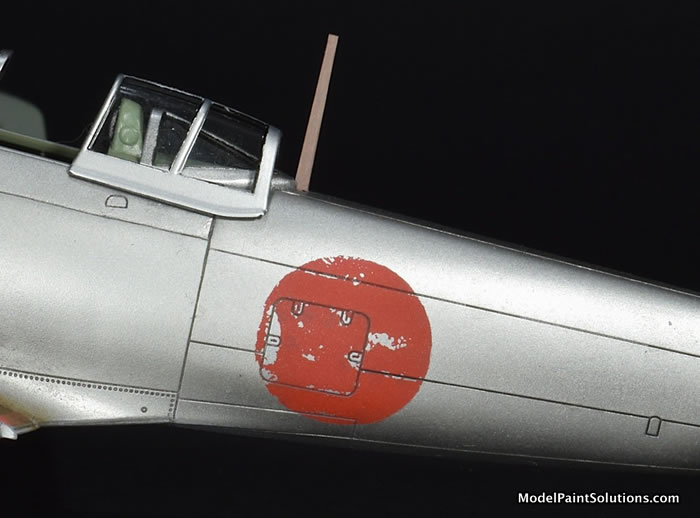
After this was allowed to dry for ~45 minutes, I started the chipping process using a small brush with bristles that had been shortened with a scalpel blade. To chip the paint, a small amount of water was applied to the area and the modified paint brush was used in a pecking motion along panel lines and other surface details that would normally show wear. Care was taken to try and not make any chips larger than ~1mm. After just a few minutes of work, the panel was sufficiently chipped and I set in on masking and painting the Hinomaru’s on the wing and fuselage.
Masks for painting the Hinomaru’s were easily cut from Tamiya Masking Paper with a stencil of the same diameter as the Hinomaru’s on the kits decals. To assure proper placement, circle masks were first applied to the model where the markings would be painted. The actual masks were then simply lined up with the circles and burnished down with an embosser. In preparation for chipping, Tresemme’ hair spray was applied at ~10psi with a 0.15mm tip/Infinity.
A mixture of Red (AK-006) nudged with few drops of Black was a good match and applied at ~12psi with a 0.20mm tip/Evolution after being diluted to ~30% with AK-HCT. Chipping of the paint was then performed after ~45 minutes of drying time as described above for the anti-glare panel.
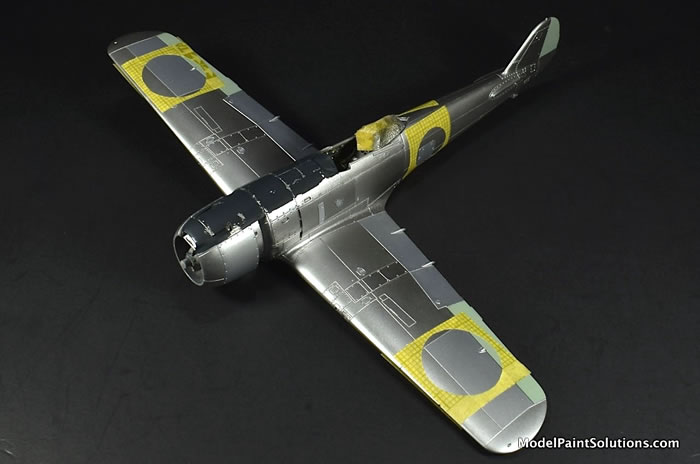
The yellow areas on the wing leading edges were next masked off with AK Tapes and after a coat of Tresemme’ hair spray, were painted Maize Yellow (RC-008). After 45 minutes of drying time, the yellow areas at the leading edge of the wing were chipped as described above.
The Canopy
The canopy parts were first dipped in Alclad Aqua Gloss and allowed to dry for 48hrs. AK masking tape was used to cover the inner portions while the kits die-cut masks were applied to the outside of each canopy part using the frames as guides. Each mask was then lightly burnished in place with a small embosser.
Prior to shooting any metallic, the outer portions of the canopy were sprayed with the same Blue/Black mix used to paint the anti-glare panel. This was applied as a light dry coat at 10psi with a 0.15mm tip/Infinity to lessen the chance of paint wicking under the masks.The windscreen was then sprayed with a mix of AK Aluminum (AK-479) plus 30% Dark Aluminum (AK-480) while the sliding and rear canopy sections were painted with a 1:1 mix of AK White Aluminum (AK-478) and Aluminum. After being allowed to dry overnight, the die-cut masks were carefully removed and the canopy parts affixed to the model using a few small drops of Bob Smith Odorless CA glue.
The Landing Gear:
The main gear legs and wheels were painted AK Aluminum diluted to 30% paint with AK Nitro. When dry, the details were enhanced by a pin-wash of Tamiya Dark Brown Panel Liner. The wheels were then masked and the tires painted a custom mix of Black 6RP (RC-071) with 20% RAF Dark Slate Grey (RC-294). This was diluted to ~30% paint in AK-HCT for application at ~12psi with a 0.15mm/Infinity.
Decals:
Having decided that the squadron insignia on the vertical stabilizer, the number “29” on the cowl, and the red lines on the wing trailing edge were beyond my masking skills, I opted to use the kits decals for all of these markings. The decals were applied using Micro-Set and -Sol and conventional techniques. “Chipping” of the decals was done with silver ink carefully applied with a small micro brush.
Engine Exhaust Stacks, Staining, and Weathering:
Taking a play from Mike “the Weatherman” Millette, the stacks were shot with AK Burnt Metal (AK-484) diluted to 70% paint with XTreme Thinner. Then, while the paint was still partially wet, Light Rust weathering pigment (MiG) was applied and rubbed into the plastic. I was quite please with the result and will be using this trick again.
The exhaust stains were done with rendered artists oils. To start, Black, White, and a little Van Dyke Brown (hello Bob Ross) were placed on a piece of cardboard for a few hours to leach out the linseed oil. Using pictures of exhaust stains provided in the Ki-84 Aero Details book as a guide, the rendered oils were first applied as a light stipple with a micro brush and then lightly blended using a small brush with a tiny amount of Mona Lisa Odorless Thinner —good stuff and available at most hardware stores.
Lastly, a mix of weathering pigments were used to highlight the tire treads and the wing walk areas.
The Final Clear Coat:
To blend the various panels and decals together, AK Clear Flat (RC-500) was diluted to ~30% in AK Nitro Thinner and after filtering this through a Paint Filter was applied at ~12psi with a 0.20mm tip/Evolution. More Flat was applied to the exhaust staines on the sides of the fuselage and landing gear.
I really liked building this kit. The ARMA boys have done it again; what an absolutely beautiful model!! The level of detail, both inside and out, provided in the ARMA K-84 makes it one of the best this builder has seen. Despite the high level of detail, the kit assembles like Lego making it a quick and easy build. That said, one has to be mindful of the presence of small sink marks that will have to be filled and blended if the goal is an all-metal finish but these are easily dealt with and are far from a deal-breaker.
Highly Recommended!
--John
For more on this review visit Modelpaintsolutions.com.
Text and Images Copyright © 2022 by John Miller / Model Paint Solutions
Page Created 27 September, 2022
Last updated
28 September, 2022
Back to HyperScale Main Page
Back to Reviews Page

|
 Home
| What's New |
Features |
Gallery |
Reviews |
Reference |
Forum |
Search
Home
| What's New |
Features |
Gallery |
Reviews |
Reference |
Forum |
Search