Trumpeter's 1/32 scale
SBD-5 Dauntless
by Jan Goormans
|
|
SBD-5 Dauntless |

Trumpeter's 1/32 SBD-5 Dauntless is available online from Squadron.com
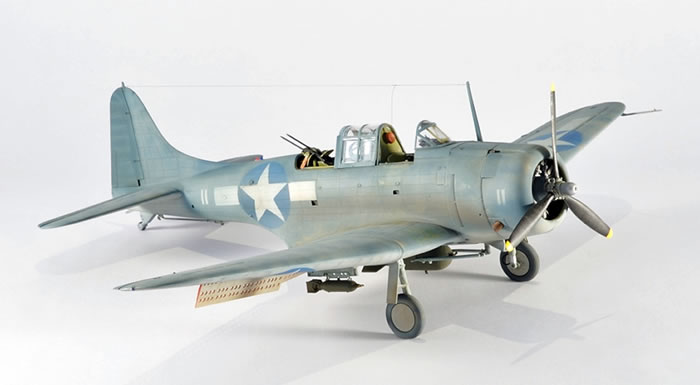
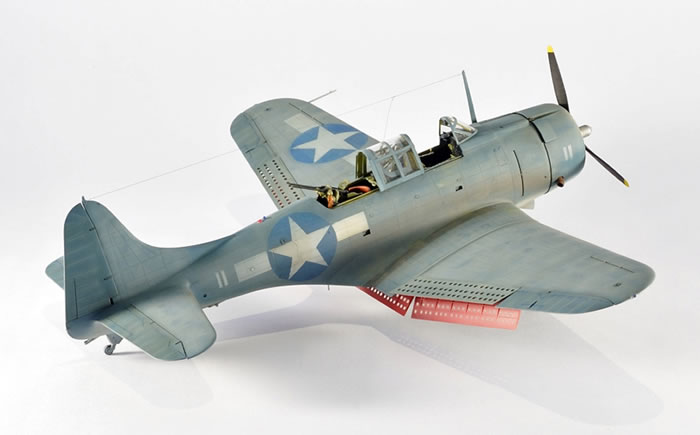
When the war started, the Dauntless was already around for some time so one could expect it would not be so successful in battle against those nimble Japanese fighters but on the contrary, it did more that it’s part in sinking enemy ships.
By the time the Helldiver came available to replace it, the Dauntless had made its mark.
Number 11
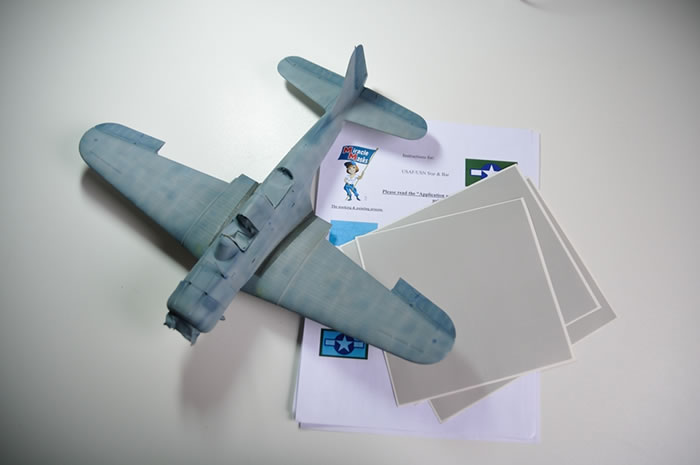
I knew long before I bought the kit that if I a-ever would build a Dauntless it had to be number 11. On page 44 of the “SBD Dauntless in Action” book you have 3 pictures from a beaten up airplane operating from Bougainville. But to my knowledge there are no decals available for this Dauntless, so I had a set of masks made by Mal Mayfield from Miracle Masks.
Information I found was that the original two-tone camouflage scheme was No. 12 Blue-Grey (Tamiya XF-18 is close) and No. 10 Light Grey (Gunze H325 is close).
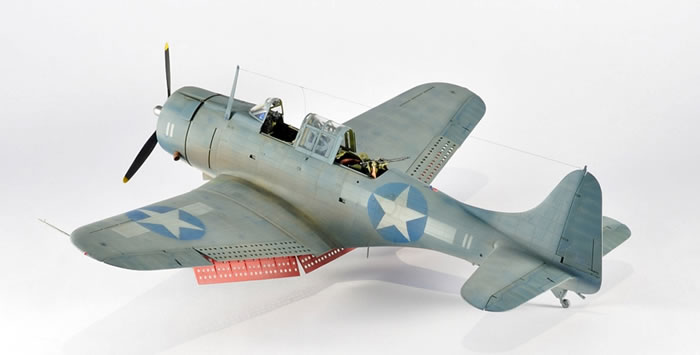
Very Complete and Easy to Build.
That’s how you could describe this kit, even build out of the box it will look good if you give it the attention it deserves.
The interior if very complete and the exterior looks really busy with all those rivets.
Clearly the work from the Trumpeter A-team.
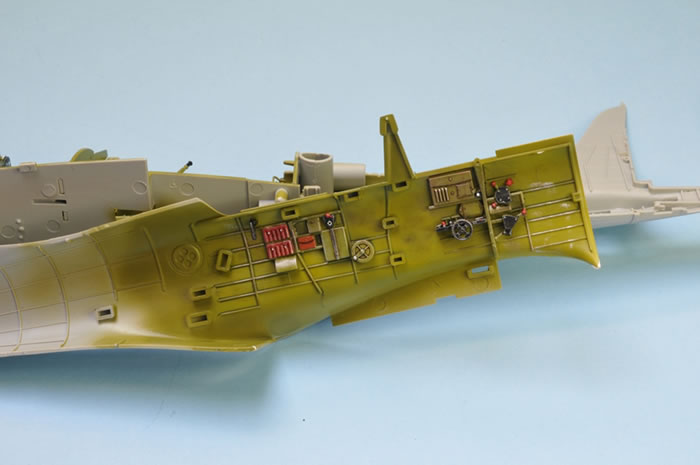
A Kit On Its Own
Trumpeter has really gone to town with this kit and has given us a complete interior. This is especially important since the Dauntless has a large greenhouse, so the efforts spend here will not be lost when closing the fuselage.
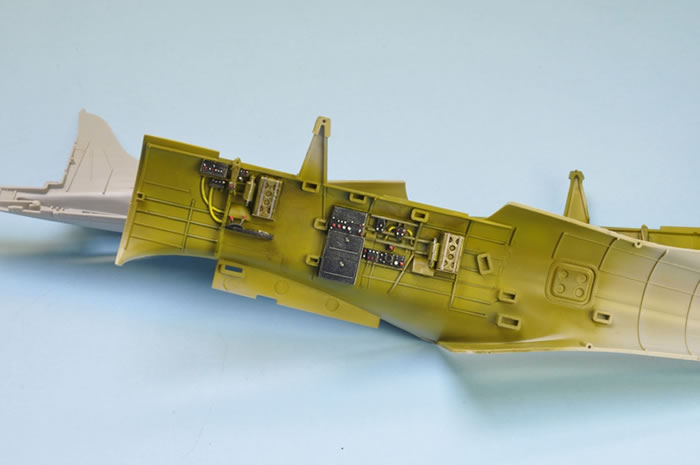
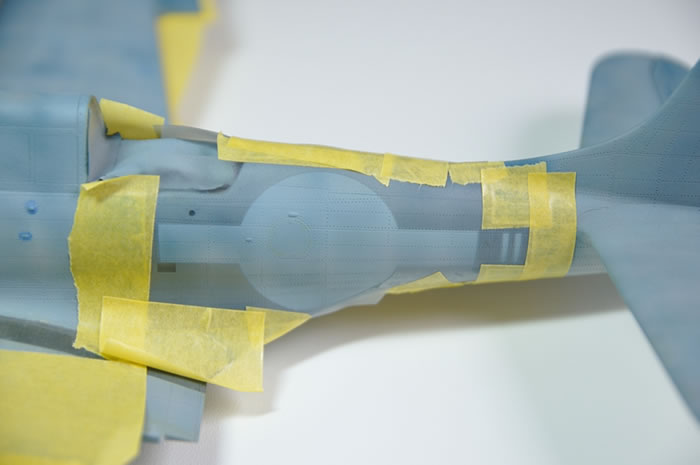
Do not assemble the interior completely or you will in in trouble when you want to paint all the small details. The interior is sprayed with Gunze Interior green.

Details are brush painted with Vallejo paints.
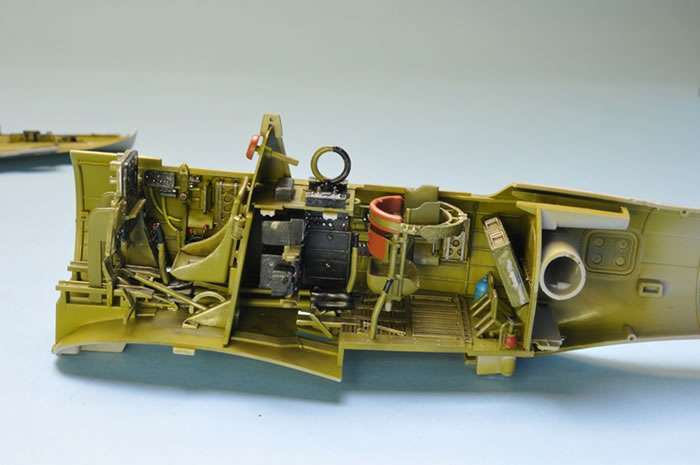
Once the interior is done, the rest is very straightforward and without troubles.
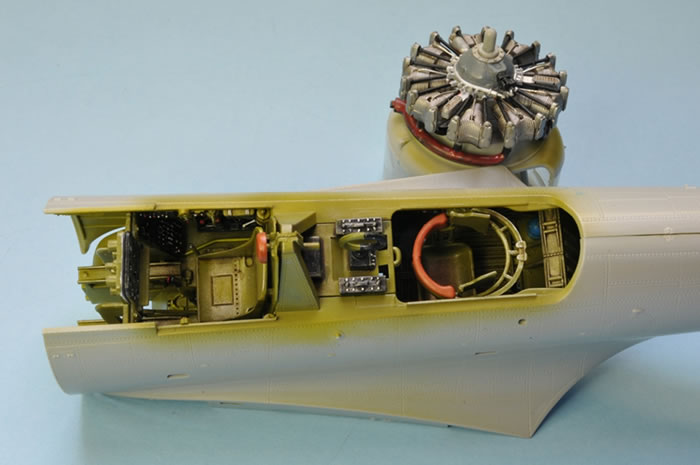
The engine is nicely detailed and with some attentive painting it will make into a nice replica of the real thing.
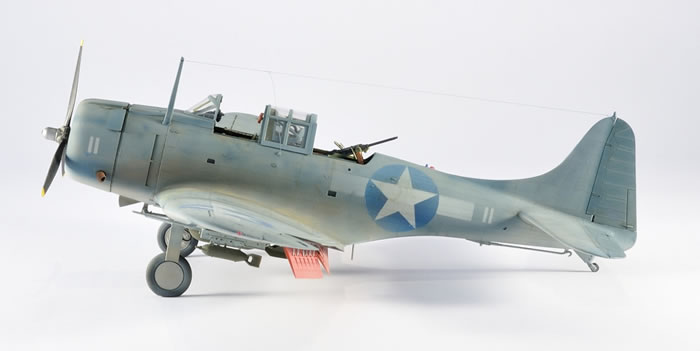
The Battered Look
These airplanes operating from the islands looked battered, the sun and the sand took their toll.
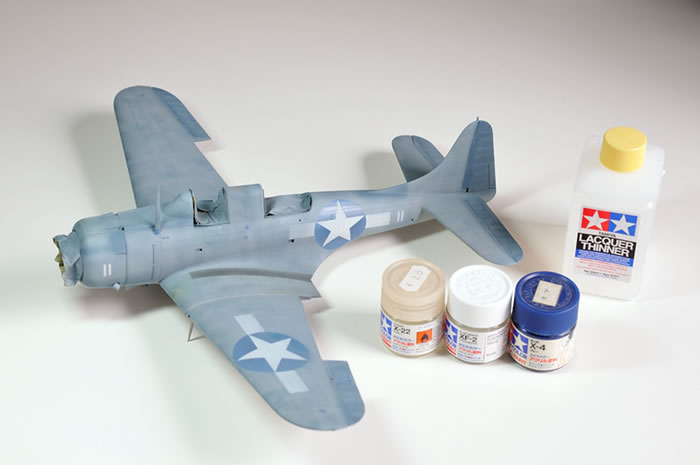
I always add Tamiya X-22 Clear in the bottle if the paint itself is matt, the thinner is Tamiya Lacquer Thinner which gives the best results for me (smooth and more durable) diluted 80/20 and sprayed at 1 bar, in very fine layers.
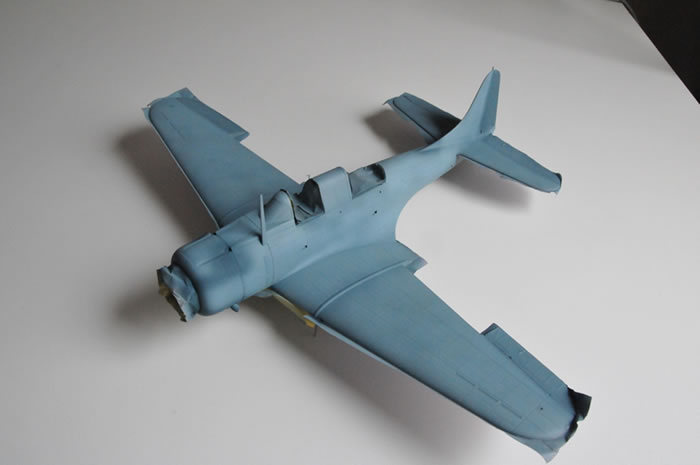
The underside was sprayed first with XF-18 Medium Bleu, way to dark but then I do not have to preshade. Then multiple layers of Grey H325 are needed to cover the Bleu.
Spray in the panels than on the panel lines. When it starts to cover the base color you can start to add different others colors (drops) to the Grey to get some life in the underside.
I do this in the cup of the airbrush, adding a few drops of the color (for example flesh, off white, dark grey) and also a bit of thinner to keep it very diluted, mixing by blocking the nozzle. From time to time add also the Gray if you do not want to end up with a completely different color. Continue until it looks a bit over the top, using the matt varnish will tone it down later.
If you would use decals it needs to look even more overdone, reason is that in that case also a clear varnish is needed.
Form the Gunze Gray H338 and the Tamiya Bleu XF-18 Medium Bleu a gray-blue color is mixed that should match the sun beaten look of the original No. 12 Blue-Grey color.
The complete upper side is sprayed with this new color.
Except the ailerons, these are sprayed with Tamiya XF-18 Medium Bleu, they look much darker than the rest of the airplane on the pictures found in the “In action” book.
To bring life into the large blue surface, Gunze light Gray H338 is sprayed randomly (much diluted) so that the result looks like patchwork.
Now we can start to add even more color drops (like clear orange, ..) to our home mixed blue and spray randomly to enhance the look of patchwork.
Randomly is important because otherwise it will look man made.
Very diluted and in many layers (keep on doing this till you are happy with the result, since the layers are very thin, they will not hide the detail). Add also some of the mixed blue if the color in the cup of the airbrush is going too far away from that mixed blue.
To pick out some panel lines light Gunze Gray H338 is used.
The final result needs to looks a bit overdone before calling it done.
So this is not the result of 2 or 3 layers, more 20 to 25, these are very thin having the advantage when you make a mistake it is easy to correct it, just go back one or two steps.
The walk lines are sprayed then on in Nato Black.
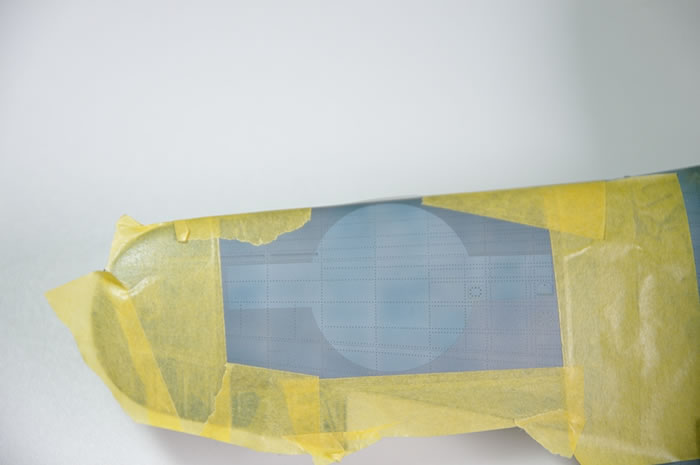
The masks are placed to spray the markings.
Tamiya XF-2 Flat White and X-4 Blue are used, but both of them are toned done immediately by adding some drops of different Gunze grays, also here randomly to get that uneven look on the markings.
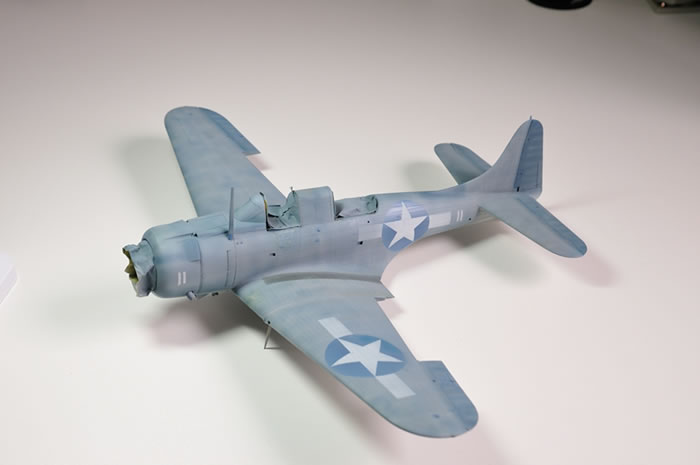
After removing the masks the complete topside is misted with the diluted self-made blue (to mist use 90/10).
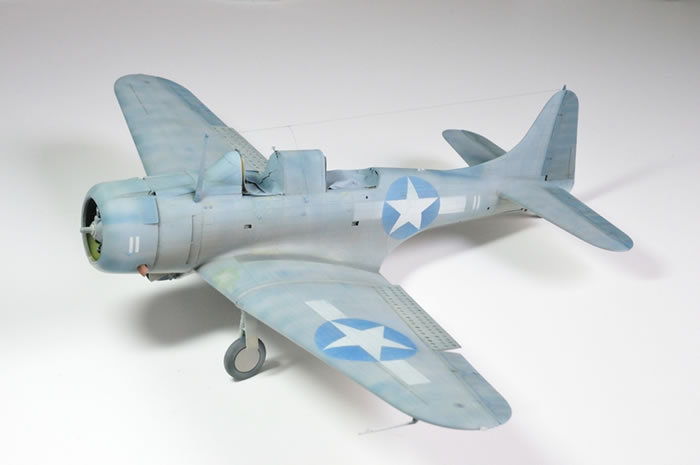
On some parts of the airframe the paint is complete gone, here the aluminum or the yellow primer is visible. These spots are hand painted with Tamiya XF-16 Flat Aluminum and XF-3 Yellow.
Weathering starts with AK Winter Streaking Grime, diluted with White Spirit and brushed onto large parts of the surface, wipe it off with a lint free cloth.
On the walkways AK Dust Effects is used.
The yellow areas around the worn aluminum spots are highlighted with oil paints.
Sand and burnt bleu (Tamiya Weathering sets A and D) are randomly dotted on the complete upper surface with the sponge side of the included brush and almost wiped of with the brush side.
When you are happy with the result you can finish it off with Xtracolor matt Varnish, this will bring all the colors a bit more together and will give a dead flat finish.
What a kit!
It is a pleasure to build and will give you the possibility to enhance your weathering techniques.
If you like the Dauntless, do not hesitate and build one of these 1/32 kits.
Model and Text Copyright ©
2016 by Jan Goormans
Page Created 25 July, 2016
Last Updated
7 September, 2016
Back to
HyperScale Main Page

|
 Home
| What's New |
Features |
Gallery |
Reviews |
Reference |
Forum |
Search
Home
| What's New |
Features |
Gallery |
Reviews |
Reference |
Forum |
Search