|
Tamiya's 1/72
scale
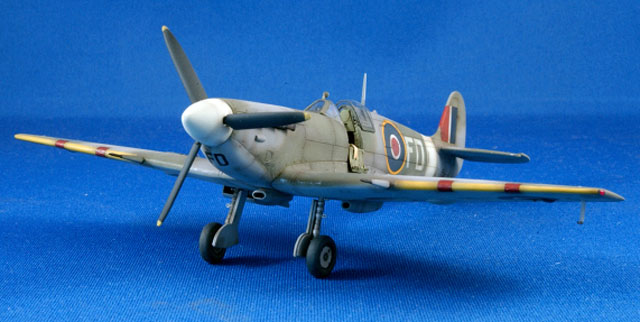
Supermarine Spitfire Vb
by Roger Fabrocini
|
 |
|
Supermarine Spitfire Mk.Vb |

Tamiya's 1/72 scale Spitfire Vb is available online from Squadron
This is Tamiya’s 1/72 scale Supermarine Spitfire Mk.Vb/Mk.Vb
Trop., kit #60756.
This was the second model in my self imposed “Theme Build” of
Czechoslovakian subjects. Having just finished a 1/48 scale Hasegawa
Spitfire Vb in the markings of F/Lt. Stanislav Fejfar, no.313 (Czech)
RAF Squadron, I decided that since I had all my reference material about
I would model another Czech Spitfire, this time in 1/72 scale .

Scouring my decal stash for a suitable subject I found a small decal
sheet by MPD, a Czech company (again, no surprises there), sheet #72513,
of a Spitfire LF Mk. Vb, serial # EP461, code “FD”, Exeter
(Czechoslovak) Wing RAF, flown by W/Cdr. Frantisek Dolezal. It would do
nicely allowing me to configure this Spitfire LF, Mk.Vb, differently
then my last, i.e: with clipped wings and the Rotol prop.
Though possessing the Aires resin cockpit for this kit i choose instead
to detail the stock cockpit parts with Photo Etched parts, mainly from
the PART set #s72-157. Everything fit well for the most part. I liked
the detail the set added to the bulkhead behind the pilot, but the PART
seat was made of thirteen tiny parts (insane) and I chose a Eduard P.E.
seat from another set instead. Mixing all the different manufacturer’s
took it’s toll on the geometry of the interior and it was too late
before I noticed the pilots seat sitting too low in the cockpit. Lesson
learned, if you’re going to become adventurous with detailing, test fit,
test fit, test fit.
I used Mr. Color lacquer BS283 Aircraft Gray Green (#364) for the
interior. I painted the Bakelite seat using Andrea Acrylics. I used four
colors that can also be used for many applications like wood, leather,
and rusted exhaust. They are, AC-48/Dark Leather, AC-41/wood,
AC-42/brown leather, and AC-40/earth.
Being a Tamiya kit the rest of the build was pretty straightforward save
the dihedral. Maybe it was me, having messed so much with the interior
that I bulged the fuselage out some, but come time to mate the wing
assembly to the fuselage I found the wings flat with no dihedral at all.
I ended up sanding the two plains of the joint until I obtained some,
but to my eyes still not enough, dihedral. (and that’s the last time
I’ll use the word dihedral in this article. What is a good synonym for
dihedral anyway?)
I used bits and pieces from the PART set to detail the airframe,
radiator and oil cooler fronts, landing gear, etc. The cockpit door is a
beaut, made up of eight pieces, but I baulked on the five pieces that
made up the tail wheel detail. Honestly when ever I look at a PART Photo
Etched set I laugh,…out loud. The parts are so small, especially in 1/72
scale , to boarder on the ridiculous. Who honestly uses all the parts?
Not me….ever.
To make the wing tip formation lights I cut notches into the wings,
painted them red and green, then filled the notch with CA glue and
sanded them to shape. For the wheels down indicators I used small pieces
of P.E. frets. IFF wires are .002 monofilament drawn through a dark gray
enamel paint marker’s felt tip. I cut and dropped the elevators for a
more candid appearance.
I wanted to display my cockpit canopy open (better to show off all the
mistakes I made in the cockpit), but Tamiya molds the canopy to the rear
cockpit glazing. I cut these apart, cleaned up and glued the rear
glazing to the fuselage and used a vacuformed canopy from Squadron. To
get a more scale appearance from the kit windshield I used Dremel’s high
speed cutter #117 to thin the inside lip of the windshield then polished
it out using micro-mesh cloths. I prefer using kit windshields whenever
possible because they fit better in most cases. The rearview mirror on
top of the windscreen was “stolen” from a Tamiya P-47 kit.
As is my standard custom I sprayed everything that
doesn’t move with Mr. Surfacer 1200. I used Gunze Aqueous acrylics this
time around.
I love
Chris Wauchop’s 1/48 scale Hasegawa Typhoon so I copied his choice
of colors for the upper surfaces using H330 for the Dark Green and H331
for the Ocean Gray. (Can you believe that Gunze doesn’t make a WWII
British Ocean Gray?!) I used a lighted H335 for the Medium Sea Gray
lower surfaces. As is my way I lighten, fade and shadow the colors till
they hardly resemble the original color. Though I chose to mask the
demarcation lines between the upper surface colors on my 1/48 scale
Spitfire I freehand these. The trick is to use a very thin mix of the
dark green, maybe 75 to 80% thinner, at very low air pressure, less then
10 psi.
When finished I use Chris's and Brett’s method of spraying a post shade
of dark brown along the borders to tidy them up a bit.
Though I stated I used the MPD sheet for W/Cdr. F. Dolezal’s markings in
reality I only used the lower engine cowling FD codes from the sheet. I
much prefer to match the Sky codes to the same colored spinner and
fuselage band so I used the sheets codes as a guide to cut masks for the
fuselage codes. I used Gunze H74 for the Sky. Pictures show that the
serials were over painted when the fuselage codes were applied leaving
just the digits on the sky fuselage band which I replicated using single
serials from a Tally-Ho sheet. The roundels and fin flash were sourced
from the kit sheet. The wing walk lines were applied using Mig Pigments.
I masked the lines using Tamiya tape then applied the Dark Gray pigment,
scrubbing it into the surface. I wanted to get a faint, worn look to the
lines which I think I achieved using the pigment dust.

Derek Pennington had commented to me that the exhaust on my 1/48 scale
Spitfire were too rusty and i believe him to be right. I used Vallejo
acrylics starting with a base of steel then dark gray followed by layers
of dark leather with a dry brush of light gray.
Weathering was achieved using fading of the camouflage colors,
airbrushed post shading with Dark brown, and washes using darker hues of
Dark Green and Gray mixed from artist oils. For control surfaces I use a
dark brown wash. I use a lighted mix of my post shade dark Brown,
thinned to about 95% thinner, to fade and weather the roundels and upper
surfaces.
Final weathering is done with a PrismaColor silver colored pencil to
simulate worn paint and chipping.
So here is another build to make my mother proud (bless
her heart) although after finishing this model she kept asking me “Where
are the red, white and blue thingies on the wings?”
She did not have to wait long. The last of my Czech trilogy was Eduard's
1/48 scale AVIA B.534
(Editor's Note - I shuffled the posting order of the
articles due to the timely nature of Roger's article on the brand new
Eduard kit. You may
Roger's article on Eduard's AVIA B.534 by following this link).
As always, thanks for the indulgence.
Click the
thumbnails below to view larger images:
[../../photogallery/photo00010515/real.htm]
Model,
Images & Text Copyright © 2007 by
Roger Fabrocini
Page Created 03 October, 2007
Last Updated
24 December, 2007
Back to
HyperScale Main Page |
 Home
| What's New |
Features |
Gallery |
Reviews |
Reference |
Forum |
Home
| What's New |
Features |
Gallery |
Reviews |
Reference |
Forum |